

We Love Our Quilting Community
At High Country Quilts we care deeply about community. With our experiences in retail, we know that a store is not only a place to shop but also a place for the community to gather and share. During this busy...


Ready to turn that pile of old T-shirts into something truly special? The whole process is actually pretty straightforward. You'll start by picking out your favorite shirts, then get them prepped and stabilized so the stretchy fabric is easy to work with. After that, it's all about cutting them into squares and putting them together.
You've got two main routes you can take: the traditional sewn method, where you stitch everything together like a quilt, or a simple no-sew version that involves tying your T-shirt top to a cozy fleece backing.
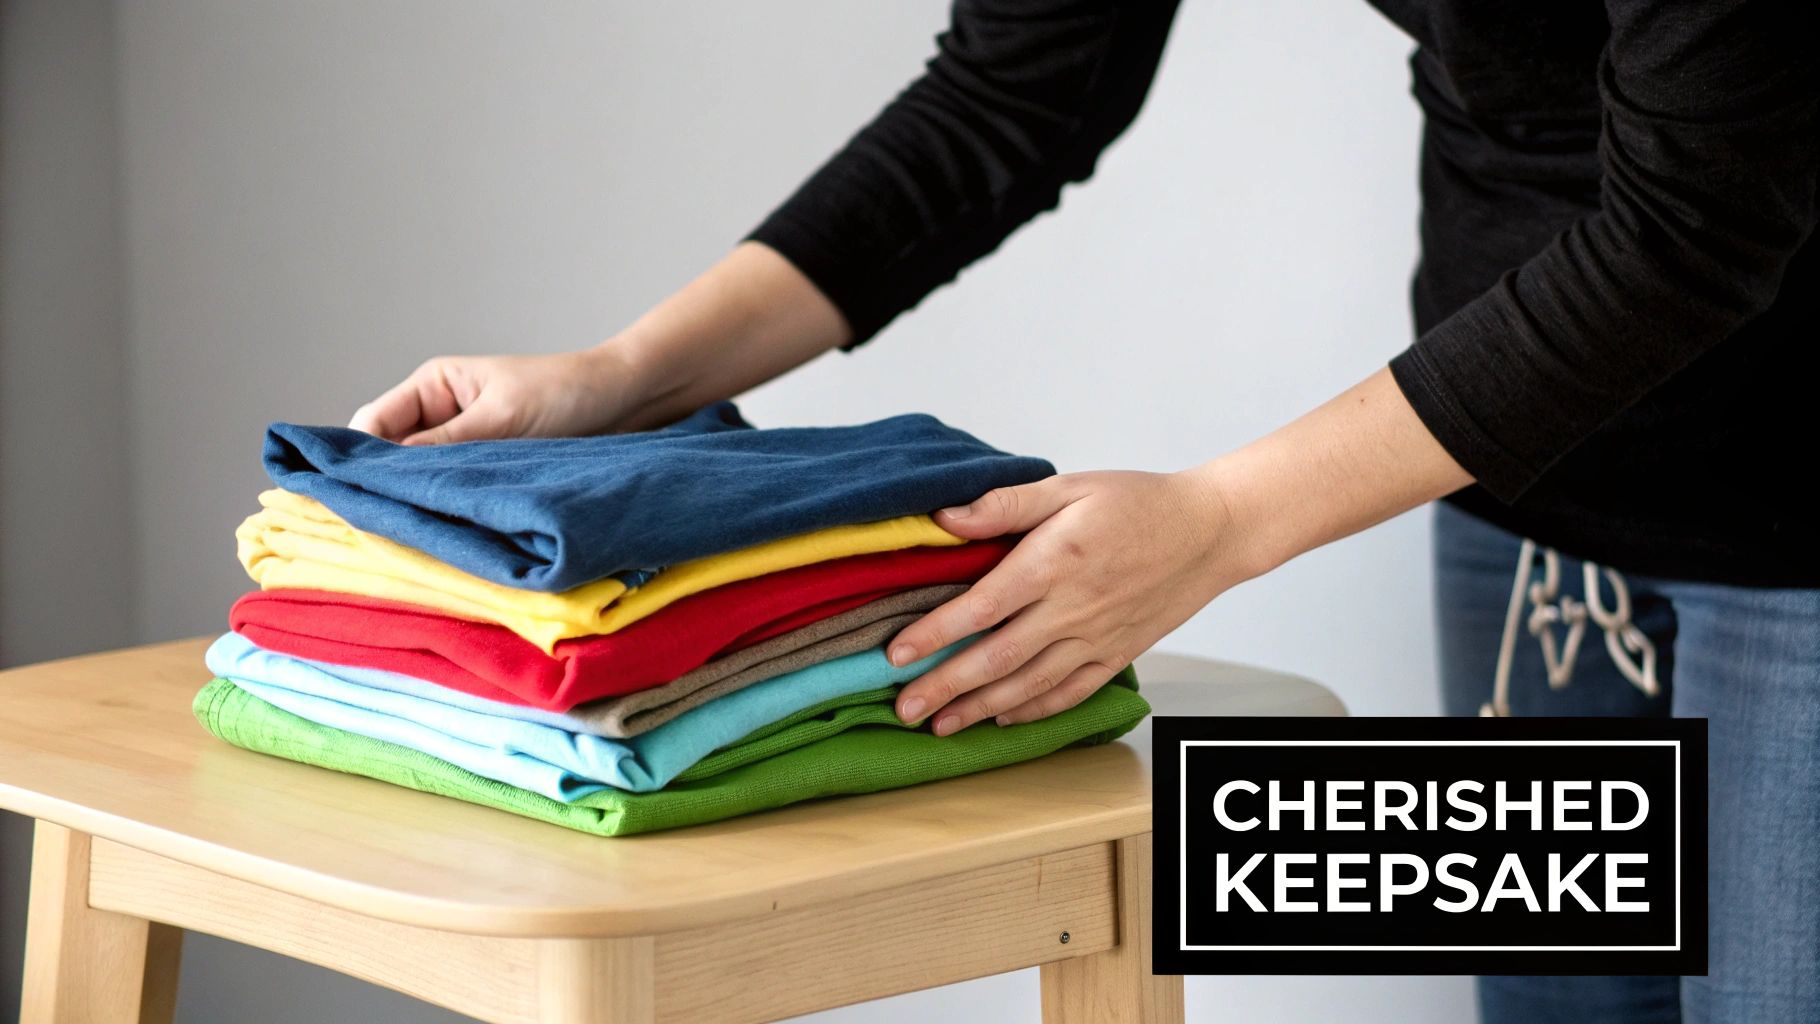
We all have them. That stack of T-shirts tucked away in a drawer or a box in the closet. The ones from concerts, high school sports teams, memorable vacations, or that 5k you trained so hard for. They're more than just old clothes—they’re tangible pieces of your story. Learning how to make a tee shirt blanket is the perfect way to bring those memories out of the dark and into your daily life.
This project is all about giving new purpose to things you can't bear to part with. Instead of letting those meaningful shirts collect dust, you can transform them into a cozy, functional quilt you’ll be proud to display and use every single day.
At its heart, making a T-shirt blanket is a beautiful form of creative upcycling your wardrobe. It’s a wonderfully sustainable craft that blends sentimental value with practicality, turning potential clutter into a genuine treasure. It’s a project that’s all about you—a unique way to celebrate your life's milestones and passions.
It's no surprise this craft has become so popular. With an estimated two billion T-shirts sold worldwide every year, it’s easy to build up a collection that's just begging for a project like this. When you make your blanket, you’re not just cleaning out a drawer. You're weaving your personal history into something warm, comforting, and full of stories.
Key Takeaway: A T-shirt blanket isn't just a craft project; it's a functional scrapbook. It lets you literally wrap yourself in memories, making it one of the most personal and rewarding DIYs you can tackle.
Before you make a single cut, you need to decide which path you want to take. Your choice will depend on your skill level, the tools you have, and the final look you're going for.
Decide which approach is right for you with this quick comparison of the two main ways to make a T-shirt blanket.
| Feature | Sewn Method | No-Sew (Fleece Tie) Method |
|---|---|---|
| Skill Level | Beginner to Intermediate (basic sewing machine skills needed) | Absolute Beginner (if you can use scissors and tie a knot, you're set!) |
| Primary Tools | Sewing machine, rotary cutter, iron, fusible interfacing | Sharp scissors or rotary cutter, ruler |
| Final Look & Feel | Polished, flat, and structured, like a traditional quilt. Lies neatly on a bed. | Casual, plush, and cozy with a distinct fringed border. |
| Durability | Very high. A well-sewn quilt can last for decades with proper care. | Good, but ties can sometimes come undone over time and may need re-tightening. |
| Customization | Highly customizable. You can add sashing, borders, and complex quilting patterns. | Simpler. Customization is mainly in the choice of T-shirts and the color of the fleece backing. |
| Time Commitment | More time-intensive due to ironing, stabilizing, and stitching each seam. | Much faster. The cutting and tying process is quicker than sewing an entire quilt top. |
Both methods create a fantastic, personal blanket. The sewn version offers a more traditional, long-lasting quilt, while the no-sew approach is a quick, fun, and accessible way to get a cozy result without ever touching a sewing machine.
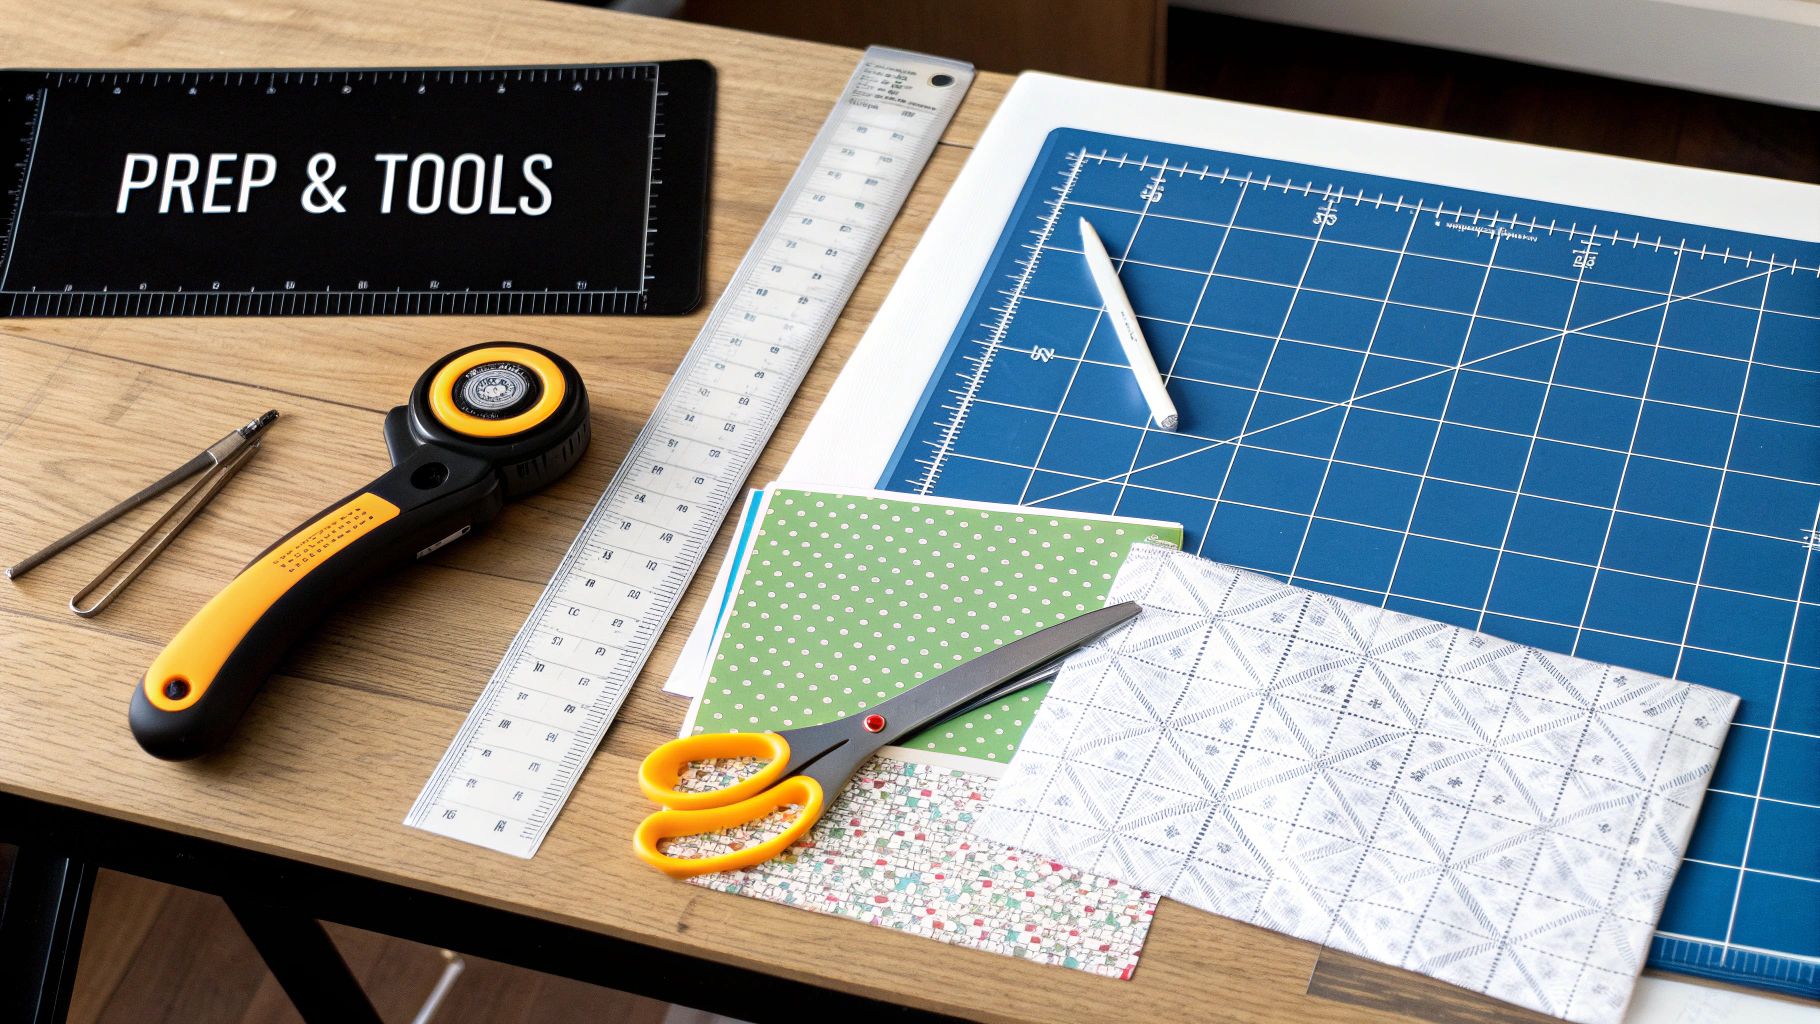
A fantastic T-shirt blanket doesn't just happen at the sewing machine. The real magic begins with thoughtful preparation. Getting your supplies in order and prepping your shirts the right way sets the foundation for a smooth, enjoyable process and a result you'll be proud of for years.
While you can get by with the basics, having the right tools makes a world of difference, especially when you're aiming for those clean, professional lines. Trust me, investing in a few key items will save you a ton of frustration.
Here’s what I always have on my table:
If you're building your toolkit from scratch, our comprehensive guide on sewing supplies for beginners is a great place to start.
Now for the fun part: picking the shirts that will tell your story! As you sort through your collection, think about creating a nice mix of colors and graphics for a visually interesting layout. Most cotton or cotton-blend T-shirts will work perfectly for this project.
Before you even think about cutting, every single shirt needs a good wash. This pre-shrinks the fabric and gets rid of any lingering dirt or oils. For those special shirts with delicate or vintage graphics, knowing how to wash graphic tees properly can keep their designs looking vibrant.
One crucial tip: wash everything without fabric softener. It leaves a residue that can prevent the fusible interfacing from sticking properly.
Pro Tip: Try to avoid shirts that are really worn out, have holes near the main graphic, or are made of super-thin material. If you must use one, be prepared for some extra reinforcement work. A strong fabric base is the key to a blanket that lasts.
This is probably the single most important step for a sewn blanket. T-shirt material is a knit, which means it’s built to stretch. That stretchiness is great when you're wearing it, but it’s a quilter’s nightmare. It leads to warped squares and a wavy, puckered blanket top.
Fusible interfacing is the solution. When you iron it onto the back of your T-shirt fabric, you completely stabilize the knit, making it behave like a sturdy woven cotton. This one step ensures your blocks won't stretch out of shape, allowing you to cut and sew with total precision.
Here's how I get a perfect application every time:
Once your shirts are stabilized, you're ready for the really creative part: cutting your final squares and designing the layout. All this solid prep work means you're now working with fabric that is cooperative, stable, and ready to become a beautiful memory blanket.
Alright, you've washed, prepped, and stabilized your T-shirts. What you're holding now is the real heart of your blanket. This next part is where the magic happens—it’s a mix of careful precision and pure creativity. Taking your time here to cut accurately and play with the layout is what elevates a project from just "homemade" to a truly "handmade" treasure.
The main goal is to turn all those different T-shirt panels into perfectly uniform squares. Getting them all the same size is non-negotiable; it's what ensures everything will fit together like a puzzle later on, preventing any weird puckering or uneven seams.
You could use fabric scissors and a ruler, but if you want crisp, professional-looking edges, the right tools make all the difference. I swear by a good rotary cutter, a clear acrylic ruler, and a self-healing mat. This trio is the secret weapon. You can see the T-shirt graphic right through the ruler to get it perfectly centered, and the cutter glides through the fabric without pulling or stretching it.
If you're new to this setup, checking out some of the best rotary cutters for quilting can help you find one that feels right in your hand.
First things first, you need to decide how big your squares will be. This is probably one of the most important decisions in the whole process.
Some common sizes that work well are:
Here’s the key: let your largest T-shirt graphic dictate the size. Find the biggest design you absolutely have to include, measure it, and then add at least an inch of buffer space on all sides. That final number? That becomes your standard square size for every single shirt. Consistency is everything.
Once all your squares are cut, the real fun begins. Whatever you do, don't just jump straight to the sewing machine! This is where your blanket’s personality comes to life. I always recommend clearing a big patch of floor so you can lay out every single square and see the whole thing at once.
Start arranging the blocks. Move them around. Swap them. Live with it for a bit. Keep tweaking until you find a layout that just feels right—something that’s balanced and easy on the eyes. There are no strict rules, but here are a few things I've learned over the years.
Think About Color and Balance
Try to spread your colors out. The goal is to avoid having all the black shirts clumped in one corner and all the white ones in another. A simple trick is to create a sort of checkerboard effect by alternating light and dark squares. It creates a natural rhythm and keeps any single area from feeling too visually heavy.
A Picture is Worth a Thousand Stitches: Seriously, once you land on a layout you love, stop everything and take a picture of it with your phone. This photo will be your best friend when you get to the sewing machine, making sure you don't accidentally sew your carefully planned design out of order.
Consider Different Arrangement Patterns
A simple grid is a classic for a reason—it always looks fantastic. But you can also play around with other arrangements to give your T-shirt blanket a more dynamic feel.
Just take your time with this part of the process. Move things around, step back to get the big picture, and don't hesitate to try out a few different combinations. Once you’re truly happy with how it looks, you’re ready to start piecing those memories together.
Alright, your T-shirt squares are prepped, stabilized, and you’ve got your layout planned. This is where the magic really starts to happen, as all those individual memories begin to connect into one big, beautiful story.
Whether you're a seasoned sewist or looking for a no-fuss, no-sew option, we’ve got you covered. Let's walk through how to assemble your quilt top.
For a durable quilt that looks sharp and lays beautifully flat, sewing is the way to go. The key here isn't about rushing; it’s all about consistency. A steady seam allowance and properly pressed seams will make all the difference between a homemade project and a professional-looking heirloom.
First things first, you'll sew your individual squares into long, horizontal rows. I find it’s best to tackle one row at a time—it’s the easiest way to keep your carefully planned design from getting jumbled.
Keep this up until all your squares are happily sewn into their designated rows.
This whole process of joining blocks is a fundamental quilting skill. If you're new to this and want to build a solid foundation, our guide on how to quilt for beginners is a great place to dig deeper.
The basic workflow, from measuring your shirts to arranging the squares, really sets you up for success here.

Getting those initial cuts and measurements right makes the final assembly so much smoother.
Now you should have a neat stack of completed rows, ready to become a quilt top.
Take your first two rows and place them right-sides-together, matching the long bottom edge of the first row to the long top edge of the second. The most important trick here is to nest your seams. This just means wiggling the vertical seams from each row until they lock snugly against each other. Pin everything generously, putting an extra pin right at each seam intersection to stop any shifting.
Sew along the entire long edge, sticking to that consistent 1/2-inch seam allowance. When you’re done, press this long horizontal seam open, just like you did with the smaller ones. Keep adding rows one by one until your masterpiece is complete!
If sewing machines just aren't your thing, don't worry! The no-sew fleece tie method is a fantastic, forgiving alternative that results in an incredibly cozy blanket with a fun, fringed border.
How it Works: For this method, you'll still assemble a T-shirt top, but instead of finishing the edges, you'll layer it with a larger piece of fleece. The two layers are then literally tied together to create the finished blanket.
Even without a sewing machine, you need a way to join your T-shirt squares. You could certainly do this by hand-stitching them, but for a true no-sew project, grab a fusible bonding web like Stitch Witchery. You can use it with your iron to fuse the squares together into rows, and then fuse the rows together.
With your T-shirt top assembled, the fun part begins.
https://www.youtube.com/embed/Ib4hLy2TY4k
You've pieced together your T-shirt top, and now you’re on the home stretch! These last few steps are what really turn that patchwork of memories into a genuinely cozy, long-lasting blanket. Trust me, choosing the right backing and finishing it with care is just as crucial as arranging the shirts themselves.
The fabric you pick for the back is what will ultimately define the blanket's feel and warmth. Each option brings a different texture to the table and requires a slightly different approach, so let's walk through the most popular choices I see people use.
The right backing really comes down to what you want from your blanket. Are you dreaming of something ultra-plush for movie nights on the couch, or do you prefer a more traditional quilt feel?
Here are my top contenders:
It’s no surprise that personalized home goods are more popular than ever. The global blanket market, which was valued at around USD 15.14 billion in 2023, is expected to grow to nearly USD 25.54 billion by 2030. This boom is partly driven by the love for unique, eco-friendly crafts like T-shirt blankets, which perfectly blend personal memories with current trends.
For those of you who have sewn your top, the finishing process is all about creating a "quilt sandwich" and securing all the layers together. This is what makes your blanket sturdy enough to withstand years of love and laundry.
A quilt sandwich is just what it sounds like: three layers. You have your finished T-shirt top, the batting in the middle for warmth, and your chosen backing fabric on the bottom.
Expert Insight: When you cut your backing and batting, make sure they are at least 4 inches larger on all sides than your T-shirt top. This extra fabric is your safety net, giving you plenty of room for quilting and squaring up the edges later without any stress.
Quilting is simply the stitching that goes through all three layers, locking them in place and adding that wonderful quilted texture. You don't have to be a master quilter here; a simple approach is often the best for a T-shirt blanket.
A fantastic and easy technique is "stitching in the ditch." This just means you use your sewing machine to stitch directly in the seam lines—the "ditches"—between your T-shirt squares. It secures the layers beautifully without distracting from the graphics on the shirts.
Once it's all quilted, the final step is binding. This is where you trim the excess backing and batting, make sure your edges are perfectly square, and sew a strip of fabric around the entire perimeter. It’s what gives your blanket that clean, professional look. Learning how to bind a quilt is a game-changing skill that adds durability and polish to any project.
If you opted for a no-sew tie blanket, your finishing work is much simpler but still key to a neat final product. Just go around the entire blanket and give your fringe a quick once-over.
With these finishing touches done, your T-shirt blanket is officially ready for snuggling. Congratulations
Even after reading a full guide, you’ll probably have a few questions pop up once you actually get started. Trust me, every first-timer does. Making a T-shirt blanket involves a lot of little decisions, so let's walk through some of the most common ones we get asked in the shop.
This is, without a doubt, the number one question I hear. The honest answer is: it completely depends on what you're making. The number of shirts is tied directly to the size of your blanket and how big you cut your squares. There’s no magic number.
The best way to figure it out is to work backward from your goal. First, decide how big you want your finished blanket to be. Let's say you're aiming for a cozy throw, maybe around 50 by 60 inches.
My best piece of advice? Always have a few extra shirts on hand. You'll thank yourself later when a graphic doesn't center quite right or you find one color just throws off the whole vibe. A couple of backup shirts can save you from a last-minute panic.
Technically, you could sew a blanket without it, but I really, really advise against it. Using a quality fusible interfacing is probably the single most important step for getting a professional, long-lasting T-shirt quilt.
T-shirt material is a knit fabric, which means it’s designed to stretch. That’s great for wearing, but it's a total nightmare when you're trying to sew. Without stabilization, you'll end up with warped squares and a wavy, distorted blanket that just won't lay flat.
Think of interfacing as the secret ingredient. It stabilizes that stretchy knit, making it behave more like a standard woven cotton. This is what keeps your squares perfectly square, your seams straight, and your finished quilt looking crisp and flat. It's an extra step that makes all the difference in the final quality.
The fabric you choose for the back has a huge impact on how your blanket feels and how warm it is. Fleece is easily the most popular choice, and for good reason! It’s super soft, warm, and budget-friendly. Plus, its edges don't fray, which makes it an ideal backing for both sewn and no-sew projects.
If you want something even more luxurious, Minky fabric is a fantastic option. It’s incredibly plush, though it can be a little slippery to work with. If you're sewing with Minky, just be sure to use plenty of pins to keep it from shifting.
Of course, you can always go the traditional route and use quilting cotton for the backing. If you do, just remember you'll want to add a layer of batting between your T-shirt top and the cotton backing for warmth. Choosing the best batting for quilts really comes down to how heavy and warm you want the finished blanket to be.
Absolutely! Pulling in different types of clothing can add so much wonderful texture and personal history to your blanket. You can easily incorporate sweatshirts, jerseys, flannel shirts, and even little pieces from baby clothes. The only trick is to be mindful of the different fabric weights and prepare each one accordingly.
Here are a few tips I've learned from mixing materials:
By just slightly adjusting your prep for each type of fabric, you can bring all those different memories together into one beautiful, cohesive blanket.
At High Country Quilts, we have all the high-quality fabrics, notions, and expert advice you need to bring your T-shirt blanket project to life. Visit us online to explore our selection or stop by our Colorado Springs shop to get inspired.
At High Country Quilts we care deeply about community. With our experiences in retail, we know that a store is not only a place to shop but also a place for the community to gather and share. During this busy...

Hi! We’re Adam and Renee Wheaton, the new owners of High Country Quilts! For more than 40 years, we’ve owned and operated vacuum and sewing businesses. Following in Renee’s father’s footsteps after he retired from All Discount Vacuum and Sewing in Colorado...


Leave a comment