

We Love Our Quilting Community
At High Country Quilts we care deeply about community. With our experiences in retail, we know that a store is not only a place to shop but also a place for the community to gather and share. During this busy...


Finishing your quilt with a beautiful binding is like putting the perfect frame on a painting. It’s that final, crucial step that transforms your quilt top into a durable, polished masterpiece. This process—creating a fabric strip, attaching it to the quilt's raw edge, and folding it over to be stitched down—is a skill that truly elevates your work from just homemade to heirloom quality.
I've seen so many beautiful quilts, but it's the binding that really tells the story of the maker's care and attention. This final touch protects your work and gives it that clean, professional look we all strive for. My goal with this guide is to take the mystery out of the process. I want to turn what can feel like an intimidating final hurdle into one of the most satisfying parts of making a quilt.
We'll walk through the entire journey together, from calculating exactly how much fabric you'll need to sewing that very last stitch. Say goodbye to guesswork and frustration. You’re about to learn the techniques for creating strong, beautiful edges that will help your quilt last for generations.
In a world where handcrafted quality is more appreciated than ever, knowing how to bind a quilt properly really makes your work stand out. It’s a quiet testament to your attention to detail. This appreciation isn't just a feeling; the global quilt market was valued at USD 5.32 billion and is projected to grow to around USD 9.26 billion. This shows a huge and growing interest in high-quality, finished quilts. If you're curious, you can explore more data on the global quilt market to see these trends for yourself.
A well-executed binding does more than just cover raw edges; it provides structural integrity, prevents fraying, and adds a final design element that can tie the entire quilt together.
I’ve broken down every aspect of quilt binding to make sure you feel confident at each stage. We’ll go step-by-step through all the essentials.
Here’s a look at what we’ll cover:

Before you can even think about stitching on that final, beautiful binding, there's some critical prep work to do. Honestly, this is where a good binding job is truly made or broken. A flawless finish just isn't possible without a solid, squared-up foundation. Taking the time now to square your quilt, trim away the excess, and figure out your fabric needs is non-negotiable.
If you rush this part, you’re setting yourself up for wavy edges and puckered corners—frustrations every quilter knows and hates. But they're also completely avoidable! By getting these first few steps right, you're paving the way for a smooth binding process and a quilt you’ll be truly proud of.
Squaring up is exactly what it sounds like: trimming your quilted project so every side is perfectly straight and every corner is a true 90-degree angle. I can't stress this enough—this step is the secret to a professional-looking quilt. If you skip it, your binding will just magnify every little curve and wobble along the edge.
Grab a large square quilting ruler and a fresh blade in your rotary cutter. The key here is to align the ruler's grid lines with the seam lines inside your quilt top, not just the raw edge of the fabric, which can get stretched and distorted during quilting.
Once aligned, carefully trim away the excess batting and backing fabric along one side. Then, rotate your quilt and do the same for the other three sides, making sure each corner forms a perfect right angle.
A perfectly squared quilt is the secret to binding that lies flat and corners that miter crisply. It's a small investment of time that pays huge dividends in the final appearance.
Running out of binding fabric halfway around your quilt is a special kind of nightmare. Luckily, a little bit of math upfront saves a lot of headaches later. Start by measuring the perimeter of your freshly squared-up quilt.
Let's use a real-world example: a cozy lap quilt that finished at 60 inches by 72 inches.
This little buffer ensures you'll have more than enough continuous binding to go all the way around without any last-minute panic.
To make this even easier, here’s a quick reference table I use to estimate fabric for common quilt sizes.
This quick reference table helps you calculate the number of binding strips needed based on common quilt sizes and a standard 2.5" binding width.
| Quilt Size (Example) | Total Perimeter (Inches) | Strips Needed (2.5" Width) | Total Fabric Required (Yards) |
|---|---|---|---|
| Baby (40" x 50") | 180" | 5 | 3/8 Yard |
| Lap (60" x 72") | 264" | 7 | 1/2 Yard |
| Queen (90" x 100") | 380" | 10 | 3/4 Yard |
| King (108" x 108") | 432" | 11 | 7/8 Yard |
Remember to always add a little extra to your final calculation, just in case! It's always better to have a bit leftover than to be a few inches short.
With your measurements in hand, you need to decide how you'll cut your binding strips. The choice between straight-grain and bias binding comes down to one simple thing: the shape of your quilt's edges.
For our 60" x 72" lap quilt with its nice, straight sides, straight-grain binding is the obvious and best choice. It provides the stability we need for those long, clean edges.
Now that your fabric is cut, it's time for the fun part: turning those separate pieces into one long, continuous binding strip that will beautifully frame your quilt. This is where all that careful measuring pays off.
This visual guide walks you through the key steps, from joining the strips to pressing the seams, giving you a clear roadmap for creating a perfect binding.
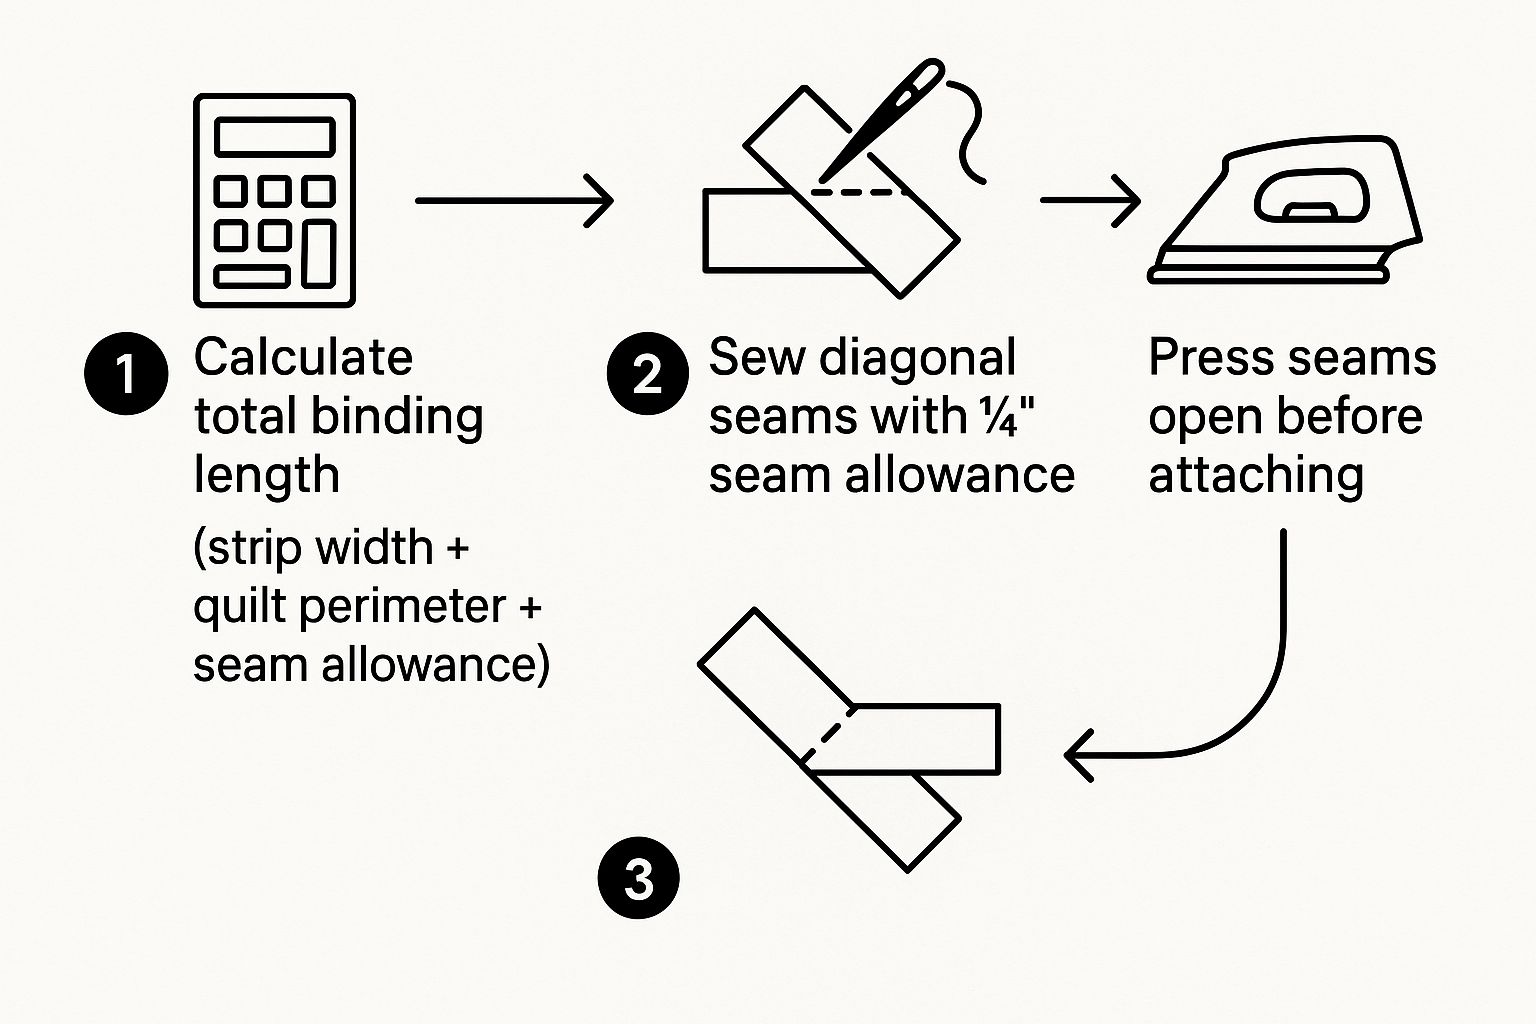
The secret ingredient here is the diagonal seam. It's a game-changer for reducing bulk and making sure your binding folds smoothly around the quilt's corners and edges.
To get a binding that lies perfectly flat, you need to join your strips with a diagonal seam. It might seem like a small detail, but it’s far better than a straight seam. Why? Because it distributes the fabric from the seam allowance over a larger area, which means no ugly, noticeable lumps along the edge of your finished quilt. It’s a professional trick that makes all the difference.
Start by taking two of your binding strips and placing them right sides together, forming a 90-degree angle. You’ll see a little square where they overlap—that’s your sewing guide. Grab a fabric marker and draw a line diagonally across that square, from the top corner to the bottom corner.
Now, just sew right on that line. This single diagonal stitch is what creates a join that's strong, flexible, and almost invisible once it's attached.
Pro Tip: Before you trim anything, I always like to finger-press the top strip back and make sure everything lines up into one long, straight piece. It takes two seconds and can save you a world of frustration with the seam ripper.
Once you’re sure the alignment is right, trim away the excess fabric, leaving a ¼-inch seam allowance. The final touch is to press this seam open with your iron. Pressing it open, instead of to one side, is another key technique for keeping things flat and bulk-free. Keep doing this until all your strips are one continuous piece.
With your long binding strip made and pressed, you're ready to attach it to the quilt itself. I can't recommend a walking foot enough for this part of the process. A walking foot is a lifesaver because its built-in feed dogs work in tandem with your machine's feed dogs, gripping the top layers and moving everything through together.
This little attachment is your best defense against wavy or stretched-out edges. It ensures that your quilt top, batting, backing, and binding all feed through the machine at the same rate, preventing any puckering or pulling.
Find a spot about halfway down one side of your quilt to start sewing. Make sure you leave a tail of at least 8 to 10 inches unsewn at the beginning—you’ll need this extra length later on to connect the ends for a seamless finish.
Precision is everything when you're attaching the binding. Carefully align the raw edge of your folded binding strip with the raw edge of your quilt. Your goal is a consistent ¼-inch seam allowance all the way around.
Here are a couple of things I do to keep my stitches straight:
Keep sewing until you get about a quarter-inch away from the first corner, and then stop with your needle down. Hitting this mark precisely is the setup for creating those crisp, beautiful mitered corners we’ll tackle in the next step.

This is where the magic really happens. Those crisp, sharp mitered corners are the signature of a beautifully finished quilt, and they're much easier to achieve than you might think. We'll conquer the corners first, then move on to joining the binding tails for that invisible, professional finish.
The whole process comes down to precision and a clever little fold. Once you get the rhythm down for the first corner, I promise the next three will feel like second nature. Forget any intimidation you might have about this step; it's a simple technique that just requires a little patience.
As you’re sewing the binding along the first side, your main job is to stop at the right moment. Be sure to stop sewing ¼ inch from the corner and backstitch to lock your stitches in place. Take your quilt out from under the needle and turn it so the next side is positioned in front of you, ready to go.
Now for that clever fold. Take the long tail of your binding strip and fold it straight up, away from the quilt. This creates a perfect 45-degree angle at the corner. I always give this a good finger-press to create a temporary, sharp crease.
Holding that first fold in place, bring the binding strip back down over itself. The top edge of your binding should now line up perfectly with the raw edge of the next side of the quilt. That little triangle of fabric you just tucked underneath is what creates the beautiful miter on the front.
Here’s a quick rundown of the corner-turning technique:
Just repeat this exact process for the other three corners. This simple, repeatable motion is the key to getting uniform, fantastic-looking corners every single time.
After you've turned that final corner and are cruising down the last side, it’s time to think about joining the beginning and ending tails of your binding. I like to stop sewing when I’m about 12 to 15 inches away from where I started. This leaves a generous gap to work in without a struggle.
This is the step that takes your quilt’s finish from good to great. The goal is to create a seamless, diagonal join that looks just like all the other seams in your binding strip.
Take the binding tail from where you started and lay it flat along the quilt's edge. Now, take the tail from where you just stopped sewing and lay it directly over the first tail.
My absolute favorite trick for a perfect join is to measure the overlap. Trim the ending tail so it overlaps the beginning tail by the exact width of your binding strip. For a standard 2.5-inch binding, you'll want a 2.5-inch overlap.
This precise measurement is a game-changer. It ensures the final piece fits perfectly into the gap without any puckering, pulling, or excess fabric.
With your ends trimmed and overlapped, it's time to sew them together. Gently unfold both tails and place them right sides together at a right angle, just like you did when you first joined your binding strips.
Using a fabric pen or chalk pencil, draw a diagonal line from the top-left corner to the bottom-right corner of the overlapping fabric. Pin the tails together to keep them from shifting while you move them to your machine.
Now, carefully sew directly on that drawn line. Before you trim away the excess fabric, I highly recommend doing a quick "test fit." Just fold the binding back into place along the quilt edge to make sure it lies flat and fits the gap perfectly.
Once you’re happy with the fit, trim the excess fabric, leaving a ¼-inch seam allowance. I like to press the seam open with my fingers to reduce bulk. Finally, lay the newly joined section of binding against the quilt edge and sew the remaining gap closed. Your binding is now a continuous, beautifully attached loop, ready for the final hand-stitching
https://www.youtube.com/embed/LmxWwkNDnig
Once your binding is attached to the front of the quilt, you're on the home stretch. Now comes the satisfying part: securing that folded edge to the back. How you tackle this final step is really a matter of personal preference and quilting style.
The two main roads you can take are the classic, meditative route of hand stitching or the quick and sturdy path of finishing by machine. Neither one is better than the other; it often comes down to the quilt's destiny. Is it a showpiece for the wall or a cozy throw destined for a lot of snuggles and washes? The right choice is simply the one that feels right for you and your project.
For a lot of us, hand-stitching the binding is a beloved ritual. It's that last quiet moment you get to spend with your quilt, a peaceful process that connects you to the generations of quilters before you. This technique gives you a nearly invisible finish on the back, lending your work that timeless, heirloom quality that a machine just can't quite replicate.
The secret here is a good blind stitch, which you might also know as a ladder stitch.
This careful, meticulous approach is exactly what many quilters and quilt lovers appreciate. In fact, recent industry insights show a real trend towards personalized quilts where craftsmanship is key—and a beautifully hand-finished binding is a huge part of that. If you're curious about these kinds of trends, you can read more on the Craft Industry Alliance website.
If your mantra is "done is better than perfect" or you need a quilt that can withstand a lot of wear and tear, finishing the binding by machine is a fantastic option. It's especially smart for quilts that will be used and washed often, like baby quilts or the throw you keep on the sofa. The stitching is strong, secure, and you'll be done in a fraction of the time it takes to hand sew.
A popular and effective method is to "stitch in the ditch" from the front. This means you sew right in the seam line where the binding meets the quilt top. As you do this, your machine neatly catches the folded edge of the binding on the back.
To get a clean finish, press the binding firmly to the back and don't be shy with the clips—they'll keep everything from shifting. A great tip is to use a bobbin thread that matches your binding fabric; it helps the stitches on the back blend right in.
While it's not an invisible finish, a neatly machine-stitched binding looks sharp and signals that the quilt is ready for real life. Whichever way you go, you'll end up with a beautiful, durable finish that shows off your hard work.
Even with a perfect plan, a few questions always seem to crop up right when you're at the final step of binding a quilt. It happens to all of us. Let's walk through some of the most common hurdles I see quilters face, so you can get that beautiful, flat finish you're after.
Most quilters, myself included, swear by 2.5-inch strips. It’s the gold standard for a reason. This width gives you plenty of fabric to work with, creating a nice, sturdy ½-inch finished binding on the back without a struggle. It's forgiving and looks great on almost any quilt.
That said, you can absolutely play with this. If you're aiming for a daintier look, try cutting your strips to 2.25 inches. Just be aware that you have less wiggle room. On the flip side, for a really thick quilt with high-loft batting or if you just love a chunkier frame, you can go as wide as 3 inches.
My best advice? Audition it first. Cut a few short strips of different widths, fold them, and clip them to a practice quilt sandwich. You'll know right away which look you prefer.
Ah, the dreaded wavy binding. This is almost always caused by one thing: stretching the binding strip as you sew. It’s a natural tendency to want to pull the fabric taut to keep it straight, but this is exactly what causes those frustrating ripples.
Think of your job as simply guiding the binding, not pulling it. Let your machine and your walking foot do the heavy lifting. A walking foot is a lifesaver here because it pulls the top binding fabric, the quilt sandwich, and the bottom layer through at the exact same speed, which is key to preventing stretching.
Also, double-check that your quilt was squared up properly before you started. If the edges of the quilt itself aren't straight, the binding has no choice but to follow that uneven line, often resulting in waves.
Yes, and you absolutely should! Using a different fabric for your binding is one of the best ways to frame your work and add that final pop of personality. A bold stripe, a fun polka dot, or a solid color pulled from the quilt top can elevate the entire piece. It’s a fantastic design opportunity.
The only real rule here is to stick with the same type of fabric. If your quilt is made from 100% quilting cotton, your binding should be, too. This ensures everything shrinks, wears, and washes at the same rate, which is crucial for the long-term health of your quilt.
Interestingly, while we're focused on these hands-on techniques, the wider quilting world is seeing some fascinating changes. Technology is making its way into the craft, with AI helping to improve precision in commercial cutting and stitching. It's a different side of the quilting coin, but it shows how our craft is always evolving. You can read more about how technology is influencing the quilting market on Dataintelo.com.
At High Country Quilts, we live and breathe this stuff. We have all the premium fabrics, tools, and friendly advice you need to get you from that first stitch to the final binding. Explore our shop today!
At High Country Quilts we care deeply about community. With our experiences in retail, we know that a store is not only a place to shop but also a place for the community to gather and share. During this busy...

Hi! We’re Adam and Renee Wheaton, the new owners of High Country Quilts! For more than 40 years, we’ve owned and operated vacuum and sewing businesses. Following in Renee’s father’s footsteps after he retired from All Discount Vacuum and Sewing in Colorado...


Leave a comment