

We Love Our Quilting Community
At High Country Quilts we care deeply about community. With our experiences in retail, we know that a store is not only a place to shop but also a place for the community to gather and share. During this busy...


Welcome to the ultimate sewing machine needle guide! This is your key to getting those flawless stitches you've always dreamed of.
It might seem small, but the sewing machine needle is the single most critical tool for your project's success. It's also, funny enough, the one thing most of us tend to overlook. This guide is here to change that, turning any needle confusion into pure confidence so you can get professional-quality stitches from start to finish.
Let's be honest—that tiny, unassuming needle holds all the power. It can literally make or break your entire project. Think of it like the nib on a fountain pen; the wrong one will leave you with skips, snags, and a whole lot of frustration. Picking the right needle isn’t just a good idea, it's a non-negotiable step for quality sewing.
Using the wrong needle can cause more than just ugly stitches. It can put permanent holes in delicate fabrics, shred that beautiful (and expensive!) thread you bought, and even put a strain on your sewing machine's motor. This is exactly why getting a handle on the different needle types and sizes is so important.
Every beautiful sewing project is built on a solid foundation, and it doesn't get more foundational than the needle. To really get why it matters so much, a quick look back helps. The first patent for a machine-ready needle came out way back in 1755, but it was Elias Howe Jr.'s 1846 patent for a grooved, eye-pointed needle that truly set the standard for modern sewing. That single innovation opened the door for all the specialized needles we have today.
When you master this one little component, you'll see a huge difference in your sewing.
The rule of thumb is simple: a new project deserves a new needle. It’s a tiny habit that will save you countless hours with a seam ripper and protect both your fabric and your machine from unnecessary wear and tear.
This guide will walk you through everything from needle anatomy to matching the right type with your fabric, empowering you to diagnose and solve problems all on your own. For a handy visual reference, check out our guide to know your needles and their uses.
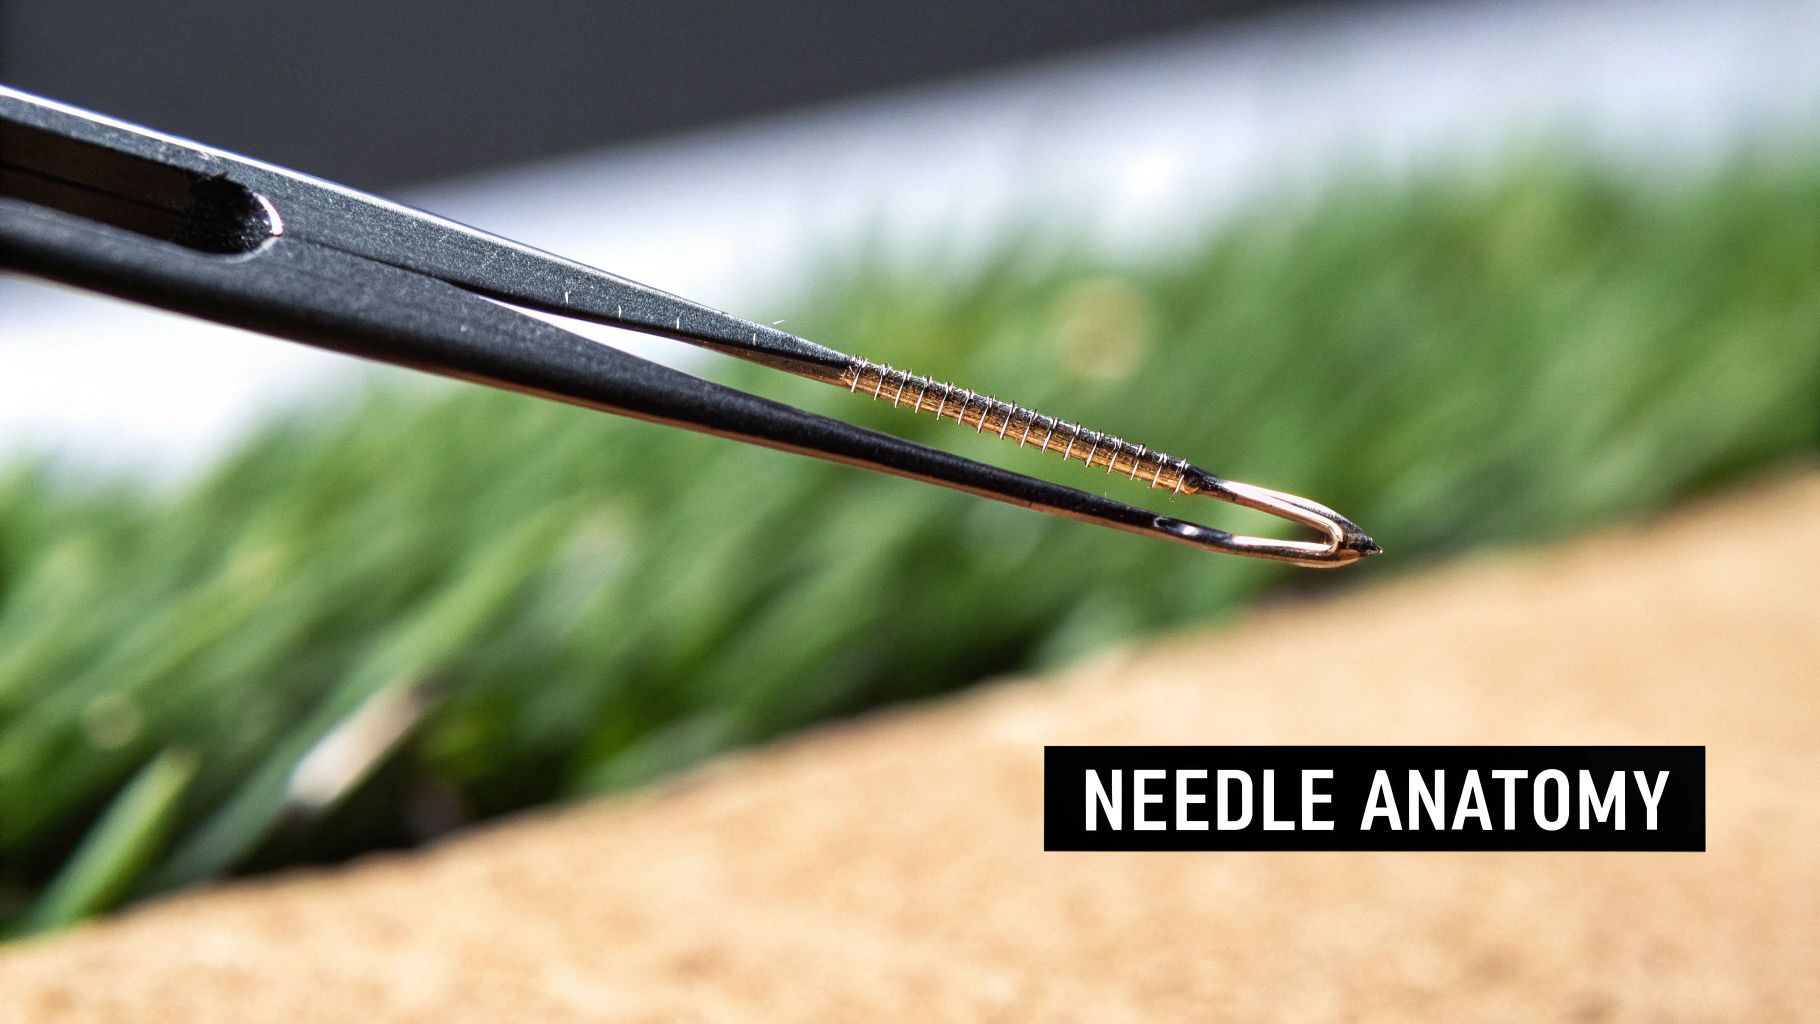
To really get the hang of your sewing machine, you have to know your tools inside and out. It’s easy to think of a sewing needle as just a simple piece of steel, but it’s so much more than that. Every curve and cut is carefully engineered for a specific task. Think of it less like a pin and more like a precision key, designed to unlock the secret to perfect stitches.
Let's break down its anatomy. Once you see how this tiny component works in perfect sync with your machine and fabric, everything else falls into place. This bit of know-how is the foundation for diagnosing problems and choosing the right needle for every single project, making the rest of this guide a whole lot easier to digest.
Right at the top, you’ll find the parts that lock the needle in place and give it structure. These are absolutely essential for keeping the needle stable and making sure it fits your machine correctly.
Together, these two parts provide the strength and proper positioning the needle needs to do its job without bending or breaking under pressure.
The middle of the needle is all about the thread. These clever features are designed to guide the thread smoothly and protect it from friction, all while helping it form a loop for the hook to catch. That's the real magic behind a lockstitch.
A single stitch is formed when the needle pushes thread through the fabric, where the bobbin hook catches it to form a loop. Every part of the needle, from the groove to the scarf, is designed to make this tiny, high-speed event happen flawlessly thousands of times.
The front groove is that subtle channel running down the front of the shaft. Think of it as a protected tunnel for your thread. As the needle plunges into the material, the thread nestles into this groove, shielding it from the intense friction that can cause shredding, fraying, or breaking.
Then there’s the scarf, a small, scooped-out indentation on the back of the needle, just above the eye. This might be the most ingenious part of the whole design. Its purpose is to let the bobbin hook get incredibly close to the needle, making it easy to grab the thread loop and form a stitch. A needle with a damaged scarf is almost always the culprit behind skipped stitches.
Finally, we get to the business end of the needle—the part that does all the work.
Once you understand this anatomy, you're no longer just grabbing any old needle from the pack. You're selecting a specialized tool for the job, with a new appreciation for how each tiny element comes together to create strong, beautiful seams.
Ever stood in the sewing aisle, staring at a wall of needle packages with codes like '80/12' and words like 'Ballpoint' or 'Microtex' and felt completely lost? You’re definitely not alone. Let's break down that jargon into practical, real-world knowledge so you can grab the right needle with confidence every single time.
Think of your needle as the translator between your sewing machine and your fabric. Get the translation right, and you'll avoid a world of sewing headaches like skipped stitches, puckered seams, and damaged fabric.
The first thing you’ll notice on a needle pack is a set of two numbers, like 80/12 or 90/14. This isn't as confusing as it looks—it's just two different measurement systems saying the same thing, kind of like seeing a temperature in both Celsius and Fahrenheit.
The main takeaway here is incredibly simple: bigger numbers mean a bigger, stronger needle. A beefy 100/16 needle is built to punch through heavy denim, while a delicate 60/8 is perfect for whisper-thin fabrics like chiffon.
One of the most common mistakes I see is trying to force a needle that's too small through a heavy fabric. This almost always ends with a bent or broken needle, which at best is annoying and at worst can throw off your machine's timing.
Beyond just size, the type of needle you choose is critical. The shape of the point is engineered for specific fabrics. While the world of specialty needles is vast, if you can get a handle on these five common types, you'll be set for over 90% of the projects that come your way.
Just like its name suggests, the Universal needle is the jack-of-all-trades. It has a slightly rounded point that makes it pretty good for both woven fabrics and more stable knits. If you're just starting out, this is your go-to needle.
But "universal" doesn't mean it's perfect for every single thing. For the best possible results on very delicate, very stretchy, or very tough fabrics, you'll want to switch to a specialized needle. Still, every sewer should have a good variety pack of Universals on hand. Our Schmetz Universal 5-pack assortment is the perfect little kit to keep in your sewing box.
These two are the absolute heroes for sewing with knit fabrics. A regular sharp needle can pierce and tear the delicate loops in a knit, causing runs and holes. But a Ballpoint needle has a rounded tip that gently pushes the fibers apart, sliding between them instead of cutting through.
Stretch needles take that idea even further. They also have a rounded tip, but they're designed with a deeper scarf (the groove on the back) to prevent skipped stitches on super-stretchy fabrics like Lycra and spandex. If you’re making swimwear or activewear, a Stretch needle isn't just a suggestion—it's a must.
When you're working with tough, densely woven materials like denim, canvas, or even layers of twill, you need a needle that won't back down. The Jeans needle is built for exactly that. It has an extra-strong, reinforced shaft to keep it from bending or breaking under pressure.
It also features a very sharp, slender point that’s designed to penetrate thick fabric with as little resistance as possible. Trust me, trying to use a Universal needle on a pair of jeans will just lead to frustration and a pile of broken needles.
For the complete opposite end of the fabric spectrum, we have the Microtex needle, sometimes called a Sharps needle. This needle is incredibly slim and has a super-sharp, acute point. It's the secret to getting perfectly straight stitches on fine, delicate woven fabrics like silk, microfiber, and batiste.
That sharp point pierces the fibers cleanly, which prevents any puckering or pulling. It’s my go-to needle for any kind of precision work, especially topstitching on high-end fabrics where every stitch counts.
To make things even easier, here's a quick cheat sheet. While your specific project might need some fine-tuning, this chart is a fantastic starting point for matching the right needle to your fabric.
| Fabric Type | Recommended Needle Type | Common Needle Size Range |
|---|---|---|
| Cotton, Linen, Quilting Cotton | Universal or Quilting | 70/10 to 90/14 |
| Denim, Canvas, Twill | Jeans/Denim | 90/14 to 110/18 |
| T-shirt Jersey, Interlock Knits | Ballpoint | 70/10 to 90/14 |
| Lycra, Spandex, Swimwear | Stretch | 75/11 to 90/14 |
| Silk, Chiffon, Microfiber | Microtex/Sharps | 60/8 to 70/10 |
| Leather, Vinyl, Suede | Leather | 90/14 to 110/18 |
This table should help you build the instinct for pairing your tools correctly, leading to much smoother and more professional-looking projects.
Thankfully, most of our home sewing machines use the 130/705 needle system. This is an industry standard that covers all these common types, so you can be confident that they’ll fit your machine. Whether you need a versatile 80/12 Universal needle or a specialized Stretch needle, choosing the right tool is the first, and most important, step to getting flawless stitches.
The real secret to flawless, beautiful stitches isn't some high-level technique—it’s simply getting your needle, fabric, and thread to work together as a perfect team. Think of it as a system. The fabric is your road, the thread is your car, and the needle is the tires. You wouldn't use skinny road-bike tires to drive a truck through a muddy field, right? The same logic holds true in sewing.
This is where all the technical talk becomes practical. A super-fine 60/8 Microtex needle will glide through silk like a dream, but it would snap in a heartbeat if you tried to punch it through heavy denim. On the flip side, a thick 100/16 Jeans needle would leave gaping holes in that same delicate silk. The needle’s only job is to open a hole just big enough for the thread to pass through without getting roughed up.
Always, always start with your fabric. Its weight and construction determine every other choice you make. Are you working with a light, crisp woven cotton or a heavy, rugged canvas? A stretchy jersey knit or a slippery, delicate chiffon? Choosing your fabric is the first domino; everything else follows from there.
Woven fabrics, which have that classic grid-like structure, need a sharp needle to pierce the threads cleanly. Knits, however, are made of interlocking loops. They need a ballpoint or stretch needle that can gently nudge those loops aside, preventing snags, runs, and holes.
This simple decision tree is a great way to visualize that first, most important step: choosing a needle point based on your fabric.

As you can see, figuring out if you have a woven or knit fabric is the fastest way to narrow down the right type of needle for your project.
Okay, so you've got the right needle type for your fabric. Now it’s time to pick the right size. This is where your thread enters the picture. The golden rule is that the thread must fit perfectly into the needle's eye and groove. If the eye is too small, your thread will shred and break. If it’s too big, you’ll have wonky tension and messy stitches.
Here's a handy little test you can do:
If the needle gets stuck, it's too small. If it drops like a rock, it might be too big. This simple gravity test is a surprisingly accurate way to confirm you have a perfect match. Getting familiar with the different types of sewing thread will also make you more confident in these choices.
Pro Tip: When you're unsure, match the needle size to the fabric weight first. For medium-weight cotton, an 80/12 is a safe bet. For heavy denim, start with a 100/16. Then, just make sure your all-purpose thread works with it. It’s the most common and reliable way to go.
Let's walk through how this all plays out in a few common sewing projects:
Project: A T-Shirt (Knit Jersey Fabric): You'll grab a Ballpoint needle to avoid snagging the knit fibers. Since jersey is a light-to-medium weight fabric, an 80/12 needle with a standard all-purpose polyester thread is a perfect setup.
Project: Quilting (Woven Cotton Layers): To piece those cotton layers together, a Quilting or Universal needle in size 80/12 or 90/14 is ideal. Paired with a 50wt cotton thread, it gives you strong seams without adding any unnecessary bulk.
Project: A Silk Blouse (Delicate Woven): This requires a delicate touch. A Microtex/Sharps needle in a tiny 60/8 or 70/10 size will make precise, clean holes. You'll want to pair it with a very fine 60wt thread to keep the fabric from puckering.
It’s easy to forget just how important this little piece of metal is, but its impact is massive. The global trade for sewing machine needles was valued at around $253 million in 2023. That figure shows how critical the right needle is to the entire textile industry, where efficiency and quality are everything. By mastering this matching game at home, you’re using the exact same principles that drive professional manufacturing around the world.
https://www.youtube.com/embed/6usWGs31XT4
Even the most seasoned sewist gets tripped up by skipped stitches or shredded thread. It's frustrating, I know. But before you start taking your machine apart or questioning your sanity, take a deep breath and look at the smallest part of the equation: the needle.
Seriously. I'd say 90% of the most common sewing frustrations start and end right there. It’s the first thing you should check when your project goes sideways.
Think of that needle as the first responder at the scene of the crime. A loud thumping sound as you sew? Puckered seams on a delicate fabric? Those aren't just annoyances; they're clues. Learning to spot these signals is the secret to fixing problems fast and, even better, avoiding them in the first place.
Skipped stitches are probably the most common headache, especially when you’re working with knits or anything with a bit of stretch. You know the look—that annoying little gap in your seam where the bobbin hook just completely missed the top thread.
More often than not, the needle is the culprit. You're likely using a needle point that’s fighting your fabric. A standard Universal needle, for instance, has a sharp point that can actually pierce and damage the delicate fibers of a knit. When that happens, the thread loop doesn't form correctly, and the hook sails right past it.
Does it feel like your top thread is just shredding, fraying, or snapping for no reason? This is another classic needle-related problem. The root cause is almost always friction. Your thread is rubbing too hard against the needle's eye or the fabric itself, and it just can't take the stress.
This often happens when the needle's eye is too small for the thread you're using. It creates a bottleneck that weakens the thread with every single stitch. A dull needle can also be the villain, as it has to brute-force its way through the material, generating extra heat and friction that wears down your thread. Don't forget to check for tiny burrs or damage on the needle itself—microscopic sharp edges will act like a razor blade on your thread.
A simple rule to live by: change your needle after every 8-10 hours of sewing. Think of it as the cheapest insurance policy you can buy for a successful project. A fresh needle is your best defense against easily preventable problems.
Ever finish a seam only to see the fabric is bunched up and wavy? That’s puckering, and it’s a clear sign that your needle is messing with the fabric's natural drape. This almost always means your needle is either too big for your fabric or has the wrong kind of point.
A big, beefy needle will punch a hole that's way too large for the thread filling it, causing the delicate fabric to draw up and pucker. You'll see this happen a lot with lightweight wovens like silk, chiffon, or voile. A dull point can cause a similar issue by dragging and pulling the fabric threads instead of piercing them cleanly.
Most sewing machine frustrations can be traced back to this tiny, inexpensive part. Before you get discouraged, take a moment to diagnose the issue. Here’s a quick-glance table to help you connect the problem to the right needle-based solution.
| Sewing Problem | Possible Needle Cause | Solution |
|---|---|---|
| Skipped Stitches | Wrong needle type (e.g., Universal on knit); dull or damaged needle. | Switch to a Ballpoint or Stretch needle for knits. Install a new needle. |
| Shredded or Broken Thread | Needle eye is too small for the thread; dull or burred needle. | Use a larger needle size or a Topstitch needle with a larger eye. Replace the needle. |
| Puckered or Wavy Seams | Needle is too large for the fabric; dull needle point. | Switch to a smaller needle size (e.g., 60/8 or 70/10) for delicates. Replace the needle. |
| Fabric Snags or Pulls | Damaged or burred needle tip; wrong needle point for the fabric. | Replace the needle immediately. Use a Microtex (sharp) needle for wovens. |
| Loud, Thumping Noises | Needle is bent or hitting the hook/plate; incorrect needle system. | Stop sewing and replace the needle. Ensure it's installed correctly and fully seated. |
Remembering to check your needle first will save you a world of trouble. For a more in-depth look at other potential machine issues, our complete sewing machine troubleshooting guide is always here to help.
Think of your sewing machine needle as a tiny, hard-working athlete. It moves at incredible speeds, piercing fabric thousands of times per minute. Just like an athlete, it eventually gets tired and worn out. A sharp, correctly installed needle is the secret weapon for great sewing, and knowing how to look after it will save you from a world of frustration.
Ignoring a dull or damaged needle is one of the quickest ways to ruin a beautiful piece of fabric. It can lead to skipped stitches, shredded thread, and even permanent snags in your material. Making needle care a regular part of your routine is a small habit that pays off big time in the quality of your finished projects.
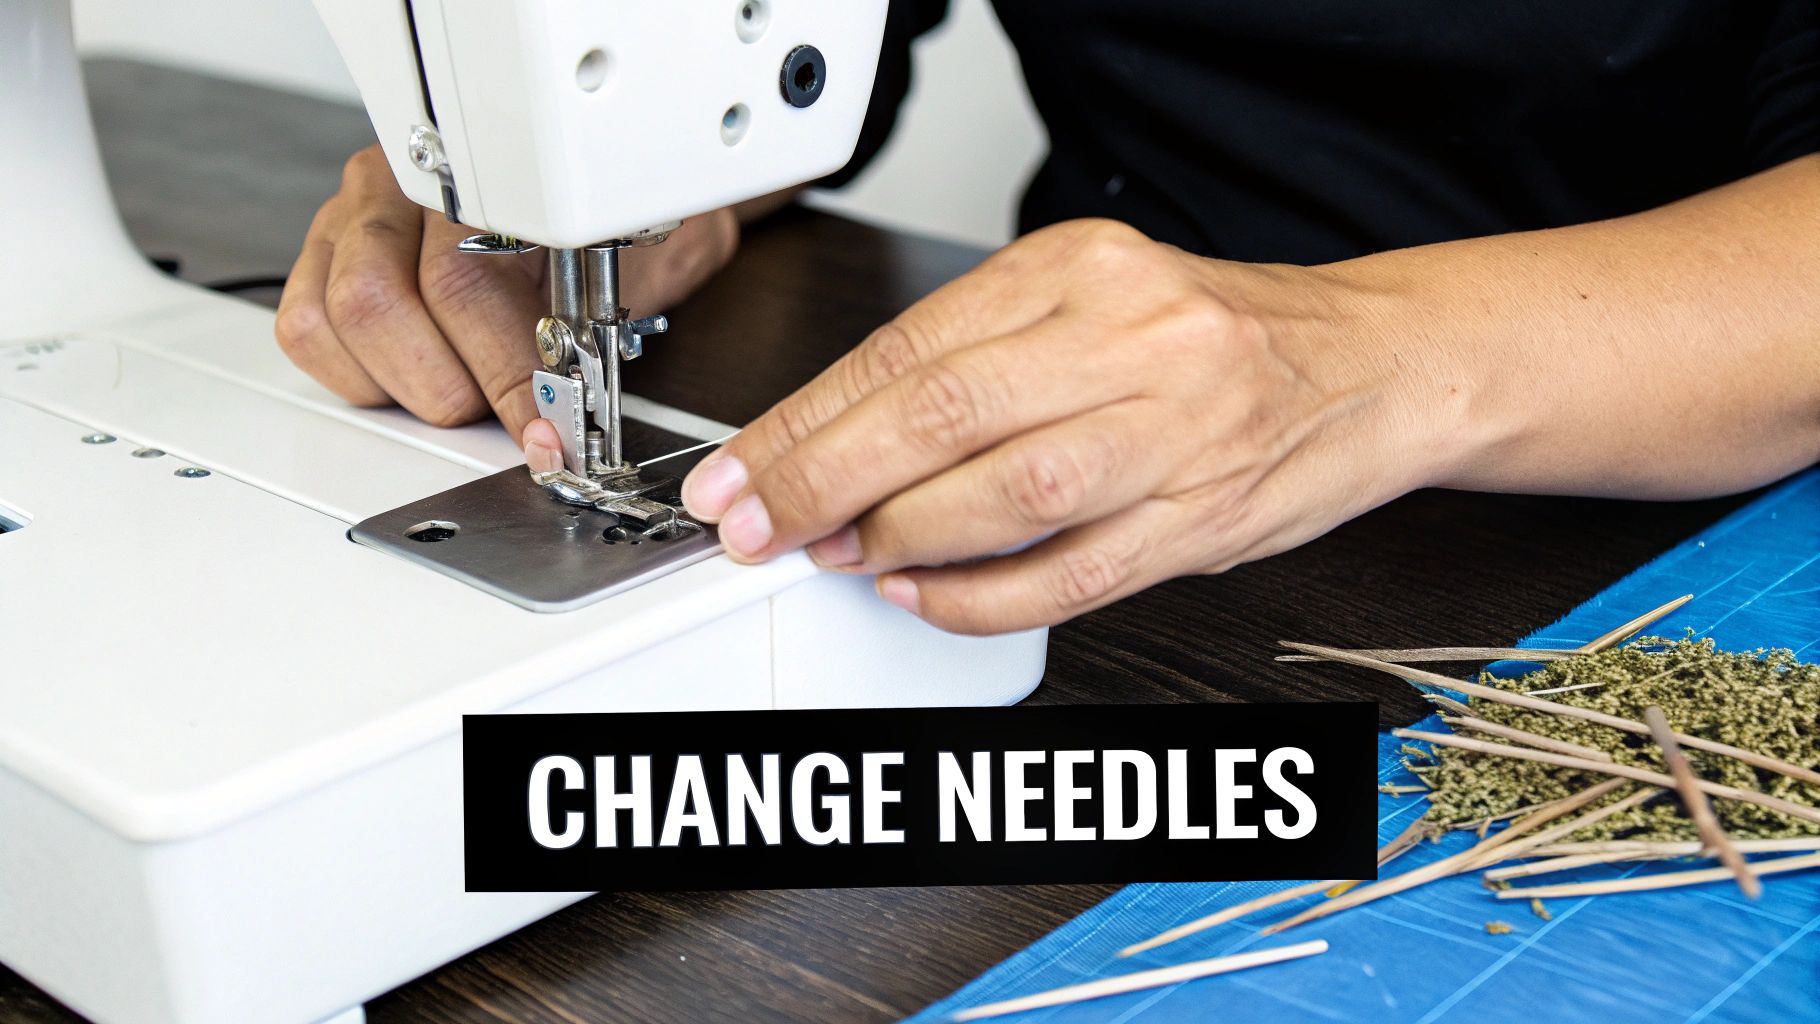
Getting the needle in right is step one. So many common sewing problems, from skipped stitches to broken thread, can be traced back to an improperly seated needle. The process is straightforward, but it’s all about precision.
The most common installation mistake is not pushing the needle all the way up. If it sits even a millimeter too low, the timing between the needle and the hook will be off, causing skipped stitches or preventing a stitch from forming at all. Always double-check that it’s fully seated before you tighten that screw.
If you take only one piece of advice from this entire guide, let it be this: change your needle often. Seriously. Needles are cheap, and a fresh one is the best insurance policy you can have for your project.
A good rule of thumb is to pop in a new needle after every 8 to 10 hours of active sewing time. But an even easier habit to get into is just starting each new project with a fresh needle. That way, you know you’re always beginning with a perfectly sharp, straight point.
Sometimes, a needle doesn't make it to the 8-hour mark. Hitting a pin by accident or crunching over a super thick seam can bend or dull the tip in an instant. It’s important to learn the warning signs so you can swap it out before it ruins your work.
When you do change your needle, don't just toss the old one in the trash. Collect used needles in a safe, sealed container like an old pill bottle or a small tin to prevent them from accidentally poking someone.
As you get more comfortable with sewing, you'll naturally run into some head-scratchers. Don't worry, we've all been there! Let's clear up a few of the most common questions people have about needles so you can keep sewing with confidence.
It's a tempting thought, isn't it? While a Universal needle is a great generalist, it's not a one-size-fits-all solution. Think of it like an all-season tire: it gets the job done most of the time, but you wouldn't use it for a snowstorm or a race. It's perfectly fine for basic woven fabrics like cotton poplin.
But when you move to other fabrics, you'll see why specialty needles matter. On knits, its slightly rounded point can catch and break the delicate looped fibers, creating tiny holes or even runs. For super-fine fabrics like silk or chiffon, you're better off with a Microtex needle to avoid leaving noticeable punctures.
A twin needle, also called a double needle, is exactly what it sounds like: two needles attached to a single shank. It pops into your machine just like a regular needle but uses two spools of thread on top and one bobbin thread below. The result? Two beautiful, perfectly parallel rows of stitching.
They are an absolute game-changer for hemming knits like T-shirts and leggings. The zigzag stitch that forms on the back gives the hem a bit of stretch, which is exactly what you need for comfy clothes. You can also use them for gorgeous decorative topstitching or creating elegant pintucks.
Hearing a needle snap mid-project is always a bit jarring, but it's usually an easy fix. The number one culprit is trying to power through heavy fabric with a needle that's too small. A delicate 70/10 needle just doesn't have the muscle for thick denim or canvas—it's going to break under the pressure.
Another common reason is forcing the fabric through the machine instead of letting the feed dogs guide it. Pushing or pulling the material can bend the needle just enough for it to hit the metal throat plate and snap. Also, double-check that your needle is inserted all the way up into the clamp and that the screw is good and tight.
Fun fact: Nearly all modern home sewing machines use the 130/705H needle system. This is the standard, so when you see that code, you can be sure the needle will fit your machine. It makes shopping for needles so much easier!
Getting a handle on these little details is what takes your sewing from good to great. The right needle truly is the fastest way to get that flawless, professional finish you're after.
Ready to try out a new needle? High Country Quilts has a fantastic selection of needles, gorgeous fabrics, and top-of-the-line BERNINA machines to get you started. Explore our collection and tackle your next project with the perfect tools for the job
At High Country Quilts we care deeply about community. With our experiences in retail, we know that a store is not only a place to shop but also a place for the community to gather and share. During this busy...

Hi! We’re Adam and Renee Wheaton, the new owners of High Country Quilts! For more than 40 years, we’ve owned and operated vacuum and sewing businesses. Following in Renee’s father’s footsteps after he retired from All Discount Vacuum and Sewing in Colorado...


Leave a comment