

We Love Our Quilting Community
At High Country Quilts we care deeply about community. With our experiences in retail, we know that a store is not only a place to shop but also a place for the community to gather and share. During this busy...


Hanging a quilt does more than just get it out of a storage box; it transforms it into a stunning piece of wall art. I've found the best methods are usually a classic quilt sleeve and rod for really even weight distribution, a sleek wooden quilt hanger for a more modern no-sew look, or even specialty clips if you need a temporary display. Each approach keeps your quilt looking its best while protecting those delicate fibers.

When you finish a quilt, you’re looking at hours of creativity, patience, and pure passion. It doesn’t matter if it’s a family heirloom passed down for generations or your very own masterpiece—it deserves to be seen and appreciated. Displaying your quilt on a wall brings so much warmth and texture to a room, and it honors the story woven right into its threads.
This isn't just a new trend. The practice of hanging quilts as functional art goes way back. During the American frontier era, quilts were often hung on the dirt walls of sod houses for insulation and to add a touch of home. They even acted as privacy partitions in tiny, single-room dwellings. Knowing this history adds a whole new layer of meaning to why we want to display our work today. You can learn more about the rich history of quilting and its role in home life in this detailed overview from Britannica.
Turning your textile creations into wall decor is about more than just making a room look nice. There are some really practical benefits, too.
By choosing the right method for how to hang quilts, you’re making sure your textile art is not only a beautiful centerpiece but also a protected investment that will last for years to come.
This guide goes beyond the basic how-tos. I want to help you pick the perfect display method for your specific quilt, your home's style, and your comfort level. From museum-quality techniques to clever no-sew solutions, we’ll get you hanging with confidence.
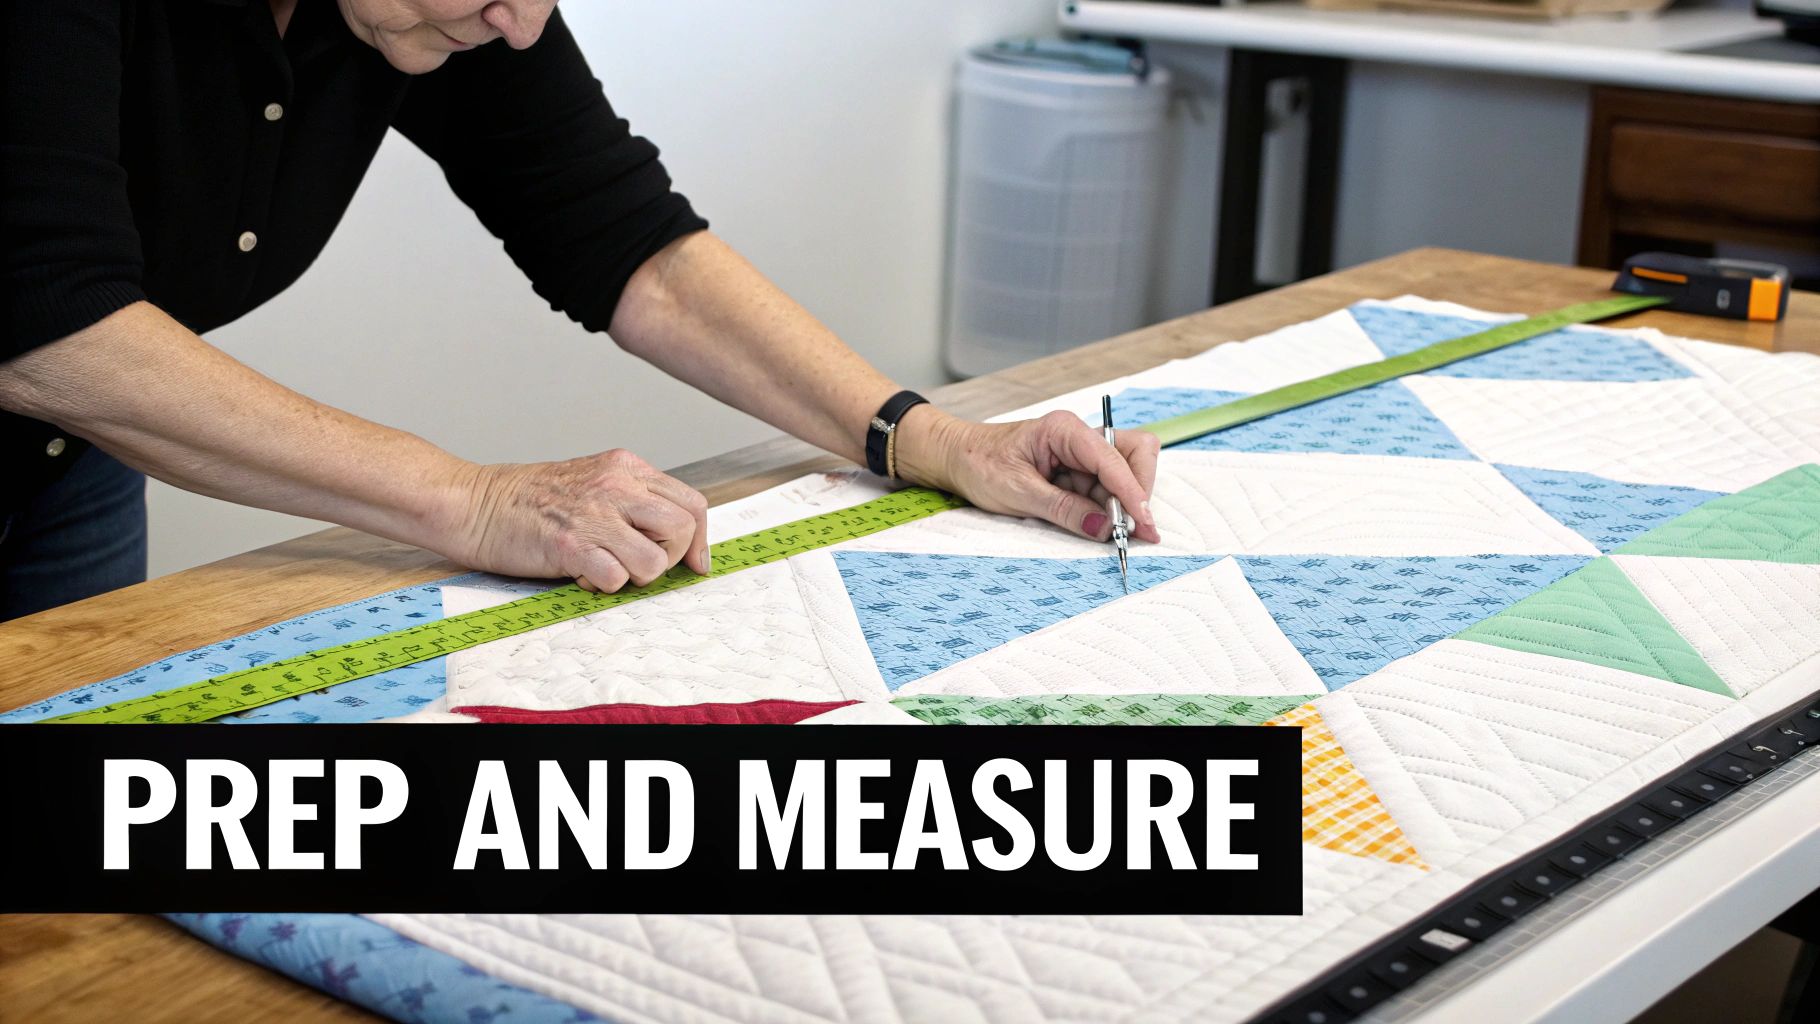
Before you grab a hammer or drill, let's talk prep work. I know it's tempting to jump right into hanging your beautiful quilt, but a little planning goes a long way. Taking a few moments to prep both your quilt and the wall is the real secret to getting that secure, professional look that does your work justice. It’s all about preventing damage and making sure your masterpiece hangs perfectly straight.
The very first thing to think about is location. Sunlight is the biggest enemy of textiles; those UV rays can fade vibrant colors faster than you’d think. I always tell people to pick a wall that doesn’t get blasted with direct sun all day. An interior wall or one that gets soft, indirect light is your best bet for keeping those colors looking fresh for years to come.
Once you’ve scouted the perfect spot, it's time for some simple math. A perfectly centered quilt is a fantastic focal point, but "eyeballing it" rarely works out.
Here’s the quick and easy way to get it right:
This simple calculation guarantees a balanced, intentional display. It's especially important to get your mounting points right, and if you have modern walls, choosing the best fixings for plasterboard walls is key to making sure everything stays put.
Okay, let's turn our attention to the star of the show. Before it goes up on the wall, you want to make sure your quilt is clean and ready. A quick pass with a vacuum's soft brush attachment can lift off any surface dust. If it needs a deeper clean, especially if it’s an antique, professional cleaning is the safest route.
The goal is to have the quilt hang as flat as possible. If it's been stored folded, you might need to gently steam or press the back to remove creases, being careful with your iron's heat setting.
Finally, get a feel for the quilt’s weight. A small wall hanging is one thing, but a heavy, king-sized quilt needs a much more robust support system. Knowing its heft will directly influence which hanging method you choose, preventing any unfortunate sagging or stress on the fabric down the road. The structure is also helped by a good finish; if you're looking for tips, this guide on how to bind a quilt is a great resource for getting those edges just right.

Alright, you've prepped your quilt and picked the perfect spot on your wall. Now for the fun part: deciding how to actually hang your masterpiece. There’s no single "best" way to do this. The right choice really comes down to your quilt's size and weight, your personal style, and whether you're up for a little bit of sewing.
Each technique has its own strengths, from museum-quality preservation that protects your work for decades to quick, modern displays you can get up in minutes. Let's walk through the most popular options so you can find the perfect match for turning your quilt into a stunning focal point.
If you ask any professional quilter or museum curator, they'll likely point you to this method. It's the gold standard for a reason. By sewing a simple fabric sleeve to the back of your quilt and sliding a rod through it, you get the most even weight distribution possible. This is absolutely critical for heavy or antique quilts, as it eliminates sagging and puts almost zero stress on the fabric itself.
Think about it: this is how museums and galleries display priceless textiles. It's a time-tested technique that ensures your quilt is protected for the long haul.
Looking for a more modern, minimalist vibe? Wooden quilt hangers are a fantastic choice. These are typically made of two pieces of wood that clamp onto the top edge of your quilt, holding it firmly with strong magnets or discreet screws. The result is a clean, floating effect that looks amazing in contemporary homes.
The biggest win here is that it's a completely no-sew solution. You can have your quilt on the wall in minutes without threading a single needle. They work especially well for smaller wall hangings where a traditional rod might look too bulky. For more ideas, check out this ultimate guide to hanging rails for walls, which covers a variety of similar display options.
My Two Cents: When using a clamp-style hanger, make sure it grips the quilt evenly all the way across. For heavier quilts, look for hangers with extra-strong magnets or a more robust clamping mechanism to prevent any slippage over time.
Another great no-sew option involves using specialty clips. These clips are designed to gently but firmly grip the quilt's edge. You can hang them from a curtain rod, a decorative dowel, or even a taut wire for an industrial look. This method gives you a lot of flexibility in terms of style and placement.
The trick is to use enough clips to spread out the weight. I’ve found that placing clips every 6-10 inches is a good rule of thumb. This prevents creating stress points that can distort or pull on the fabric. For tiny quilts or mini-hangings, a decorative holder like a tabletop tri-stand hanger offers a similar look on a much smaller scale.
What if you're renting or just can't bear the thought of putting holes in your walls? Don't worry, you still have some great options. My go-to for this scenario is a combination of strong, removable adhesive hooks (like Command Strips) and a lightweight dowel.
Here’s how I do it:
This setup is perfect for lightweight quilts, temporary displays, or if you like to switch out your decor with the seasons. Just be sure to read the weight limits on the adhesive hook packaging carefully!
To help you decide at a glance, here’s a quick comparison of the top hanging techniques. Use this to find the best fit for your specific project.
| Hanging Method | Best For | Skill Level | Potential for Damage |
|---|---|---|---|
| Sleeve and Rod | Heavy, antique, or large quilts; a professional, flat finish. | Basic Sewing | Low (stitches can be removed, but requires altering the quilt back). |
| Wooden Hanger | Modern decor; small to medium quilts; no-sew convenience. | Beginner | Very Low (clamps onto the edge without piercing the fabric). |
| Clip System | Versatile styling; adjustable displays; no-sew option. | Beginner | Low to Medium (improper spacing can cause fabric distortion over time). |
| Adhesive Hooks | Renters; temporary displays; lightweight quilts; no wall damage. | Beginner | Very Low (risk is to the wall paint if removed improperly, not the quilt). |
Ultimately, the best method is the one that feels right for both your quilt and your home. Each of these options will get your beautiful work off the floor and onto the wall where it belongs.
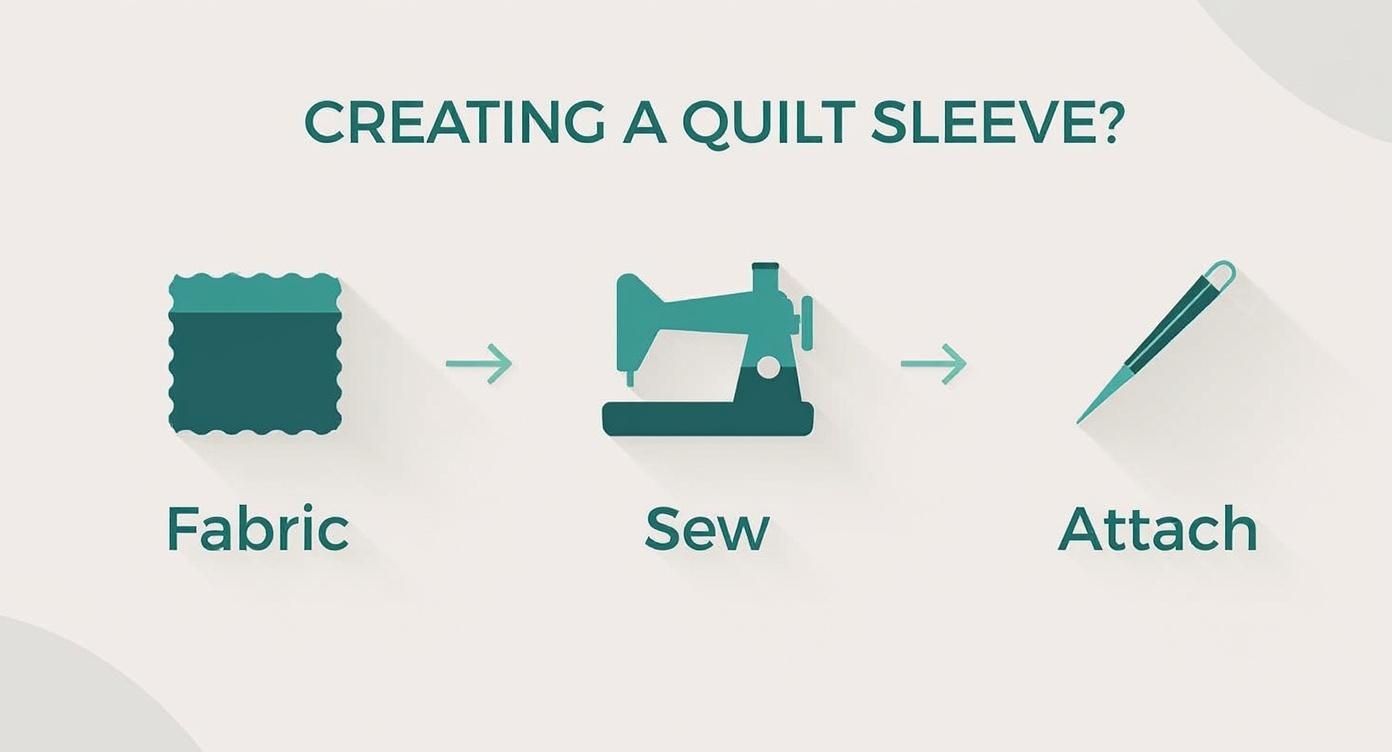
For a truly professional, museum-quality display, nothing beats a classic quilt sleeve. This is the method galleries and serious collectors swear by, and for good reason—it distributes the quilt's weight perfectly across its entire width. It's the secret to getting that flawlessly flat hang that prevents sagging and protects your textile art for the long haul.
Don't let the sewing part intimidate you. Even if you're not a master seamstress, creating a quilt sleeve is surprisingly straightforward. The whole idea is to simply attach a fabric tube to the back of your quilt, creating a clean channel for a rod or dowel to slide through. This simple addition eliminates the stress points that clips or clamps can create over time.
First things first, let's talk fabric. I always reach for a simple, sturdy 100% cotton muslin. It’s strong, it breathes, and it won't react with the beautiful dyes in your quilt top. A crucial tip: always pre-wash your sleeve fabric! This prevents any future shrinkage that could cause frustrating puckering on the back of your finished quilt.
Figuring out the size is easy. Just follow this simple guide:
With your fabric cut, press the long edges under by about a quarter-inch. Then, fold the entire strip in half lengthwise and give it another good press. This creates a neat, finished tube that’s ready for sewing. A quick zip down the long, raw edge with your sewing machine is all it takes to complete the sleeve.
The decision to hang quilts as artistic statements has deep roots. For example, the Baltimore Album style, popular in the 1840s, featured elaborate appliquéd blocks that were meant for public display, acting as beautiful community records. Learn more about the history of displaying quilts from this National Park Service overview.
Now for the main event: attaching the sleeve to your quilt. Lay it out about a half-inch down from the top binding on the back, making sure it's perfectly centered. This next part is where your careful attention really pays off.
You'll want to hand-stitch the sleeve in place using a blind stitch or a whipstitch. The absolute key here is to catch only the backing fabric and the batting with your needle. You never want your stitches to go all the way through to the quilt top. This is how you keep the stitching invisible from the front and avoid any weird dimpling.
If you’re ever worried about the hold on a smaller project, a dot of high-quality fabric adhesive like E6000 Fabri-Fuse can add some extra security, but for a proper sleeve, stitching is always the best way to go. Just take your time and use small, consistent stitches spaced about a half-inch apart for strong, discreet support.
With your sleeve securely attached, all that's left is to choose a dowel or rod. It needs to be strong enough to support your quilt's weight without bowing in the middle.
For smaller, lightweight quilts, a simple wooden dowel from the hardware store works beautifully. If you're hanging a larger, heavier piece, I'd recommend upgrading to a sturdy curtain rod or even a metal conduit for extra peace of mind.
Cut the rod so it’s just a bit shorter than the quilt's width—this allows it to sit invisibly inside the sleeve. When you mount your brackets on the wall, try to hit the wall studs for maximum security. A quick check with a level ensures everything is perfectly straight before you slide the rod into the sleeve and finally place your quilt on the wall.
Getting your quilt hung on the wall is a great feeling, but your job isn't quite over. Once it's up, your textile art is exposed to a whole new set of challenges—dust, sunlight, and humidity are all part of its environment now. A little proactive care goes a long way in keeping your masterpiece looking just as vibrant as the day you finished it.
Preserving your quilt is an ongoing process, not a one-and-done task. The most common foe you'll face is dust, which loves to settle deep into fabric fibers. A gentle but regular cleaning routine is your best defense. My go-to method is using a vacuum cleaner with the soft brush attachment.
Here's the trick: cover the nozzle with a small piece of clean nylon screen (like from a window screen) and hold it in place with a rubber band. This simple hack lets you pull up the dust without the powerful suction yanking on your quilt's delicate threads and stitches. It's a lifesaver.
After dust, sunlight is the biggest threat to your fabric. It's the number one cause of fading, and it's irreversible. Even indirect UV rays filtering through a window can bleach the colors over time.
If your quilt is hanging in a sunny room, try rotating its position every so often to a different wall to even out the light exposure. You can also look into special window films that block UV rays. For another layer of defense, you might want to learn more about a UV protectant spray for fabric.
Humidity is another silent enemy. Too much moisture in the air can lead to mildew and cause the fibers to weaken, which is especially dangerous for antique or fragile pieces. The best prevention is good air circulation. Just be sure to avoid hanging your prized quilts in humid spots like bathrooms, basements, or laundry rooms.
Every year or so, give your quilt a break. I like to take mine down and let it lie completely flat in a dark room with stable temperatures for a couple of weeks. This allows the fibers to relax from the constant, gentle pull of gravity.
This infographic shows you the simple steps for making a quilt sleeve. In my experience, a sleeve is one of the absolute best ways to hang a quilt because it distributes the weight evenly and prevents the stress that causes damage.
Starting with a proper hanging method like a sleeve is really the first step in long-term preservation. You're setting your quilt up for success from day one.
It’s also important to know when to step back. If you're caring for an antique, a precious heirloom, or a particularly delicate quilt, sometimes the best approach is to do less, not more. Stick to the most gentle cleaning methods and handle it as little as possible.
If you spot any real signs of trouble—like seams that are starting to fray, brittle spots, or disintegrating fabric—it’s time to call in an expert. A professional textile conservator has the specialized knowledge to preserve these irreplaceable pieces for generations to come.
Even with a solid plan, you're bound to run into a few questions when hanging your quilts for the first time. I've been there! Over the years, I’ve fielded a ton of queries from fellow quilters, so I’ve pulled together the most common ones right here.
My goal is to give you clear, straightforward advice so you can display your beautiful work with total confidence. Let's get these questions sorted out.
When you’re dealing with a really heavy quilt, the sleeve and rod method is, without a doubt, your best bet. It’s specifically designed to spread all that weight evenly across the entire top edge of the quilt. This prevents any single point from taking on too much stress, which is what causes sagging and damage.
The real secret to protecting your walls, though, is in how you anchor the hardware. You absolutely want to screw your mounting brackets directly into the wall studs whenever possible. If the studs just aren’t in the right spot for your display, you’ll need to use heavy-duty drywall anchors. Make sure they are rated to hold significantly more weight than your quilt. And don't forget to choose a strong, rigid rod that won't bow under the pressure.
A Little Trick I've Learned: For extra support on those massive quilts, make your sleeve a bit wider than usual—think five or even six inches. This gives you more surface area to distribute the load, taking the strain off both the quilt's fabric and your wall.
If you'd rather not put a needle and thread anywhere near your finished quilt, you have some great no-sew options.
My personal favorite for a clean, modern look is a set of wooden quilt hangers. These are essentially clamps that hold the top edge of your quilt between two pieces of wood. They provide fantastic, even support and look really polished.
Another excellent choice is to use special quilt clips on a decorative curtain rod. For a completely wall-friendly approach, you can even use strong Command hooks to hold up a lightweight dowel. Then, just use small clips to attach the quilt to the dowel. It's a perfect solution if you're renting or just don't want to make holes in the wall.
Of course! But you have to approach it with a much more delicate touch. With an heirloom or fragile quilt, you need to avoid any method that puts stress on specific points. Individual clips are a definite no-go here, as they can pull on, distort, and eventually tear old, delicate fibers.
The method museums trust—the gold standard—is to mount the quilt onto a board that has been covered with acid-free fabric. The quilt is then carefully hand-stitched onto this backing material in several places, giving it complete support from top to bottom. If that feels a bit too intensive, a wide, properly attached fabric sleeve is the next safest choice. Remember to handle these precious textiles as little as possible, and always with clean, dry hands.
Ready to find the perfect tools and fabrics for your next project? High Country Quilts offers an incredible selection of quilting supplies, from vibrant fabrics to essential notions and BERNINA sewing machines. Visit us online to explore our collection and get inspired!
At High Country Quilts we care deeply about community. With our experiences in retail, we know that a store is not only a place to shop but also a place for the community to gather and share. During this busy...

Hi! We’re Adam and Renee Wheaton, the new owners of High Country Quilts! For more than 40 years, we’ve owned and operated vacuum and sewing businesses. Following in Renee’s father’s footsteps after he retired from All Discount Vacuum and Sewing in Colorado...


Leave a comment