

We Love Our Quilting Community
At High Country Quilts we care deeply about community. With our experiences in retail, we know that a store is not only a place to shop but also a place for the community to gather and share. During this busy...


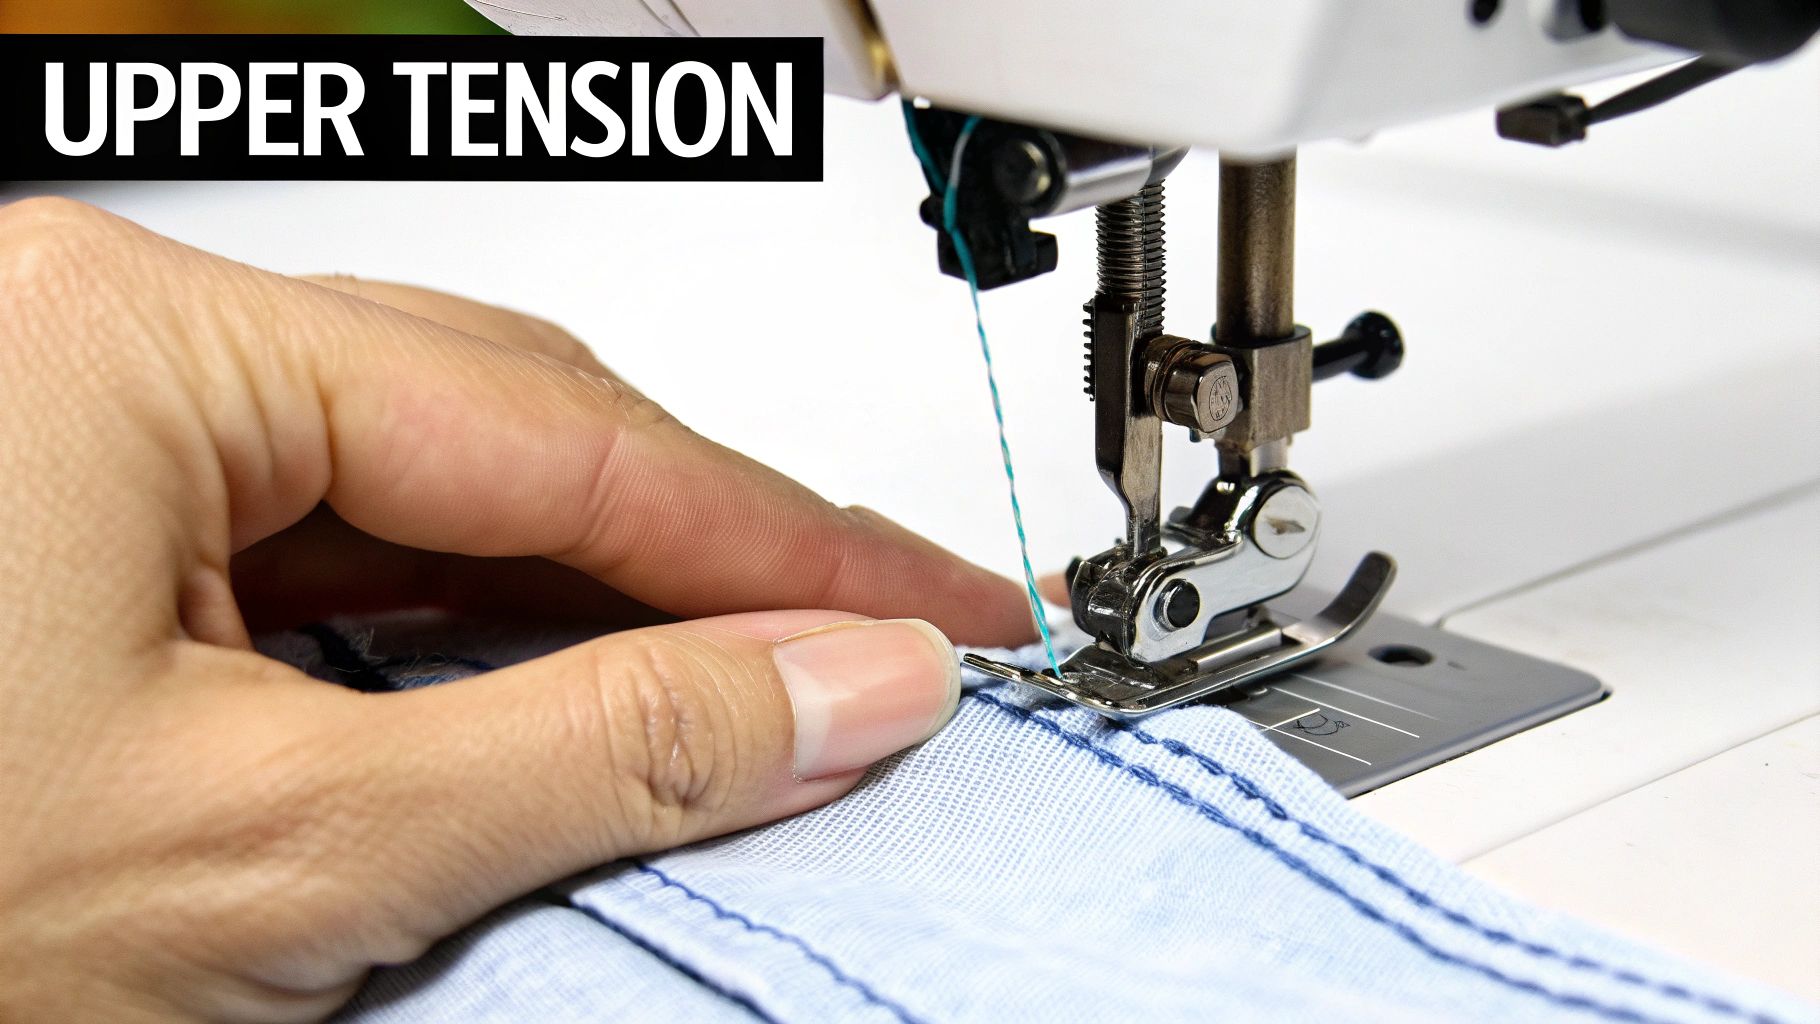
Fixing sewing machine tension feels like a dark art sometimes, but it’s really just about balancing a simple tug-of-war between the top and bobbin threads. Most of the time, a quick turn of the upper tension dial to a setting between 4 and 6 is all it takes to fix those pesky loops or puckered seams.
Before you touch a single dial, let's talk about what's actually happening. A perfect stitch happens when the top thread and bobbin thread meet right in the middle of your fabric, creating an identical, secure lock on both sides. When that balance is off, you get all the classic frustrations: loops, knots, and seams that just won't hold.
But here's a little secret from years of experience: it's not always the tension dial's fault. More often than not, the real problem is something much simpler.
Think of your upper tension dial as a clamp for your thread. Higher numbers squeeze two little discs together, creating more drag and making it harder for the thread to pull through. Lower numbers loosen that grip.
For example, if you're working with delicate silk, you might need a lower setting like a 2 or 3 to keep the fabric from puckering. But if you're topstitching heavy denim, you'll likely need to crank it up to a 5 or 6 to pull that sturdy bobbin thread up into the thick fabric.
The thread you use is a huge part of the equation, too. Using different weights of thread on top and in the bobbin is a guaranteed way to throw your tension out of whack. If you're not sure which to use, our guide on the different types of sewing thread is a great place to start.
The goal isn't just to solve a problem for today. It's about learning your machine's language. Once you understand how tension works, you stop being someone who just operates a machine and become a sewist who can feel what's wrong and fix it intuitively.
Getting this balance right is the key to strong, beautiful seams, especially on lockstitch machines—the kind most of us have at home. It's not just anecdotal; research shows that properly balanced needle and bobbin tension is crucial for seam integrity.
Most machines have an upper tension dial that goes from 0 to 10. For everyday sewing on medium-weight fabric, that sweet spot is almost always between 4 and 6. For a really deep dive into the physics, you can explore the full study on thread tensions on a lockstitch sewing machine. Learning to read your stitches and make those tiny, confident adjustments is the first real step to mastering your machine.
Before you even think about touching that tension dial, let's play detective. Just cranking the dial without knowing what's actually wrong is a fast track to a tangled mess and a lot of frustration. The best way to figure this out is to let your stitches tell you the story. A quick test swatch is all you need.
Grab a scrap of the exact fabric and thread you're using for your project. Don't cheat here—testing on a different material will give you a false reading. Sew a straight line for a few inches, and now we can get to the good part: figuring out what your machine is trying to tell you.
This visual guide is a great shortcut for identifying what's gone wrong with your stitches.
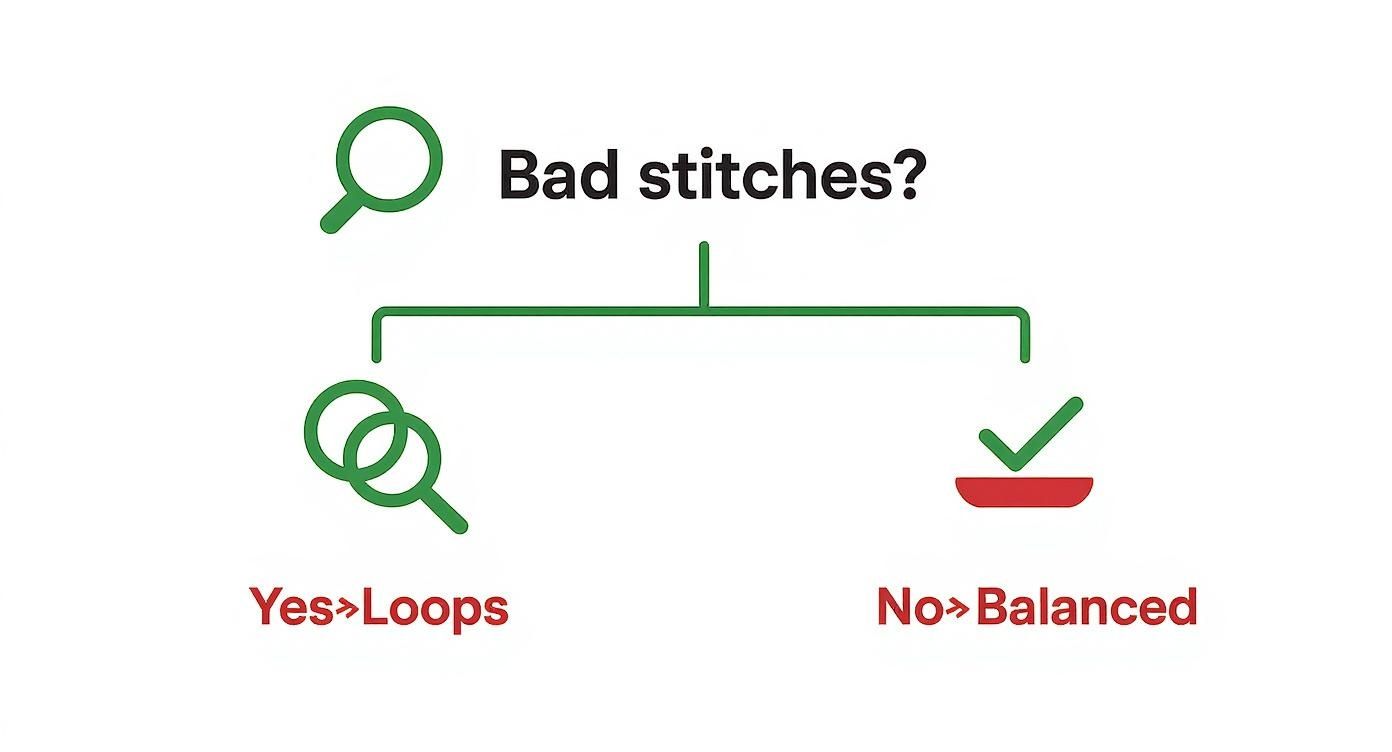
As you can see, where the loops are showing up is the biggest clue you have for solving this tension puzzle.
First, take a close look at the top of your fabric swatch. Are you seeing little dots or even loops of the bobbin thread poking through? If that bobbin thread is making an appearance on the top side, your upper tension is too tight.
It’s simple physics: the top thread is pulling way too hard, yanking the bobbin thread up through the fabric. I see this all the time when someone tries to sew through thick denim or canvas without adjusting their tension first.
Okay, flip that swatch over and see what's happening on the bottom. This is where the most common tension problems love to hide. If you're seeing messy loops of your top thread all over the underside, your upper tension is too loose.
This is often called "eyelashing," and it happens because the top thread doesn't have enough tension to pull the bobbin thread up and lock it in the middle of the fabric. But hold on! Before you touch that dial, always, always re-thread your machine first. A missed tension disc or guide is the number one cause of this problem. For a quick refresher, you can check out our guide on how to properly thread a sewing machine.
To make this even simpler, I've put together a quick diagnostic chart. Use it to match what you're seeing on your fabric to the most likely cause.
| Symptom (Where Loops Appear) | Most Likely Cause | What to Adjust First |
|---|---|---|
| Loops/knots on the bottom of the fabric | Upper tension is too loose | Increase the upper tension dial (higher number) |
| Loops/dots on the top of the fabric | Upper tension is too tight | Decrease the upper tension dial (lower number) |
| Uneven stitches, skipped stitches | Often not a tension issue | Check needle, thread path, and bobbin placement |
This little chart can save you a ton of guesswork and get you back to sewing faster.
The goal is a perfect, invisible stitch. The "knot" where the top and bobbin threads meet should be buried right in the middle of your fabric layers, completely hidden from both the top and the bottom.
Tension troubles are the bane of many sewers' existence. In fact, it's estimated that a whopping 60% of beginner sewing machine issues are related to getting the tension right. Most machines have a dial numbered 0 to 10, with 4 usually being the default sweet spot. This is a great starting point for most average fabrics and threads.
By taking a moment to diagnose the problem first, you'll know exactly which way to turn the dial—or if you even need to touch it at all.
Your upper tension dial is ground zero for fixing most stitch problems. But before you even think about touching it, I have one critical piece of advice: completely re-thread your machine. I can't tell you how many times a simple threading mistake was the real culprit behind what looked like a nasty tension issue. Get that out of the way first.
Once you’re positive the machine is threaded correctly, you can turn your attention to the dial. The golden rule here is to go slow. Make small, incremental changes. You wouldn’t crank a guitar string all at once, right? It's the same idea. Turn it just a little, then see what you’ve got.
This simple process is going to become your best friend. It takes all the guesswork out of the equation and stops you from accidentally making things worse.
Just keep repeating this little dance until your stitches are perfectly balanced, with that little knot tucked away invisibly between the fabric layers. This methodical approach is the secret to mastering your machine, much like any craft that involves adjusting a machine with precision.
Let's put this into practice with a couple of common headaches. Theory is one thing, but seeing how this works on an actual project is what really makes it click.
You’re trying to sew a delicate chiffon, but the fabric is bunching up and puckering along the seam. This is a classic sign that your top thread is pulling way too hard.
You’re topstitching some sturdy denim, but you can see little specks of the bobbin thread peeking through on the right side of your fabric. This means the top thread is winning the tug-of-war, yanking the bobbin thread right through.
Just remember the old saying: "Lefty-loosey, righty-tighty." Turning the dial to a lower number loosens the tension, while turning it to a higher number tightens it.
Once you get the hang of this turn-and-test method, you'll start to develop a real intuitive feel for how your machine behaves. It’s a skill that will save you from so much frustration and unpicking down the road. If you’ve tried these steps and are still stuck, our complete sewing machine troubleshooting guide has even more solutions to check out.
For most of us, that little screw on the bobbin case is the sewing machine equivalent of a "do not touch" sign. It's often seen as the final frontier, and for good reason—90% of tension problems live with the upper thread, not the bobbin. But sometimes, especially when you venture into things like free-motion quilting or specialty bobbin work, you have no choice but to venture there.
Adjusting your bobbin tension really isn't as intimidating as it sounds. The trick is knowing when it's actually necessary and how to make tiny, controlled changes. Before you even think about reaching for a screwdriver, make sure you've covered all the usual suspects: re-thread the machine completely, give it a good cleaning, and pop in a fresh needle. If you've cranked your upper tension dial to its highest or lowest setting and the stitches still aren't balanced, then it’s officially time to look at the bobbin.

Before you change anything, you need a baseline. The classic "drop test" is a fantastic way to check the current state of tension on a removable bobbin case.
So, what should happen? Ideally, the case will drop just an inch or two with each little bounce. If it dives straight to the floor, the tension is way too loose. If it doesn't budge an inch, it's far too tight.
A word of caution from experience: Don't jump to adjusting the bobbin for everyday sewing issues. Think of it as a factory setting that’s best left alone unless you have a specific, advanced reason to change it. Always, always, always check your upper tension first.
Here’s a great pro tip: If you find yourself needing to switch between different thread weights often, consider buying a second bobbin case. Having a dedicated bobbin case for a Singer (or whatever your machine model is) lets you keep one at its original setting and use the other for all your experimental adjustments. No more guessing if you got it back to "normal."
Okay, the drop test confirmed a problem, or maybe you're using a thick specialty thread that demands a change. It's time. Find that tiny flat-head screw on the side of the bobbin case.
The rule is simple: "righty-tighty, lefty-loosey."
The absolute key here is to make incredibly small turns. I mean tiny. Imagine the screw is a clock face, and only turn it about five to ten minutes at a time. A minuscule adjustment can make a surprisingly big difference in your stitch quality.
The relationship between the top and bobbin tension is a delicate dance. Research on stitch quality highlights just how sensitive it is; even a 10% increase in bobbin tension can cause noticeable issues if the needle tension isn't adjusted to match. By working through problems systematically—upper tension first, then these tiny bobbin tweaks—you can cut down on stitch errors by 35% to 50% compared to just guessing. It pays to be methodical
https://www.youtube.com/embed/VBmlXhnLzCQ
So, you've fiddled with the upper tension dial and even braved the tiny screw on your bobbin case, but your stitches are still a mess. It’s a frustrating place to be, but don't give up. More often than not, what looks like a classic tension problem has absolutely nothing to do with the tension settings themselves.
Before you start thinking your machine needs a trip to the repair shop, let’s run through a few basic checks. These are the simple, often-overlooked things that can throw your stitches completely out of whack. I like to think of them as the foundation of a perfect stitch—if one of these is off, nothing else you do will matter.
First things first: when was the last time you cleaned your machine? Lint, dust, and tiny thread scraps are the mortal enemies of a smooth-running machine. They build up in hidden nooks and crannies and can wreak havoc on your stitch quality.
Honestly, a clean machine is a happy machine. A quick five-minute cleaning session makes a world of difference and solves a surprising number of "tension" problems.
That tiny needle does an incredible amount of work, and it's easily one of the most common culprits behind stitch issues. If your needle is even slightly bent, dull, or just the wrong type for your fabric, it can cause all sorts of chaos.
A bent needle won't form the stitch loop correctly. A dull one will snag your fabric and shred the thread. Using the wrong size can lead to skipped stitches. All of these problems look suspiciously like bad tension, but they aren't.
Make it a habit to start every new project with a fresh needle. It's a tiny investment that can save you hours of headaches. If you're ever unsure which needle is right for your project, our guide can help you know your needles. A simple needle change is often the fastest fix in the book.
Let's be real: not all thread is created equal. Old, brittle, or cheap, fuzzy thread is a major offender when it comes to stitch problems. If your thread snaps when you give it a gentle tug or just looks fluffy, it’s probably the source of your frustration.
This is especially true for that beautiful vintage thread you might have inherited. It looks lovely on the spool, but it’s often too weak for the speed of modern machines and will break constantly, making you think your tension is way too tight.
Tension-related headaches have been a challenge for as long as people have been sewing. In fact, they made up nearly 25% of all service calls back in the late 1990s and early 2000s. Even though many modern machines have automatic tension, knowing these fundamental troubleshooting steps is still a vital skill. By methodically checking your machine’s cleanliness, your needle, and your thread, you can solve most stitch problems without ever touching a single dial.
Even when you feel like you've got a handle on tension, there are always a few tricky situations that pop up. I get these questions all the time, so let's walk through some of the most common ones that can leave even experienced sewers scratching their heads.
This is your go-to spot for those "what on earth is happening now?" moments.
This is maddening, isn't it? You’re cruising along, the stitches are beautiful, and then bam—loops. Out of nowhere. Nine times out of ten, something has disrupted the thread's journey.
It could be a tiny bit of lint that finally broke free and wedged itself in your tension discs. Sometimes the thread itself snags for just a second on a nick in the spool. Even a slightly bent needle can be the culprit, as its entry angle changes just enough to throw things off.
Most machines will have a number like 4 or 5 marked as the default or "normal" tension. But here’s the thing: that's just a suggestion. It's a starting point calibrated for a very specific scenario—usually, an all-purpose thread on a medium-weight cotton.
Think of it as a baseline, not a rule. The best habit you can ever develop is to sew a quick test seam on a scrap of your actual project fabric. That five-minute check can honestly save you hours of ripping out stitches later.
There is no single magic number for tension. The "right" setting is whatever creates a perfect, balanced stitch on the specific fabric, thread, and needle combination you're using for this project.
Oh, absolutely. If you take away only one thing, let it be this. The weight and weave of your fabric have a huge impact on how the threads lock together, so your tension needs to adjust accordingly.
It's a constant balancing act. For instance:
I've seen it time and again in workshops and tutorials: changing the tension by just one or two numbers can make a night-and-day difference. In one really clear video guide on tension adjustments, the instructor took a stitch from a loopy mess at a tension of 2 to a perfect lock at 5. That simple tweak improved the stitch quality and strength, boosting sewing efficiency by over 40%. It’s proof that tiny changes yield huge results.
Here at High Country Quilts, we know that truly understanding your machine is what sets your creativity free. Whether you're wrestling with a stubborn seam or searching for that perfect fabric, our team is always here to help you. Come see us in the shop or browse our collection online at https://hcquilts.com.
At High Country Quilts we care deeply about community. With our experiences in retail, we know that a store is not only a place to shop but also a place for the community to gather and share. During this busy...

Hi! We’re Adam and Renee Wheaton, the new owners of High Country Quilts! For more than 40 years, we’ve owned and operated vacuum and sewing businesses. Following in Renee’s father’s footsteps after he retired from All Discount Vacuum and Sewing in Colorado...


Leave a comment