

We Love Our Quilting Community
At High Country Quilts we care deeply about community. With our experiences in retail, we know that a store is not only a place to shop but also a place for the community to gather and share. During this busy...


To get the hang of pressing seams, the first thing to remember is it’s a specific up-and-down motion with a hot iron—not a back-and-forth glide. This is the core technique that sets your stitches and stops the fabric from stretching out of shape. Mastering this is the secret to getting those crisp, professional results we all want in our sewing and quilting projects.
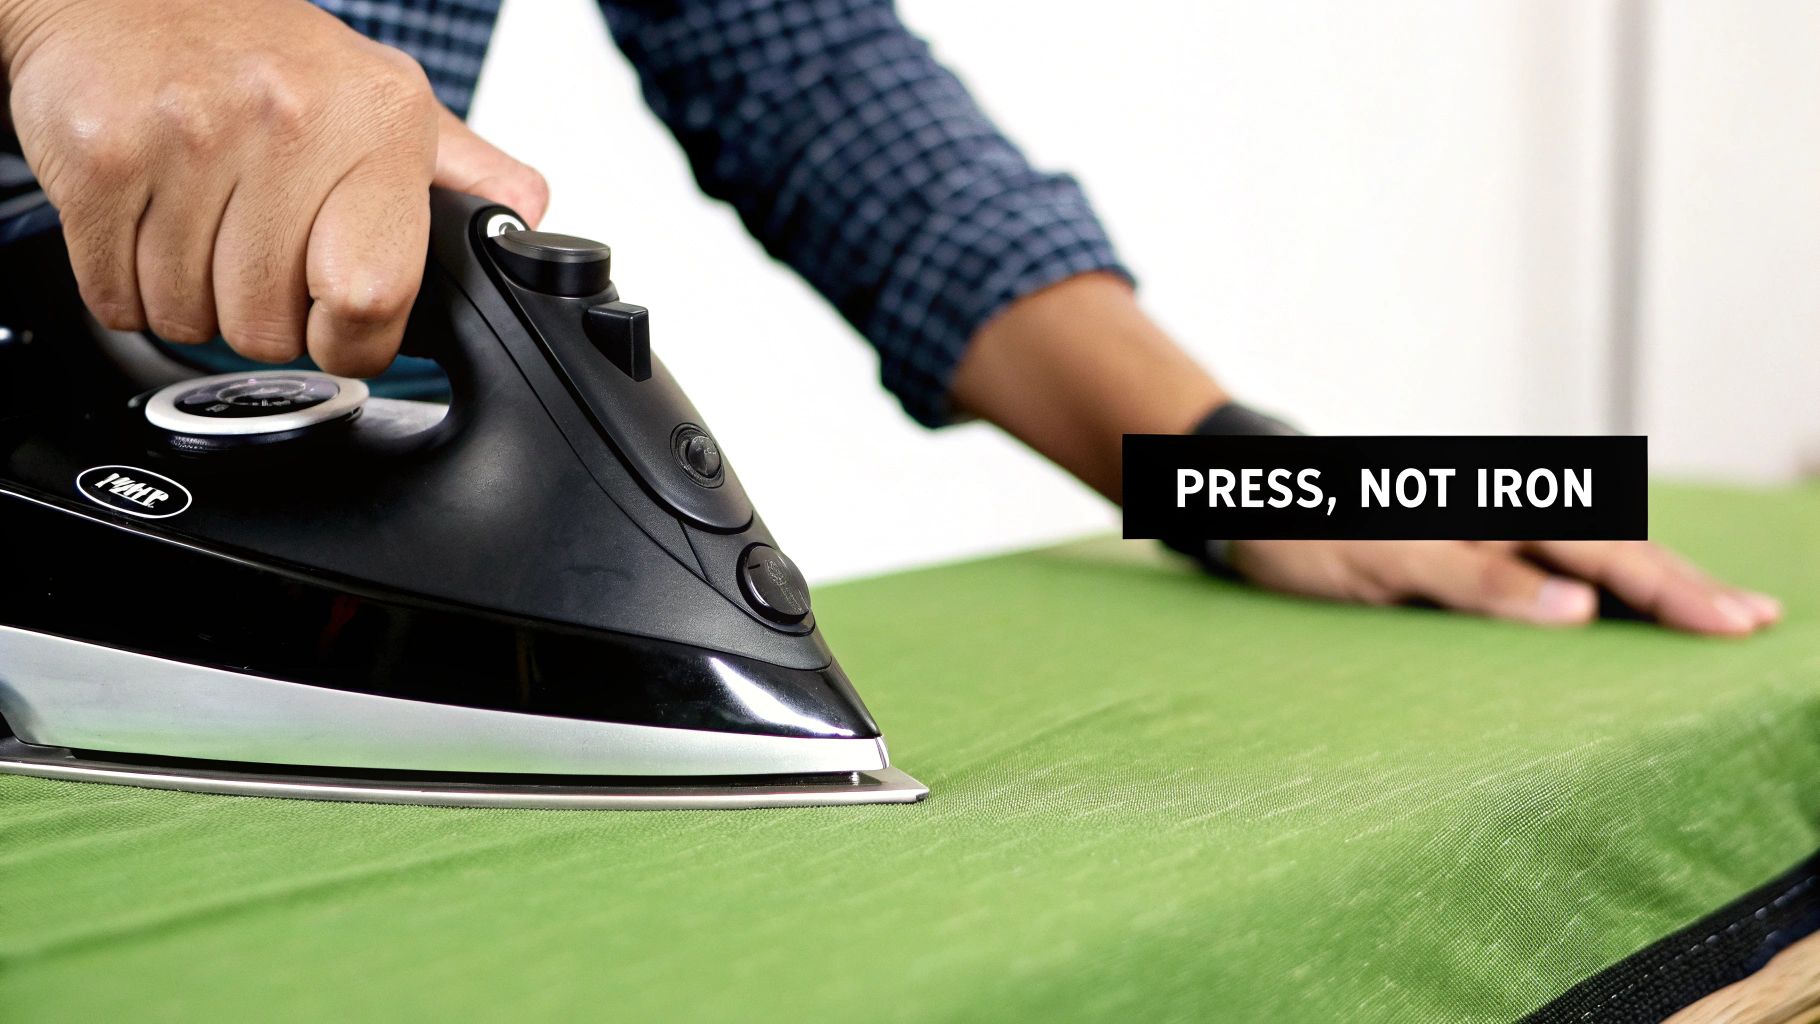
So many of us use the words "pressing" and "ironing" interchangeably, but in the sewing room, they are two completely different things with very different results.
Ironing is what you do to a wrinkled shirt—gliding the iron back and forth to smooth it out. But that same motion can easily stretch and warp your carefully cut fabric pieces, throwing your whole project out of whack. Pressing, on the other hand, is a precise, targeted up-and-down movement. You're applying heat and pressure to meld the thread right into the fabric fibers.
This small difference is what lies behind perfectly sharp points, quilt blocks that lie beautifully flat, and garments that hang just right. For anyone new to the craft, getting this down early makes a huge difference in accuracy. Our guide on how to quilt for beginners dives deeper into how these foundational skills all stack up to create amazing results.
To quickly see the difference, here's a simple breakdown of how these two actions compare when you're working on a project.
| Action | Motion | Purpose in Sewing | Outcome |
|---|---|---|---|
| Pressing | Up-and-down, stationary pressure | To set stitches and flatten seam allowances | Crisp, flat seams with no fabric distortion |
| Ironing | Back-and-forth, gliding motion | To remove wrinkles from a large piece of fabric | Can stretch, warp, and distort seams |
Thinking about it this way makes it clear why we press during construction and iron before we even start cutting.
Think of pressing as the structural engineering of your quilt or garment. When you press properly, you ensure every seam allowance lies perfectly flat. This cuts down on bulk and makes it so much easier to line up your next pieces.
This isn't just about making things look pretty; it directly impacts how long your creation will last. Good seam pressing can actually extend a garment's lifespan by 20-25% because it prevents the fabric distortion that leads to weak spots and premature wear. You can read more about industry trends and innovations over at Data Bridge Market Research.
Without a good press, even the most accurate cutting and sewing can result in a wonky, unprofessional finish. It’s the step that turns homemade pieces into handmade treasures.
Ultimately, taking a few extra moments to press correctly at each step makes the entire sewing process flow better. It really is the difference between fighting with your fabric and having it work beautifully with you.
If you want a truly professional finish, you can't just wing it with your pressing. Having the right tools on hand is what separates a frustrating struggle from a smooth, satisfying process.
It all starts with your iron. Sure, any iron gets hot, but for sewing and quilting, a quality steam iron is non-negotiable. You need one that gives you control—adjustable temperature and steam settings are key. This way, you can confidently press everything from tough cotton to whisper-thin silks without worrying about scorching your fabric.
Just as critical is what you press on. That wobbly ironing board you use for your shirts probably won't cut it. It just doesn't provide the firm, stable surface you need for precision work. A dedicated pressing mat makes a huge difference. Wool mats, in particular, are fantastic because they absorb heat and essentially press the fabric from both sides at once. The result? Insanely flat seams.
Once you have a solid iron and surface, a few extra tools can really elevate your game. These aren't just gadgets for experts; they solve real, everyday pressing problems and make the whole process faster and more effective.
Honestly, the single best upgrade you can make for your sewing room is a fantastic iron. A reliable model with consistent heat and powerful steam eliminates so much of the guesswork.
While you can get by without some of the fancier tools, a high-quality iron is one investment you won't regret. We've put together a full guide with our top picks, and you can find our recommendations for the best iron for quilters to see what might work for you. Building out your toolkit is all about finding the items that help you get that polished, professional look we all strive for in our projects.
Okay, you've got your iron hot and your tools at the ready. Now for the fun part! Knowing how to press is one thing, but knowing which technique to use—and when—is what really elevates your work from homemade to handmade. The three foundational methods are pressing open, pressing to one side, and the quick-and-dirty finger press. Each one has its place in your quilting toolbox.
This handy visual breaks down the three basic ways to handle your seams.
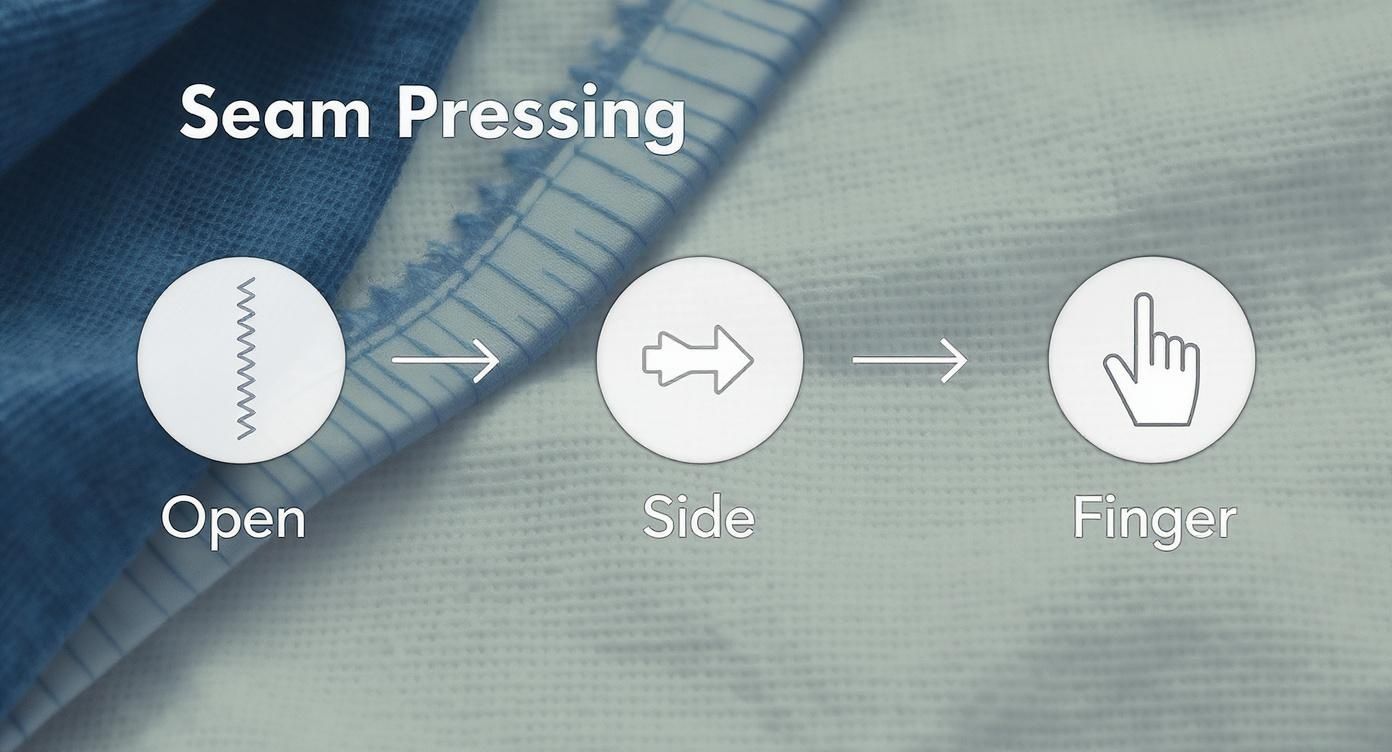
As you can see, you can either open the seam to lie perfectly flat, push it to one side for nesting, or just use your finger for a quick, temporary crease.
Pressing your seams open is your best friend when you’re fighting bulk. After stitching, you’ll just open up the two flaps of the seam allowance and press right down the middle, making everything lie as flat as possible.
This is a fantastic choice for garment sewing and a real lifesaver in quilting when you have a lot of points meeting in one spot. Think of an eight-pointed star—pressing those seams open will prevent a big, lumpy bump right in the center.
Now, pressing to one side is the absolute workhorse of the quilting world. Instead of splitting the seam allowance, you simply press both layers together in the same direction. Easy.
The magic here is that it allows you to nest seams. When you're joining two quilt blocks, you press their seam allowances in opposite directions. As you line them up to sew, the seams will literally lock into each other, giving you perfectly matched points and corners almost every time. A tried-and-true tip is to always press toward the darker fabric to keep it from shadowing through your lighter pieces.
My Go-To Tip: Always "set the seam" first before pressing it to the side. Just press the seam flat as it was sewn before you even open the fabric pieces. This little step helps the thread sink into the fabric fibers, giving you a much stronger and crisper seam line.
Sometimes you don't need the full heat-and-steam treatment just yet. A finger press is exactly what it sounds like—using the warmth and pressure from your thumb or finger to create a temporary crease.
I find this super helpful when working with tiny pieces or when I just need to check if my block is going to come out the right size before I commit with the iron. It’s also a gentler approach for delicate fabrics that might scorch or warp under direct heat. It won't hold forever, but it's the perfect little prep step.
Of course, all these methods depend heavily on your seam allowance, and you can get a great refresher on that topic by reading our guide on what is seam allowance in sewing. And for those of you who also use a heat press in your craft room, understanding heat press temperatures is crucial for getting great results without damaging your beautiful fabrics.

It’s one thing to press a straight seam on a piece of quilting cotton, but what happens when you’re dealing with something less cooperative? Eventually, every sewist runs into fabrics that are bulky, slippery, or seams that curve in ways that seem to defy a flat iron.
Take heavy fabrics like denim, canvas, or corduroy. Their seams are so thick they can feel like a speed bump under your iron. Simply blasting them with high heat won't get them to lie flat. The secret is to reduce that bulk before you press by grading the seam allowances. This just means trimming one layer of the seam allowance a little shorter than the other. After grading, a good shot of steam followed by a tailor's clapper will work wonders to set a sharp, flat press.
Delicate fabrics are a whole different ballgame. Materials like silk, rayon, or satin can scorch or get a strange, permanent shine in an instant if your iron is too hot or you press too hard.
Always use a press cloth. It’s a non-negotiable for me when working with delicates. This simple piece of fabric acts as a protective shield, diffusing the iron's heat and preventing damage while still letting you set the seam.
Then you have curves—the bane of many a sewist. Armholes, princess seams, and collars are meant to be three-dimensional, and pressing them flat completely ruins their shape. This is where a tailor's ham becomes your most valuable tool. Draping the curved seam over this firm, rounded cushion lets you press the fabric into its intended shape, preserving the garment's fit and drape. It’s like having a miniature dress form right on your ironing board.
It's also worth noting that stretchy fabrics need their own special approach. For a deep dive on that, check out our guide on how to sew stretch fabrics.
No matter how challenging the fabric or seam might seem, there's always a tool or a technique to get a professional finish. It just takes a little know-how.
We've all been there. You're in the zone, piecing everything together, and then you notice a stray tuck or a piece that's stretched completely out of shape. Even with the best intentions, a few common slip-ups during pressing can cause some real headaches. The good news is that once you learn to spot them, they're usually easy to fix.
One of the biggest culprits is using a classic ironing motion—gliding the iron back and forth. That sideways drag is notorious for pulling on the fabric's threads, especially on the bias, which can lead to frustrating distortion. The fix is a simple habit change: lift the iron completely off the fabric before moving it to the next spot. Press, lift, move, repeat. It makes a world of difference.
A shiny, scorched look on your fabric is a classic sign of over-pressing. This happens a lot with dark cottons or synthetic blends. The best way to prevent this is to use a press cloth as a buffer. Always start with a lower temperature setting on your iron and only turn it up if you absolutely need to.
Sometimes, you’ll run into a seam that just won't lie flat, no matter what you do. Before you get frustrated, take a breath and try a few tricks from my playbook.
A rebellious seam can be caused by anything from thread tension to the fabric's weight. But you can usually coax it into submission with the right approach.
Learning to troubleshoot these little issues on the fly is what separates good results from great ones. The same techniques that help you get perfect seams are critical when you're finishing the edges of your project. You can see just how important a good press is in our guide on how to bind a quilt, where it makes all the difference.
Pressing problems are a part of sewing, but they don't have to ruin your project. Here’s a quick guide to identifying and solving some of the most common issues you might encounter.
| Problem | Likely Cause | Solution |
|---|---|---|
| Stretched or Wavy Seams | Ironing motion (gliding) instead of pressing, especially on bias-cut edges. | Use an up-and-down pressing motion. Lift the iron completely between sections. |
| Puckered Seam Lines | Thread tension was too tight during sewing, or the seam wasn't "set" before pressing. | First, try re-pressing and setting the seam. If it's still puckered, you may need to re-stitch with a looser tension. |
| Fabric Has a "Shiny" Look | Iron temperature is too high for the fabric type; direct contact between the iron and fabric. | Lower the iron's heat setting. Always use a press cloth, especially on darks and synthetics. |
| Seam Won't Lie Flat | Stubborn fabric, thick thread, or a complex seam intersection. | Set the seam first, use a burst of steam, and follow up with a tailor's clapper to lock it in place. |
| Tiny Tucks Next to Seam | Fabric was folded or bunched under the seam allowance while pressing open. | Gently mist the area with water, then carefully re-press, making sure the fabric on both sides of the seam is perfectly smooth. |
By keeping these solutions in mind, you can handle most pressing challenges and keep your projects looking clean and professional from start to finish.
Even after years behind a sewing machine, we all run into questions about getting that perfect press. Let's tackle some of the most common ones I hear—the little details that really elevate a finished project.
This is a classic debate, and the honest answer is: it depends entirely on your fabric.
For quilting cottons and sturdy linens, steam is your best friend. It penetrates the fibers, helping them relax so you can press them into submission for a wonderfully crisp, flat seam.
On the other hand, you'll want to stick with a dry iron for more delicate fabrics like silk or certain synthetics. Steam can be too aggressive, potentially leaving water spots or even altering the fabric's texture for good.
My golden rule: Always test on a scrap piece first. It takes two seconds and can save you from a costly mistake.
Ah, the clapper! This simple block of wood is one of sewing's best-kept secrets. After you give a seam a good shot of steam, you immediately press the clapper down on it. The wood absorbs all that heat and moisture, and its weight holds the seam perfectly flat while it cools and sets.
Is it absolutely essential? For basic projects, maybe not. But if you're working with wool for tailoring or want impossibly flat quilt block seams, a clapper is a complete game-changer. The difference is something you can truly see and feel.
This is a strategic choice, and knowing when to do which will make your construction process so much smoother.
Pressing seams open is all about reducing bulk. It's the standard for most garment sewing, especially on places like the side seams of a pair of pants. It’s also fantastic for quilt blocks where you have a lot of points coming together in one spot.
Pressing seams to one side is the default for most quilters. Why? It allows you to "nest" your seams. When you join two blocks, the opposing seam allowances will lock snugly into each other, making it incredibly easy to align your points and corners with precision.
At High Country Quilts we care deeply about community. With our experiences in retail, we know that a store is not only a place to shop but also a place for the community to gather and share. During this busy...

Hi! We’re Adam and Renee Wheaton, the new owners of High Country Quilts! For more than 40 years, we’ve owned and operated vacuum and sewing businesses. Following in Renee’s father’s footsteps after he retired from All Discount Vacuum and Sewing in Colorado...


Leave a comment