

We Love Our Quilting Community
At High Country Quilts we care deeply about community. With our experiences in retail, we know that a store is not only a place to shop but also a place for the community to gather and share. During this busy...


Welcome to the vibrant world of quilting! That first stitch, the joy of watching colors and shapes come together, it's a uniquely rewarding experience. But where do you start? The thought of cutting countless tiny pieces and mastering complex patterns can feel intimidating for newcomers. This guide is designed to remove that fear and replace it with pure creative excitement. We've curated a list of foundational beginner quilt projects, each selected to build your confidence and teach essential skills step-by-step without overwhelming you.
This listicle serves as a practical roadmap. We'll explore everything from the simple satisfaction of a classic patchwork square quilt to the clever magic of a disappearing nine-patch block. Each project is a gateway to a lifelong passion, breaking down the process into manageable, enjoyable steps. Here at High Country Quilts, we believe everyone can create something beautiful. As you embark on your quilting journey, you might also find inspiration in exploring other creative DIY projects like sensory bottles to further spark your crafting spirit.
We'll move beyond theory and provide you with actionable instructions, pattern recommendations, and material lists for each project. Whether you're aiming to make a cozy baby quilt or a stylish quilted pillow cover, you will find the perfect starting point here. Let’s dive in and find the ideal first project to get you started.
The simple square patchwork quilt is the quintessential starting point for anyone new to quilting. As one of the most fundamental beginner quilt projects, its beauty lies in its simplicity. The project consists of same-sized fabric squares sewn together in a basic grid pattern. This straightforward design allows you to focus entirely on mastering core skills without the distraction of complex shapes or intricate piecing.

This project is your training ground for achieving a consistent quarter-inch seam allowance, sewing straight lines, and pressing seams correctly. By arranging squares in simple rows and columns, you build muscle memory and confidence that will serve you in all future quilting endeavors.
The patchwork square quilt is perfect for beginners because it minimizes complexity while maximizing learning. There's no need to interpret complicated patterns; your only tasks are cutting accurately and sewing straight. This allows you to see a beautiful result quickly, which is incredibly motivating. It's a low-stress introduction to the craft, often seen in charity quilt drives and modern quilt guilds for its timeless appeal and quick assembly.
To ensure your first patchwork quilt is a success, follow these key tips:
The strip piecing quilt is another excellent entry point into the world of quilting and one of the most efficient beginner quilt projects you can tackle. This method involves sewing long fabric strips together, pressing them, and then cutting the resulting "strip set" into smaller segments. These segments can then be rearranged to create surprisingly complex-looking designs like log cabins, rail fences, or simple bar patterns from basic straight seams.
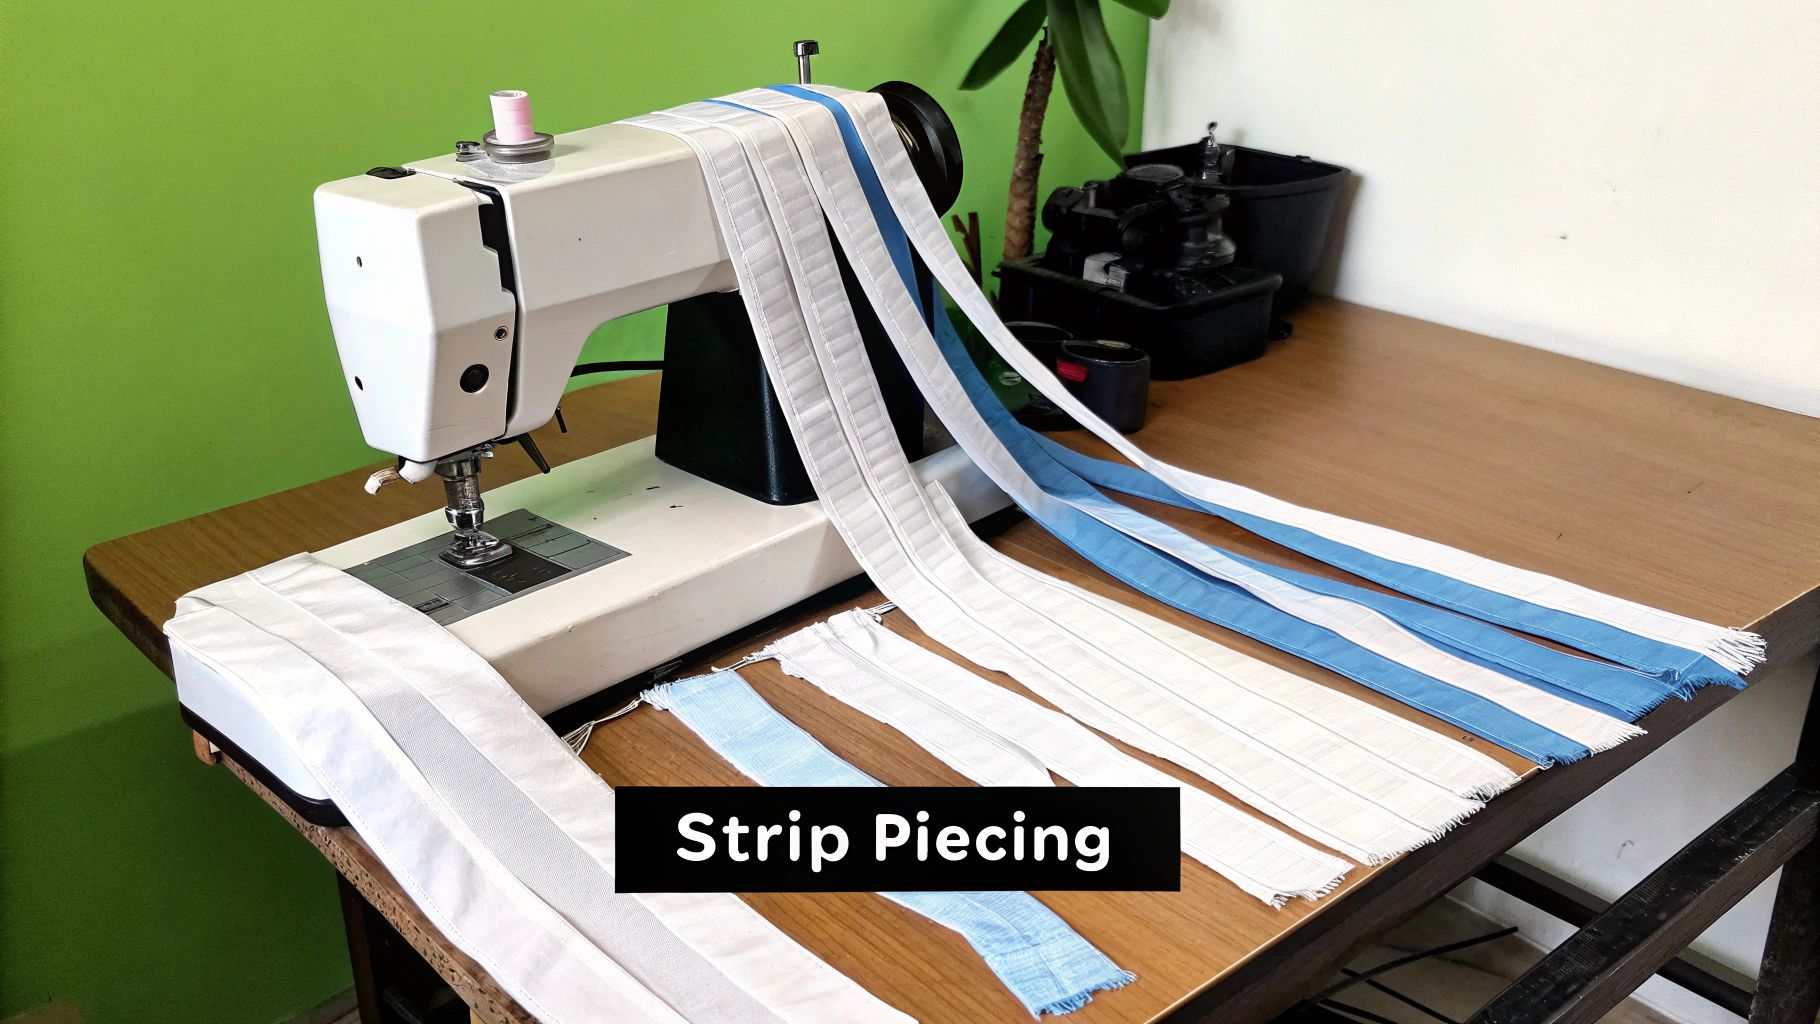
This technique is a fantastic time-saver and a great way to use pre-cut fabric bundles like Jelly Rolls. It teaches you the importance of consistent seam allowances and accurate cutting on a larger scale. By sewing long, continuous seams, you quickly build confidence and rhythm at your sewing machine, making it a satisfying and fast-paced project.
Strip piecing is ideal for beginners because it dramatically reduces the amount of individual pieces you need to cut and handle. Instead of cutting dozens of small squares, you work with a few long strips. This forgiving process allows for minor imperfections while still producing a dynamic and visually interesting quilt top. Popular "Jelly Roll Race" quilts are a testament to this method's speed and appeal, often allowing a quilter to assemble an entire top in just a few hours.
To get the best results with your first strip piecing quilt, keep these tips in mind:
The charm pack quilt is a fantastic next step for those looking to simplify the quilting process even further. A charm pack is a curated bundle of pre-cut 5-inch fabric squares, a convenient format that eliminates the most intimidating step for many beginners: cutting. These coordinated bundles from manufacturers like Moda or Robert Kaufman provide a beautiful assortment of fabrics, making them one of the most accessible beginner quilt projects available.
By using pre-cut squares, you can dive directly into sewing, focusing entirely on refining your seam allowance and piecing techniques. The uniform size of the squares makes alignment straightforward, ensuring a polished and professional-looking result with minimal frustration. This project is all about building confidence and enjoying the creative process of arranging colors and patterns.
A charm pack quilt is ideal for beginners because it removes the pressure of precise cutting, allowing you to focus on the joy of sewing. The squares are perfectly sized and coordinated, which takes the guesswork out of fabric selection and preparation. This convenience means you can complete a beautiful quilt top in a single weekend, providing a quick and satisfying sense of accomplishment that fuels your passion for the craft.
To get the most out of your charm pack project, keep these tips in mind:
The Half-Square Triangle (HST) quilt is a fantastic next step after mastering squares, introducing a dynamic diagonal element to your work. Considered one of the most versatile beginner quilt projects, it's built from square blocks made of two right-angle triangles. This simple component opens up a world of design possibilities, from classic pinwheels and chevrons to complex-looking geometric arrangements.
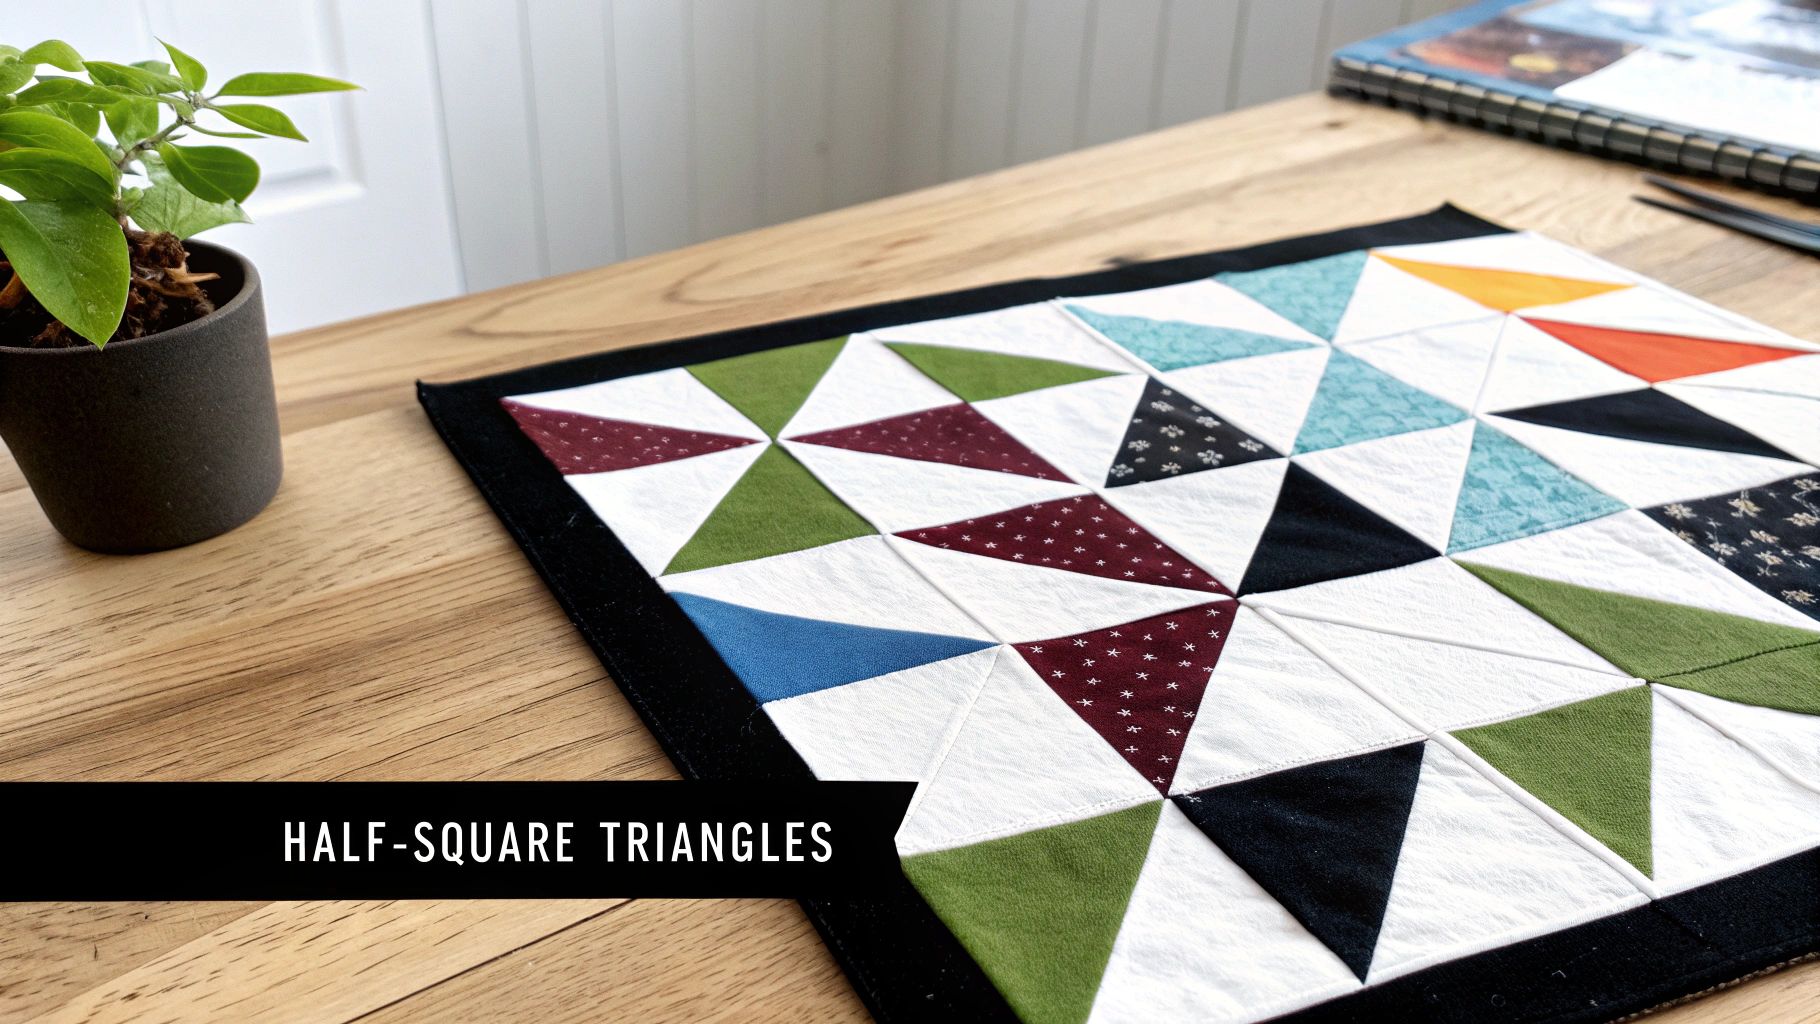
This project teaches you how to handle fabric on the bias (the diagonal grain), a crucial skill for more advanced patterns. Modern techniques make creating HSTs surprisingly simple, often starting with two squares sewn together and then cut, which minimizes stretching and ensures accuracy. The result is a visually stunning quilt that looks far more intricate than it is to assemble.
The HST quilt is the perfect introduction to creating angles and points in quilting. It bridges the gap between simple squares and more complex blocks, building your confidence with each perfectly matched point. The design possibilities are nearly endless, allowing for immense creativity with just one simple block type. It’s an empowering project that yields a professional-looking finish, encouraging you to continue exploring the craft.
To master the Half-Square Triangle and ensure a beautiful quilt, follow these tips:
The Disappearing Nine Patch quilt offers a touch of magic for those seeking impressive results with simple techniques. This project begins with a standard nine-patch block, a 3x3 grid of squares, but then transforms it into a complex-looking design through a few strategic cuts. This clever method is one of the most rewarding beginner quilt projects because it creates an intricate aesthetic without any difficult piecing.
After sewing a basic nine-patch block, you slice it both vertically and horizontally. The four resulting smaller blocks are then rearranged and rotated to create a completely new, more dynamic pattern. The original nine-patch grid "disappears," replaced by an optical illusion of interconnected shapes and lines that looks far more advanced than it is.
This quilt is perfect for beginners who want to build on their basic skills and create something visually stunning. It introduces the concept of cutting and reassembling blocks, a common technique in more advanced quilting, but does so in a manageable, low-stress way. The "wow" factor you get from such a simple process is a huge confidence booster, proving that you don't need years of experience to make a beautiful, intricate quilt.
To master the Disappearing Nine Patch technique, focus on precision and organization:
A quilted pillow cover is a fantastic small-scale project that lets you experience the entire quilting process from start to finish. This is one of the most practical beginner quilt projects because it allows you to learn piecing, quilting, and binding techniques without the commitment of a large quilt. It's a low-risk, high-reward endeavor that results in a beautiful and functional piece for your home.
This project serves as a perfect practice canvas. You can experiment with a mini patchwork design, try your hand at appliqué for the first time, or practice your machine quilting in a manageable space. The smaller size means you can complete it in an afternoon, providing a quick sense of accomplishment that fuels your quilting passion.
Quilted pillow covers are ideal for beginners because they build confidence quickly and efficiently. You'll tackle the same skills required for a full quilt, like accurate piecing and finishing, but on a much smaller scale. This minimizes potential frustration and the investment in fabric. It's an excellent way to use up leftover fabric scraps from other projects and test out color combinations before committing to a larger design.
To create a professional-looking quilted pillow cover, focus on these details:
Creating a baby quilt is a cherished and highly practical entry point into the world of quilting. As one of the most rewarding beginner quilt projects, a baby quilt offers a manageable scope, typically ranging from 36 to 42 inches square. This smaller size allows you to learn and practice all the fundamental quilting steps, from piecing to quilting and binding, without the intimidation of a bed-sized project.
The contained size means faster completion, providing a wonderful sense of accomplishment that fuels your passion for the craft. Whether you use simple charm packs, strip-piecing techniques, or even simple appliqué, the final product is a heartfelt gift that will be treasured for years. It’s a project that is both a learning tool and a meaningful keepsake.
A baby quilt is the perfect motivational stepping stone. Its smaller dimensions make it less costly in terms of fabric and supplies, and it can be easily managed on a standard home sewing machine. This project provides a complete quilting experience on a smaller scale, making it ideal for mastering techniques before tackling larger, more complex quilts. The immense satisfaction of creating a beautiful, functional gift for a new arrival is a powerful motivator for any new quilter.
To create a beautiful and safe baby quilt, keep these tips in mind:
Foundation Paper Piecing (FPP) introduces a technique where you sew fabric directly onto a printed paper pattern. This method acts as a guide, allowing for the creation of intricate, precise designs that might otherwise seem out of reach for new quilters. As one of the more advanced beginner quilt projects, FPP removes the guesswork from complex angles and measurements, making it a fantastic skill-building exercise.
This project teaches you how to follow a numbered sequence to build a block piece by piece. The paper foundation stabilizes the fabric and ensures every point and seam aligns perfectly. Once a block is complete, the paper is carefully torn away, revealing a flawless design.
Foundation Paper Piecing is perfect for beginners who want to achieve stunning accuracy without years of practice. It's an ideal method for creating sharp points and complex geometric shapes like stars or intricate animals. The structured, almost paint-by-numbers approach builds confidence and allows you to tackle ambitious patterns early in your quilting journey, yielding impressive results that look professionally made.
To ensure your first FPP project is a success, focus on these key tips:
| Project | 🔄 Implementation complexity | ⚡ Resources & time | 📊 Expected outcomes | Ideal use cases | ⭐ Key advantages / 💡 Tip |
|---|---|---|---|---|---|
| Simple Square Patchwork Quilt | Very low — straight seams, basic piecing | Low materials; quick (8–20 h) | Clean grid look; forgiving of small errors | Beginners, scrap projects, charity quilts | ⭐ Extremely beginner-friendly; quick results. 💡 Use rotary cutter & quarter‑inch foot |
| Strip Piecing Quilt | Low — long seams, accurate cross‑cutting needed | Efficient use of strips; fast (6–15 h) | Secondary patterns from simple strips; impressive visual impact | Jelly rolls, scrap strips, fast lap quilts | ⭐ Fast with low waste. 💡 Chain‑piece and starch strips before cutting |
| Charm Pack Quilt | Very low — no cutting, straightforward assembly | Low time (4–10 h) but higher material cost (pre‑cuts) | Coordinated, nearly foolproof results | Beginner kits, kids, workshop projects, quick gifts | ⭐ Easiest learning curve; attractive palettes. 💡 Add sashing for interest |
| Half‑Square Triangle (HST) Quilt | Moderate — diagonal seams, bias control required | Moderate time (10–25 h); trimming/square‑up tools useful | Dynamic geometric patterns; sharper, more complex look | Pinwheels, traditional/modern geometric quilts | ⭐ Sophisticated results; strong skills builder. 💡 Use sew‑and‑flip & square‑up ruler |
| Disappearing Nine Patch Quilt | Moderate — precise cutting and block orientation | Moderate materials/time (8–18 h); works with charms/strips | Complex‑looking, optical designs from simple blocks | Confidence‑building projects, mystery quilts | ⭐ Produces advanced look quickly. 💡 Label blocks and use a design wall |
| Quilted Pillow Cover | Low — full process at small scale, finishing required | Very low materials; very fast (3–8 h) | Functional, polished small item; great practice piece | Testing patterns, gifts, practicing quilting/finishing | ⭐ Low commitment, fast payoff. 💡 Try envelope back and walking foot |
| Baby Quilt Project | Moderate — full‑size techniques but smaller scale | Moderate materials/time (20–40 h) | Real quilt experience; gift‑ready finished quilt | Baby gifts, stepping stone to larger quilts | ⭐ Manageable full‑quilt practice. 💡 Use pre‑cuts and simple repeating blocks |
| Foundation Paper Piecing (FPP) Quilt | Medium–high — learning curve for paper foundations | Higher time (15–30 h); needs printer/tear‑away paper | Extremely precise, complex designs with sharp points | Precision blocks, complex stars, advanced beginners | ⭐ Enables intricate, accurate designs. 💡 Print at 100%, use lightweight paper & short stitches |
You’ve just journeyed through a landscape of creative possibilities, from the straightforward charm of a Simple Square Patchwork Quilt to the surprising complexity of a Disappearing Nine Patch. Each of these beginner quilt projects serves as a unique entry point into the rich and rewarding world of quilting. The projects we've explored demonstrate that starting this craft doesn't require immediate perfection, but rather a willingness to learn and a passion for creating something beautiful with your own hands.
Whether you were drawn to the speed of a Strip Piecing Quilt or the precision of Foundation Paper Piecing, the most crucial takeaway is that there is a perfect starting point for every personality and skill level. The journey from a stack of fabric to a finished quilt is a process of small, manageable steps. Mastering the quarter-inch seam, learning to chain piece, and understanding how to press your seams are the foundational skills that will carry you through a lifetime of quilting.
The path forward is clear: choose the project that speaks to you most. Don't overthink it. The goal of your first project is not to create a flawless heirloom but to build confidence and discover the joy of the process. Remember the core principles we've covered:
The value of completing one of these beginner quilt projects extends far beyond the finished item. You are not just making a quilt; you are building skills, patience, and a deep sense of accomplishment. Each stitch is a step toward becoming a more confident and capable maker. The community you join and the creative outlet you develop will bring you joy for years to come.
Your quilting story is waiting to be written, and the first chapter begins with that single, decisive stitch. Gather your tools, select your fabrics, and allow yourself the grace to learn and grow. The most beautiful quilt is the one you have the courage to start.
Ready to begin your quilting adventure? Visit us at High Country Quilts in Colorado Springs for a curated selection of fabrics, notions, and BERNINA sewing machines perfect for any project. Explore our class schedule or get expert advice from our friendly staff by visiting our website: High Country Quilts.
At High Country Quilts we care deeply about community. With our experiences in retail, we know that a store is not only a place to shop but also a place for the community to gather and share. During this busy...

Hi! We’re Adam and Renee Wheaton, the new owners of High Country Quilts! For more than 40 years, we’ve owned and operated vacuum and sewing businesses. Following in Renee’s father’s footsteps after he retired from All Discount Vacuum and Sewing in Colorado...


Leave a comment