


We Love Our Quilting Community
At High Country Quilts we care deeply about community. With our experiences in retail, we know that a store is not only a place to shop but also a place for the community to gather and share. During this busy...


A single standard charm pack contains 42 five-inch squares and finishes at about 31.5 inches square in a 7×7 layout. That means one pack usually makes a small quilt top or wall hanging, while a more usable quilt needs multiple packs, added borders, or both.
You may already have a charm pack beside your sewing machine, a pattern open on your phone, and a tempting pile of coordinating fabric nearby. Before you sew the first seam, answer the practical question that many beginner patterns leave unclear: how much finished quilt will these squares make?
A charm pack is convenient because the fabric has already been cut and coordinated. It isn't automatically a complete throw-sized quilt, though. The finished dimensions depend on the number of squares, the seam allowance, the layout, and whether you add sashing or borders. Plan that size first, then choose the pattern and machine settings that support it.
At the sewing machine, a charm pack can look like the beginning of a full quilt. Before you choose a block or thread the machine, decide how much finished quilt you need. A small wall hanging, baby quilt, and lap quilt each require a different plan.
A charm pack quilt begins with a coordinated bundle of precut fabric. A typical pack contains 42 squares cut to 5 inches by 5 inches. Each square covers 25 square inches, giving the pack about 1,050 square inches of fabric before seam allowances. The format is widely associated with Moda Fabrics since the early 2000s. This guide to charm squares and precut quilting fabrics explains the precut format and its development.
The sewing changes those measurements. A true quarter-inch seam removes fabric from both sides, so each square finishes at 4.5 inches. A 7×7 grid uses 49 finished squares and measures about 31.5 inches square before borders. Since a standard pack has 42 squares, that layout requires additional squares, substitutions, or another fabric choice. At the machine, use a quarter-inch foot or a clearly marked seam guide, then check that your seam produces the expected finished size before piecing the whole top.
Practical rule: Treat the charm pack as a starting quantity, not a guaranteed quilt size.
A 31.5-inch center works well for a small baby quilt, table topper, or wall hanging. It will feel too small for a generous lap quilt unless you plan borders, sashing, or extra blocks from the beginning. Two packs provide more design flexibility and fabric variety. Three packs can support a substantially larger top, although the pattern may still call for background fabric, repeated prints, sashing, or borders.
| Quilt Use | Finished Size (approx.) | Squares Needed | Packs Needed |
|---|---|---|---|
| Wall hanging or tabletop project | Small | One coordinated layout | One pack may be enough |
| Baby or small utility quilt | Small to medium | More than one compact grid | One pack with borders, or multiple packs |
| Lap or throw quilt | Medium to large | A substantially larger grid | Multiple packs plus supporting fabric |
Bundle counts vary. Some contain 40, 42, or 50 squares, and collections with fewer prints may include repeats. Check the actual count before selecting a block layout. This overview of charm pack sizing and planning can help you compare bundles.
Draw the grid on paper before buying batting or backing. Mark each row, the number of squares, and the planned border width. That sketch keeps the center from becoming a finished top that is too small for its intended use. Look for enough contrast among light, medium, and dark prints so the pattern remains visible after sewing. You can browse charm pack fabric options before choosing the collection.
Before cutting or arranging anything, place the planned quilt size beside your charm pack. A neat grid can still produce a top that feels too small if the pattern needs borders, sashing, or background fabric. Mark the intended finished dimensions on paper, then gather only the batting and backing that match that plan.
Preparation keeps the sewing machine work orderly. Set up a flat surface, clean iron, sharp rotary cutter, quilting ruler, cutting mat, fabric clips or pins, seam ripper, and thread. Keep a design wall or large table nearby so you can see the whole arrangement before joining pieces.
Press every charm square flat. If a square is slightly skewed, a light application of starch can help, but do not stretch the fabric. Set the iron down and lift it instead of dragging it across the square. Trim loose threads and small dog-ear points, then square any visibly uneven piece.
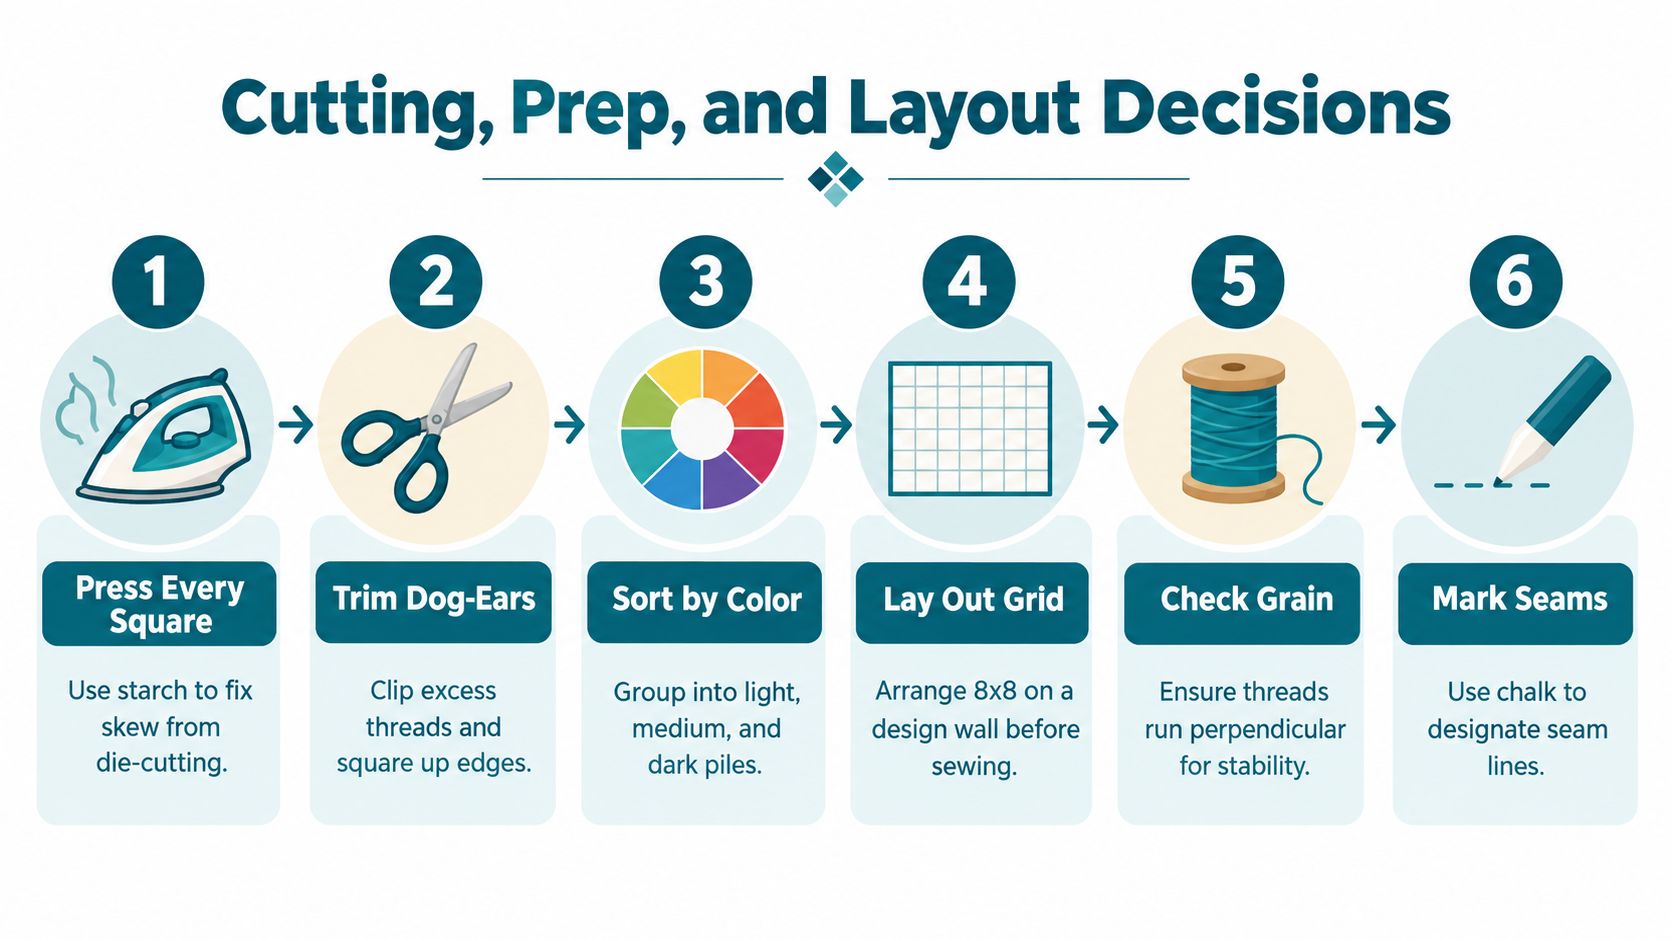
For a straight-set grid, leave the charm squares whole. This preserves the precut edges and gives you fewer pieces to manage. If the selected pattern uses strip piecing, it may call for sub-cutting squares into 2.5-inch strips. Follow a tested pattern for those cuts rather than estimating at the cutting table.
Half-square triangles add movement but also add steps. Pair a light square with a darker one, mark the diagonal, sew on both sides of the line, cut between the seams, and square the units before joining them. Make one test unit first because its finished size depends on seam width and trimming.
Sort fabrics by value as well as color. A red, blue, or green print can read as light, medium, or dark according to its background. Spread the squares across the table and view them from a distance. If every piece has similar visual weight, the block design may fade after sewing.
Arrange the complete grid before taking pieces to the machine. Photograph it directly from above and label each row with sticky notes. Stack each row from left to right, leaving the first square on top or marking its position with a clip. The labels work like a map when the layout is divided into manageable piles.
If you sketch color ideas digitally before touching the fabric, tools that let you replace fabric pattern in video can help you preview how a palette shift changes the overall look.
Use this pre-sewing checklist:
Watch the construction process before starting if seeing each movement helps you learn:
You have a charm pack on the table and a finished size in mind, but the two may not match. Start by asking how much quilt the pack can produce. A single pack contains enough squares for a compact straight-set project, while a larger design may require another pack, background fabric, or borders. Decide the finished size before choosing a pattern, so you do not complete the pieced center and discover that it needs a border plan.
If you are still comparing fabric options, Explore charm pack collections for your next pattern and check how the prints will behave at the finished block size. Large motifs may lose part of their design in small units, while smaller prints usually create a more even scrappy effect.
The straight-set grid is the clearest first pattern. You sew whole charm squares into rows, then join those rows to make the quilt top. Because the squares keep their original shape, you avoid extra cutting and reduce the chance of reversing a triangle or turning a block the wrong way.
One pack plus borders can make a compact quilt of about 36" x 36". Added solid fabric can change the proportion, but it should be part of the plan before you begin sewing. The piecing is quick compared with the other choices, although pressing and checking row length still take attention. At the machine, consistent seam width matters most. A seam that is slightly too wide on several squares can make the finished row noticeably shorter.
Choose this pattern if you want to practise chain piecing, row assembly, matching seams, and basic pressing with the fewest design decisions.
A rail fence pattern adds strip piecing and gives the quilt a directional rhythm. In a common version, you group precut squares into units, then arrange those units so the rails alternate direction. Use two packs plus 1 yd of background fabric for the version shown in the comparison below. Other recipes may change the cuts, so check the selected pattern before cutting.
Some squares remain whole, while others become strips or smaller sections. That makes rail fence a useful second project for a quilter who has already sewn accurate seams and wants more control over color placement. At the sewing machine, keep the strip edges aligned as you feed them through. Small shifts can make the rails uneven by the time the block is assembled.
Photograph the completed block arrangement before joining it. The image helps you preserve the intended direction when similar-looking units are stacked beside the machine.
A disappearing nine-patch starts with a basic nine-patch block. After sewing that block, you cut it apart, rotate the sections, and resew them into a design that appears more complex. The process shows how changing scale and orientation can create a new visual rhythm from a simple starting unit.
Use two packs for the layout listed below. This choice involves more cutting and labeling than the straight grid, and it creates more seam intersections. Press carefully and square the units before joining them, because small inaccuracies become easier to see as the block grows. Select it when you want a stronger focal design without curved piecing or difficult appliqué.
| Pattern | Skill Level | Packs Needed | Finished Size Range | Estimated Piecing Time |
|---|---|---|---|---|
| Straight-set grid | Absolute beginner | 1 pack + borders, about 36" x 36" | Compact, with room to expand through borders or added packs | Shortest of the three |
| Rail fence | Beginner with basic piecing experience | 2 packs + 1 yd background fabric | Small to medium, expandable | Moderate |
| Disappearing nine-patch | Confident beginner | 2 packs | Small to medium, expandable | Longest because of extra cutting and resewing |
The straight set is the safest choice for whole squares. The rail fence is the next step for strip piecing and directional layout. Choose the disappearing nine-patch when rearranging cut units appeals more than sewing a plain grid.
Your charm-pack top may look finished on the design wall, yet still be smaller than the quilt you need. Before sewing the first long seam, check the planned dimensions and decide whether borders will provide the extra width or length. That choice affects how you arrange the squares, how many rows you build, and how much backing, batting, and binding to prepare.
Accurate piecing begins with a tested seam. On a BERNINA machine, a quarter-inch patchwork foot such as foot #37 or #57 can give your fabric a clear guide, but the foot cannot correct every setup problem. Sew two charm-square scraps together, measure the unit, and adjust the needle position or fabric guide if the seam is too wide. Test again before starting the quilt. Uneven feeding, thread tension, or an edge drifting away from the guide can change the finished size of every row.
Place two squares right sides together and sew the seam. Add the next squares without cutting the thread between units. This chain-piecing method keeps pairs in order and reduces loose thread tails. Leave a small gap between each pair, clip the units apart, and add the next square to complete each row.
Press every seam in the same direction, usually toward the darker fabric. Set the seam with the iron first, then press without stretching the cloth. A wool pressing mat can help form crisp units. As you join neighboring rows, alternate the pressing direction so the seams nest together instead of stacking into bulky intersections.
A consistent seam is more valuable than a fast seam. Slow down whenever the fabric edge stops meeting the guide.
Before quilting, check the top against your size plan. If it needs borders, attach them after measuring the top through its center and cutting the border strips to that measurement. This keeps the edges from becoming wavy or stretched.
Make the quilt sandwich with the backing, batting, and pieced top. Smooth each layer from the center outward, then pin or spray baste thoroughly, with extra attention around seams and along the edges. Secure layers shift less, which helps prevent puckers.
For a first quilt, straight diagonal lines or a simple meander are manageable choices. A BERNINA walking foot, such as foot #50, helps feed the layered quilt evenly. Sew at a steady speed, and support the quilt on the table so its weight does not pull against the needle.
Trim the quilted sandwich after quilting is complete. Cut binding strips for your chosen method, join them, and press the long strip in half with wrong sides together. Attach it to the front with a quarter-inch seam, mitering each corner as you reach it.
For curved edges, join strips on the bias so the binding can flex around the shape. Fold the binding to the back and machine-stitch it in place, or sew it by hand for a less visible finish. Keep the quilt flat during the final stitching. If the binding waves, stop and correct the tension instead of forcing it flat afterward. Find quilting tools and sewing accessories for the finishing stage before quilting so the correct foot, thread, batting, and binding fabric are ready.
A charm pack can produce a smaller quilt than you expected, especially with a simple grid layout. Before correcting individual blocks, compare the finished top with the size you planned. If the center is too small, decide whether to add borders, enlarge the design with more blocks, or use the top for a smaller project. Planning this early prevents a finished center with no suitable edge treatment.
Uneven seam allowances shorten every row and can pull the top out of square. Sew a small three-square test block and measure it before continuing. If it is off, adjust the needle position, fabric guide, or sewing speed, then test again. A consistent seam is like a fixed ruler: every unit has a better chance of matching the next one.
A precut square may arrive slightly off-grain or develop a skewed edge during handling. Square visibly uneven pieces before sewing. If the fabric still shifts, change the cutting direction and press carefully. Avoid stretching the piece into shape, because that can transfer the distortion to the finished row.
Several seams meeting at one point can form a raised lump and make accurate joining difficult. Press neighboring rows in alternating directions so the allowances nest instead of stacking. Clip only an allowance that creates a genuine obstruction, and leave enough fabric to keep the seam strong.
First confirm that the walking foot is installed correctly and that the layers are basted firmly. If the pucker follows a seam line rather than spreading across an area, the basting interval may be too wide. Re-baste at a 3-inch grid through the affected zone, then quilt that area again on a scrap sandwich if possible. Check the machine manual before changing any pressure or feeding settings.
A wavy binding may have been stretched, cut too short, or attached to an inaccurately measured edge. Measure the completed quilt perimeter before cutting, then join enough strips to cover every edge with overlap. Ease the binding around corners without pulling it tight.
Choose border fabric only after measuring the completed top. Choose fabric for borders and binding so the border scale suits the actual quilt and the center does not end with an unfinished edge.
Before choosing another pattern, decide how much quilt you want to make. A charm pack can produce a neatly sized small top, but it may not cover a bed without added borders, sashing, or extra fabric. Measure the finished top from your first project and write down the target size for the next one. That simple step keeps you from completing a beautiful center with no plan for extending it.
High Country Quilts offers in-store beginner charm pack workshops and machine-specific BERNINA classes. A class can help you check a pattern, choose a presser foot, and set up your machine before you sew a full batch of pieces.
Choose the fabric collection after setting the size. Compare color, print scale, and contrast before buying multiple packs. Check whether coordinating yardage is available for borders, sashing, or backing. A bundle with many different prints may need a solid or low-volume companion so the pattern remains easy to read.
Use your first quilt to choose the next construction challenge. A straight-set grid builds confidence with matching rows. A rail fence gives you strip-piecing practice, while a disappearing nine-patch creates more movement. A charm pack can supply the main prints, and a layer cake or jelly roll may provide a larger-scale border if the pattern requires one. Measure the top again before cutting that border.
Keep strengthening the skills that will support every later quilt:
If you share a pattern or project guide online, readable typography helps people follow each step. A body copy font size of at least 16px, comfortable spacing, and mobile margins support easier reading, as outlined in the U.S. Web Design System typography guidance. Line spacing and headings also need adjustment for small screens, as explained in this mobile typography guide. The responsive font accessibility resource covers relative text sizing and readable line lengths.
Visit High Country Quilts for charm packs, quilting supplies, BERNINA support, and classes. Bring your layout questions, confirm the finished size you want, and choose fabric for a project that has room to grow.
At High Country Quilts we care deeply about community. With our experiences in retail, we know that a store is not only a place to shop but also a place for the community to gather and share. During this busy...

Hi! We’re Adam and Renee Wheaton, the new owners of High Country Quilts! For more than 40 years, we’ve owned and operated vacuum and sewing businesses. Following in Renee’s father’s footsteps after he retired from All Discount Vacuum and Sewing in Colorado...


Leave a comment