

We Love Our Quilting Community
At High Country Quilts we care deeply about community. With our experiences in retail, we know that a store is not only a place to shop but also a place for the community to gather and share. During this busy...


Embroidery might seem complex, but it really just comes down to a few foundational techniques. If you're just starting out, focus on mastering these five core stitches: the running stitch, backstitch, satin stitch, stem stitch, and the lazy daisy stitch.
These five stitches are the absolute backbone of countless designs you'll see. They'll take you from simple, clean outlines to beautiful, intricate floral patterns. Honestly, they're the perfect gateway into this timeless craft.
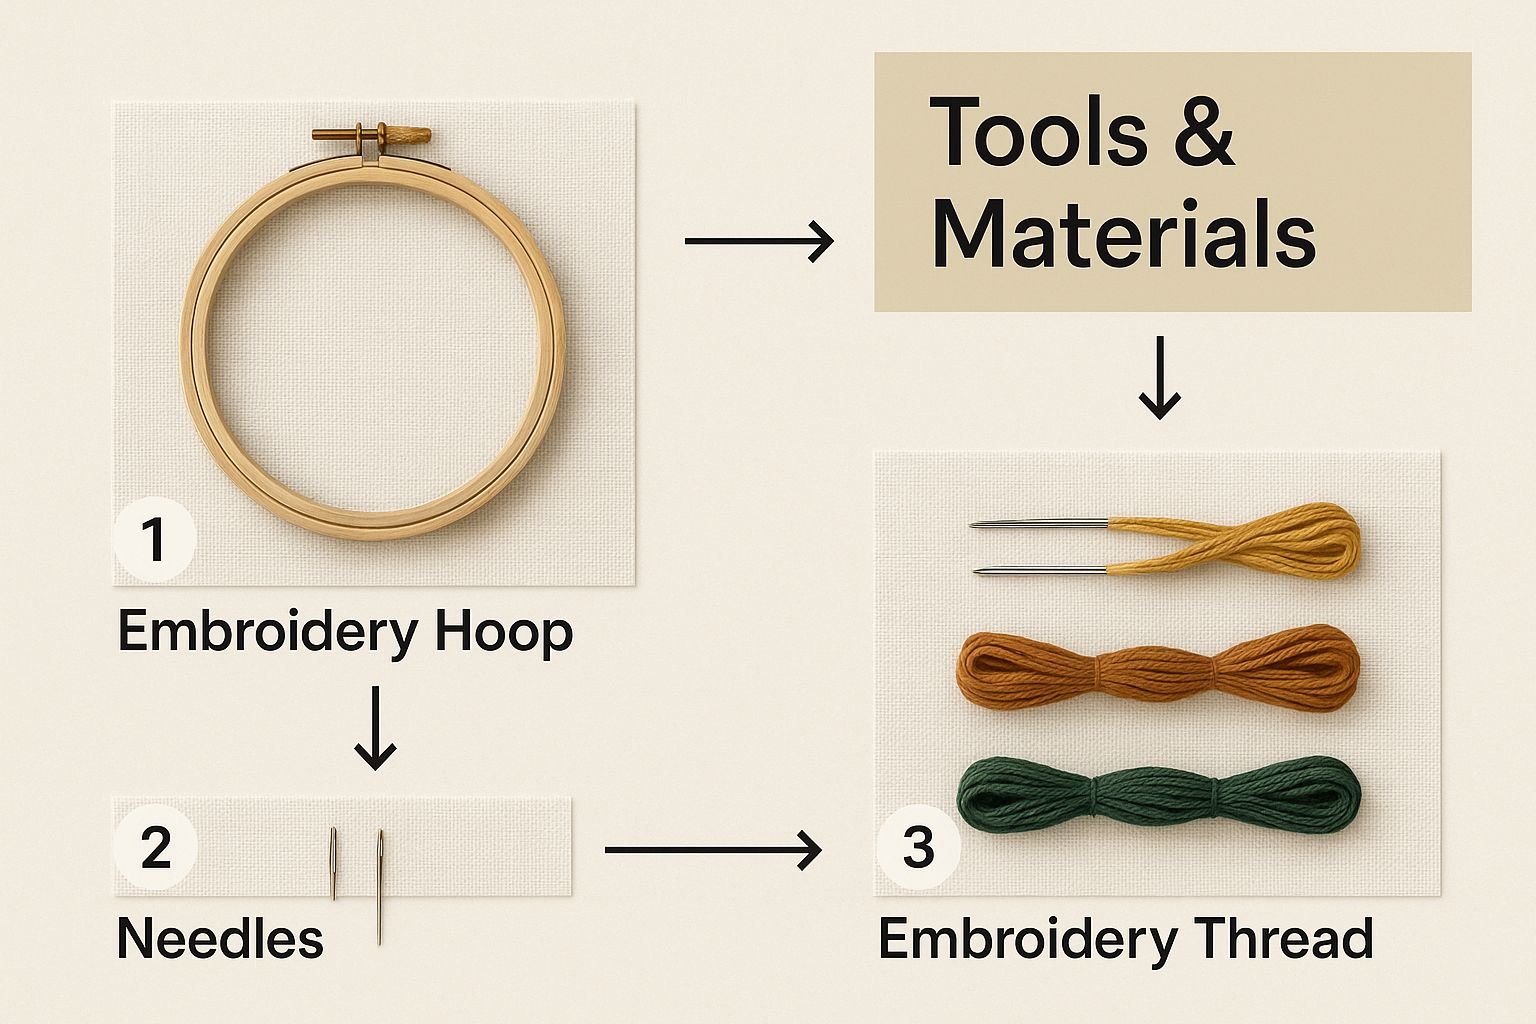
Before you can dive in and make that first stitch, you'll need to gather a few tools. The great news? You don’t need to spend a fortune to get started with embroidery. A small handful of well-chosen supplies is all it takes to set you up for success and help you sidestep some common beginner frustrations.
Think of these as the essential ingredients for all your future creative projects.
It’s easy to get overwhelmed by long supply lists when you start a new hobby. But for embroidery, you really only need a few key items to get going. Focus on these essentials first—you can always build out your collection as you get more experience.
Here’s what you absolutely must have:
Here's a quick look at the essentials in one place.
| Item | Recommended Type | Beginner Tip |
|---|---|---|
| Fabric | Medium-weight cotton or linen | Look for "even-weave" fabric. It makes counting threads for precise stitches much easier down the road. |
| Embroidery Floss | Six-strand cotton floss (e.g., DMC or Anchor) | Start with a basic color pack. You don't need every shade to begin learning the core stitches. |
| Needles | Embroidery/Crewel needles (variety pack, sizes 3-9) | A needle with a larger eye is your friend! It saves you from the frustration of difficult threading. |
| Hoop | 5- or 6-inch wooden or plastic hoop | Make sure the hoop holds the fabric tight. If it slips, your stitch tension will be inconsistent. |
| Scissors | Small, sharp embroidery scissors | Dedicate these scissors only to thread. Using them on paper or other materials will dull them quickly. |
Getting your materials together is the first exciting step on your embroidery journey.
The global embroidery and sewing crafts market has seen incredible growth, largely because so many people are diving into handmade arts. Beginners using these fundamental stitches for DIY projects, home décor, and fashion are a huge part of this trend.
Once you have your materials in hand, you’re ready to get your workspace set up. A comfortable, well-lit spot makes all the difference. For more ideas on building out your creative toolkit, take a look at our comprehensive list of sewing supplies for beginners.
Clean, confident outlines are the backbone of great embroidery. They’re what give a design its shape and structure, guiding the eye and making the whole piece look polished. This is where we’ll dig into the two stitches that are absolute must-knows for creating those crisp lines.
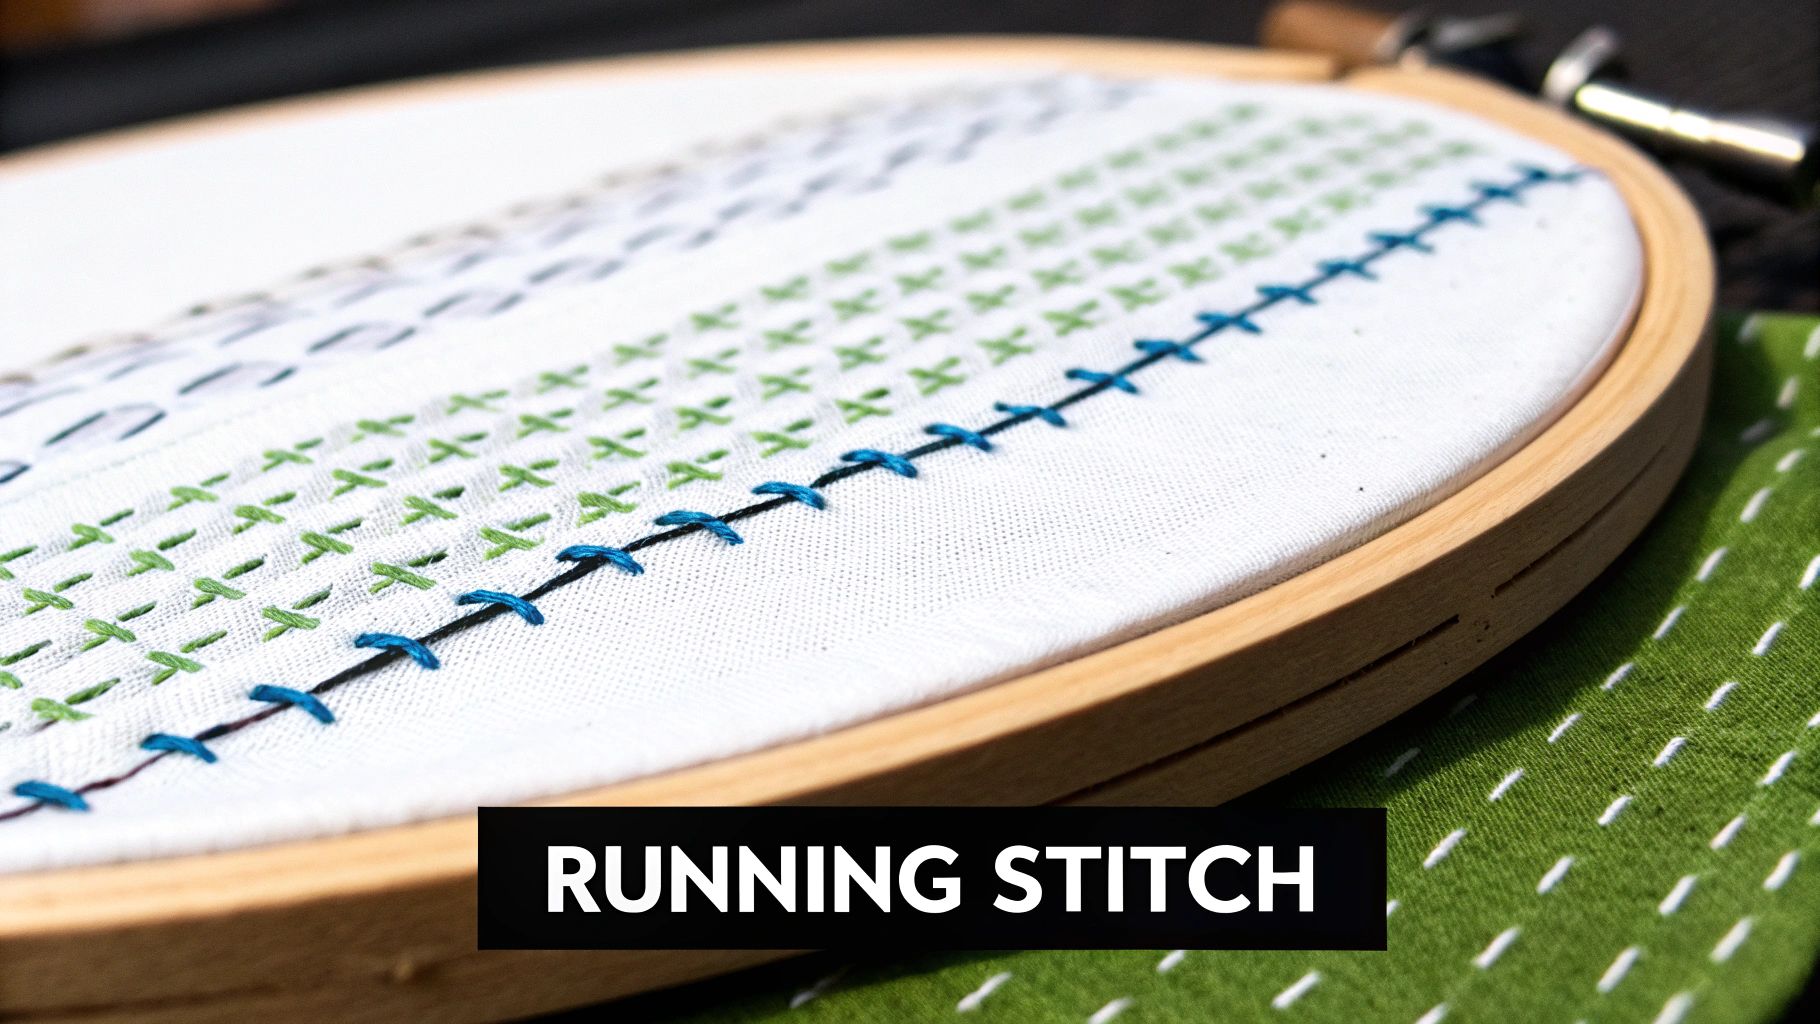
First up is the Running Stitch, which is about as fundamental as it gets—it's the perfect place for any beginner to start. Then we'll move on to the Backstitch, which will quickly become your go-to for creating a solid, unbroken line that looks incredibly neat. Get these two under your belt, and you'll be able to outline just about any design you can dream up.
This quick visual guide shows the basic tools and materials you'll be working with.
Having all your supplies ready to go before you start makes the whole process so much more relaxing and fun.
You've probably done a Running Stitch before, even if you didn't know what it was called. It's the same in-and-out motion used in basic hand sewing, and it creates a simple, charming dashed line. Don't let its simplicity fool you, though; it’s incredibly versatile.
To get started, just bring your needle up from the back of the fabric. Move it forward along your design line—maybe a quarter-inch to start—and push it back down through the fabric. That’s your first stitch! Now, bring the needle up again a short space away from where you went down and do it all over again.
I find myself turning to the Running Stitch for all sorts of things:
A little tip from my own experience: The real secret to a beautiful Running Stitch is consistency. Try to make your stitches and the gaps between them the exact same length. This is what takes it from a simple utility stitch to a truly stylish design element.
Okay, so when you need a line that’s solid and unbroken—think lettering, flower stems, or defining the crisp edge of a shape—the Backstitch is your best friend. It creates a strong, clean line that almost looks like it was done on a machine. It's easily one of the most useful stitches you'll learn.
The name "Backstitch" tells you everything you need to know. You'll start by bringing your needle up through the fabric, but one stitch length away from where you want your line to begin. Then, you take the needle backward and push it down right at the starting point. For your next stitch, bring the needle up one stitch length ahead of your last one, and once again, bring it back down into the very same hole where the previous stitch ended.
This backward movement is what makes each stitch fit snugly against the last, creating that seamless, rope-like effect. The key here is also consistency, especially when you're working on curves. Using shorter stitches will help you navigate tight corners and circles much more smoothly, preventing any weird, blocky angles in your outline. Once you're comfortable with these two stitches, you'll have a fantastic foundation for all your future embroidery projects.
When you're ready to move beyond simple straight lines, the stem stitch is your best friend. This is the stitch you'll turn to for creating graceful curves, elegant lettering, and all sorts of rich textures. As its name suggests, it’s the go-to for flower stems and vines, giving them a beautiful, rope-like appearance that looks far more complicated than it actually is.
The motion of the stem stitch is what sets it apart. While a backstitch involves working backward into the previous hole, the stem stitch uses a unique overlapping movement. You'll bring the needle up through the fabric and make a straight stitch, but here's the key: for the next stitch, you'll bring the needle back up beside the middle of the stitch you just made.
This slight overlap is what magically creates that twisted, cord-like texture. The real trick, though, is to always keep the loop of your working thread on the same side of the needle. It doesn't matter if you keep it above or below, but picking a side and sticking with it is crucial for a clean, uniform look.
The stem stitch really comes into its own on curved lines. Because of how each stitch overlaps the last, it naturally flows around bends without creating the stiff, almost pixelated look you can sometimes get with a backstitch on a curve.
To get a perfectly smooth arc, the secret is to shorten your stitches. Shorter stitches let you adjust the angle of your line more frequently, which is exactly what you need to create a seamless curve. This makes it an amazing choice for cursive lettering, winding floral patterns, or any design that needs a more organic, flowing feel.
The angle of your needle and exactly where you bring it up next to the previous stitch can dramatically change the look. For a thicker, more rope-like line, bring your needle up very close to the previous stitch. For a flatter, more delicate line, bring it up a little bit further away.
Even the most basic stitches have a few little secrets that take them from good to great. Keep these tips in your back pocket as you practice:
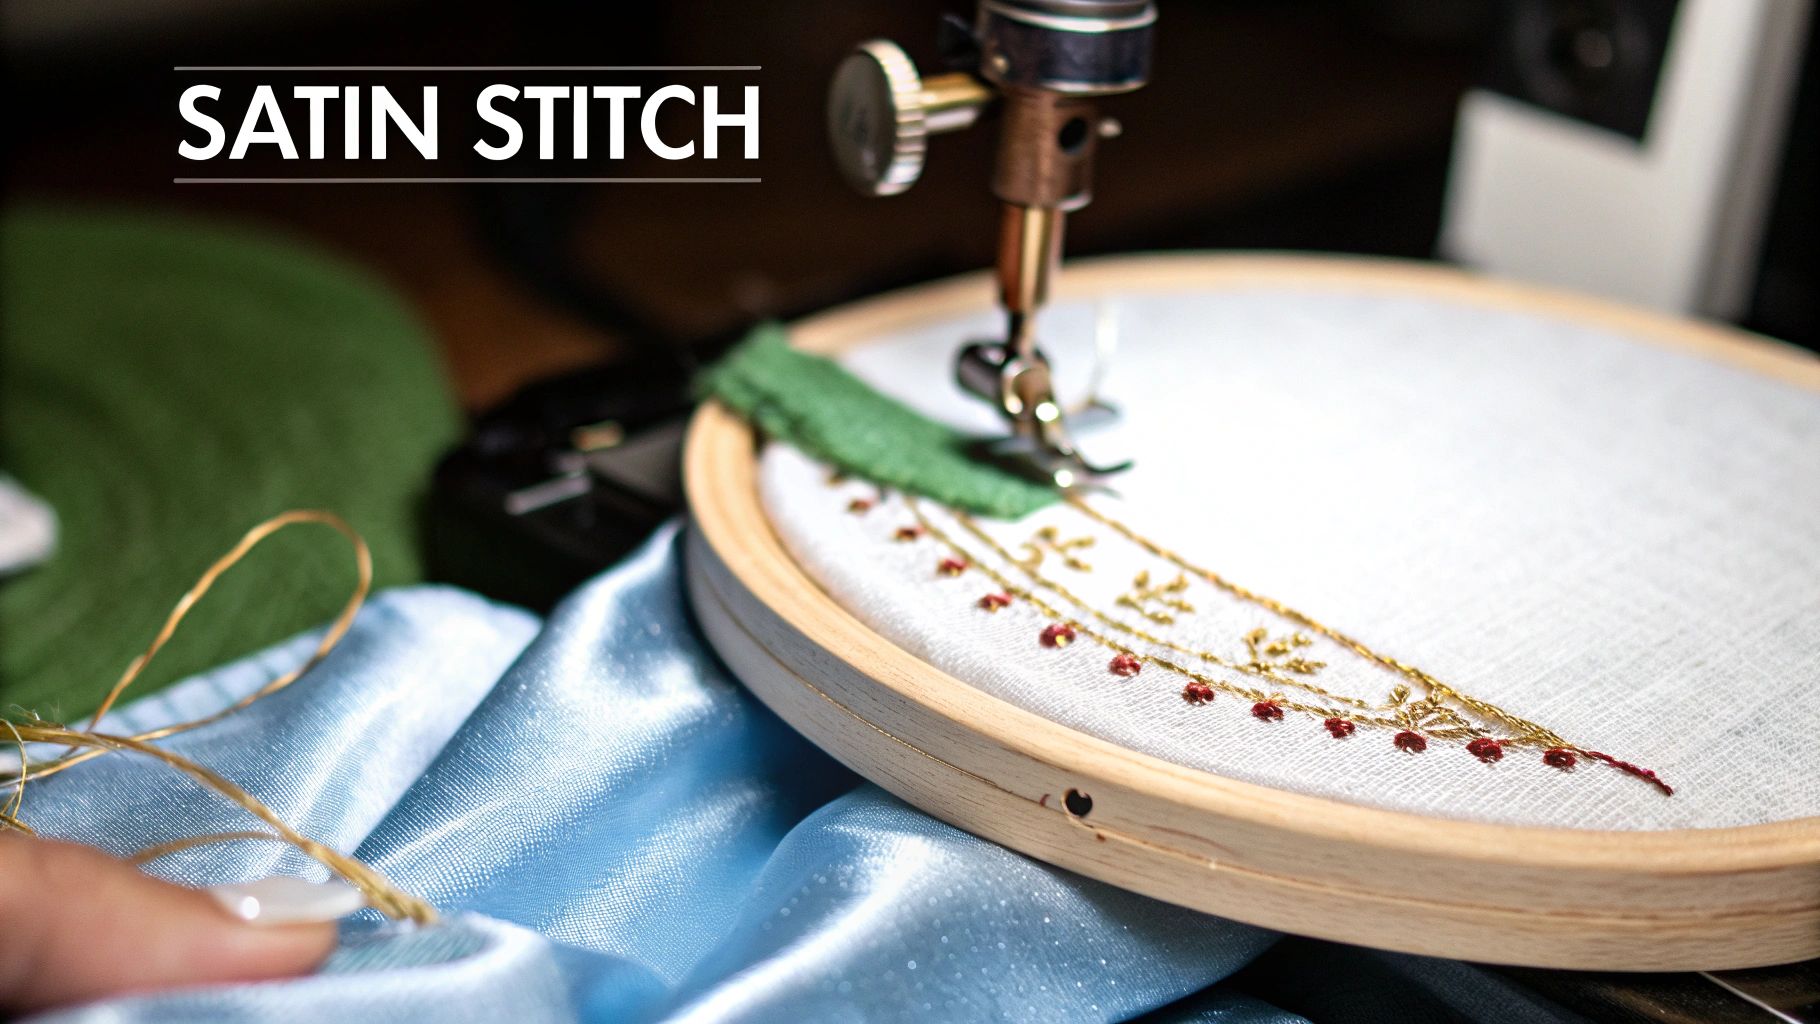
The satin stitch is where your embroidery work really starts to shine. It’s how you take a simple outline and turn it into a solid, vibrant block of color—think of it as literally painting with thread. Getting that signature smooth, glossy finish can feel a little intimidating at first, but it’s absolutely achievable once you get the hang of it.
Unlike stitches that trace a line, the satin stitch fills an area by laying down straight stitches one right after the other. They should be so close that they touch, but never overlap. The whole point is to create a seamless, solid field of color. This is one of the most powerful basic stitches you can learn, and it will completely change the look of your projects.
Before you make your first stitch, a little bit of prep work will make all the difference. The real secret to a professional-looking satin stitch isn't just the stitch itself—it's the foundation you lay for it. A well-defined border gives your stitches a clean, crisp edge to butt up against.
I always start by outlining the shape I intend to fill. You can use a backstitch or a split stitch for this, but I almost always go with a split stitch. It creates a slightly raised edge that helps your satin stitches look fuller and more defined, giving them a nice little boost. Taking the time to do this one small step is the best way to keep your fill from looking fuzzy or uneven around the borders.
My Two Cents: Keep your satin stitches on the shorter side, ideally no longer than half an inch. Any longer and they tend to loosen, sag, or snag over time, which totally ruins the smooth effect you’re working so hard to create. If you need to fill a larger shape, it’s much better to break it up into smaller, more manageable sections.
The two things that will make or break your satin stitch are perfectly parallel stitches and consistent tension. I like to think of it like laying down planks of hardwood flooring—each one has to be perfectly straight and snug against the last one to get that seamless look.
Your stitches need to go straight from one side of the shape to the other, almost like rungs on a ladder. When you bring your needle up for the next stitch, do it right beside where the last one went down. You don't want any fabric peeking through, but you also have to be careful not to overcrowd your stitches or accidentally pierce a previous one.
For a really thick, luxurious fill on projects that won't see a lot of wear and tear, I love using a thread like DMC Pearl Cotton. It has a beautiful natural sheen and comes as a single, non-divisible thread.
Tension is just as crucial. Pull too tight, and your fabric will pucker. Too loose, and the stitches will look floppy and messy. You're aiming for that sweet spot where the thread lies flat and smooth against the fabric without causing any distortion at all. It’s a gentle touch that you’ll quickly develop with a bit of practice.
Alright, this is where the magic really starts to happen. We're moving on to the details—the little flourishes that take a piece from simple to stunning. The French knot and the lazy daisy are two absolute must-knows for any beginner, and they're perfect for adding incredible texture and charm.
They might look a bit fancy, but I promise they're surprisingly straightforward once you get the hang of the movement.
I love using these for tiny floral details, filling in small areas with a "polka dot" texture, or just adding decorative accents. Let’s walk through how to master both.
The French knot gets a bad rap for being difficult, but it's all about getting your thread tension just right. Think of it as creating a tiny, textured dot. They make perfect flower centers, little animal eyes, or even a field of scattered stars.
First, bring your needle up through the fabric right where you want the knot to sit. Now, here's the key part: use your non-dominant hand to hold the thread taut, pulling it away from the fabric. With the thread held tight, wrap the floss around your needle once or twice. Wrapping it once gives you a delicate little knot; twice makes it a bit bigger and bolder.
Keeping that thread pulled taut, poke the needle back down into the fabric right next to where you came up—and I mean right next to it, not in the exact same hole. As you pull the thread through from the back, the wraps will tighten up and form a perfect little knot on the surface.
My biggest tip for French knots: The secret is to keep that thread taut with your non-dominant hand until the floss is almost completely pulled through. If you let go too soon, the wraps will loosen, and you'll get a loopy mess instead of a crisp, tight knot.
The lazy daisy is one of the most satisfying stitches to learn as a beginner. With just a few simple motions, you get a perfect little petal or leaf shape. It’s also known as a detached chain stitch, which is exactly what it is—a single, anchored loop.
Here’s how you do it. Bring your needle up from the back of the fabric. Next, go back down into the very same hole you just came out of, but don't pull the thread all the way through! You want to leave a loop on the surface of your fabric.
Now, bring your needle up again a short distance away, making sure the needle tip comes up inside the loop. This catches the loop. Pull the thread all the way through, and you'll see the petal form.
To finish it off, just make a tiny anchoring stitch over the end of the loop to secure it. That's all there is to it! Arrange five or six of these in a circle, maybe with a French knot in the middle, and you've stitched a beautiful little flower.
Getting these decorative details right can sometimes come down to having good tools. A quality deluxe needle threader is a real game-changer, especially when you're working with multiple strands of floss and your eyes start to get tired.
Jumping into embroidery is exciting, but it’s completely normal to have a few questions pop up as you get started. Getting the right answers early on can be the difference between a frustrating afternoon and falling in love with a new craft.
Let's walk through some of the most common hurdles I see beginners face. We'll get these sorted out so you can get back to the fun part—actually stitching.
When you’re first finding your rhythm, the fabric you choose makes a huge difference. I always recommend starting with a medium-weight, natural woven fabric.
Something like a basic cotton or a nice linen (or even a cotton-linen blend) is perfect. These fabrics have a clear, stable weave that’s easy to see and puncture with a needle, but they’re tight enough to hold your stitches securely. You won’t have to fight with the material.
Try to avoid anything stretchy like t-shirt jersey or knit fabrics for your first few projects. They can easily pull out of shape, which can distort your beautiful stitches. Honestly, a simple piece of quilting cotton or even an old, clean pillowcase makes for a fantastic and cheap practice canvas.
That little skein of embroidery floss is made up of six individual strands, but you'll almost never use all six at once. The magic happens when you separate them. This is how you control the thickness and texture of your lines.
Here’s a good rule of thumb to get you started:
Don’t be afraid to play around with this! Changing your strand count is one of the simplest ways to completely alter the look of your work.
A quick tip from my own experience: The number one reason I see beginners get frustrated is fabric puckering. It almost always comes down to two things: pulling the stitches too tight or not having the fabric tight enough in the hoop. Your stitches should just rest flat on the surface, not tug or cinch the material at all. Think gentle!
Ah, the dreaded fabric pucker. Don't worry, it happens to every single one of us, and it’s usually an easy fix related to tension.
First, check your hoop. Your fabric should be "drum tight" before you make a single stitch. If you can tap it and it makes a little thump-thump sound, you’re in good shape. If there's any slack at all, your stitches will inevitably pull the fabric inward as you work.
Next, pay attention to your stitching tension. As you pull each stitch through, the thread should lay snugly against the fabric, but not so tightly that it causes the material to ripple. If you’re working on a thinner or more delicate fabric, a stabilizer can be your best friend. A simple backing prevents puckering and gives your stitches a much more stable foundation. If you want to learn more, we have a great guide on how to use embroidery stabilizer. It’s a real game-changer.
At High Country Quilts, we truly believe that starting a new craft should be a joy, not a chore. We’re here with all the supplies, expert advice, and friendly encouragement you need to kick off your creative journey. Come explore our shop and find everything to get you stitching today at https://hcquilts.com.
At High Country Quilts we care deeply about community. With our experiences in retail, we know that a store is not only a place to shop but also a place for the community to gather and share. During this busy...

Hi! We’re Adam and Renee Wheaton, the new owners of High Country Quilts! For more than 40 years, we’ve owned and operated vacuum and sewing businesses. Following in Renee’s father’s footsteps after he retired from All Discount Vacuum and Sewing in Colorado...


Leave a comment