

We Love Our Quilting Community
At High Country Quilts we care deeply about community. With our experiences in retail, we know that a store is not only a place to shop but also a place for the community to gather and share. During this busy...


Ever noticed the neat rows of stitches on the outside of your jeans? That's topstitching, and it’s one of those key details that makes a handmade item look polished and professional. It’s simply a line of stitching that's visible on the 'top' side of the fabric, but it does so much more than just sit there.
Topstitching pulls double duty, acting as both a structural workhorse and a beautiful design element. It can be the difference between a project looking homemade and looking like it came straight from a high-end boutique.
So, what gives ready-to-wear clothing that crisp, durable, and finished look? A big piece of the puzzle is topstitching. It's more than just a decorative touch; it’s a fundamental technique that reinforces seams and adds a sharp, intentional style. Think of it like the frame around a picture—it defines the edges, draws the eye, and pulls the whole piece together.
By getting a handle on topstitching, you can dramatically improve the quality of your work, whether you're sewing a simple pillowcase or a complex jacket. It serves two main purposes, often at the same time.
Let's take a quick look at its core functions.
| Aspect | Description |
|---|---|
| Functional Role | Reinforces seams, holds down facings and seam allowances, and adds durability to high-stress areas like pockets and zippers. |
| Decorative Role | Adds visual interest, defines shapes, and provides a professional, polished finish. Can be done in contrasting or matching thread. |
| Common Uses | Jeans, jackets, bags, collars, cuffs, quilts, and upholstery. |
Mastering these two aspects is what truly elevates your sewing skills.
First and foremost, topstitching is about strength. It acts as a powerful reinforcement, especially on items that get a lot of use. Think about the seams on denim jackets or the straps on a tote bag—the extra stitching helps prevent them from pulling apart under pressure.
It also works wonders on the inside. Topstitching is perfect for tacking down seam allowances, facings, and linings, forcing them to lie flat and stay put. This creates a clean, crisp finish that won’t bunch up or shift around, even after a trip through the wash.
Key Takeaway: Functional topstitching isn't just for show. It's a structural element that extends the life of your project by securing seams and reinforcing high-stress points.
Beyond its practical side, topstitching is a fantastic way to express your creativity. It turns a basic seam into a thoughtful design feature. Using a contrasting thread color can make a pocket pop, define a unique neckline, or add a bold accent to a cuff.
This is where a garment goes from looking simply finished to looking truly designed. While we're focused on topstitching here, exploring related skills like What Is Embroidery can give you even more tools for adding beautiful, custom details to your work.
Topstitching is one of those techniques that quietly separates the homemade from the handmade. It's a true workhorse, pulling double duty to add both serious strength and a touch of artistry to your projects. At first glance, it might just look like a line of stitches, but it’s doing so much more behind the scenes.
Simply put, adding a row of stitches along a seam reinforces the heck out of it. This one small step stops fabric from rolling, tames unruly facings and linings so they lay flat, and locks down seam allowances so they behave in the wash. That’s precisely why you’ll always find it on high-stress points, like the handles of a tote bag or the pockets on your most-worn pair of jeans.
Think of building a sturdy piece of furniture. You have the main pieces, but it’s the hidden screws and supports that give it the strength to last for years. Functional topstitching is exactly that for your sewing—it’s the invisible engineering that ensures a garment holds its shape and stands up to real life.
Here’s where it really shines in a practical sense:
This dedication to clean, strong construction gives a project that high-quality, ready-to-wear feel. It’s a detail that signals craftsmanship, which is why even in the world of luxury goods, experts check the stitching for evenness to verify authenticity.
Once its structural job is done, topstitching gets to have some fun. This is where you get to step in as the designer and turn a simple seam into a deliberate style element. It becomes the beautiful finishing touch everyone notices, much like the perfect trim on that well-built piece of furniture.
Just by swapping your thread color for one that pops, you can create a striking contrast that beautifully outlines a pocket or defines a collar. Playing with stitch length is another trick; a slightly longer stitch often looks bold and modern, while a shorter one can feel more delicate and traditional.
Designer's Insight: Think of your topstitching thread as a fine-point pen. You can use it to draw clean lines, guide the eye, and add a signature flourish that makes the piece completely and totally yours.
This decorative power is what elevates a project from being merely functional to being truly bespoke. You're no longer just piecing fabric together—you're making intentional design choices that show off your skill and unique point of view.
Ever wonder how some projects get that perfectly straight, professional-looking row of stitches? It’s not magic—it's all about having the right tools for the job. Just like a painter needs the right brushes, a sewer needs the right needle, thread, and presser foot to nail their topstitching. Getting this setup right is your secret weapon against wonky lines and puckered fabric.
Your quest for beautiful topstitching starts with the needle. While a universal needle can get you by in a pinch, a dedicated topstitch needle is a total game-changer. These needles are specifically designed with an extra-large eye and a deeper groove running down the shaft. This clever design minimizes friction on that thicker topstitching thread, so it won’t shred or break, giving you much smoother, more even stitches.
Think of it like trying to push a thick rope through a tiny keyhole versus sliding it onto a large hook. One is a recipe for frustration, the other is effortless.
Now, let's talk thread. The thread you pick completely changes the final look. You can use your standard all-purpose thread, but a specialized topstitching thread is much heavier and creates that bold, defined line you see on things like denim jeans. It’s what gives those seams their classic, sturdy appearance.
One key thing to remember: only use the heavy topstitching thread for your needle. For the bobbin, stick with your regular all-purpose thread. Putting heavy thread in both the needle and the bobbin is a recipe for tension headaches and a tangled mess on the underside of your fabric. This combo gives you that strong, beautiful stitch on top without making your machine angry.
Pro Tip: Always, always test your needle and thread combo on a scrap of your project fabric first. This little step lets you tweak your settings and avoid a disastrous mistake on your actual garment.
Once you've got your needle and thread sorted, it's time to adjust your machine. The most important setting for topstitching is the stitch length. You'll almost always want to use a longer stitch—somewhere between 3.0 mm and 4.0 mm. Shorter stitches tend to disappear into the fabric and look cluttered, whereas longer stitches stand out, look straighter, and give a much cleaner, more deliberate finish.
In sewing, the right settings are what create that professional-grade durability. Many quilters and crafters aim for a stitch length of 6 to 8 stitches per inch, which is longer than your average seam. This helps create those beautifully smooth rows without causing any puckering. You can find more details on these time-tested recommendations, which sewers have been relying on since the 1980s.
Finally, a few specialized presser feet can make guiding your fabric a breeze.
Switching to these tools can take topstitching from a nerve-wracking chore to a genuinely satisfying process. It's the best way to guarantee that professional touch on every single project.
To make things even easier, here’s a quick guide to help you choose the right tools and settings based on the weight of your fabric. This isn't a set of hard-and-fast rules, but it’s a fantastic starting point for most projects.
| Tool/Setting | Recommendation for Light Fabrics (e.g., Cotton) | Recommendation for Heavy Fabrics (e.g., Denim, Canvas) |
|---|---|---|
| Needle | Topstitch Needle, size 80/12 or 90/14 | Topstitch Needle, size 100/16 or 110/18 |
| Thread (Top) | Topstitching Thread (30-40 wt) or 2 strands of all-purpose | Heavy-Duty Topstitching Thread (30 wt or heavier) |
| Thread (Bobbin) | All-Purpose Thread (50 wt) | All-Purpose Thread (50 wt) |
| Stitch Length | 3.0 mm - 3.5 mm | 3.5 mm - 4.5 mm |
| Tension | Slightly lower than normal (e.g., 3-4) | Slightly higher than normal (e.g., 5-6) |
| Presser Foot | Edge-Stitching Foot or Blind Hem Foot | Edge-Stitching Foot or Walking Foot |
Remember to always test on a scrap piece of your fabric first! A quick test swatch can save you a ton of time and frustration by letting you perfect your settings before you touch your main project.
You've picked your tools and tweaked your machine settings, so now it's time to get down to the actual sewing. The secret to a perfect topstitch isn't speed—it's all about patience, prep, and a steady hand. Let's walk through the process, breaking it down into simple steps that will give you a clean, professional finish every single time.
Believe it or not, the most important step happens before you even touch your machine. A crisp, flat seam is the bedrock of straight topstitching. Grab your iron and press those seam allowances open or to one side, whatever your pattern calls for. A well-pressed seam gives your needle a clear, smooth path to follow, which is key to avoiding the little lumps and bumps that can send your stitches askew.
With your seam perfectly flat, it's time to get your machine ready for action. Pop on your chosen presser foot—an edge-stitching or blind hem foot is fantastic here because it gives you a physical guide to follow. Thread your machine with the heavier topstitching thread on top (through the needle) and your regular all-purpose thread in the bobbin.
Next up, lengthen that stitch. I find a setting between 3.0 mm and 4.0 mm is the sweet spot. Longer stitches just look straighter and more prominent than your standard stitch length, and this one tweak makes a huge difference in getting that classic, store-bought look.
This little graphic really simplifies the essential setup steps before you start.
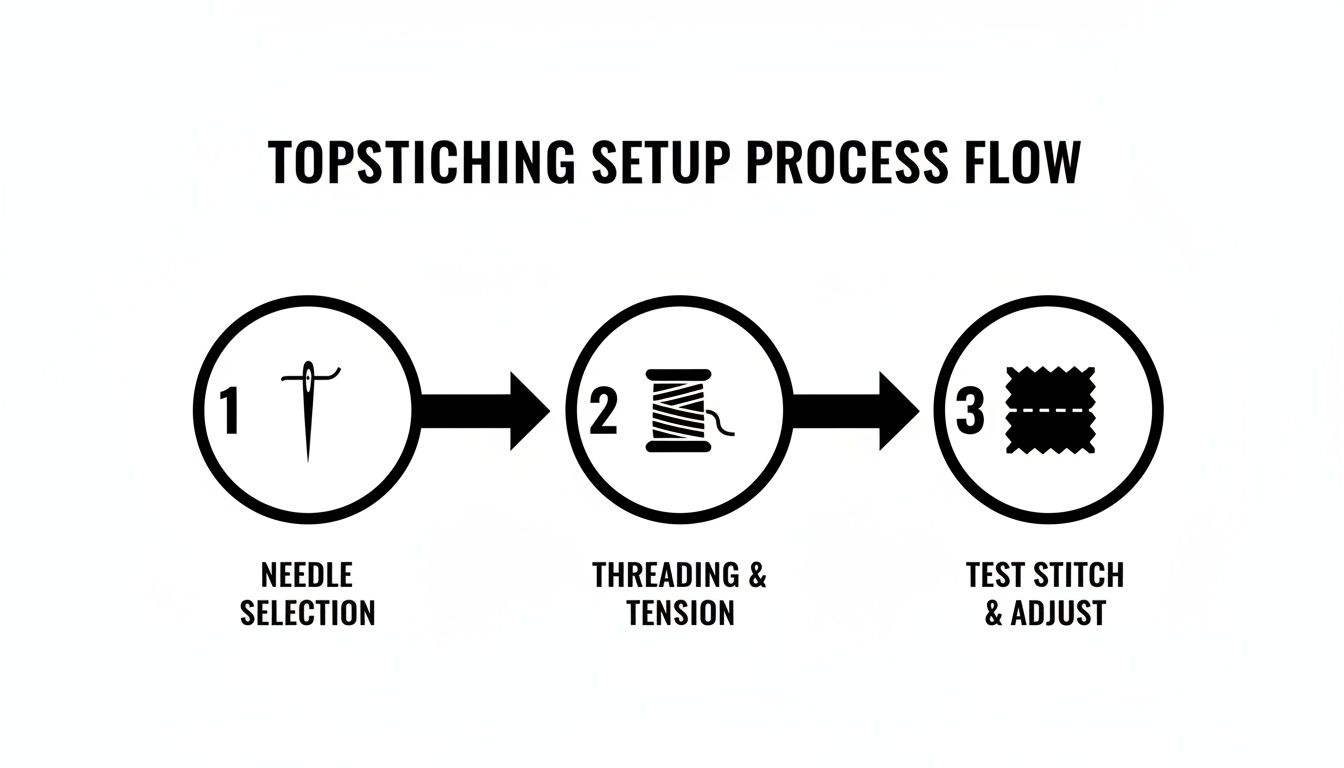
As you can see, success really is a three-part harmony: having the right needle for your fabric, using the correct thread combo, and always—always—running a quick test on a scrap piece to make sure it all looks right.
Alright, you're ready to sew. Place your fabric under the needle, lining up the guide on your presser foot with the seam or the fabric's edge. Don't have a special foot? No problem. You can easily make your own guide. I've used everything from a piece of washi tape to a stack of sticky notes placed right on the machine's throat plate to keep my stitching perfectly parallel.
Sew at a slow and steady pace. Seriously, rushing is the enemy of a straight line. Concentrate on guiding the fabric gently, letting the machine do the heavy lifting of pulling it through. Your only job is to keep that fabric edge right up against your guide.
Crucial Tip: Whatever you do, don't backstitch at the beginning and end of your topstitching. Backstitching creates a thick, messy-looking knot that really stands out. Instead, just leave long thread tails (about 4–5 inches) when you start and stop.
Once you're done, dealing with those thread tails is easy and gives you a flawless finish.
By following these simple steps—pressing well, setting up your machine correctly, guiding the fabric steadily, and finishing cleanly—you'll build the muscle memory and technique for beautiful topstitching every time.
Once you've nailed the basic straight topstitch, you can start to play. Think of it less as a simple stitch and more as a design tool with a ton of creative potential. Learning a few different techniques is like moving from a single graphite pencil to a full set of colored pencils—suddenly, you have a whole new range of ways to add detail, structure, and polish.
Getting comfortable with these key variations will give you a powerful set of finishing options. You'll know just what to do for the sharp collar on a cosplay uniform or the delicate final touch on a quilt. Let's dig into some of the most useful and popular topstitching techniques you can add to your repertoire.
Ever look at a high-end garment and wonder how they get that impossibly neat, crisp line of stitching right on the very edge of a seam? That's edgestitching. It’s a specific type of topstitching that runs incredibly close to a folded edge or seam, usually just 1/16 to 1/8 of an inch away. Its primary job is functional: it keeps facings, linings, and seam allowances tacked down and out of sight.
This is the secret weapon behind perfectly flat collars, cuffs, waistbands, and pocket openings. Edgestitching stops the fabric from rolling to the outside and gives your project a clean, professional finish. For the best results, an edge-stitching foot is a lifesaver. Its built-in guide makes sewing a ruler-straight line almost foolproof.
If you want to achieve that classic ready-to-wear look, especially on knit fabrics, twin needle topstitching is a must-know technique. A twin needle (sometimes called a double needle) is a special needle that fits right into your standard sewing machine. It creates two perfectly parallel rows of straight stitches on the top, while the bobbin thread underneath forms a zigzag that gives the seam some stretch.
This makes it the go-to choice for hemming t-shirts, leggings, and activewear. The stitch provides a durable, flexible finish that moves with the fabric instead of popping under pressure. It's also a fantastic decorative touch on woven fabrics, often seen on the yokes of denim jackets or down the legs of jeans for that iconic, rugged style.
Sewist's Secret: Using a twin needle is one of the quickest ways to make a homemade knit garment look store-bought. Those parallel lines instantly mimic the look of a coverstitch machine, signaling a professional finish without you needing to buy specialized equipment.
Don't let the built-in stitches on your sewing machine go to waste! Most modern machines come packed with an array of decorative stitches, and they can be used for so much more than just small embellishments. Using one of these patterns as your topstitch is a fantastic way to inject personality and unique flair into any project.
Imagine a simple scallop stitch running along the hem of a child's dress, or a cool geometric pattern outlining the pockets on a handmade tote bag. For cosplayers, this is an incredible tool for recreating the intricate trim you see on character costumes. When you venture into decorative topstitching, always test on a scrap first. You’ll want to use a slightly longer stitch length and maybe switch to a satin stitch foot to help the fabric feed smoothly. You might just find your new signature finishing touch.
Even when you've done everything right, topstitching can throw you a curveball. It happens to everyone! Let's walk through a couple of the most common hiccups sewers run into and how to fix them so you can get back to what you love.
Puckering is probably the #1 topstitching frustration. You’re sewing along, and the fabric starts bunching up under your beautiful stitches. What gives?
Nine times out of ten, the problem is tension. Think about it: you've got that thick, heavy topstitching thread on top and your regular, lighter thread in the bobbin. This creates a natural imbalance that your machine needs a little help with. Try bumping up the upper thread tension just a notch or two. This small adjustment helps pull the bobbin thread up a bit tighter, forcing the stitch to lie flat and smooth.
Specialized guide feet are fantastic, but you don't need one to sew a perfectly straight line. You can easily make your own guide right on your machine.
My favorite trick? A small stack of sticky notes. Just place them on your machine's throat plate right where you want the edge of your fabric to be. A piece of washi tape or painter's tape works just as well. Simply keep your fabric edge gliding along the tape's edge as you sew, and you'll have a dead-straight guide for a flawless stitch line.
This is where you get to play designer! Choosing between thread that blends in or pops out completely changes the feel of your project. There's no right or wrong answer—it all depends on the look you're going for.
A Simple Guideline: If the goal is strength without distraction, match your thread. If you want to add a deliberate design element, go bold with contrast.
Learning how to navigate these little challenges is what topstitching is all about. Once you know how to fix puckering, guide your fabric with confidence, and make intentional thread choices, you've unlocked the control and creativity to give any project that polished, professional look.
Here at Famcut.com, we're all about helping you bring your creative ideas to life, whether you're quilting a masterpiece or building the perfect cosplay. Check out our community and find inspiration for your next project at https://famcut.com.
At High Country Quilts we care deeply about community. With our experiences in retail, we know that a store is not only a place to shop but also a place for the community to gather and share. During this busy...

Hi! We’re Adam and Renee Wheaton, the new owners of High Country Quilts! For more than 40 years, we’ve owned and operated vacuum and sewing businesses. Following in Renee’s father’s footsteps after he retired from All Discount Vacuum and Sewing in Colorado...


Leave a comment