

We Love Our Quilting Community
At High Country Quilts we care deeply about community. With our experiences in retail, we know that a store is not only a place to shop but also a place for the community to gather and share. During this busy...


Ever wondered what separates a garment that just fits from one that feels truly comfortable and looks professionally made? The secret ingredient is something called sewing ease.
Think of it as the intentional "breathing room" added to a pattern. It's the crucial difference between your raw body measurements and the finished size of your clothing, making sure you can actually move, sit, and live in what you create.
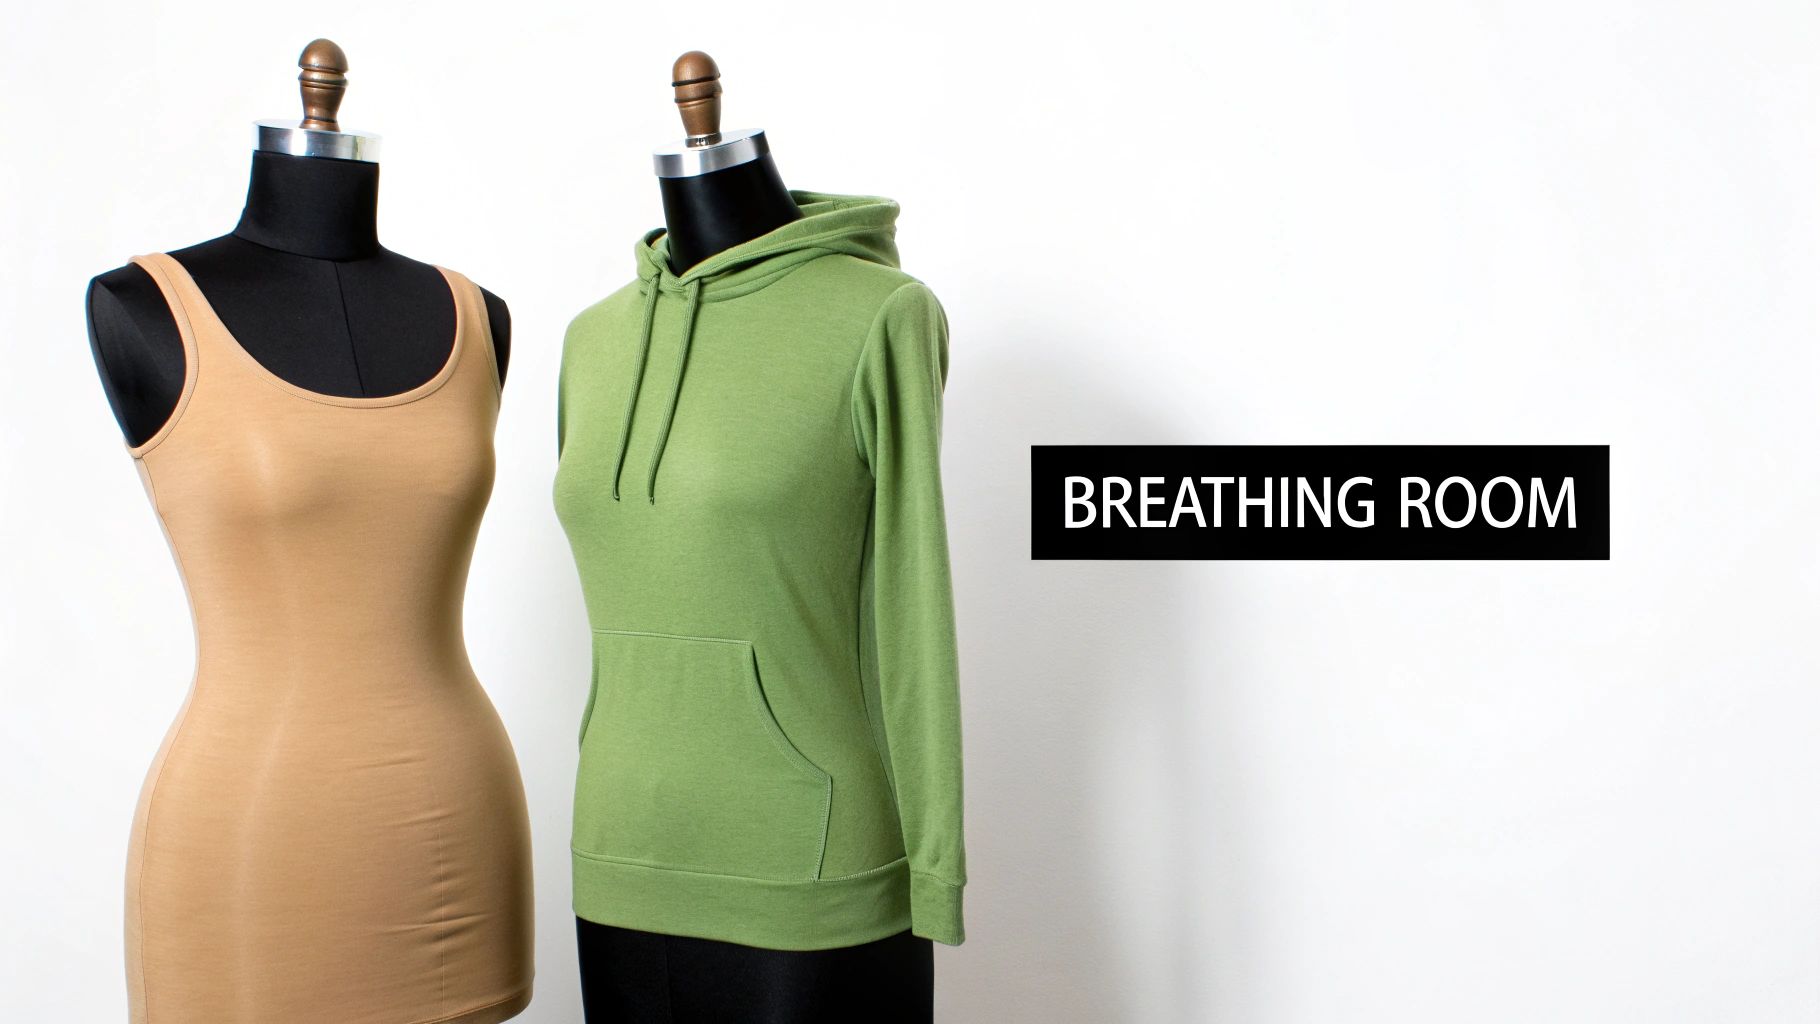
Picture the difference between a skin-tight compression shirt and a breezy, oversized linen tunic. That vast difference in fit comes down to one thing: the amount of ease. Without it, every piece of clothing would be uncomfortably constricting, fitting more like a wetsuit than a wearable garment. Mastering the concept of sewing ease is what turns a flat piece of paper into something you'll love to wear.
This isn't a new idea, either. The amount of ease has always shifted with fashion. Early 20th-century garments were quite fitted, often with just 1 to 2 inches of ease. Fast-forward to the 1920s, and looser styles took over, sometimes with more than 4 inches of ease to achieve that classic, drop-waist flapper silhouette. You can find more on the evolution of clothing production over on UniformMarket.com.
When you're sewing, you'll encounter two distinct types of ease:
The real artistry in getting a perfect fit is in the interplay between these two. One ensures your clothes are wearable, while the other brings your creative vision to life. Nailing this balance is what makes a project look truly polished and professional.
To make the distinction crystal clear, here’s a quick side-by-side comparison. Think of wearing ease as the non-negotiable foundation for movement, while design ease is the stylistic choice built on top of it.
| Feature | Wearing Ease | Design Ease |
|---|---|---|
| Primary Purpose | Function and comfort | Style and silhouette |
| Is it Optional? | No, it's essential | Yes, it depends on the design |
| Amount | Minimal (e.g., 1-3 inches) | Varies widely (from zero to 10+ inches) |
| Garment Example | Fitted t-shirt | Oversized hoodie or A-line skirt |
Ultimately, understanding how these two types of ease work together is a game-changer. It gives you the power to not just follow a pattern, but to truly understand and adjust it to create garments that fit your body and your personal style perfectly.

To really get a handle on what sewing ease is all about, you need to know that it comes in two distinct flavors. These two types work hand-in-hand to create clothes that look good and feel great, but they have completely different jobs. You can think of them as the science and the art of getting the perfect fit.
The first, and most essential, is wearing ease. This is the absolute bare minimum of extra room you need in a garment just to exist in it. It’s what lets you breathe, bend your elbows, sit down, or reach for a coffee mug on the top shelf without hearing that horrible riiiip of a seam giving way.
Without wearing ease, your clothes would fit like a sausage casing, restricting your every move. It’s the behind-the-scenes hero that makes your handmade wardrobe truly wearable.
For any garment made from a non-stretch fabric, wearing ease is the foundation. It isn't about style; it's a practical necessity. The amounts are pretty small, but the difference they make is enormous.
Here’s a general guide for the minimums you'll need:
Think of wearing ease as the invisible engineering in your clothes. It’s what separates a shirt that just looks good on the hanger from one that actually feels amazing to wear all day long.
Okay, so once you’ve covered the basics with wearing ease, it’s time for the fun part: design ease. This is all the extra room added on top, purely for stylistic effect. It's how a garment gets its specific shape, silhouette, and personality.
Design ease is what makes a shirt tailored and sleek, relaxed and comfy, or dramatically oversized. A sharp, structured blazer will have very little design ease to keep its clean lines. On the other hand, a floaty bohemian maxi dress might have a whopping 10 inches or more to get that breezy, effortless drape. This is where your creative vision truly comes to life.
Think of sewing ease as the secret ingredient that makes a piece of clothing feel just right. It’s the difference between a shirt that moves with you and one that feels like a straightjacket, or a pair of pants that hangs beautifully versus one that just looks baggy. Nailing the right amount of ease is what separates a homemade project from a truly professional-looking garment you’ll reach for again and again.
When you get the ease wrong, you'll know it immediately. Too little, and everything feels tight. Seams pull, buttons gape, and you can barely lift your arms. Besides being incredibly uncomfortable, this constant strain can weaken the fabric and stitches, causing your hard work to wear out way too fast.
But too much ease can be just as bad. A design that was meant to be sharp and tailored ends up looking frumpy and shapeless. The garment just hangs off you, completely losing the silhouette the pattern designer had in mind.
So, what's the magic number for ease? There isn't one. The perfect amount is a delicate dance between the fabric you've chosen and what you plan to do while wearing the garment.
The material itself is a huge factor. A crisp, woven cotton with zero stretch needs more ease built in just so you can move. On the other hand, a slinky rayon or a jersey knit with plenty of stretch can be made with much less ease, or even negative ease, for a body-hugging fit. The differences between materials like cotton vs polyester fabrics will totally change how much room you need.
A garment’s purpose is just as crucial. A workout top needs a ton of ease to accommodate all sorts of movement. A structured blazer, however, only needs enough ease to slip comfortably over a blouse without looking sloppy.
Understanding ease transforms you from someone just following a pattern to an artist making intentional choices. You start to see how those numbers on the chart directly translate into comfort, style, and a garment that lasts.
In fact, studies have shown that insufficient ease can make a garment feel up to 40% less comfortable. Simply adding the right amount of ease—often just a 5-10% extra fabric allowance in critical spots—doesn't just boost comfort. It also extends the life of your clothes by an average of 15% because it reduces stress on the seams. This little detail is fundamental to creating high-quality clothing that stands the test of time.
Alright, let's get practical. Understanding ease is one thing, but actually finding it in a pattern is where you start to take control of your sewing. This is the skill that bridges the gap between a "meh" fit and a truly polished, custom-made garment. The best part? It’s surprisingly simple.
The secret you're looking for is usually hidden in plain sight on the pattern envelope or instruction sheet. You need to find a small but mighty chart labeled finished garment measurements. Don't get this confused with the body measurement chart—that’s just for picking your starting size. The finished measurements chart tells you the actual final size of the garment at the bust, waist, and hips.
Figuring out the total ease in any pattern boils down to a quick bit of math. All you need is a tape measure, your pattern, and a moment to do some basic subtraction.
Formula: Finished Garment Measurement – Your Body Measurement = Total Ease
That one little number tells you so much! It's the "breathing room" the designer intended for the garment. You’ll know instantly if it's meant to be skin-tight, relaxed, or intentionally oversized, which helps you make smarter decisions before you cut into your good fabric.
This visual guide really drives home why getting the right amount of ease is so crucial.
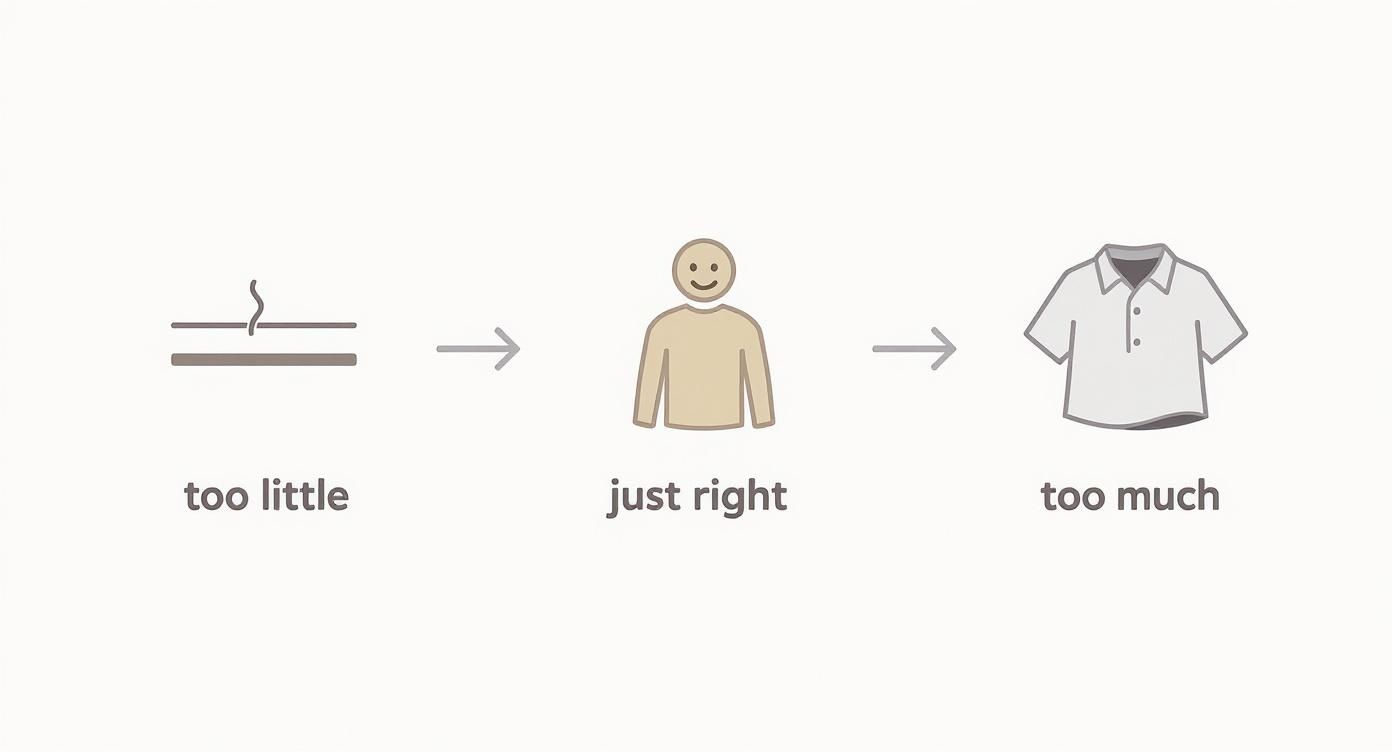
As you can see, ease is what makes a garment comfortable and stylish. It’s the key to avoiding a fit that’s either restrictively tight or unflatteringly sloppy.
Let's walk through a quick scenario. Say you’re planning to sew a simple woven top. You've measured your full bust and it’s 36 inches.
You check the pattern’s finished garment measurements, and for your size, it lists the bust as 40 inches. Time to plug those numbers into our formula:
40 inches (Finished Garment) – 36 inches (Your Body) = 4 inches (Total Ease)
And there you have it. You now know this top has a total of 4 inches of ease at the bust line. This typically translates to a comfortable, classic fit—it includes about 2 inches of wearing ease (so you can move!) and another 2 inches of design ease for a look that's relaxed but not baggy. With that simple calculation, you’ve just decoded the pattern’s intended fit.
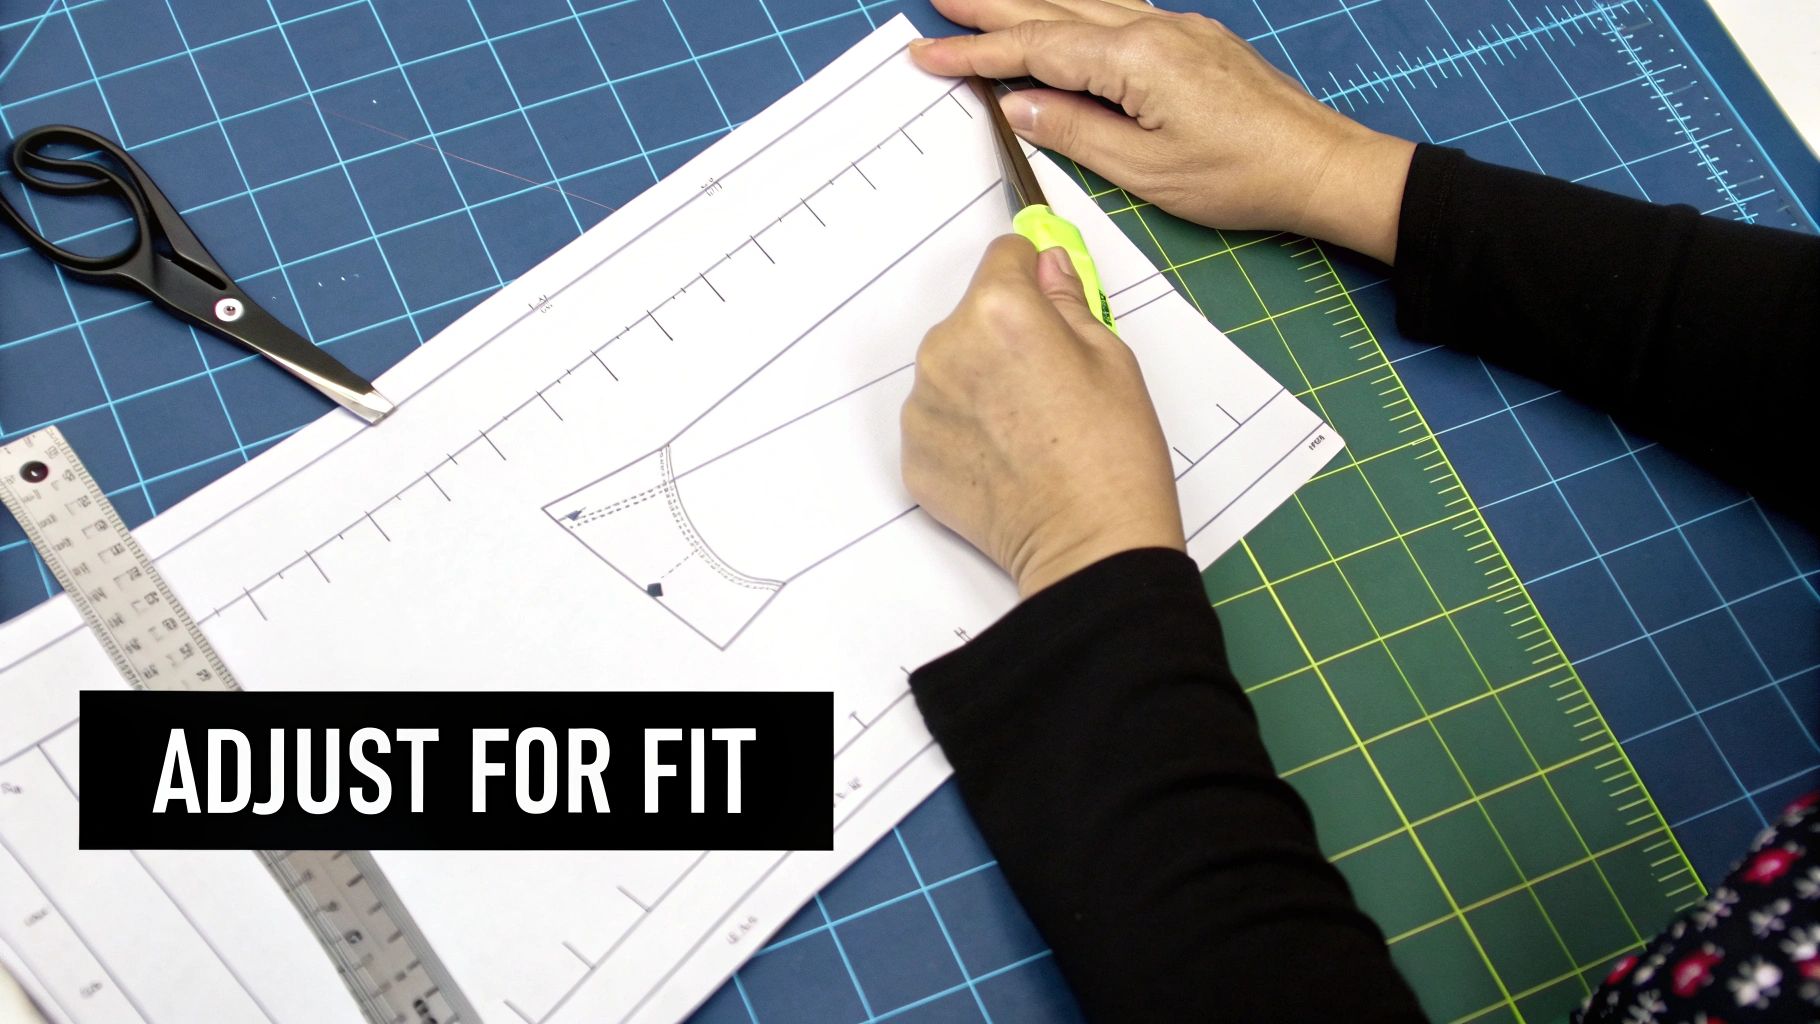
Okay, you've got the numbers down. Now for the fun part: actually changing the pattern to make it work for your body. This is where you graduate from following instructions to truly taking control of your sewing projects. Don't let pattern alterations scare you off—a few straightforward tweaks can make all the difference between a garment that's "okay" and one that feels like it was made just for you.
Most of the time, we're just adding or removing a bit of room in key places. Let's say a pattern feels a little too tight across your bust or biceps. You don't have to scrap it and go up a full size, which might make the shoulders too wide. Instead, you can use a classic technique called the “slash and spread” method. It's exactly what it sounds like: you'll carefully cut your paper pattern piece and spread it apart to add that extra space right where you need it, leaving the rest of the pattern untouched.
And if you have the opposite problem—too much fabric somewhere? You can simply pinch out the excess on the pattern piece, creating a dart or redrawing a seam to get a closer fit. Easy as that.
Once you get the hang of a few common adjustments, you’ll feel confident enough to tackle almost any pattern that comes your way. These are the fit issues that pop up again and again.
Here are a few you'll probably encounter:
A quick reminder: your fabric choice is a huge part of this equation. A structured, non-stretch cotton will require you to be pretty spot-on with your ease calculations. But a stretchy jersey knit? It's much more forgiving and might not need any changes at all.
Learning these basic alterations is like getting a secret key that unlocks a world of custom-fit clothing. You'll be able to tweak any pattern to match your unique shape and create garments you absolutely love to wear.
Once you start wrapping your head around ease, a few practical questions almost always pop up. Let's walk through some of the most common ones I hear from other sewers to make sure you've got a solid handle on this crucial concept.
You bet it does. This is probably one of the most important things to remember.
Woven fabrics like cotton, linen, or chambray have zero natural stretch. For these, you always need positive ease—making the garment bigger than your body—otherwise, you simply won't be able to move.
On the flip side, you have knit fabrics, which are a whole different ballgame because they stretch. Knits often require very little ease, zero ease, or even negative ease. This is where you intentionally make the garment smaller than your body measurements for a snug, form-fitting look, like you'd see in leggings or a swimsuit.
This is a big one, and getting them mixed up can really throw off your project.
Think of ease as the "living room" built into the main part of your pattern pieces. It’s all about comfort, movement, and the overall style.
Seam allowance, however, is just that narrow little strip of fabric—usually around ½" to ⅝"—that runs along the very edge of a pattern piece. Its only job is to give you space to stitch the seams together. It has absolutely nothing to do with how the final garment will fit.
Don't get these two mixed up. Ease dictates how your garment fits and feels on your body, while seam allowance is purely a construction detail.
I know it’s tempting, but this is a shortcut you should almost always avoid. While going up a size does add more room, it adds it everywhere, and often in all the wrong places.
Sizing up will make the shoulders wider, the armholes bigger, and the neckline drop lower. This can completely throw off the intended structure and silhouette of the design. A much better approach is to choose your size based on your key body measurements and then make specific adjustments to add ease exactly where you want it. That’s the secret to a great, custom-feeling fit.
Ready to start your next project with confidence? Find the perfect patterns, fabrics, and classes at Famcut.com. Explore our collection at https://famcut.com and bring your creative visions to life.
At High Country Quilts we care deeply about community. With our experiences in retail, we know that a store is not only a place to shop but also a place for the community to gather and share. During this busy...

Hi! We’re Adam and Renee Wheaton, the new owners of High Country Quilts! For more than 40 years, we’ve owned and operated vacuum and sewing businesses. Following in Renee’s father’s footsteps after he retired from All Discount Vacuum and Sewing in Colorado...


Leave a comment