Three-Day Quilting & Sewing Retreat Extravaganza
October 15th –17th
Join us for an unforgettable three-day retreat filled with creativity, inspiration, and hands-on learning! Whether you’re pas...
8 Inspiring Small Quilting Projects to Try in 2025
Small quilting projects deliver big satisfaction: they’re fast, require minimal supplies, and encourage creative play. In this roundup, you’ll find eight inspiring ideas – from potholders to fabric bookmarks – each detailed with skill levels, estimated time, materials suggestions, pattern links, and expert tips. Whether you aim to practice new stitches on a BERNINA machine, create a quick gift, or prep for your next workshop, these projects fit any schedule.
You’ll discover projects ideal for gift-giving, home decor, beginner-friendly sewing classes, and BERNINA machine demos. Each idea includes materials you can find at your local store, plus tips to make sewing easier and fun. Our focus on small quilting projects ensures quick wins and keeps creative momentum high.
What You’ll Learn
Skill level guidance and time estimates for each project
Fabric choices, tool suggestions, and precut options
Pattern links or concise how-to summaries
Pro tips on store-bought fabrics and accessories
Why It Matters
Spark creativity with manageable projects
Build confidence before tackling larger quilts
Make handcrafted gifts that delight recipients
Connect with local classes and machine support
This straightforward guide to small quilting projects helps quilters of all levels turn simple ideas into mini masterpieces and connect with local resources for ongoing support.
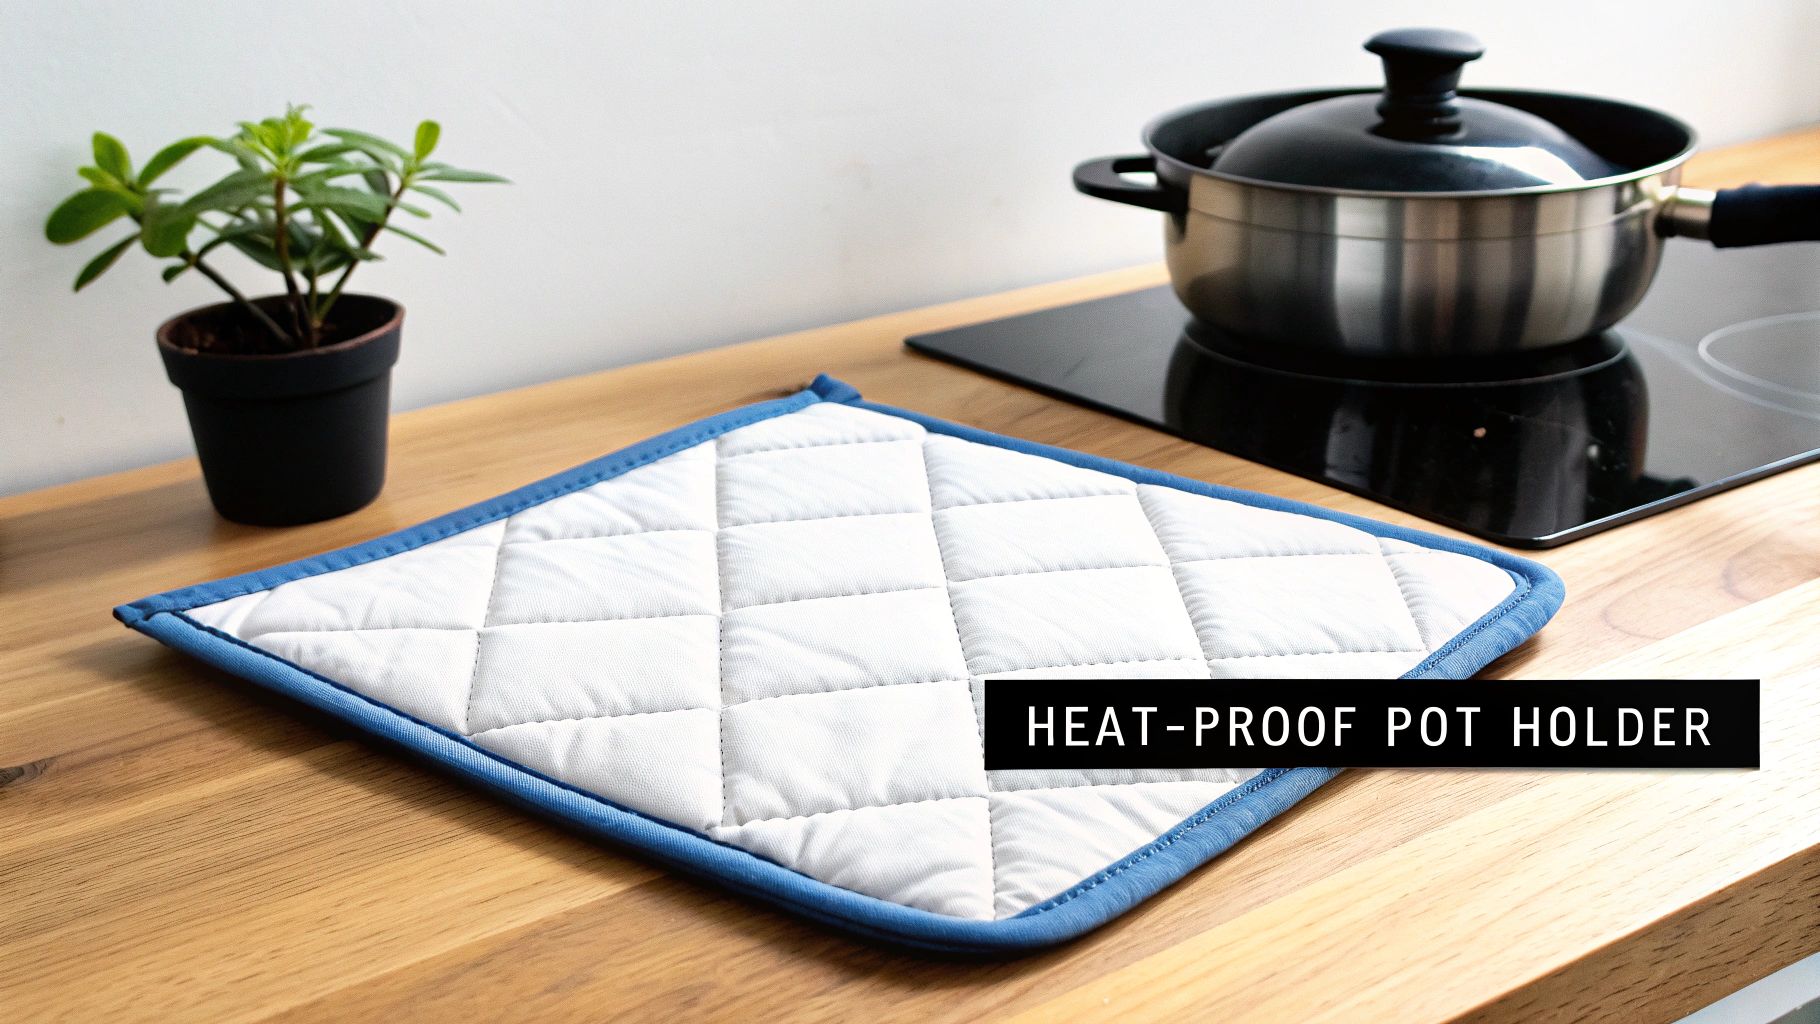
1. Quilted Pot Holders and Hot Pads
Quilted pot holders and hot pads are small quilting projects built from two fabric layers sandwiching insulated batting. At 8×8 to 10×10 inches, they protect hands and surfaces from heat while showcasing decorative stitches. This beginner-friendly idea jumps off the page in any roundup of small quilting projects, making great gifts or kitchen accents.
Examples and Inspiration
Seasonal themed pot holders (pumpkins in autumn, snowflakes at winter)
Coordinated kitchen sets with matching tea towels and hot pads
Personalized monogrammed squares as wedding or housewarming gifts
Materials and Precut Suggestions
Fabrics: Two 10″ squares of 100% cotton (prewashed)
Batting: One 10″ cotton or Insul-Bright® square
Notions: Coordinating thread, 2″ fabric strip for loop corner
Stack fabric right sides together, place batting on top
Quilt diagonal lines every 1″ using contrasting thread
Trim edges to 9½″ square, attach 2″ loop strip at corner
Bind all around with 2½″ bias binding
Actionable Tips
Pre-wash all cotton fabrics to avoid post-quilt shrinkage
Use visible thread for crisp grid quilting patterns
Anchor batting edges with quilting lines, not pins
Finish loops large enough for easy hanging
Why Choose This Project
Quick 1–2 hour completion time fits beginner schedules
Hands-on practice for straight-line quilting and binding
Build confidence before tackling larger quilts
Perfect retail demo item in local quilting classes
Get Support and Next Steps
Join a local quilt group or book a class at your neighborhood sewing shop. Explore more detailed patterns at BERNINA’s project library (https://www.bernina.com) for tips on machine settings and decorative stitches.
2. Mug Rugs and Coasters
Mug rugs and coasters are compact quilted projects—approximately 12×16 inches for mug rugs and 4×4 inches for coasters—designed to cradle beverages and protect surfaces. These small quilting projects combine functional utility with decorative patchwork or appliqué, making them perfect stash-busters and quick craft gifts. Quilters of all skill levels can explore piecing, appliqué, and decorative stitching on a manageable scale.
Examples and Inspiration
Scrappy patchwork mug rugs using leftover 2″ and 3″ strips
Appliquéd seasonal motifs (pumpkins in autumn, holly at winter)
Coordinated coaster sets in matching charm-square packs
Materials and Precut Suggestions
Fabrics: Four 6″ cotton squares for a mug rug or two 5″ squares for a coaster
Batting: One 6″ cotton or bamboo blend scrap piece
Notions: Fusible web for appliqué, coordinating thread, 2″ strip for binding
Tools: Rotary cutter, quilting ruler, sewing machine, small iron
Step-by-Step Summary
Prepare top: fuse appliqué shapes or piece patchwork blocks
Layer right-side up top, batting, and backing; baste with spray or pins
Quilt around motifs or in-the-ditch every ½″ using decorative thread
Trim to exact 12×16″ or 4×4″ size, then bind edges with 2″ strips
Actionable Tips
Use charm-square precuts for speedy color coordination
Chain-piece multiple units for assembly-line efficiency
Try decorative stitches on edges for quick finishing flair
Press seams open to keep coasters flat and neat
Why Choose This Project
Excellent stash-busting idea for small scraps
Quick 1–2 hour make time boosts confidence
Hands-on practice with appliqué and tiny bindings
Perfect for gifts, market stalls, or store demos
Get Support and Next Steps
Join a local quilt guild or sign up for a seasonal mug rug workshop at your neighborhood sewing shop. Explore more small quilting projects and detailed tutorials in BERNINA’s project library (https://www.bernina.com) for machine tips and stitch recommendations.
3. Table Runners
Table runners are narrow quilted fabric strips typically 12 to 18 inches wide and 36 to 54 inches long. They decorate and protect table surfaces while showcasing quilting designs. This item ranks high among small quilting projects for its versatility and impact.
Examples and Inspiration
Holiday-themed appliqued runners with festive motifs
Striped patterns using seasonal fabric bundles
Medallion centerpieces framed with coordinating borders
Scrappy log cabin styles for a cozy handmade look
Materials and Precut Suggestions
Fabrics: Five 18 × 22 in fat quarters or 2 yards of 100 percent cotton
Batting: One 14 × 40 in cotton or polyester batting piece
Notions: Coordinating thread, 2.5 in bias binding strips
Piece center blocks or appliqué motifs and add border strips
Layer top, batting, and backing fabrics; secure edges with pins
Quilt straight lines or custom designs using a walking foot
Trim edges to finished dimensions (12 × 36 in or desired length)
Attach binding all around with bias binding
Actionable Tips
Use a walking foot for even stitch length and quilt density
Sketch quilting motifs before piecing to guide stitching flow
Align directional prints lengthwise for a cohesive look
Try contrasting binding to frame the runner
Why Choose This Project
Instant table décor update with minimal yardage
Highlights quilting patterns in a visible area
Builds skills in border seams and long quilting lines
Complete in one afternoon for quick gratification
Get Support and Next Steps
Join a table runner workshop at your local quilt shop or find BERNINA tutorials online. Visit www.bernina.com for pattern downloads and machine settings tips.
4. Baby Quilts and Lap Quilts
Baby quilts and lap quilts are smaller-scale quilts ranging from 36×36 inches to 50×60 inches. These sweet projects combine skill-building patchwork with a functional finish that keeps infants cozy or serves as a handy throw. Ideal for baby showers and family gifts, they introduce quilters to block layouts, simple appliqué, and modern geometric designs.
Examples and Inspiration
Simple strip-pieced quilts with novelty fabric centers
Classic nine-patch baby quilts in pastel palettes
Appliquéd animal or character theme quilts for nurseries
Modern geometric lap quilts with bold color blocking
Materials and Precut Suggestions
Fabrics: Four to six coordinating 10″ squares of 100% cotton (prewashed)
Batting: One 40×50″ piece of 100% cotton or cotton-poly blend
Notions: Double-fold bias binding, appliqué fusible web if needed
Sew blocks into rows, then join rows into full top
Layer top, batting, and backing; baste with spray or pins
Quilt with straight lines or free-motion patterns
Trim edges and attach double-fold bias binding
Actionable Tips
Use child-safe, machine-washable fabrics for baby quilts
Pre-wash all fabrics to prevent post-quilt shrinkage
Choose 100% cotton batting for durability and gentle loft
Plan quilting lines to avoid bulky seam intersections
Bind with double-fold bias tape for extra strength
Why Choose This Project
Fills a practical need while honing piecing skills
4–6 hour project time fits busy schedules
Perfect personalized gifts that grow with the recipient
Expands technique repertoire before tackling larger quilts
Get Support and Next Steps
Join a local quilting group or sign up for a class at your neighborhood BERNINA retailer. Explore step-by-step patterns and machine settings at BERNINA’s project library (https://www.bernina.com) for added guidance.
5. Patchwork Pillows
Patchwork pillows are decorative or functional cushions sized 12×12 to 20×20 inches. They feature pieced patchwork fronts sewn from squares, strips, or appliqué motifs with quilted or plain backs. This project merges quilting techniques with home décor for custom accents or coordinating sets.
Examples and Inspiration
Strip-pieced rainbow pillows brighten a sofa or reading nook
Charm pack patchwork cushions using precut 5" squares
Appliquéd decorative pillows with florals or geometric shapes
Accent pillows matching larger bed or couch quilts
Materials and Precut Suggestions
Fabrics: Assorted 100% cotton prints, prewashed and pressed
Pillow Form: 14" square insert (or 18" for oversized look)
Backing: One 16"×16" solid fabric panel with zipper opening
Sew strips or blocks right sides together, press seams flat.
Layer front with batting and backing, quilt desired pattern.
Trim to 14½" square, add piping if desired.
Attach invisible zipper to back edges.
Insert pillow form and close zipper.
Actionable Tips
Use 14" pillow forms for standard 14½" covers.
Press seams open or to one side to reduce bulk.
Add piping or contrasting binding for polished detail.
Choose midweight fabrics to withstand wear.
Test zipper placement on scrap before sewing.
Why Choose This Project
Enhances home décor with custom quilting touches
Intermediate-level practice for piecing, quilting, and zippers
Quick 2–3 hour make for gift giving or workshops
Get Support and Next Steps
Join a local quilt group or book a class at your neighborhood sewing shop. Explore more detailed pillow patterns at BERNINA’s project library (https://www.bernina.com) for machine settings and decorative stitch ideas.
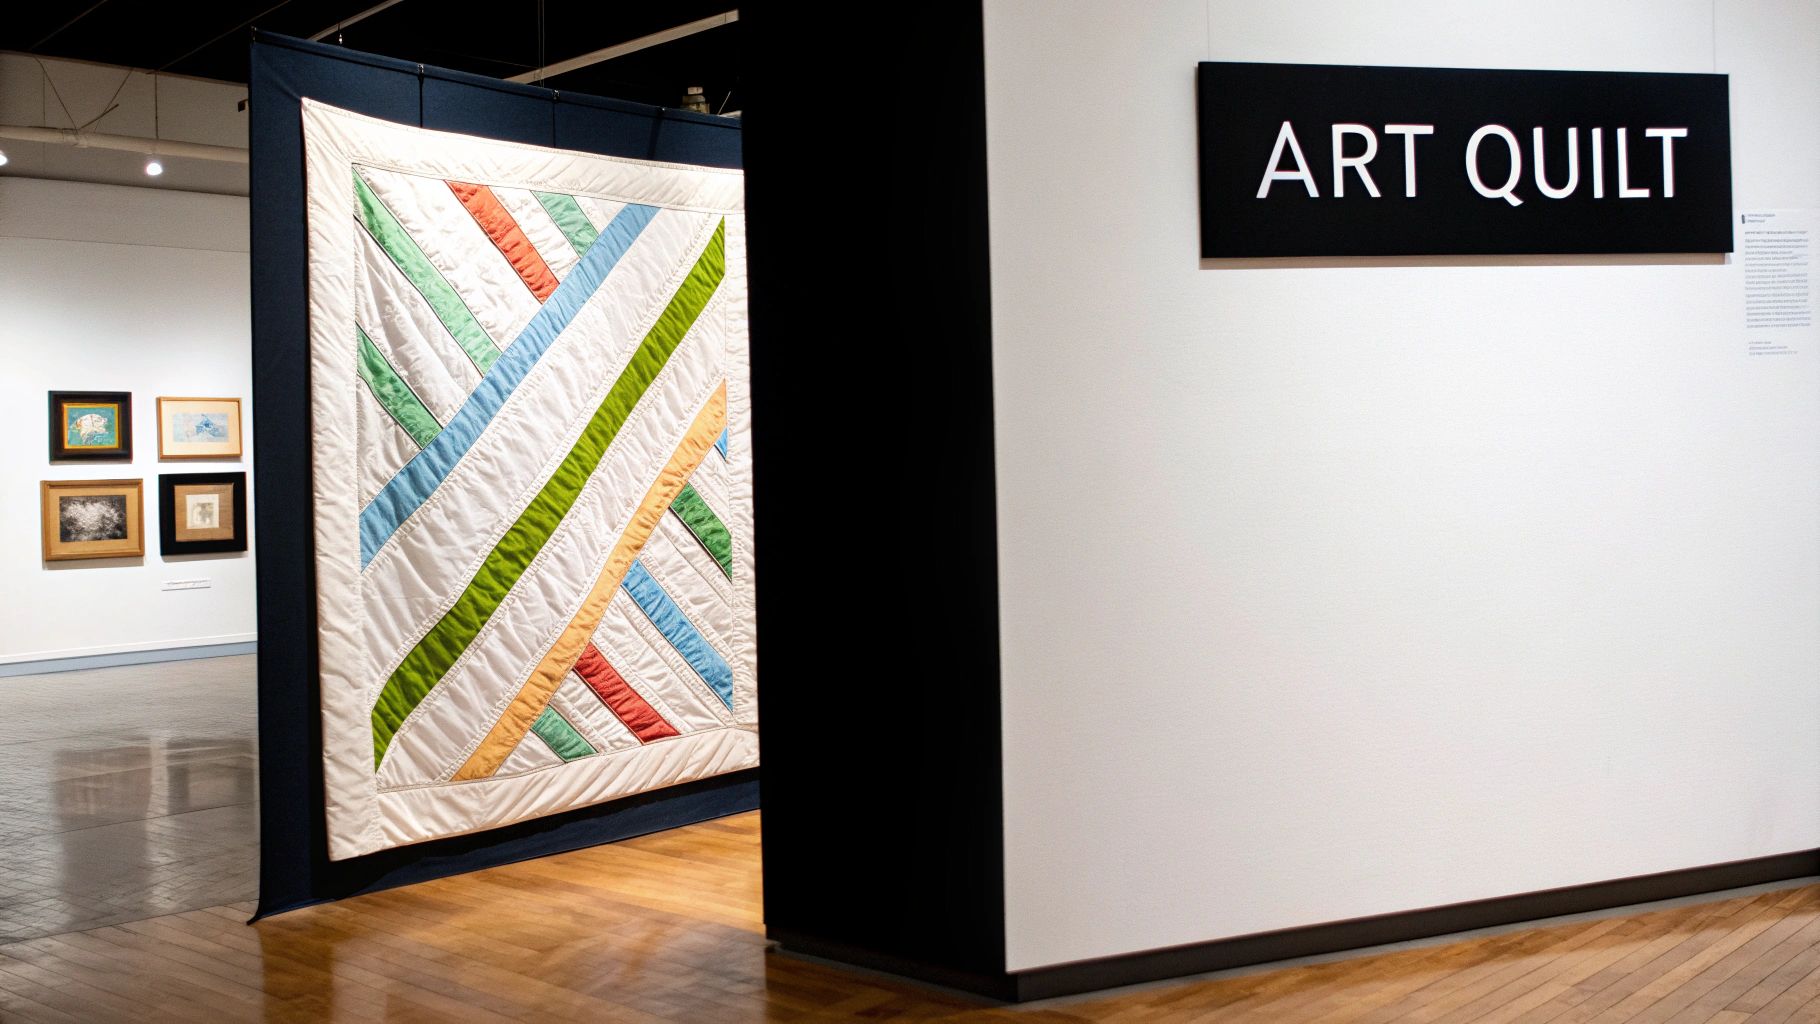
6. Wall Hangings and Smaller Art Quilts
Wall hangings and smaller art quilts are creative wall displays sized 24×24 to 36×36 inches that focus on color play and quilting artistry over function. These small quilting projects let you experiment with design, thread art, and gallery-quality finishes in a manageable size.
Examples and Inspiration
Modern geometric art quilts featuring triangles and stripes
Abstract fabric collages with layered patches and thread drawing
Seasonal motifs like autumn leaves or spring florals
Gallery-ready mini quilts with minimalist color palettes
Materials and Precut Suggestions
Fabrics: Assorted high-contrast quilting cotton, 24″×24″ or 36″×36″
Batting: 26″×26″ cotton or wool batting for drape and loft
Notions: Water-soluble marking pen, 2″ strip for hanging sleeve
Tools: Free-motion foot, walking foot, design wall or flannel board
Step-by-Step Summary
Sketch design on paper or pin shapes to a design wall
Cut and fuse or raw-edge applique fabric pieces
Layer backing, batting, and top; baste with spray or pins
Quilt free-motion or straight-line patterns to emphasize motifs
Attach hanging sleeve to backing before binding edges
Actionable Tips
Prewash fabrics to avoid distortion after quilting
Choose high-contrast or tone-on-tone prints for depth
Test free-motion motifs on scrap to refine your stitch length
Add a lightweight sleeve wide enough for a wooden dowel
Why Choose This Project
Showcases artistic vision without a large commitment in time
Enhances free-motion quilting and composition skills
Creates personal decor or gift-worthy art pieces
Achievable in 4–6 hours, perfect for weekend makers
Get Support and Next Steps
Join the Modern Quilt Guild or local art-quilt meetup for critique and inspiration. Explore Quilting Arts Magazine (https://www.interweave.com) for advanced techniques. Book a free-motion quilting workshop at your nearest BERNINA dealer to refine your machine settings.
7. Bag Linings and Fabric Pouches
Bag linings and fabric pouches are small quilted containers sized from 4×8 to 10×14 inches. By combining pieced or quilted panels with a fully lined interior and a zipper or drawstring closure, you create functional storage for notions, cosmetics, or small gifts. This project skillfully blends decorative quilting with practical sewing techniques.
Examples and Inspiration
Quilted cosmetic bags with color-blocked panels and metal zipper pulls
Patchwork needle cases with snaps or magnetic closures
Fat quarter storage pouches for sewing supplies or travel toiletries
Drawstring project bags with cork cord and toggles
Materials and Precut Suggestions
Fabrics: Two 10″×16″ fat quarters of 100% cotton for exterior and lining (prewashed)
Interfacing: One 10″×16″ piece of fusible midweight interfacing for structure
Notions: 9″–12″ zipper or 1⁄4″ cord for drawstring, small handles or tab hardware
Fuse interfacing to the wrong side of exterior fabric; quilt simple lines or custom motifs
Layer exterior and lining right sides together, insert zipper or pin drawstring casing
Sew around pouch perimeter, leaving a small opening in lining for turning
Box corners by marking and sewing squares at each bottom corner, then trim
Actionable Tips
Use fusible interfacing instead of batting for crisp shape retention
Pre-mark corner squares with fabric pencil for accurate box corners
Coordinate inside and outside prints for a professional reveal
Choose quality zippers or toggles to elevate your finish
Why Choose This Project
Builds zipper-installation confidence on a small scale
Versatile gift option for quilters, crafters, or makeup lovers
Quick 2–4 hour finish ideal for class demos or weekend sewing
Utilizes fat quarters and scrap fabrics to reduce stash waste
Get Support and Next Steps
Join a local quilt group or reserve a zipper workshop at your neighborhood sewing shop. Explore more patterns and machine settings at BERNINA’s project library (https://www.bernina.com) to master professional-grade pouches.
8. Quilted Bookmarks and Fabric Greeting Cards
Quilted bookmarks and fabric greeting cards are miniature quilting projects combining two fabric layers and a thin batting core for durability and decorative appeal. Measuring just 2″×6″ for bookmarks and 5″×7″ for greeting cards, these designs showcase artistic flair on a small scale. Ideal for scrap usage and quick completion, they make heartfelt gifts or promotional items in any roundup of small quilting projects.
Examples and Inspiration
Pieced patchwork bookmarks accented with ribbon tassels
Appliquéd fabric greeting cards featuring floral or seasonal motifs
Fabric cards with decorative topstitching, beads, or small charms
Teacher appreciation bookmarks with apple or book-themed appliqué
Materials and Precut Suggestions
Fabrics: 2½″×6½″ strips for bookmarks, 6″×8″ squares for cards
Batting: Lightweight cotton batting or fusible fleece scraps
Notions: Lightweight stabilizer, ribbon or twill tape, small beads or charms
Tools: Rotary cutter with a small ruler, BERNINA sewing machine
Step-by-Step Summary
Fuse stabilizer to wrong side of front fabric, layer batting between fabric pieces
Quilt simple lines or motifs ½″ apart to secure layers
Trim quilted sandwich to final dimensions, clip corners, turn right side out if enclosed
Attach ribbon loop at top of bookmark or adhere fabric panel onto card blank
Actionable Tips
Use a tear-away stabilizer for crisp appliqué edges
Pre-make card blanks to streamline assembly
Add ribbon ends and charms before final quilting to anchor securely
Chain-piece multiple bookmarks to minimize thread changes
Why Choose This Project
Fast 30–60 minute turnaround perfect for small quilting projects
Excellent scrap-busting idea to clear fabric remnants
Great for personalized gifts, classroom fundraisers, or craft fairs
Builds skills in precision piecing and fine-scale quilting
Get Support and Next Steps
Join your local quilt guild or register for a small-projects workshop at a BERNINA dealer. Explore free patterns and video tutorials for more small quilting projects at https://www.bernina.com.
You’ve explored eight versatile small quilting projects—from potholders to fabric greeting cards—each with clear skill levels, time estimates, and material suggestions. These bite-sized ideas prove that meaningful handmade gifts and home accents don’t require months of commitment.
Variety of Uses: Protect surfaces (mug rugs), beautify walls (mini art quilts), personalize accessories (zip pouches)
Scalable Skills: Build basic patchwork and free-motion techniques, then layer complexity
Quick Wins: Finish projects in an afternoon to sustain momentum
Plan Your Next Small Quilting Project
Gather your favorite precuts and scraps—mix solids, prints, and textured wovens
Choose a project that matches your calendar:
1–2 hours: quilted bookmarks, mug rugs
3–4 hours: potholders, fabric pouches
Weekend: table runner, baby quilt
Sketch a simple layout or use a print-at-home template
Check your BERNINA machine settings for stitch length and tension
Pin or spray-baste small sections to reduce shifting
Label each block or piece to stay organized
Hone Your Techniques
Patchwork Precision: Use a 1⁄4-inch foot and accurate seam allowances
Consistent Quilting: Practice stippling or straight-line quilting on small scraps
Binding Basics: Master mitred corners on a mini wall hanging before scaling up
Quilt As You Go: Finish one block at a time for instant gratification
Decorative Stitching: Try BERNINA’s utility stitches for edging mug rugs
Fabric Layering: Experiment with batting weights—cotton for flat projects, wool for loft
Embrace the Process and Impact
Small quilting projects serve as creative playgrounds. You’ll refine foundational sewing skills, learn fabric behavior, and gain confidence before tackling larger quilts. Each completed piece also makes a heartfelt gift or a statement accessory to brighten your home.
Joining local workshops accelerates your growth. Interact with fellow sewing enthusiasts, receive real-time feedback, and find inspiration in every stitch. Plus, using a reliable BERNINA machine ensures your seams stay straight and your designs stay crisp.
Keep these insights in mind as you start each mini project. Track your progress, celebrate small victories, and view mistakes as learning opportunities. Consistency will transform simple squares of fabric into treasured keepsakes.
Let today’s mini quilt spark tomorrow’s masterpiece. Happy sewing!
Ready to take your small quilting projects further? Visit High Country Quilts for hands-on BERNINA machine demos and local classes that bring your ideas to life. Discover tools, fabrics, and expert guidance at High Country Quilts.
At High Country Quilts we care deeply about community. With our experiences in retail, we know that a store is not only a place to shop but also a place for the community to gather and share. During this busy...
Hi! We’re Adam and Renee Wheaton, the new owners of High Country Quilts! For more than 40 years, we’ve owned and operated vacuum and sewing businesses. Following in Renee’s father’s footsteps after he retired from All Discount Vacuum and Sewing in Colorado...


Leave a comment