

Free Fabric All Year: Our 2027 Fabric Punch Card
November 2–25 only: buy a $200 gift card in either store and get a free yard of fabric every month of 2027.

Your first ten strips look fine until two of them go under the needle and the seam ripples. One end measures true, the other runs a hair narrow, and by the time the block is pressed it's small. The ruler is still on the mat, still square, and still carrying a slot you never cut through.
That's the part most beginners miss. A slotted ruler for quilting isn't a measuring tool with decorative openings cut into it. The slot is a channel that holds the rotary blade on a fixed path while the fabric sits still underneath, which is exactly what you need when you're cutting the same width twenty times in a row.
Treat the slot as a repeatable cutting path and the tool gets simpler. You make fewer decisions per cut, and you gain a way to check your own accuracy instead of trusting a printed tolerance on the package.
The slot spacing determines which widths you can cut along a ruler's fixed path. Common slotted rulers use 0.5-inch increments, with markings such as 2.5, 3, 6, 9 or 12 inches where those sizes are included, as shown in this slotted-ruler cutting demonstration. Align the ruler, cut through the selected slot, then turn it to crosscut the strips into squares or rectangles.
The printed marking is a starting point, not proof that your cut is accurate. Before making a batch, check the cut width against the ruler's markings and use that result to confirm your setup.
| Cut or shape | Ruler marking | Common use |
|---|---|---|
| 2.5-inch strip | 2.5 slot | Narrow strips for nine-patch and binding |
| 3-inch strip | 3 slot | Sashing and small-block strips |
| 6-inch strip | 6 slot | Wider borders and large-block strips |
| 9-inch strip | 9 slot | Large sashing and table runner pieces |
| 12-inch strip | 12 slot | Wide strips and long crosscuts |
| Squares and rectangles | Crosscut after a quarter turn | Units cut from strips already cut |
| 45-degree shapes | 45-degree marking | Diamonds and triangles |
| 60-degree shapes | 60-degree marking | Hexagons and equilateral triangles |
These markings serve different jobs. Straight slots make repeated strips; a quarter-turn crosscut turns those strips into squares and rectangles. Angle markings help cut diamonds and triangles, but they do not correct an uneven fabric edge or a ruler that has shifted.
Before cutting, confirm the ruler is aligned with the fabric edge and the selected slot matches the intended width. After the first cut, measure the result. Rulers from Creative Grids, Tula Pink and AccuQuilt at High Country Quilts let you compare slot increments with the sizes you plan to cut.
Cut forty 2.5-inch squares from a traced template and you've made forty alignments, forty pencil lines and forty chances to drift. A slotted ruler replaces that with one alignment and forty passes of the cutter through the same channel.
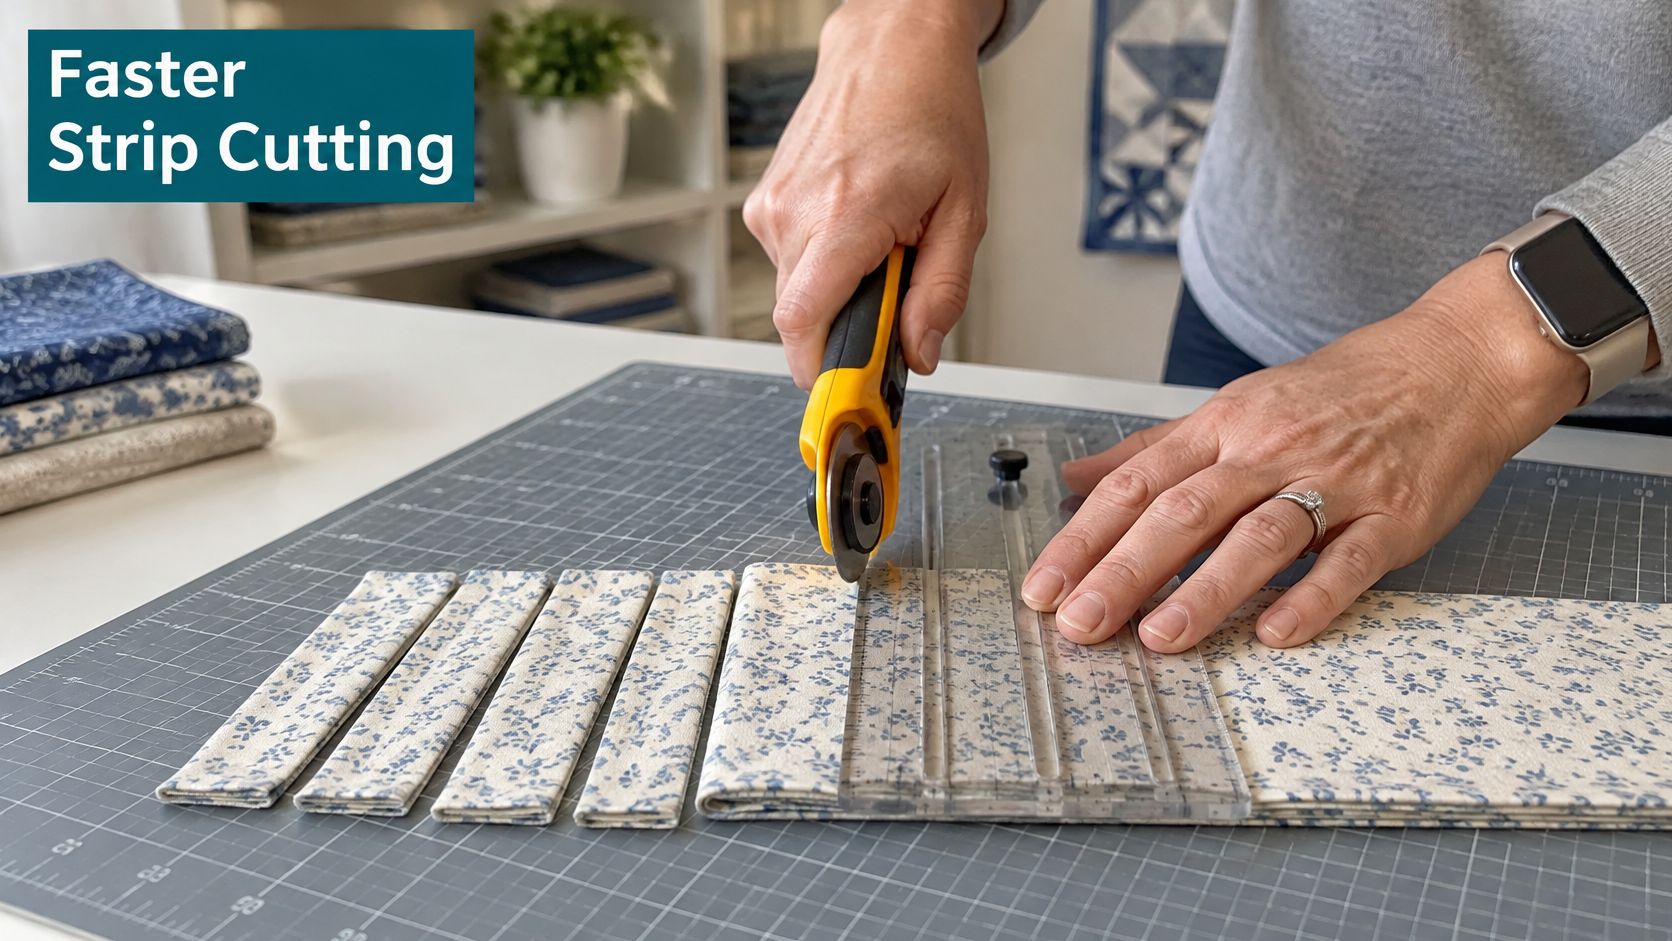
Square one edge once, set the zero line on it, and cut through the 2.5-inch slot until you have the pile you need. Four things improve at once: alignment resets drop, so positioning error doesn't stack up across the set; the fabric stays visible under clear acrylic; the slot wall keeps the blade from wandering; and the units repeat at one width.
The limit deserves saying plainly. A repeatable path reduces positioning error. It does nothing for fabric that was never pressed or a first trim that wasn't square.
Where a plain ruler wins: one odd-sized cut with no repeat behind it. Setting up a slot path buys you nothing when you're cutting a single 7 3/8-inch piece.
The tool has a documented lineage. U.S. Patent No. 5,557,996, filed on March 9, 1994 and granted on September 24, 1996, describes a transparent plastic sheet with slots acting as cutter guides for quilt pieces, according to the patent for a slotted cloth-cutting guide. It's a quiltmaking patent rather than a general tailoring one, which tells you slotted rulers were already a distinct technical solution by the mid-1990s.
Watch the flat hand and the blade hand in this clip. The motion is small, repeated, and that repetition is the whole point.
Rotary cutter injuries usually happen a second after the cut, when the blade is still open and your hand is already reaching for the next strip. Build the habits before you build the speed.
Wash the ruler with mild soap and cool water on a soft cloth, and skip alcohol and other solvents that cloud acrylic and lift printed lines. Keep rulers out of direct sunlight and away from irons and radiators, since heat warps a flat plate into a rocker that rocks on the fabric. Store flat or hung on a peg, not stacked under heavy bins of fabric.
A chipped slot wall lets the blade wobble, and no amount of careful cutting fixes a guide that's no longer straight. Retire the ruler or move it to rough work. Mats belong in the same conversation: rotate yours regularly and replace it once the grid carries deep grooves, because a worn mat lets the ruler sit at a slight angle and the strip gradually grows.
Scratches across the top surface make grid lines hard to read in a busy print, so I'd keep the clearest ruler for squaring and let a scuffed one handle rough trimming. Then check three things before you sit down: blade, mat, ruler.
A slotted ruler turns repeated cuts into a fixed path: align the fabric once, then guide the blade through each slot instead of repositioning the ruler after every strip. The Thomas Acres guide to quilting rulers describes fewer alignment resets as a production advantage. That helps, but accuracy still depends on the fabric and your setup.
Use these seven steps to set up the cut, check the result and keep the strip set consistent.
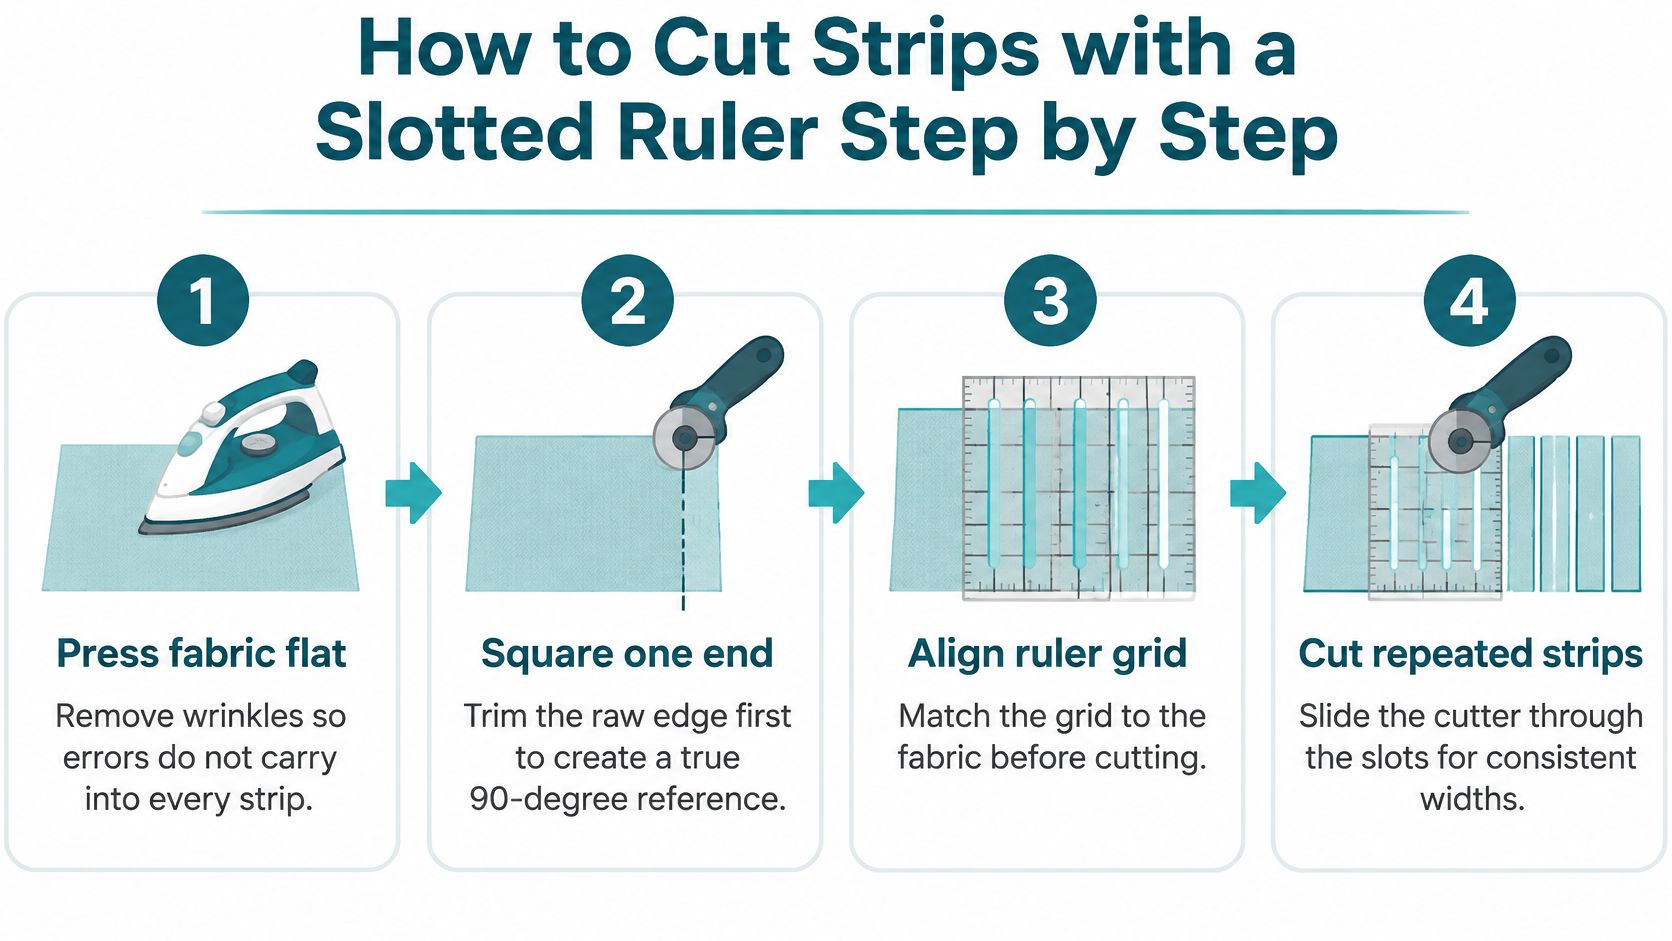
Right-handed quilters often place the fabric on the right and the ruler on the left to reduce unnecessary handling between cuts. Left-handed quilters can mirror the setup. Choose the arrangement that lets you guide the cutter without twisting the fabric or reaching across the blade path.
Check the result rather than relying on the ruler's printed precision claims. Measure the first test strip at several points along its length, then compare later strips against it. A slotted ruler provides a repeatable cutting path; it cannot correct a crooked starting edge, folded fabric or a ruler that shifts.
A slotted ruler can help keep repeated cuts consistent, but the starting edge remains your reference. High Country Quilts carries rulers from Creative Grids, Tula Pink and AccuQuilt.
The symptom that shows up first is strips that narrow across a set. Strip one measures true, strip ten is short at both ends, and the seam allowance you blamed turns out to be innocent. Almost always the ruler or the fabric shifted and the reference stopped being square.
Error comes from fabric preparation, reference selection, hand pressure and tool condition far more often than from slot dimensions. Work through the symptom you have.
| Symptom | Likely cause | Fix |
|---|---|---|
| Strips narrow across a set | Ruler or fabric shifted during cutting | Re-square the fabric, reset the zero line and recheck width every few cuts |
| Wavy or bowed strips | Unpressed fabric or a raw edge used as reference | Press flat, trim a fresh squared edge and cut again |
| Ruler slides mid-cut | Loose grip or fingers resting on the ruler | Keep the non-cutting hand flat and press evenly along the slot |
| Blade skips or drags | Dull blade or tilted cutter | Replace the blade and hold the cutter upright |
| Corners do not meet at 90 degrees | Off-square first trim | Trim a new squared end before cutting any strips |
Wavy strips point to fabric that was never pressed, or to a raw edge used as the measuring reference. Measuring from an untrimmed bolt edge creates a false reference that every strip inherits. Press, straighten the grain, trim a fresh edge, and start from that. This one is a single-session fix unless the fabric itself was cut badly off grain.
A ruler that slides mid-cut is usually a hand problem before it's a tool problem: fingers resting on the surface instead of pressing flat, or too much downward force on the cutter, which adds drag and pulls the ruler along. Regrip and slow down. A blade that skips or drags needs replacing, and the cutter needs to stay vertical. Neither is fixed by pressing harder.
Precision figures deserve a caveat. Some premium acrylic rulers publish tolerances around ±0.001 inch, with edge straightness near ±0.002 inch over 24.5 inches, and those are product-specific claims rather than an industry benchmark, as Linda's guide to acrylic quilting rulers notes. Your cutting doesn't inherit them.
Before you cut the full quilt, sew a test pair and check the finished unit against the pattern's expected size. If the unit is consistently off, correct the source of the deviation first, because a systematic error repeated forty times is a quilt that won't lie flat.
The rule that saves the most fabric: fix the drift before you cut more strips. Cutting eleven more strips from a bad reference just gives you eleven more pieces to re-cut.
When the drift traces to a worn ruler rather than technique, replacement rulers at High Country Quilts solve it faster than fighting the tool.
Three projects cover everything in this article without asking you to cut a single curve. All of them run on strips and squares, so the cutting habits get practiced in a forgiving setting where a slow strip costs you a few inches of fabric rather than a whole quilt.
Nine-patch placemat. Cut 2.5-inch squares, sew nine into a block, and make four blocks for a 36-square set. The repetition is the lesson: one width, cut again and again, then crosscut into identical squares.
Strip-pieced table runner. Sew 2.5 or 3-inch strips together into a strip set, press the seams, then crosscut the sewn set into units with the ruler turned a quarter turn. Here you find out whether your strips were the same width, because a strip set with a narrow strip bows when it's pressed.
Triangle table topper. Cut 6.5-inch squares and slice each one diagonally to get triangles, which is a gentle first pass at the angle markings before you attempt diamonds or hexagons.
The rotation is the mechanic behind all three. The first cuts produce parallel strips, and turning the ruler approximately a quarter turn lets you crosscut those strips into consistent units, which is why Sewing Trip's guide to quilting rulers for small projects points to these tools for repeated geometric pieces rather than free-form cutting.
| Project | Cut size | Units needed | Skill practiced |
|---|---|---|---|
| Nine-patch placemat | 2.5-inch squares | 36 squares, nine per block, four blocks | Straight strips and squares |
| Strip-pieced table runner | 2.5 or 3-inch strips | 8 to 10 sewn strips crosscut into units | Strip sets and quarter-turn crosscuts |
| Triangle table topper | 6.5-inch squares | 4 squares cut diagonally into 8 triangles | Angle markings and diagonal cuts |
Finish one block before you cut the whole project, then measure it against the pattern. A block that comes out small is telling you something about your strips, and one block is a cheap place to hear it. The rulers on the High Country Quilts cutting and measuring page include the 45-degree and 60-degree markings that carry you into diamond and hexagon work later.
At the cutting mat, the useful test is whether the slot gives you a repeatable path, not whether the ruler promises precision. Choose slots that match the strips in your patterns. For a first ruler, 2.5-inch slots cover many nine-patch blocks, while 3-inch and 6-inch slots suit other strip needs. Angle markings are useful if you plan to cut diamonds or hexagons; a 6.5-inch square ruler can also serve for squares and triangles.

High Country Quilts carries rulers from Creative Grids, Tula Pink and AccuQuilt, along with fabrics, sewing and embroidery supplies, notions, machines, longarms and vacuums. At the Colorado Springs shop, you can browse rulers and fabric in person and ask about upcoming beginner classes or community events.
Before cutting a full width of fabric, make a test strip and measure it at several points. A consistent reading helps confirm your setup; a slotted ruler cannot correct fabric that shifts, an inaccurate starting edge or a cutting angle that wanders. Then try the nine-patch placemat, cutting only what you need for one block before checking its size.
Visit High Country Quilts to browse the shop's quilting and sewing supplies and ask about upcoming beginner classes.
November 2–25 only: buy a $200 gift card in either store and get a free yard of fabric every month of 2027.

Serger and BERNINA Mastery classes, longarm training, bag-of-the-month, Kids Sewing Club and a Highlands Ranch retreat. Here's what's on the calendar in November.

Free gifts, included packages and special pricing on the BERNINA 790 ULTRA, 990, Liberty Editions, L 890 serger and Q Series longarms, now through December 31.


Leave a comment