

We Love Our Quilting Community
At High Country Quilts we care deeply about community. With our experiences in retail, we know that a store is not only a place to shop but also a place for the community to gather and share. During this busy...


Before you can sew on ribbon like a pro, you need to gather the right gear. It's about more than just a random needle and thread; choosing the right tools for your specific fabric and ribbon is the secret to getting that smooth, pucker-free finish we all want.
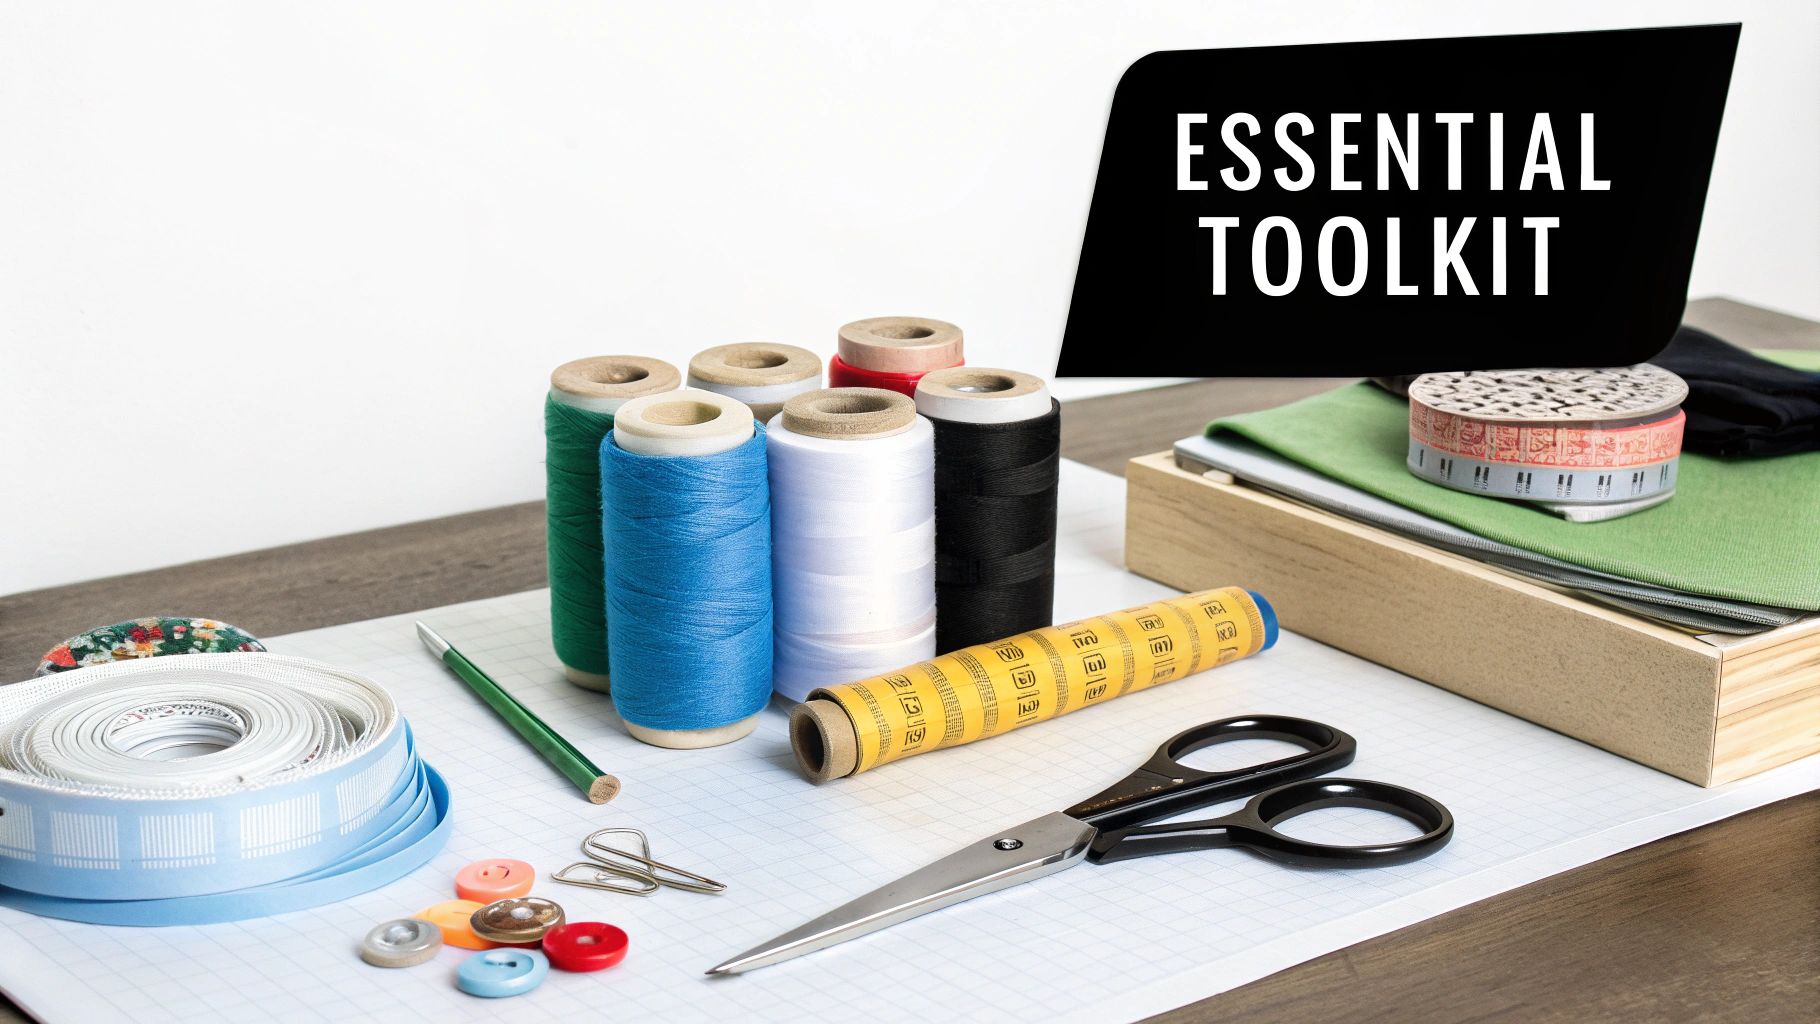
Whether you’re working on a detailed quilt or a dazzling cosplay costume, setting up your workspace properly first will save you a ton of headaches later. Think of it as your foundation. A well-stocked toolkit is crucial for any sewing project, but ribbons, in particular, demand a few specific items to achieve a polished, professional look.
The growing interest in crafting is undeniable. In fact, the global sewing supplies market, which includes a huge variety of ribbon, is on track to hit $5.5 billion by 2033. This just goes to show how much these small details matter in the larger world of apparel and craft.
One of the most common mistakes I see is people grabbing any old needle and thread to attach a ribbon. This choice is absolutely critical and depends entirely on the materials you're working with.
Needles: If you’re sewing delicate silk or satin ribbons onto fine fabrics, you’ll want a Microtex or Sharps needle in a size like 70/10 or 80/12. Their ultra-sharp points slide through the fabric without causing snags. For tougher combinations, like a heavy ribbon on denim, a Universal 90/14 needle is a solid choice.
Thread: A good all-purpose polyester thread is your workhorse; it’s strong and has a little give. But for heirloom projects or when working with natural fibers, a 50-weight cotton thread offers a beautiful matte finish that just melts into the fabric. Always try to match your thread color to the ribbon as closely as you can for an invisible stitch.
Choosing the correct needle and thread is crucial for a professional finish. This table matches common ribbon and fabric types with the recommended tools to prevent damage and ensure durability.
| Ribbon Type | Best Paired Fabric | Recommended Needle | Recommended Thread |
|---|---|---|---|
| Satin/Silk | Lightweight fabrics (chiffon, silk, fine cotton) | Microtex/Sharps (60/8 to 70/10) | 50wt cotton or fine polyester |
| Grosgrain | Medium-weight fabrics (cotton twill, linen) | Universal (80/12) | All-purpose polyester |
| Velvet | Medium to heavy fabrics (velveteen, corduroy) | Sharps or Microtex (80/12 to 90/14) | All-purpose polyester |
| Organza | Delicate, sheer fabrics (tulle, organza) | Sharps (60/8) | Fine, lightweight polyester |
| Jacquard | Upholstery or heavy apparel fabric | Jeans/Denim (90/14 or 100/16) | Heavy-duty polyester |
Getting these pairings right from the start is half the battle won. It’s what separates a homemade look from a handmade, high-quality one.
Trying to eyeball your ribbon placement is a recipe for wavy, crooked lines. Trust me. Keeping your ribbon perfectly straight and secure before you sew is non-negotiable for a clean result.
A clear ruler and a disappearing ink fabric pen are your best friends for precision. Measure and mark your guidelines directly onto the fabric, giving you a perfect path to follow.
Pins can be a problem, especially on delicate fabrics like satin where they can leave permanent marks. I often prefer using fabric glue pens or wash-away wonder tape. These hold the ribbon firmly in place while you stitch, and you don’t have to worry about holes. Of course, picking the right fabric is just as important as the ribbon itself. If you want to dive deeper, you can learn about different fabric types to better understand their unique qualities.
And last but not least, keep a sharp seam ripper within arm's reach. Mistakes happen to even the most experienced of us! A good seam ripper makes corrections quick and painless, saving both your sanity and your fabric from accidental tears.
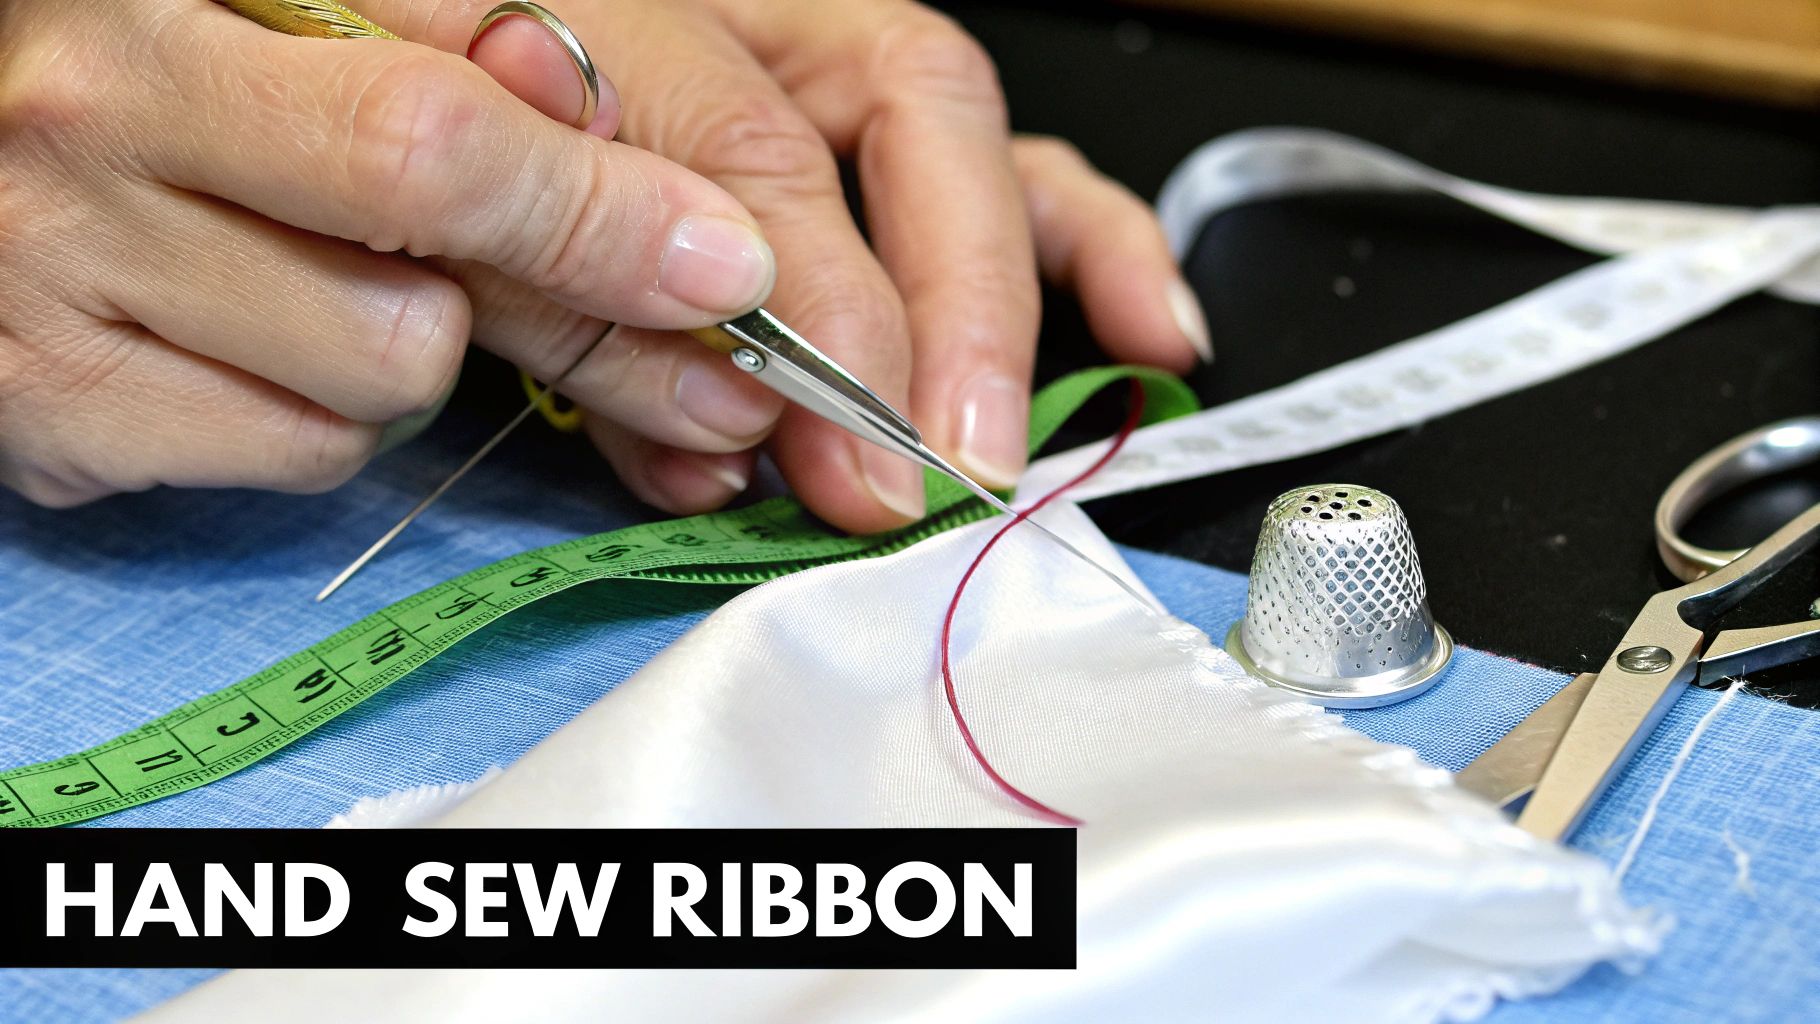
Sometimes, a sewing machine is just too much. For those delicate jobs—tacking a slippery silk ribbon onto a hem or carefully navigating the curves of a cosplay piece—nothing beats the control and personal touch of sewing by hand.
The whole point is to create a seam that’s strong but looks like it’s barely there. Getting that balance right comes down to picking the right stitch and using a bit of finesse. You want the ribbon to look like it was always meant to be part of the design.
The stitch you go with will completely change the final look. If you need to sew on ribbon so the thread is practically invisible, the slip stitch is going to be your go-to.
The Slip Stitch: This is my absolute favorite for a clean finish. You just pick up a tiny thread or two from the main fabric, then slide the needle through the folded edge of the ribbon. When you get the hang of it, the stitches are completely hidden from the front. It's perfect for things like heirloom quilts or formal dresses.
The Running Stitch: On the other hand, if you’re going for a more decorative or rustic vibe, a simple running stitch can be gorgeous. Use a contrasting thread, and the stitches themselves become part of the design. This looks fantastic on folk-style clothing or for adding a bit of texture to a quilt border.
No matter which stitch you choose, keeping your tension even is the most important part, especially with fabrics like satin or silk that love to pucker. If you pull the thread too tight, the fabric will bunch up, and it just won't look polished.
My Go-To Trick: Every few inches, I pause and just smooth the fabric out with my hand. It’s a simple move, but it helps release any tension that’s building up in the thread and makes sure the ribbon and fabric lay perfectly flat.
The way you start and end your seam is just as crucial as the stitches themselves. A big, bulky knot will create a noticeable bump under the ribbon and can even work its way loose over time.
Forget the traditional knot. Instead, lock your thread in place by making a few tiny backstitches right where the ribbon will cover them. Just stitch in the same spot two or three times, and that thread isn't going anywhere.
When you get to the end, just repeat the process on the underside of the fabric. Make a few small, overlapping stitches, pass the needle through the loop of your last stitch to create a tiny knot, and then run the needle tail under a few nearby stitches before snipping it close. No lumps, no bumps.
Let's be honest—working with slinky materials like satin or charmeuse ribbon can be a nightmare. They twist, they slide, and they seem to have a mind of their own. It can make you want to give up before you even start.
The key is all in the prep work. Before you thread your needle, get that ribbon secured.
Taking just a couple of extra minutes to secure your ribbon first makes all the difference. You can stop fighting the fabric and just focus on creating those beautiful, even stitches. It turns a frustrating task into a genuinely relaxing and rewarding part of the project.
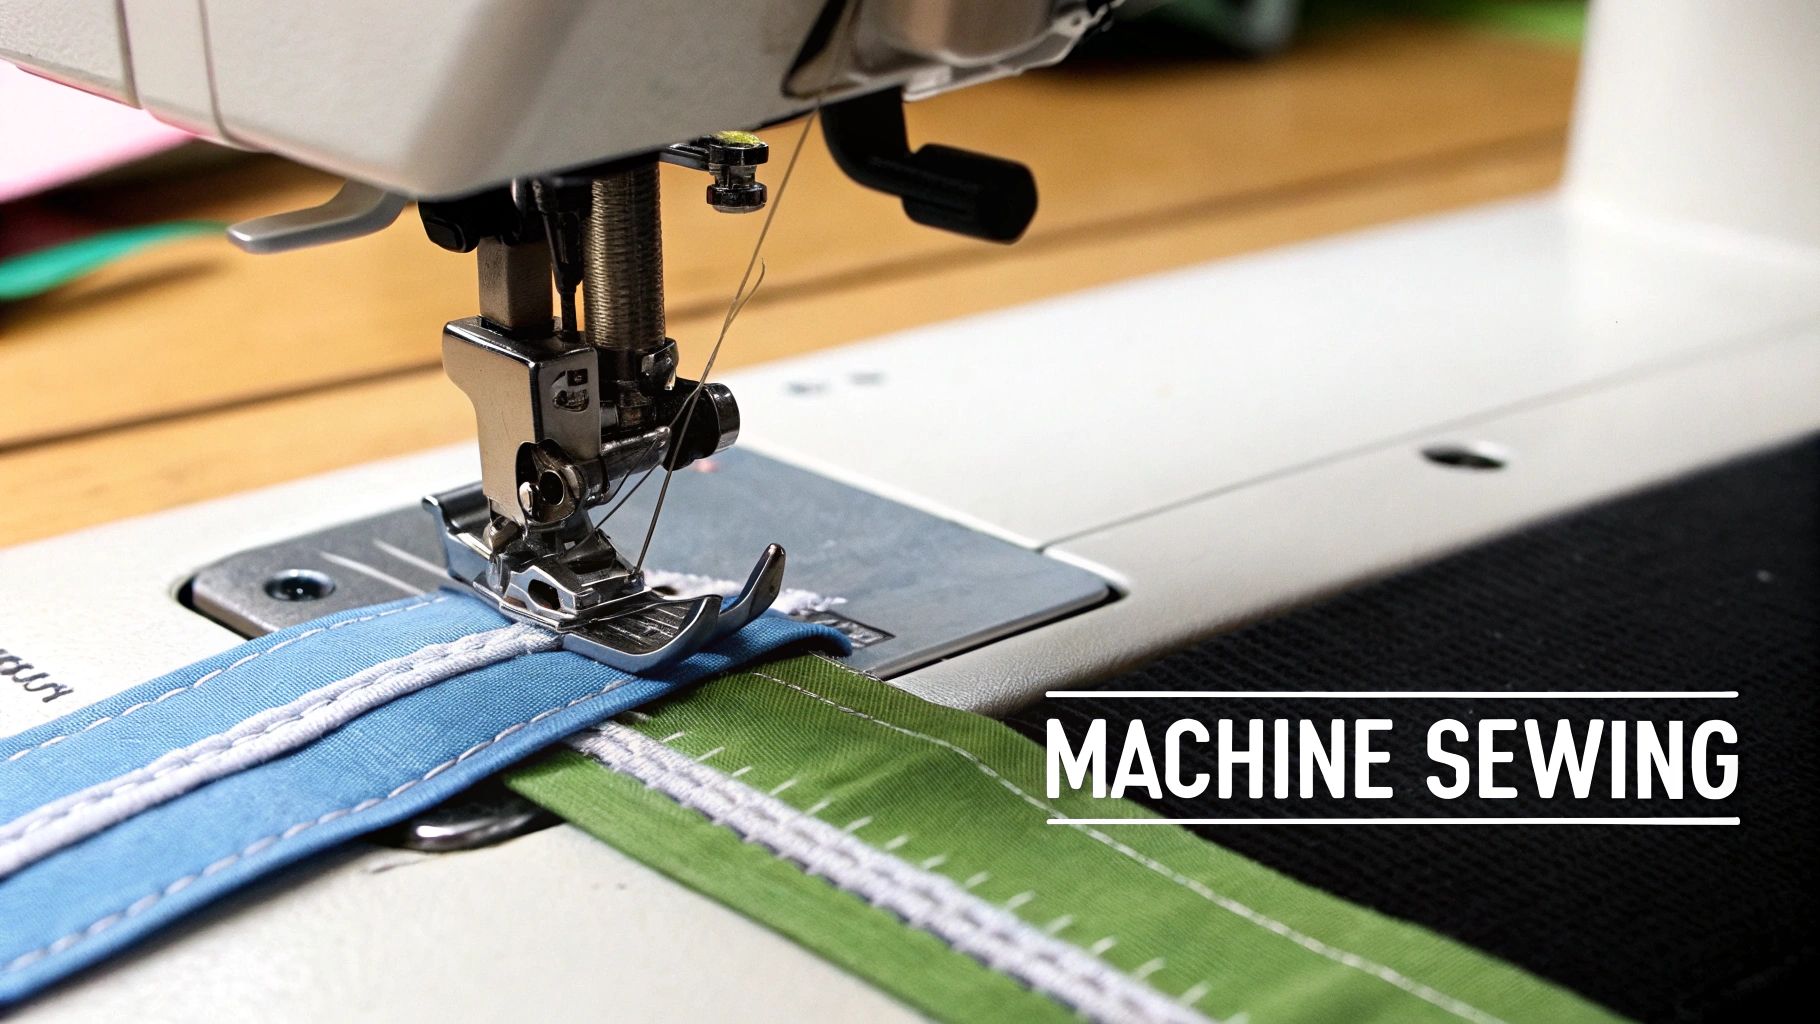
When you need to cover a lot of ground—like adding ribbon trim to a full-length costume or sashing to a quilt—the sewing machine is definitely your best friend. It gives you strong, consistent stitches in a fraction of the time, making sure your ribbon is not just beautiful but also tough enough to handle regular wear and tear.
But getting that professional finish is about more than just feeding the ribbon through the machine. The real secret is in the setup. From dialing in the right machine settings to choosing the best presser foot for the job, these initial steps are what make the difference between a puckered mess and a perfectly straight, beautiful seam.
Before you even think about starting, you need to get your machine configured for the specific ribbon and fabric you're working with. A common mistake is just sticking with the default settings, which almost always leads to bunching, skipped stitches, or other headaches.
Pro Tip: Always, always test your settings on a scrap piece of fabric with a small snippet of the same ribbon. This five-minute check lets you fine-tune everything before you commit, saving you the massive frustration of ripping out a long, messy seam later on.
The biggest challenge when you sew on ribbon with a machine is stopping it from veering off course, especially over long stretches. Here, preparation is everything. First, press your ribbon with a cool iron to get rid of any creases from the spool.
Next, you have to secure the ribbon to your fabric. I highly recommend skipping pins, as they can create little bumps and distort the ribbon as they pass under the presser foot. My go-to method is using a temporary adhesive. A 1/4-inch wash-away tape applied to the back of the ribbon is fantastic; it holds everything securely in place and then dissolves completely in the first wash.
Once you start sewing, remember to just guide the fabric—don't push or pull it. Let the machine’s feed dogs do the heavy lifting. Your only job is to keep the ribbon's edge lined up with your presser foot guide or a mark on your machine's throat plate.
Don't feel boxed in by a simple straight stitch! Most modern sewing machines are packed with beautiful built-in decorative stitches that can turn a basic ribbon trim into a true design feature. Imagine a simple zigzag, a gentle scallop, or an intricate serpentine stitch sewn right down the center of a wide ribbon. It can add incredible texture and visual interest.
While the sewing world is always evolving, it's interesting to note how our creative choices fit into the bigger picture. The markets for machines and textiles are well-documented, but the specific ways we crafters use materials like ribbon are part of a larger, more nuanced story. If you're curious about these market dynamics, you can find detailed reports on the sewing machine market from Cognitive Market Research. It really shows how individual creativity with techniques like this contributes to the industry as a whole.
Ribbon isn't just for tying bows or finishing a hem. When you start thinking of it as a design tool, you'll find it can solve all sorts of creative problems, especially in cosplay and quilting where details are everything. It’s all about seeing ribbon as a core ingredient, not just a final garnish.
For a cosplayer, the right ribbon can perfectly replicate a character's detailed uniform trim. For a quilter, it can be that pop of texture that brings a whole quilt block to life.
In cosplay, it's a constant battle between accuracy and making something that will actually survive a convention. Ribbon is fantastic for creating those sharp, clean details that are so hard to get right with fabric alone.
Nailing the Details: Grab some satin or grosgrain ribbon to mimic those intricate patterns on everything from armor and uniforms to elaborate gowns. You can layer different widths and colors to build complex, eye-catching designs that look like they've jumped right off the screen. For example, getting the crisp white lines on an anime school uniform is as simple as topstitching a narrow white ribbon onto the navy collar.
Adding Structure: Got a floppy cuff or a collar that won’t stand up? Wider, stiffer ribbons like grosgrain are your best friend. When you sew on ribbon right along the edge of a cuff, it basically acts like a light interfacing, giving it a crisp shape without making it bulky.
Lacing and Ties that Last: Instead of struggling with buttonholes for a corset or bodice, create your own lacing loops from folded ribbon. They look great, and more importantly, they provide a much stronger anchor for your cording, so you don't have to worry about anything ripping under pressure.
Here's one of my favorite cosplay hacks: I use a really thin satin ribbon to create a faux piped edge. Just stitch it right inside your seam line before you turn a piece right-side-out. The result is a subtle, raised line that makes any garment look incredibly professional.
For quilters, ribbon is an invitation to play with texture. It's a way to add a bit of shine, a pop of color, or a completely unexpected dimensional element that goes way beyond traditional piecing.
It’s these kinds of personal creative choices that push the craft forward. While big reports, like this one on the sewing thread market from Precedence Research, show us the broad strokes, the real innovation happens at the individual sewing machine.
You can go big and bold with ribbon on a quilt, or keep it subtle. It all depends on the look you're going for.
Dimensional Sashing: Forget plain fabric strips for your sashing. Try appliquéing a wide, decorative jacquard or satin ribbon over your sashing seams. It creates a gorgeous raised grid that gives the whole quilt top a touch of elegance and depth.
Woven Borders: This one is a showstopper. Weave several ribbons—think different colors, widths, and textures—into a panel for your border. Pin the woven piece to your border fabric, stitch it down on all four sides, and quilt it as you normally would. The visual interest is just incredible.
Ribbon Prairie Points: You can make those classic folded triangles out of ribbon and tuck them into seams or along the binding. They add a fun, 3D element that catches the light and makes you want to reach out and touch the quilt. It becomes a treat for the hands as well as the eyes.
Even the most seasoned stitcher runs into trouble now and then when trying to sew on ribbon. Before you reach for the seam ripper in a fit of frustration, take a breath. Most common issues—like puckered fabric or skipped stitches—are surprisingly easy to fix with a few small adjustments.
The trick is learning to diagnose the problem. Puckering, for example, is almost always a dead giveaway for a tension issue. Your thread might be too tight, or you could be accidentally stretching the fabric as it feeds through the machine. Skipped stitches? That usually points right back to your needle. It could be dull, bent, or just the wrong type for the job.
Nothing ruins a beautiful ribbon accent faster than puckered, wavy fabric. It just looks unprofessional. Before you tear out the seam, glance at your machine's upper tension dial. If it’s set too high, the needle thread yanks on the bobbin thread, causing the material to bunch up.
As a quick fix, try lowering the tension by one full number and run a test on a scrap. If puckering persists, pay attention to how you’re handling the fabric. Your job is to guide it, not push or pull. Let the feed dogs do the heavy lifting to keep everything moving evenly.
A walking foot is my secret weapon against puckering. It essentially adds a second set of feed dogs on top, making sure the ribbon and base fabric glide through the machine at the exact same speed. It's a game-changer.
The jarring thump of a broken needle or the sight of a seam with obvious gaps is enough to make anyone groan. Nine times out of ten, your needle is the culprit. A dull needle has to force its way through the fabric instead of piercing it cleanly, which can make it bend, break, or miss the bobbin hook entirely.
This decision tree gives you a great visual for how different project types, like cosplay versus quilting, might change your approach to applying ribbon and what problems you're more likely to face.
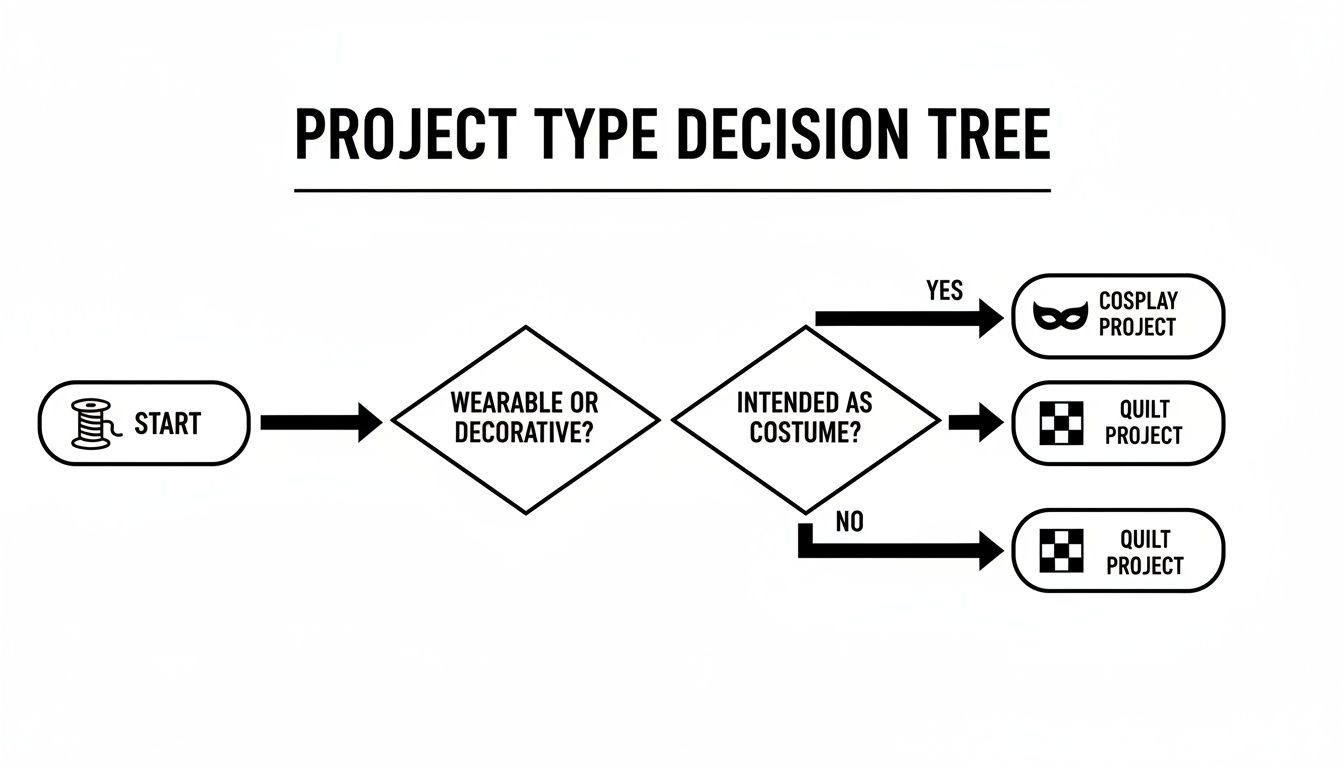
As you can see, the end goal of your project really dictates the best techniques to use from the very beginning.
So, what do you do when your ribbon just refuses to stay straight? Slippery materials like satin and silk are infamous for twisting and drifting out of place mid-seam. The key here is all in the prep work—you have to secure it before you even think about stitching.
While pins are an option, they often create little bumps and distortions in slinky ribbons. I much prefer using a temporary adhesive. A thin line of wash-away wonder tape or a few dabs from a fabric glue pen will hold that ribbon right where you want it. This one extra step makes all the difference and saves you from the headache of a wobbly, unprofessional-looking finish.
Even the clearest instructions can leave you with a few head-scratchers once you actually sit down at your machine. It happens to all of us! Let's tackle some of the most common questions that come up when you're working with ribbon.
This is a fantastic question, and the short answer is: it depends, but it's usually a good idea. If you're working with natural fiber ribbons like cotton, pre-washing is a must to get any potential shrinkage out of the way before it's attached to your project. You can toss sturdier ribbons into a mesh laundry bag and run them through a gentle cycle with like colors.
For your more delicate ribbons, like silk or certain satins, hand washing is the only way to go. A quick dip in cool water with a tiny bit of mild soap, followed by air drying, is perfect. Once it's dry, a quick pass with a low-heat iron will have it looking crisp and ready to sew.
Ah, the classic challenge! Sewing something with no stretch (ribbon) onto something that stretches a lot (knits) can feel tricky, but it's totally doable. The secret is to accommodate the stretch so your stitches don't pop later.
Your first move should be to swap out your standard needle for a ballpoint or stretch needle. These needles are designed to slide between the fibers of the knit fabric instead of piercing through them, which prevents those frustrating runs and holes.
When it comes to the stitch itself, think "stretch." A narrow zigzag stitch is your best friend here. It has built-in give that will allow the seam to flex right along with the fabric. The most important thing is to let the machine do the work—don't pull or stretch the fabric or the ribbon as you sew.
Nothing's worse than a beautifully stitched ribbon that starts to unravel at the ends. Luckily, you have a few great options to stop fraying for good.
Here at Famcut, we love helping you bring your creative ideas to life. From basic grosgrain to luxurious silk, you can explore our entire collection of ribbons and sewing essentials over at https://famcut.com to get started on your next masterpiece.
At High Country Quilts we care deeply about community. With our experiences in retail, we know that a store is not only a place to shop but also a place for the community to gather and share. During this busy...

Hi! We’re Adam and Renee Wheaton, the new owners of High Country Quilts! For more than 40 years, we’ve owned and operated vacuum and sewing businesses. Following in Renee’s father’s footsteps after he retired from All Discount Vacuum and Sewing in Colorado...


Leave a comment