

We Love Our Quilting Community
At High Country Quilts we care deeply about community. With our experiences in retail, we know that a store is not only a place to shop but also a place for the community to gather and share. During this busy...


Stepping into the world of quilting can feel both exciting and overwhelming. With countless designs, techniques, and tools available, the most common question is: where do you begin? The secret to a successful and enjoyable first project is choosing a pattern that builds your confidence without causing frustration. A great beginner pattern focuses on fundamental skills like accurate cutting with a rotary cutter, maintaining a consistent ¼-inch seam allowance, and pressing seams correctly. These core abilities are the foundation of every beautiful quilt you'll ever make.
This guide breaks down nine essential and accessible quilting patterns for beginners. Each one is a stepping stone, designed to teach you core techniques while you create something you can be proud of. Before diving into specific quilting designs, mastering how to read sewing patterns will unlock countless possibilities and ensure a smooth start to your projects. We will explore everything from the classic Four Patch and Rail Fence to the surprisingly simple Disappearing Nine Patch, giving you a clear roadmap to launch your quilting adventure. These patterns are your perfect starting point for developing precision and skill, one block at a time.
The Four Patch is a cornerstone of quilting and one of the most accessible quilting patterns for beginners. It is a simple block made from four squares of fabric sewn into a 2x2 grid. Its straightforward construction, relying only on straight seams and basic cutting, makes it the perfect starting point to build fundamental quilting skills. The beauty of the Four Patch lies in its versatility; it can be created with two alternating fabrics for a classic checkerboard look or with four different fabrics for a scrappy, unique design.
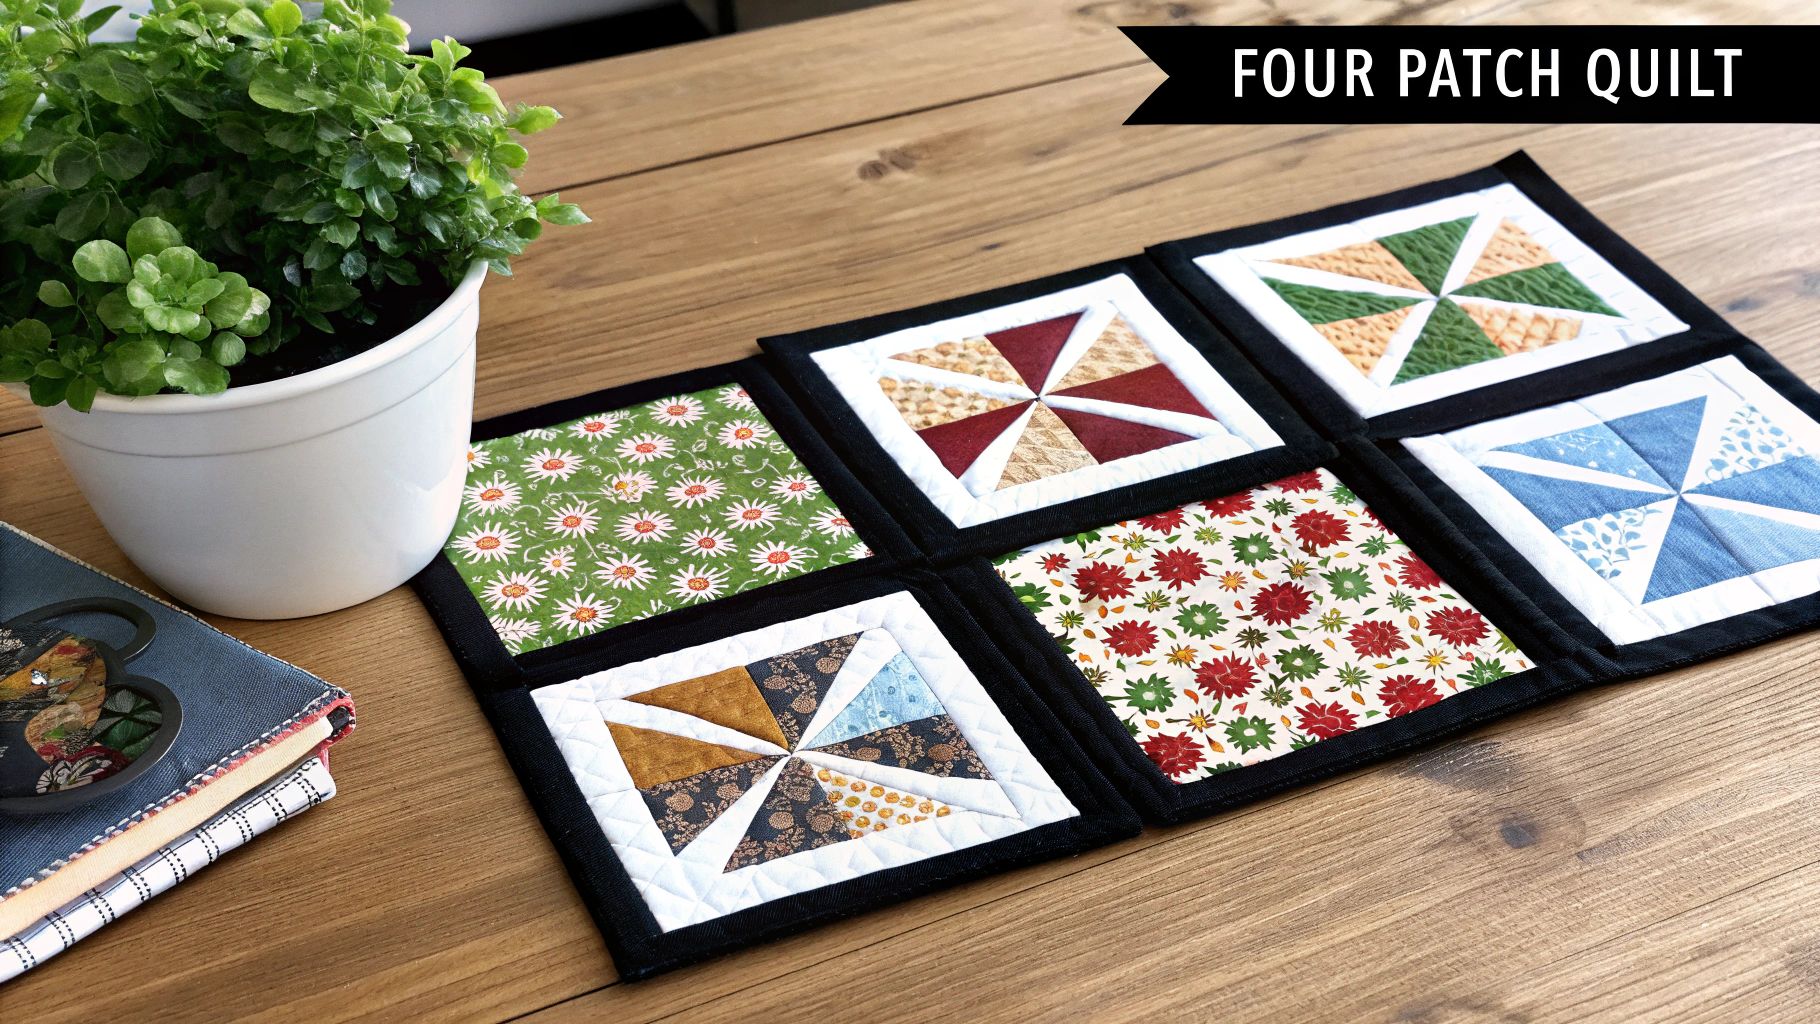
This block is a fantastic way to learn precision, as the accuracy of your finished quilt top depends on how well the four corners meet in the center. It’s an ideal choice for a first project like a baby quilt or a table runner.
The Four Patch block teaches several essential skills without overwhelming a new quilter. It introduces precise cutting, mastering the quarter-inch seam allowance, and pressing seams effectively. Because the pieces are small and uniform, it provides immediate, satisfying results that build confidence.
A logical next step from the Four Patch, the Nine Patch block is one of the most classic and recognizable quilting patterns for beginners. It is constructed from nine equal-sized squares arranged in a 3x3 grid. This simple design, often featuring two contrasting fabrics in a checkerboard layout, has been a quilting staple for centuries. Its slightly increased complexity offers a gentle challenge while reinforcing core sewing skills.
The Nine Patch is an excellent pattern for learning about seam alignment and block construction. It appears in everything from traditional Amish quilts and scrappy Depression-era designs to modern baby quilts, showcasing its timeless appeal and adaptability.
The Nine Patch introduces quilters to the concept of joining rows together, a fundamental technique in quilt-making. It builds on the skills learned from simpler blocks, requiring more seams and intersections to align. This makes it the perfect pattern for mastering consistency and learning efficient assembly methods like strip piecing, which dramatically speeds up the quilting process.
The Rail Fence is one of the best quilting patterns for beginners because it relies entirely on sewing straight strips of fabric together. This pattern creates a dynamic, visually interesting design using only simple rectangular strips. These strips are sewn together lengthwise to create a "strip set," which is then cut into square blocks. By rotating these blocks, you can create captivating zigzag, staircase, or basket-weave effects with minimal effort.
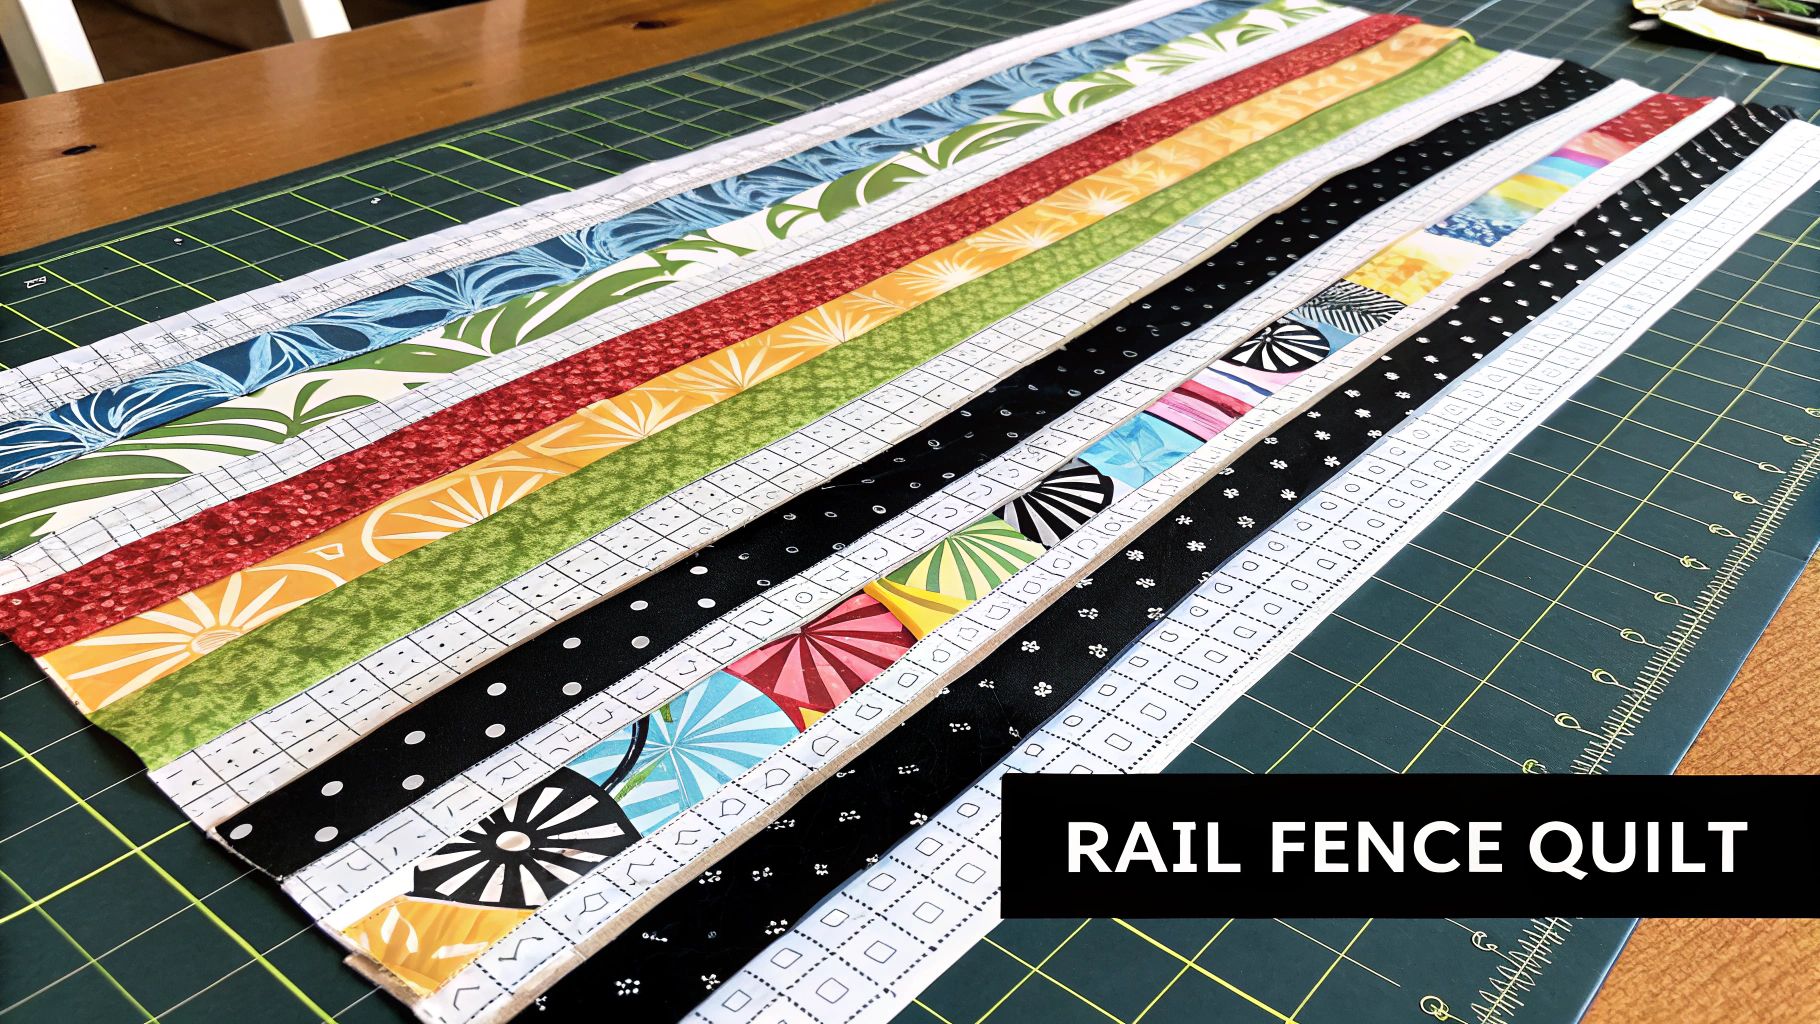
This pattern is exceptionally forgiving and a fantastic way to use pre-cut 2.5-inch strips, often sold as "Jelly Rolls." It’s an ideal choice for a quick project like a baby quilt or a modern lap throw, and its simplicity allows the fabric choices to truly shine. The construction is so straightforward that many quilters can complete a "jelly roll race" quilt top in under an hour.
The Rail Fence pattern introduces strip piecing, a fundamental and efficient quilting technique. It helps beginners master sewing long, straight seams and highlights the importance of fabric value (the relative lightness or darkness of a color). Because there are no intersecting seams to match within the blocks, it’s a low-stress way to create a quilt with impressive visual movement.
The Half Square Triangle, or HST, is a building block in countless quilting patterns for beginners and advanced quilters alike. This versatile unit consists of a square made from two right-angled triangles sewn together along their longest edge. While sewing triangles might seem intimidating, modern methods allow beginners to create them easily by starting with squares, avoiding the need to cut individual triangles and handle tricky bias edges directly. The design possibilities are nearly endless, from classic Pinwheel and Broken Dishes patterns to stunning modern gradient quilts.
Mastering the HST opens up a new world of design and is a fantastic skill-builder for any new quilter. The precision required to trim these blocks to size will significantly improve your overall accuracy and the finish of your projects.
The HST introduces quilters to working with diagonal lines and points without being overly complex. The most common "two-at-a-time" method is efficient and forgiving, teaching the importance of accurate marking, sewing, and trimming. It is the perfect next step after mastering basic squares, adding dynamic visual interest to any quilt.
The Log Cabin is one of the most iconic and beloved quilting patterns for beginners. The block is constructed around a central square, traditionally red to symbolize the hearth of the home, with fabric "logs" or strips added sequentially around it. Typically, two adjacent sides are built with light-colored fabrics and the opposite two with dark fabrics, creating a dynamic interplay of light and shadow. This method introduces quilters to the concept of building a block outwards from a central point.
The true magic of the Log Cabin block is revealed when multiple blocks are sewn together. The simple light and dark construction allows for an almost endless variety of secondary patterns, such as the popular Barn Raising, Sunshine and Shadow, or Straight Furrows layouts, making it incredibly versatile.
The Log Cabin block teaches precision in a structured, repetitive way. Each added log must be the correct length, and seams must be straight, offering excellent practice for consistent sewing. It also introduces the idea of how block orientation can dramatically change the overall look of a quilt, encouraging creative exploration from a very simple starting point.
The Strip Quilt is one of the most straightforward and forgiving quilting patterns for beginners, making it an ideal first project. The concept is wonderfully simple: long strips of fabric are cut and sewn together lengthwise to create the quilt top. There is no complex piecing or matching of intricate points, just straight cuts and long, straight seams. The visual appeal comes entirely from the choice and arrangement of fabrics, allowing for stunning designs from rainbow progressions to modern minimalist styles.
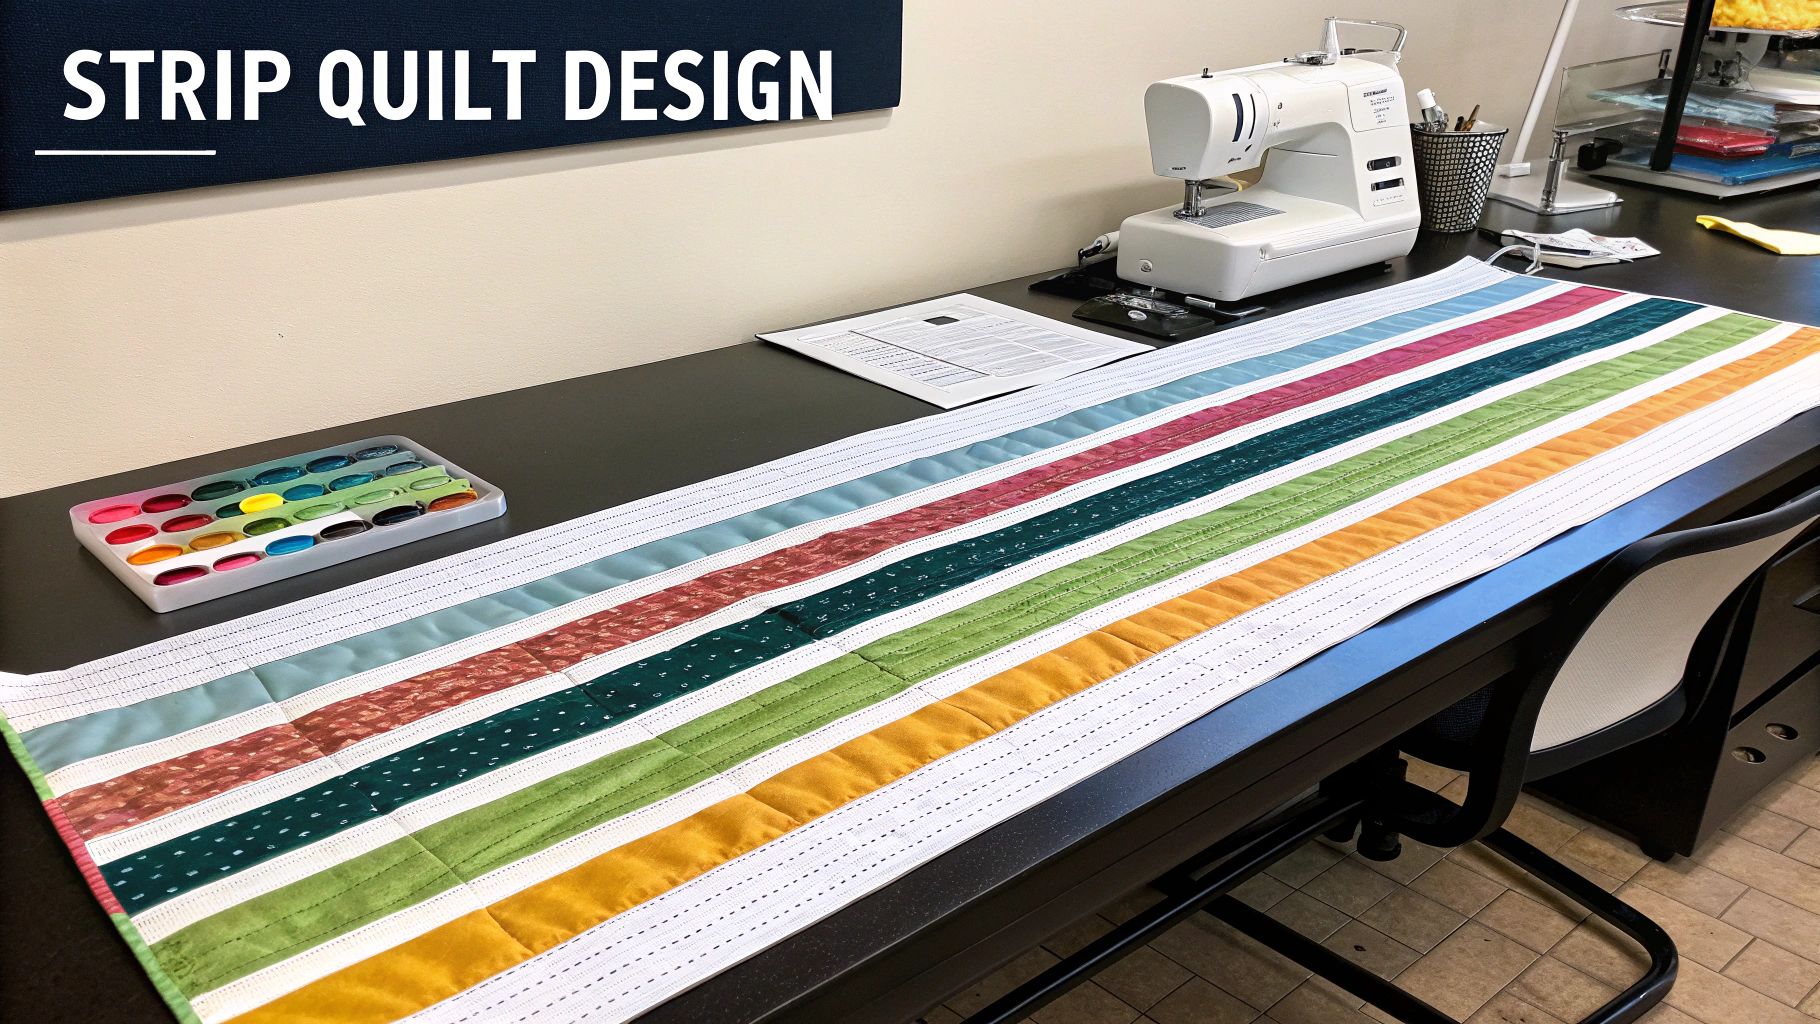
This pattern is exceptionally fast to assemble, offering a quick and gratifying finish that boosts confidence. It’s perfect for showcasing beautiful fabric collections, using up scraps, or working with pre-cut 2.5-inch strips, commonly known as "Jelly Rolls."
The Strip Quilt isolates and strengthens the most fundamental quilting skill: sewing a consistent, straight seam. By repeating this one action, new quilters can build muscle memory for guiding fabric and maintaining an accurate quarter-inch seam allowance over long distances. It also introduces the concept of color theory and layout in a low-pressure way, as the primary design decisions happen before any sewing begins.
The Flying Geese block is a classic and visually dynamic component in quilting. This rectangular unit features a large central triangle (the "goose") flanked by two smaller triangles (the "sky"), creating the iconic image of geese in flight. While working with triangles might seem intimidating, modern techniques have made this one of the more accessible quilting patterns for beginners looking to expand their skills beyond basic squares. The pattern adds movement and direction to any quilt design.
This block is fundamental to countless designs, from traditional migration quilts and intricate borders to modern quilts featuring oversized geese. It is an excellent pattern for learning how to handle bias edges and piece sharp, accurate points, which are crucial skills for more advanced quilting projects.
Flying Geese introduce quilters to working with triangles and achieving precise points without being overly complex. The pattern teaches how to handle fabric cut on the bias, which stretches more than fabric cut on the grain. Mastering a no-waste construction method also provides a huge confidence boost and a set of four identical blocks in one go.
The Disappearing Nine Patch is a magical block and one of the most exciting quilting patterns for beginners. The process begins by creating a simple Nine Patch block (a 3x3 grid of squares). Then, in a surprising twist, you cut the finished block into four equal quarters, rearrange them, and sew them back together to reveal an entirely new, more intricate design. This "disappearing" act transforms a basic block into something that looks far more complicated than it is.
The technique is fantastic for creating visually stunning quilts with minimal effort. It works beautifully for projects like modern baby quilts using high-contrast fabrics or scrappy quilts made from leftover 5-inch squares. The final pattern is a delightful surprise, making the process engaging and fun for new quilters.
This pattern introduces the concept of block transformation, teaching beginners how to deconstruct and reconstruct a simple unit to create complexity. It builds confidence by producing impressive results from a very manageable starting point. It's the perfect next step after mastering basic blocks, reinforcing skills like precise cutting and seam nesting while adding a layer of creative fun.
The Disappearing Nine Patch is one of the most magical and satisfying quilting patterns for beginners. The process starts with a simple Nine Patch block, made from nine squares of fabric arranged in a 3x3 grid. Then, in a transformative step, you cut the finished block into four equal quarters. These new, more complex-looking blocks are then rearranged to create a completely different and intricate design. This "disappearing" act creates a secondary pattern that looks far more complicated than it actually is, offering a huge visual reward for minimal effort.
The infographic below illustrates the simple three-step process for creating this dynamic block.
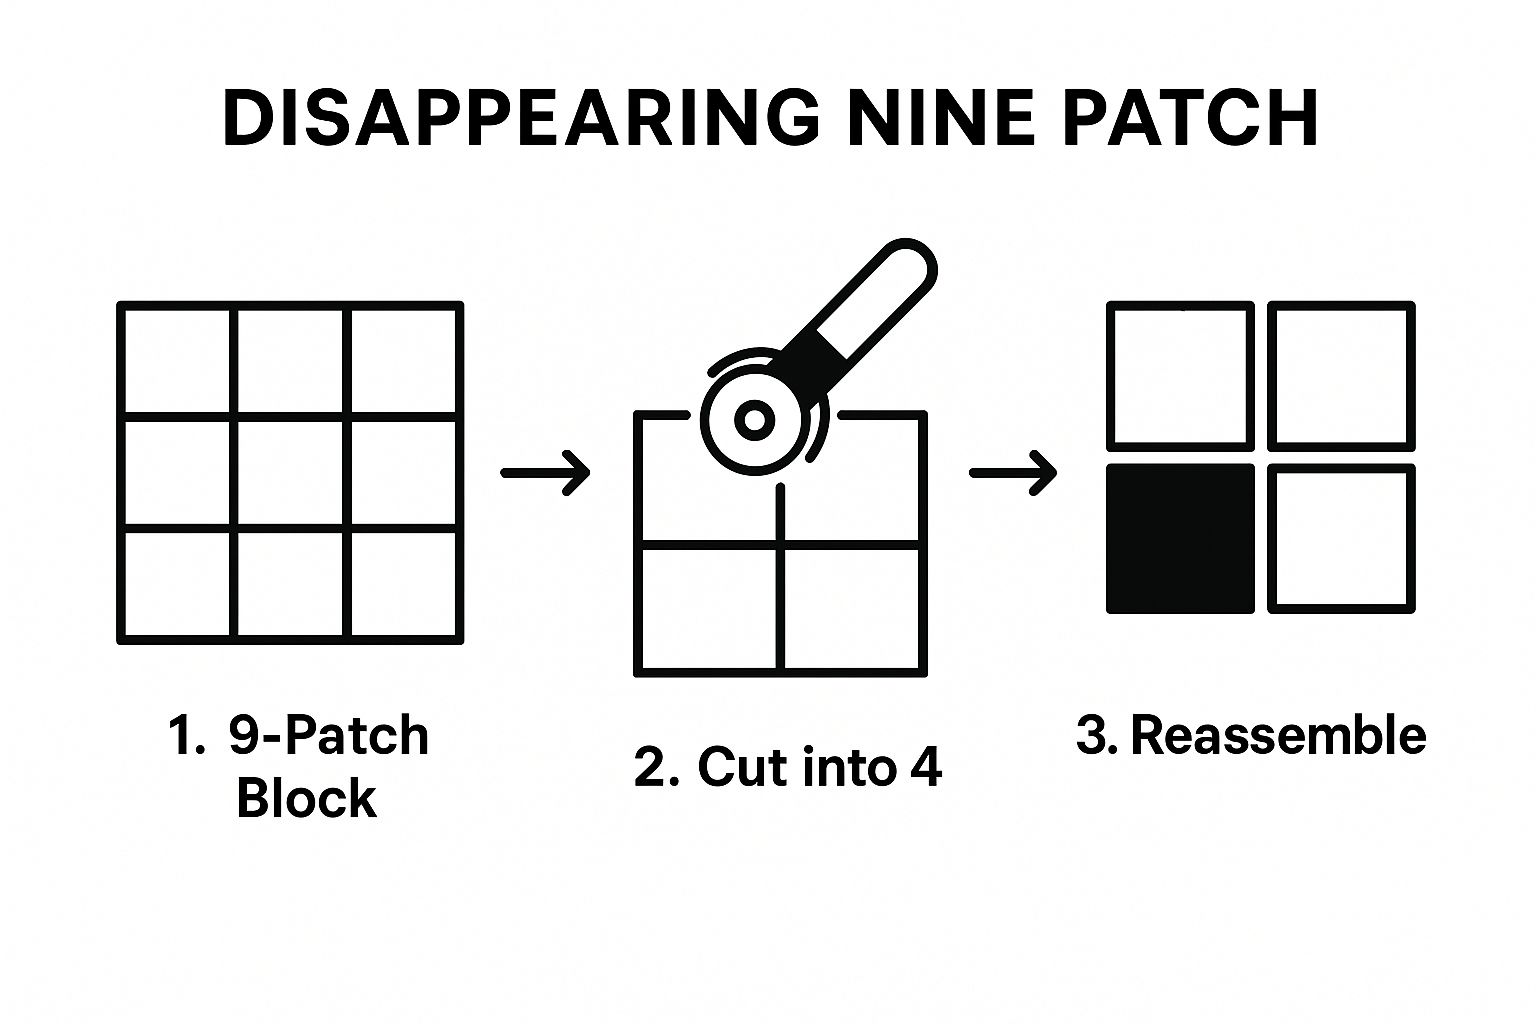
This visualization shows how a single, basic block is deconstructed and then reconstructed to produce a more complex and visually interesting pattern.
This pattern is perfect for beginners because it introduces the concept of block deconstruction in a simple, controlled way. It builds on the basic Nine Patch, reinforcing skills like precise cutting and seam allowances, while teaching how a few extra cuts can completely alter a design. The impressive result builds confidence and encourages quilters to experiment.
| Quilt Block | Implementation Complexity 🔄 | Resource Requirements ⚡ | Expected Outcomes 📊 | Ideal Use Cases 💡 | Key Advantages ⭐ |
|---|---|---|---|---|---|
| Four Patch | Low - basic cutting and straight seams | Minimal - simple squares, scrap friendly | Simple, classic checkerboard look | Beginners, practice cutting and piecing | Fast, beginner-friendly, minimal waste |
| Nine Patch | Moderate - more seam intersections to master | Moderate - strip piecing possible | Classic 3x3 grid with neat intersections | Beginners improving precision, versatile styles | Teaches piecing accuracy, quick with strips |
| Rail Fence | Low - straight seams with strip sewing | Low - uses fabric strips or jelly rolls | Zigzag or basket weave illusion | Beginners using strips, jelly roll quilts | Very fast, dynamic visual effects, uses strips |
| Half Square Triangle | Moderate - working with triangles and bias edges | Moderate - multiple construction methods | Diagonal lines, versatile for complex designs | Intermediate beginners learning triangles | Foundation block, dynamic movement, versatile |
| Log Cabin | Moderate - sequential piecing, light/dark planning | Moderate - scraps suitable | Spiral log pattern, many layout options | Scrap use, sequential piecing practice | Scrap-friendly, historical, flexible layouts |
| Strip Quilt | Very Low - only long strips, straight seams | Minimal - only fabric strips | Simple, bold stripes emphasizing fabric choice | Absolute beginners, first quilts | Very fast, minimal measuring, fabric showcase |
| Flying Geese | Moderate - triangles with bias edges | Moderate - accurate cutting needed | Directional movement, dynamic designs | Beginners learning triangle piecing | Dynamic visuals, versatile, good triangle intro |
| Disappearing Nine Patch | Moderate - cut and rearrange after piecing | Moderate - nine patch base block | Complex secondary patterns from simple blocks | Confident beginners, confident in basic piecing | Impressive results, introduces cut-rearrange |
You've just explored a curated collection of foundational quilting patterns for beginners, each one a stepping stone on your creative journey. From the simple elegance of the Four Patch and Rail Fence to the versatile geometry of the Half Square Triangle and the mesmerizing effect of the Disappearing Nine Patch, these designs are more than just projects; they are your training ground. They provide the perfect opportunity to build essential quilting muscle memory.
By working through these patterns, you’re not just sewing fabric together. You are mastering the fundamentals that will underpin every future quilt you create. Each project teaches a distinct and crucial skill, such as achieving a precise quarter-inch seam, nesting seams for perfect points, accurately cutting with a rotary cutter, and pressing blocks for a flat, professional finish. These are the non-negotiable skills that separate a homemade quilt from a handmade masterpiece.
Remember the core principles we've discussed. Accuracy is paramount, starting with your very first cut. A quilt is a cumulative project, and small inaccuracies in early steps can become significant challenges later on. Embrace tools like a quality cutting mat, a sharp rotary cutter, and clear quilting rulers to ensure your foundation is solid.
Don't underestimate the power of practice and patience. Your first Flying Geese points might not be perfect, and your initial Log Cabin block might seem a little skewed. That’s completely normal. Each stitch is a lesson, and every block you complete builds confidence. The goal isn't immediate perfection but steady progress.
Pro Tip: Create a "practice block" before starting your main project. Use scrap fabric to test your seam allowance, pressing technique, and block construction. This small step can save you a lot of time and frustration, allowing you to work out any kinks before cutting into your beautiful project fabric.
Now is the time to transition from reading to doing. Don't let analysis paralysis stop you. Here’s a simple plan to get started:
Embracing these beginner-friendly quilting patterns is the best way to build a strong foundation. You are learning the language of quilting, one block at a time. Celebrate every small victory, from a perfectly nested seam to a finished block that lies flat. Soon, you'll look back at these first projects with pride, recognizing them as the beautiful beginning of a lifelong passion.
Ready to gather your supplies and start that first project? At High Country Quilts in Colorado Springs, we have everything you need, from beautiful beginner-friendly fabric collections and precuts to high-quality BERNINA sewing machines that make piecing a joy. Our knowledgeable staff is always here to help you select the perfect materials and tools for your chosen pattern, so visit us in-store or explore our online shop at High Country Quilts to get started on your creative path today.
At High Country Quilts we care deeply about community. With our experiences in retail, we know that a store is not only a place to shop but also a place for the community to gather and share. During this busy...

Hi! We’re Adam and Renee Wheaton, the new owners of High Country Quilts! For more than 40 years, we’ve owned and operated vacuum and sewing businesses. Following in Renee’s father’s footsteps after he retired from All Discount Vacuum and Sewing in Colorado...


Leave a comment