

We Love Our Quilting Community
At High Country Quilts we care deeply about community. With our experiences in retail, we know that a store is not only a place to shop but also a place for the community to gather and share. During this busy...


So, what exactly are quilting binding clips? Think of them as small, mighty clamps designed to hold your quilt binding firmly in place while you sew. They're a modern alternative to traditional pins, offering a faster and safer way to get the job done.
These clever little tools provide a firm, even grip that keeps your fabric from slipping and sliding, making it so much easier to get that clean, professional finish we all strive for.
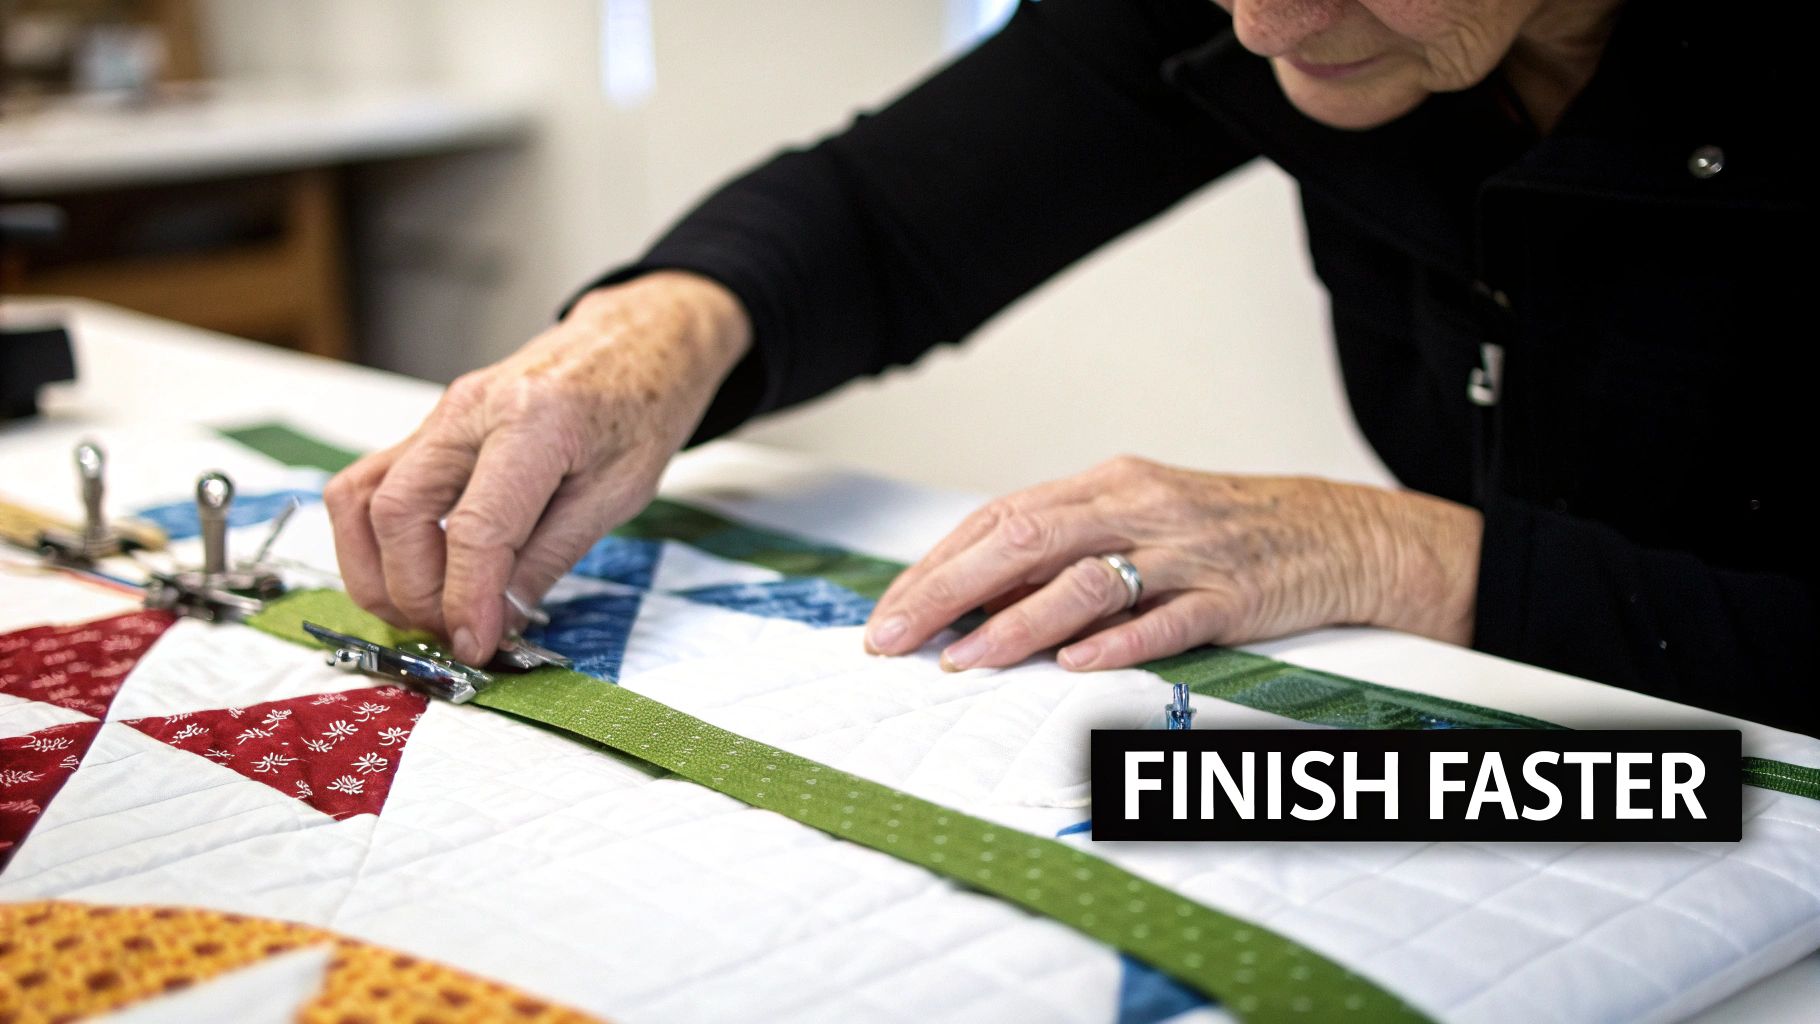
Every quilter knows that feeling of getting to the final binding step. You're so close to the finish line, filled with excitement, but then comes the often tedious job of pinning the edge all the way around. It's a critical stage that can truly make or break your quilt's final look, but historically, it's been a slow and fussy process.
This is exactly where quilting binding clips come in and completely change the game. Imagine them as tiny, tireless assistants holding your binding securely without poking a single hole in your beautiful work. They can turn a frustrating chore into a smooth, even satisfying, part of the process. For anyone looking for a faster, more precise, and fabric-friendly solution, these clips are the answer.
The move from pins to clips isn't just a fleeting trend; it’s a genuine improvement to how we quilt. The benefits are obvious right away, making them an essential tool for any sewing basket.
This small tool addresses one of the most common pain points in quilt making, helping you achieve those flawlessly crisp edges you've been aiming for. It’s a simple investment that delivers a dramatic improvement in both process and results.
The growing popularity of binding clips also says a lot about how the quilting world is evolving. The craft has seen huge growth, with the market projected to hit USD 4.5 billion by 2025. With nearly 18% of quilters being new to the hobby, there's a real demand for user-friendly tools that make tricky steps easier. You can find more quilting market insights on craftindustryalliance.org to see the bigger picture.
This guide will walk you through exactly why so many quilters, from beginners to seasoned pros, have fallen in love with quilting binding clips.
Think about the last time you tried to hold a stack of papers together perfectly while gluing the edges. You probably didn't just pinch them with your fingers and hope for the best, right? You'd grab a paperweight or something heavy to apply even pressure. Quilting binding clips are based on that exact same idea—they’re like tiny, powerful clamps made just for fabric.
Essentially, these handy clips are a modern quilter's solution to the classic challenge of holding binding in place for sewing. They're small, usually made of plastic or metal, and have a spring that lets you open and close them with a quick squeeze. Their main purpose is to grip all the layers of your quilt sandwich—the top, batting, backing, and binding—and hold everything securely without any slipping or shifting.
The big difference between clips and old-school pins is that clips hold the fabric from the outside. Pins have to pierce right through your material, which can leave behind little holes, especially on delicate fabrics, vinyl, or leather. Clips just clamp down on the edge, keeping your project pristine.
What really makes these little gadgets so brilliant is their clever design. Most quality quilting clips have a perfectly flat bottom, and that’s a feature you'll learn to love at your sewing machine. It allows the edge of your quilt to glide smoothly across the machine bed, so your fabric doesn't get snagged or bunched up as you stitch.
The top of the clip is usually curved, making it comfortable to pinch open. On the inside, you'll often find little guide marks or a slightly textured surface for an even better grip on your fabric. It’s a beautifully simple tool that was clearly designed by someone who understands what a quilter actually needs.
Their simple, effective design is why their popularity has exploded beyond the quilting world. The global market for similar fastening products was valued at around USD 12.8 billion and continues to grow. Spring clamps, which are a close cousin to our quilting clips, make up a huge part of that market. It just goes to show how essential these simple tools have become in all sorts of creative work. You can get more details about the binder clip market forecast from futuremarketinsights.com.
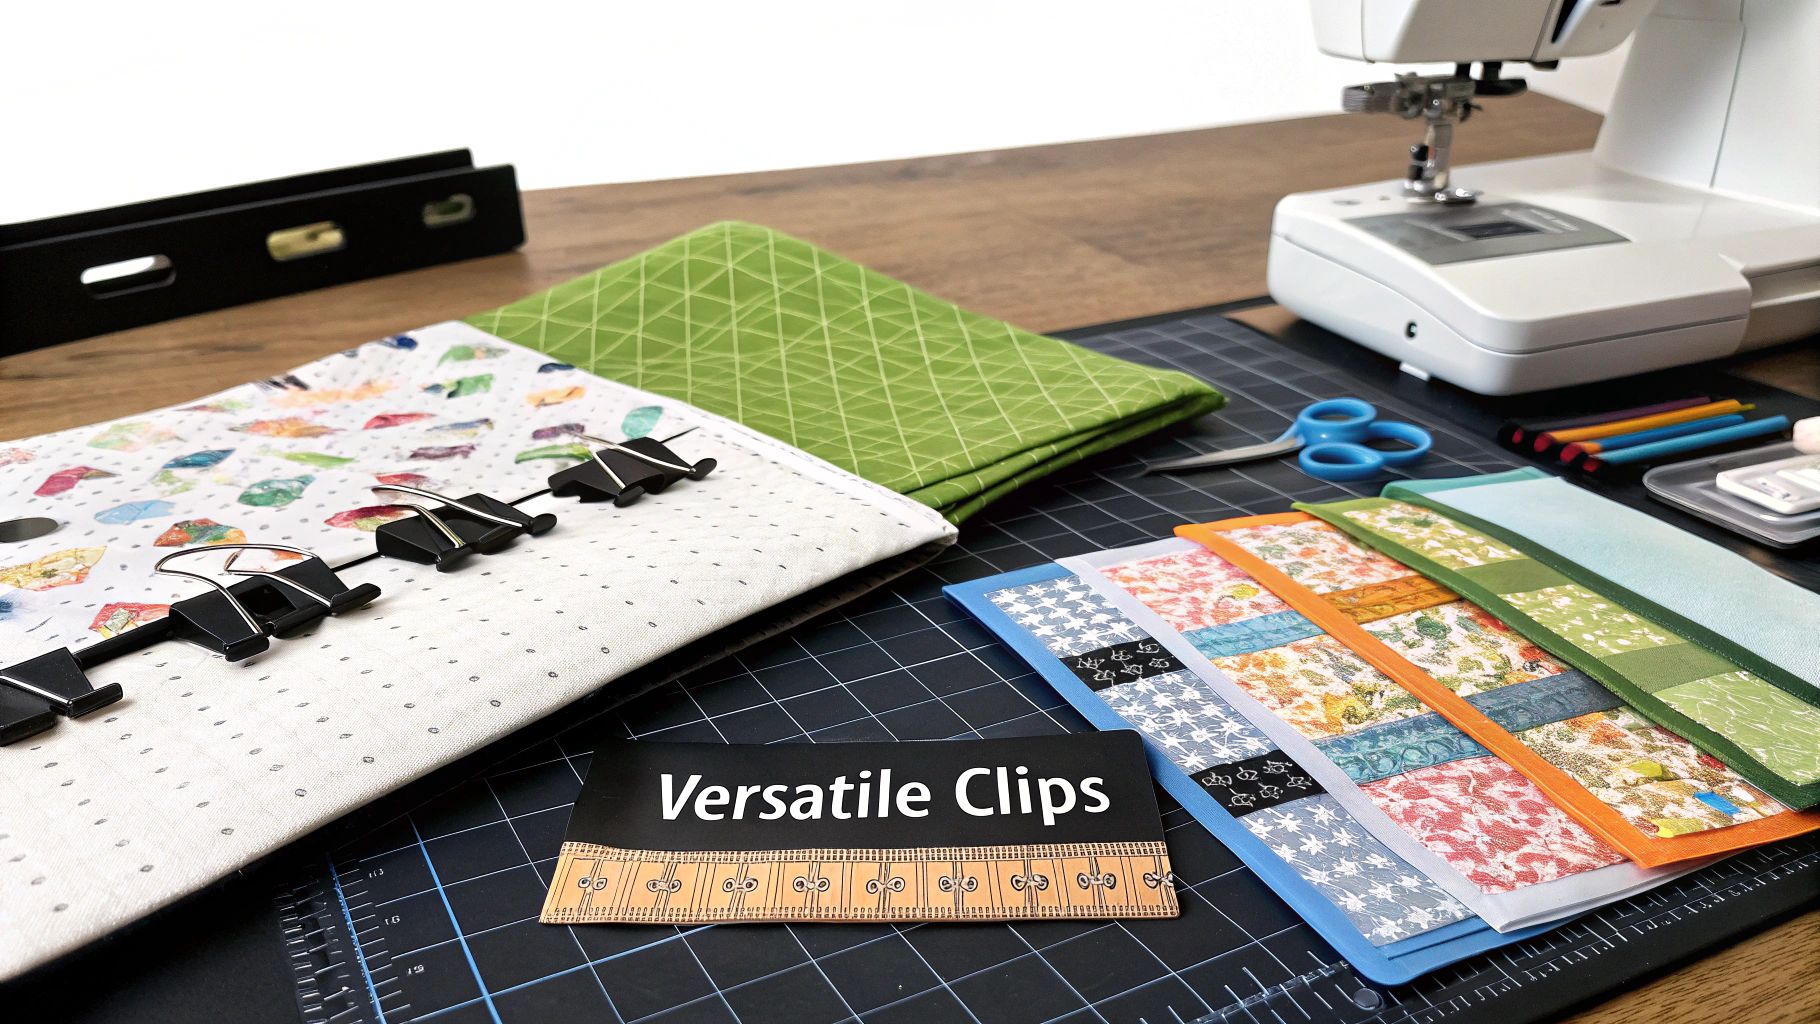
You'll quickly discover that not all quilting clips are the same. Having a few different types on hand means you’ll always have the right tool for the job, whether you're working on a delicate baby quilt or a heavy-duty tote bag. They mostly vary by material and size.
After material, the next thing to consider is size.
The right clip size can make a huge difference in your workflow, especially when navigating tricky curves or managing bulky layers. Choosing correctly ensures you have just the right amount of grip without distorting your fabric.
Let’s break down the common sizes we carry here at High Country Quilts and what they’re perfect for.
Common Clip Sizes and Their Uses
| Clip Size | Best For | Why It Works |
|---|---|---|
| Mini | Navigating tight curves, English Paper Piecing (EPP), and small projects. | Their smaller footprint allows for precise placement on curved edges without bunching the fabric. |
| Standard | Straight edges on most quilts, bag making, and general sewing. | This is the versatile workhorse, offering a great balance of size and holding power. |
| Jumbo | Holding together very thick quilt sandwiches or multiple bulky layers. | Their wider opening and stronger spring are designed to tame the thickest projects with ease. |
Alright, let's move from talking about clips to actually putting them to work. This is where the magic happens. Using quilting binding clips is surprisingly easy, and once you get the hang of it, you'll wonder how you ever managed without them. It turns that final, often fiddly, step of quilting into something you can actually look forward to.
I like to think of it like taping off a room before you paint. You wouldn't just start throwing paint on the wall and hope for a straight line, right? You carefully apply painter's tape to get those perfect, crisp edges. Your clips are your painter's tape—they set you up for a professional, clean finish on your quilt.
Let's walk through it, step by step.
A little prep work here saves a lot of headaches later. Before a single clip comes out of the tin, make sure your quilt is squared up and your binding strips are pressed and ready to go. A straight, clean edge is your foundation.
With your quilt ready, lay the raw edge of your binding strip along the raw edge of the quilt top. It’s crucial to leave a "tail" of about 8-10 inches of loose binding where you start. Don't clip this part down yet! You'll need this tail later to join your binding ends for that seamless, invisible finish.
Now for the fun part. Start securing the binding to the quilt's edge, placing your first quilting binding clip about an inch from where your binding strip begins. Continue placing clips every 2 to 3 inches along that first side. This spacing is the sweet spot—it holds everything securely without stretching or distorting your fabric.
Pro Tip: I always use a different colored clip to mark my starting point. It's a simple visual reminder of where I began and where I'll need to join the ends when I come all the way back around.
With one side all clipped up, you’re ready to head to the machine. Stitch the binding down with a ¼-inch seam allowance. As you sew, simply remove each clip right before it gets to the presser foot. This way, there's no risk of hitting a clip and breaking a needle (we've all been there). Sew until you're about ¼ inch from the corner, then stop and backstitch.
This simple infographic breaks down the core stages of the binding process.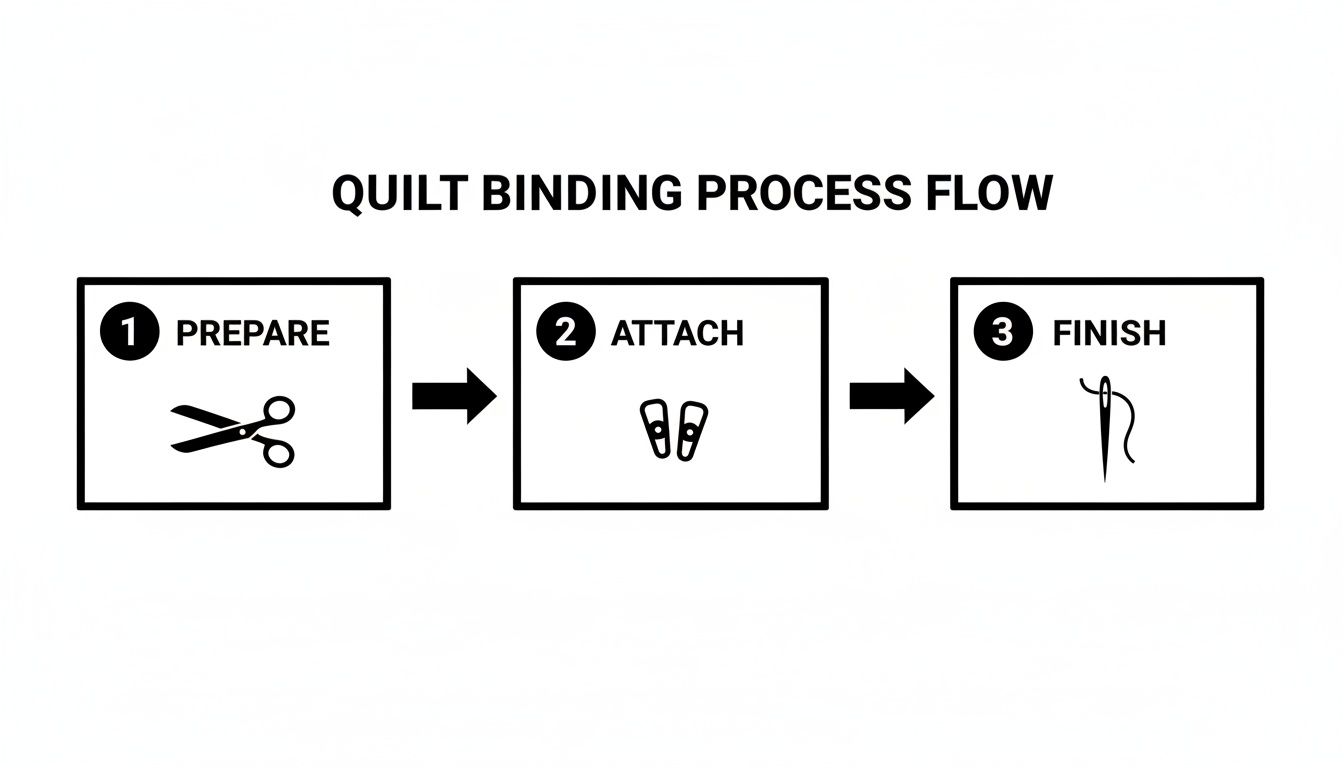
As you can see, it’s a straightforward flow from prep to finish, and those clips are the star player during the attachment phase.
Those sharp, tidy mitered corners are what give a quilt that truly polished look, and clips make them almost foolproof. Once you've stopped sewing ¼ inch from the corner, take the quilt out from under the needle.
First, fold the binding strip up and away from the quilt, creating a neat 45-degree angle. Next, fold the binding strip straight back down, so its raw edge lines up perfectly with the raw edge of the next side of the quilt. The diagonal fold you just made at the corner should be perfectly aligned with the edge you just sewed.
Secure this perfect little fold by placing a clip right on the corner. It'll hold that crisp miter in place for you. From there, just keep clipping down the new side, keeping your clips spaced every 2 to 3 inches.
You'll repeat this exact same sequence for all four corners:
This methodical approach makes sure every corner is sharp, neat, and identical. The clips really act like a helpful third hand, holding everything precisely where it needs to be while you maneuver the quilt.
Okay, you've sewn the binding all the way around the front and joined the ends. It's time to bring it home by finishing it on the back. This is where clips are an absolute game-changer, especially if you like to finish your binding by machine.
Start by wrapping the binding over the raw edge of the quilt to the back. You want the folded edge of the binding to just cover the line of stitching you made on the front.
Now, start clipping it down on the back side. You’ll notice the clips have a really firm, satisfying grip here, holding that folded edge snugly against the quilt back. Stick with that same 2-3 inch spacing to keep things consistent all the way around.
As you clip your way around the quilt, you're creating a perfectly prepped edge that’s all set for the final pass. Whether you plan to "stitch in the ditch" from the front or topstitch on the back, the clips guarantee that the binding won't wiggle or shift. This is how you avoid that frustrating moment when you flip the quilt over and see your stitches have missed the binding on the underside. Instead, you get a beautiful, durable finish on both sides, every single time.
While their name says "binding," these little wonders are far too handy to leave in the jar until you’re on the final step of a quilt. Think of them as your sewing room’s secret weapon, ready to jump in whenever you need a firm but gentle hold.
Once you get a feel for them, you’ll find yourself reaching for them all the time. They're not a one-trick pony; they’re a must-have for any modern crafter’s toolkit, solving problems you didn’t even know could be made easier.
Anyone who’s ever made a bag knows the struggle. You're trying to wrangle canvas, vinyl, fusible fleece, and several layers of cotton all at once. Pins just don't cut it here—they bend, they can't push through, and they definitely can’t clamp down on that much bulk.
This is where binding clips become your best friend. They have the strength to easily grip super-thick seams, holding everything tightly in place while you sew. Trying to assemble a zippered pouch with vinyl pockets? Clips are practically a necessity for keeping the vinyl, fabric, and zipper perfectly aligned.
Seasoned bag makers almost always choose clips over pins, especially when sewing with materials that would show permanent pinholes. Clips provide that secure hold you need for a clean finish without ever damaging delicate materials like vinyl, cork, or leather.
Imagine you're adding the final binding to a complex travel case. Those corners can get incredibly thick. A strong clip flattens those areas out, letting you sew slowly and precisely for a truly professional look.
English Paper Piecing (EPP) is a beautiful, precise hand-sewing technique, but let's be honest—keeping track of all those little fabric-wrapped papers can be a pain. While basting with thread is the classic method, clips offer a fantastic modern shortcut.
Instead of spending time basting every single piece, you can use mini clips to hold the fabric folds down while you hit them with a quick dab of glue. This simple switch has some big payoffs:
This small change can completely streamline your EPP process, letting you focus on the joy of watching your design come together.
Clips are brilliant for all sorts of everyday sewing tasks, too. Try using them to hold pattern pieces to your fabric instead of pins. This is a game-changer for slippery silks or thick wool where pins either leave marks or are just a hassle to use.
Got long strips of sashing or border fabric? Roll them up and clip them to stay tidy until you need them. You can also clip project swatches together or keep all the small, cut pieces for a single block organized in one bundle. Honestly, the uses for your quilting binding clips are only limited by your imagination, making them one of the hardest-working tools in your entire sewing room.
Walk into any quilt shop, like our own High Country Quilts, and you'll see a rainbow of binding clips in all shapes and sizes. It can be a little overwhelming at first. How do you know which ones will become your go-to tool and which will just sit in a drawer? It really boils down to matching the clips to the kinds of projects you love to make.
Think of it like picking the right knife in the kitchen. You wouldn't use a giant chef's knife for peeling a single apple, right? And you definitely wouldn't try to slice a watermelon with a tiny paring knife. The same logic applies here. The clips you'll need for a hefty king-sized denim quilt are a world apart from what you'd use for a delicate, curvy miniature wall hanging.
First things first, what size projects do you tackle most often? Your usual quilting habits are the best guide for what to buy.
The thickness of your quilt sandwich is a huge factor. You're looking for that Goldilocks grip—strong enough to hold everything together without slipping, but not so tight that it crushes or distorts your fabric.
This all comes down to a clip's grip strength, which is dictated by its spring and material. Metal clips, for instance, usually have a much firmer, more rigid hold. This makes them perfect for clamping down on thick layers of canvas, denim, or projects with dense foam stabilizers, which you often see in bag making.
Plastic clips, on the other hand, offer a gentler but still surprisingly secure grip. This is usually all you need for standard quilting cottons, and their lighter tension means they're less likely to leave little indentations on more delicate fabrics.
When you're in the shop, pick up a clip and test the spring. It should be easy enough to squeeze open with one hand but have enough power to snap shut with authority. That balance is the sweet spot between being easy to use and having a hold you can trust.
Finally, think about how long you want these tools to last. A well-made set of binding clips is an investment that should serve you for years and years. You want to look for clips made from sturdy materials that won't easily crack or bend out of shape.
One of the most important design features to look for is a flat back. This simple detail allows the clip to glide smoothly right up against the bed of your sewing machine, preventing any snagging or bunching as you sew.
Also, check for a smooth finish with no rough edges that could potentially catch on your beautiful fabric. The best way to judge is to get your hands on them. Stopping by a local shop like High Country Quilts lets you actually feel the difference in quality and pick a set that feels solid and reliable. When you weigh these different factors, you'll be able to choose the perfect clips to support your creativity.
Your quilting clips are some of the hardest-working little helpers in your sewing room. With just a tiny bit of care, they'll be your trusty companions for years and years. Think of them like any other good tool in your kit—a quick clean-up and a smart storage spot will keep them in perfect shape for whatever project you dream up next.
Most clips are built tough from plastic or metal, so they don’t ask for much. But adopting a few simple habits will go a long way in keeping them gripping strong and ready to go.
Every once in a while, your clips are bound to get a little messy from fabric markers, glue, or basting spray. When that happens, a quick wipe-down is all it takes. Just grab a damp cloth with a dab of mild soap and gently clean off any gunk.
Got a stubborn spot, like some dried-on adhesive? A cotton swab dipped in a little rubbing alcohol will do the trick. Just make sure to dry the clips thoroughly when you're done, especially around the metal springs, to keep any rust from forming.
A question I get asked a lot is whether quilting binding clips lose their grip over time. It's pretty rare with good quality clips, but you can help them out by not storing them clamped onto something thick for a long time. That can wear out the spring. Just let them relax in a container between projects.
This little routine keeps them in top condition and ensures no stray marks or sticky spots get transferred to your next beautiful quilt.
How you store your clips is just as important as how you clean them. We’ve all been there—tossing tools into a big drawer only to have to dig for them later. Giving your clips a dedicated home is a much better way to go.
Storing them properly protects them from getting crushed or lost and saves you the headache of searching for that one last clip when you're right in the middle of finishing a binding.
Even the best tools can hit a snag now and then. If you notice your clips are slipping on really slick fabrics like satin or a silky rayon, the solution is usually pretty simple: just place them closer together.
Instead of your usual spacing, try placing them every 1 to 1.5 inches. This creates more points of contact and stops that slippery fabric from wiggling free.
By keeping these easy care and troubleshooting tips in mind, you’ll make sure your favorite quilting clips stay a reliable part of your creative toolkit for countless quilts to come.
Even after seeing all the benefits, it's totally normal to have a few questions before you're ready to ditch your pin cushion. We hear these all the time at the shop, so I've put together answers to the most common queries to help you feel confident about making the switch.
The honest answer? It depends on the size of your quilts. A great rule of thumb is to have enough clips to go all the way down one full side of your biggest typical project, spacing them about 2-3 inches apart.
That's a definite no. You should never try to sew over a clip. They're not like thin pins that a needle might luckily push aside. A clip is solid and will absolutely break your needle, and even worse, it could knock your sewing machine's timing out of whack.
The rhythm is easy once you get it down: just sew up to the clip, stop with your needle in the down position, remove the clip, and then keep on sewing. Their bright colors make them super easy to see, so you won’t accidentally stitch over one.
Good quality clips are designed specifically to avoid this. They have a firm grip, but it's gentle enough that they won't leave permanent marks on your standard quilting cottons.
Now, if you're working with something more delicate or plush—think velvet, minky, or a fluffy fleece—it's a good idea not to leave them clamped on for days at a time. For most quilting, though, you won't have any issues at all.
It all comes down to the design of the clip. A well-made one spreads the pressure out evenly instead of pinching one tiny spot. That flat back is the key; it holds the fabric securely against your machine bed without digging in.
I get it—a tin of clips costs more upfront than a pack of pins. But think of them as a one-time investment in your quilting toolbox. Clips don't bend, they don't rust, and they never get dull.
More than that, they save you a ton of time and frustration. And they protect your beautiful quilt top (which you've already spent hours on!) from getting snagged or leaving permanent pinholes. For most quilters, the speed, safety, and a beautifully finished edge make quilting binding clips more than worth it in the long run.
Ready to make finishing your quilts faster, easier, and more precise? Come check out the selection of high-quality clips we've curated at High Country Quilts and find the perfect set for your next masterpiece.
At High Country Quilts we care deeply about community. With our experiences in retail, we know that a store is not only a place to shop but also a place for the community to gather and share. During this busy...

Hi! We’re Adam and Renee Wheaton, the new owners of High Country Quilts! For more than 40 years, we’ve owned and operated vacuum and sewing businesses. Following in Renee’s father’s footsteps after he retired from All Discount Vacuum and Sewing in Colorado...


Leave a comment