

We Love Our Quilting Community
At High Country Quilts we care deeply about community. With our experiences in retail, we know that a store is not only a place to shop but also a place for the community to gather and share. During this busy...


Starting a new hobby like quilting can feel both exciting and overwhelming. The intricate patterns and beautiful designs might seem out of reach, but every expert quilter began with a single stitch. This guide is your first step, curated specifically to bypass the confusion and get you straight to the fun. We've compiled a list of fantastic quilt projects for beginners that are designed to build your skills, boost your confidence, and result in a beautiful finished product you can be proud of.
Each project in this roundup breaks down fundamental techniques into manageable, enjoyable steps. You’ll learn core skills like accurate cutting, precise seam allowances, and simple block construction. These foundational abilities are the building blocks for any future quilting endeavor you dream up, from complex heirlooms to practical items. For a practical and fun first project, consider making simple quilted play mats, which use many of the same basic techniques you'll find here.
This list is more than just a collection of patterns; it's a structured path to success. We'll guide you through everything from simple patchwork and modern strip quilts to beginner-friendly appliqué. Our goal is to provide clear, actionable insights that empower you to start creating immediately. At High Country Quilts, we believe everyone can create something beautiful. Let's explore the perfect project to launch your quilting adventure.
The simple square patchwork quilt is the quintessential starting point for anyone new to quilting. This foundational project involves sewing uniform fabric squares together in a grid, creating a classic checkerboard effect. Its beauty lies in its simplicity, making it one of the most accessible quilt projects for beginners while teaching essential skills like accurate cutting, consistent seam allowances, and block assembly without overwhelming you with complex patterns.
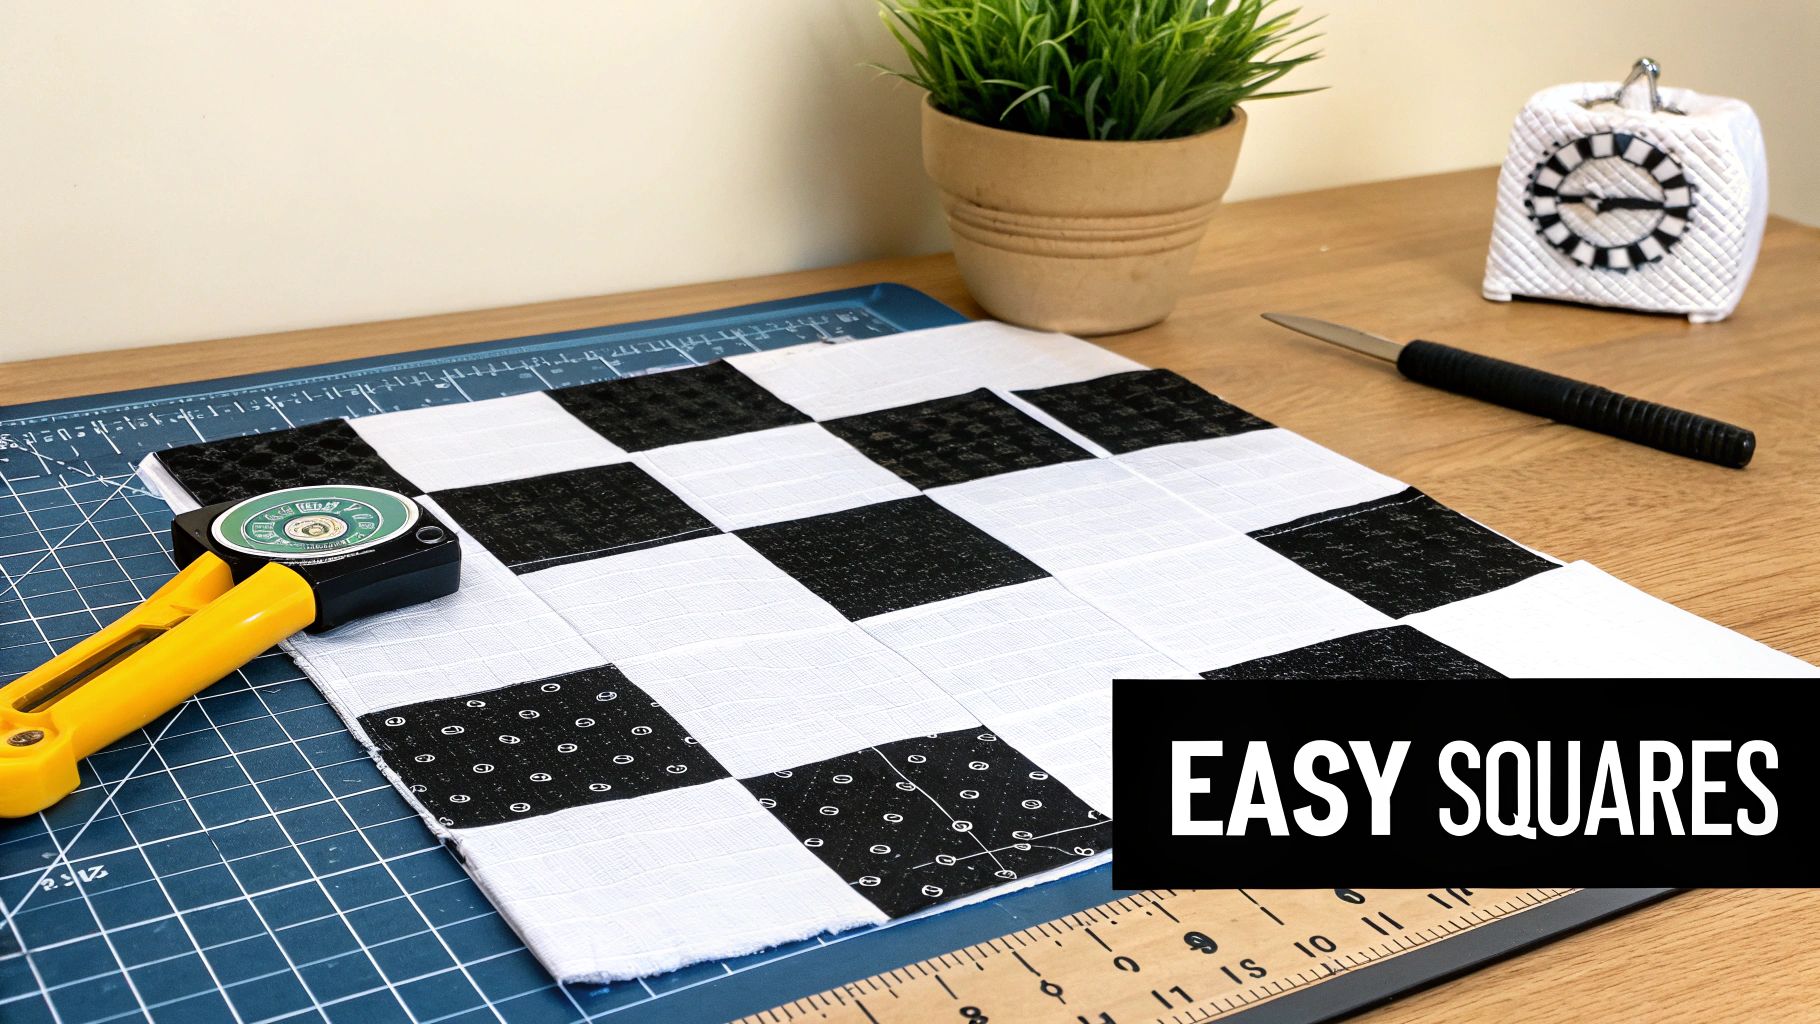
This method is perfect for your first project because it builds confidence and provides a clear path from fabric to finished quilt. The design is incredibly versatile and can be adapted using different fabric collections.
A square patchwork quilt is ideal for mastering the basics. Pre-cut fabric bundles, such as 5-inch "charm packs" or 10-inch "layer cakes," eliminate the most time-consuming step: cutting. This allows you to focus purely on precise sewing and pressing, which are the cornerstones of all quilting.
For a deeper dive into mastering the basics, explore our comprehensive course for creators to get started. You can get more details on the Simple Square Patchwork Quilt class on ugccreator.com.
The Jelly Roll Strip Quilt is an incredibly fun and fast project, making it a favorite among quilt projects for beginners. This technique uses pre-cut 2.5-inch fabric strips, famously known as "Jelly Rolls," which are sewn together side-by-side. Because the cutting is already done for you, you can dive straight into sewing, making it one of the quickest ways to create a beautiful quilt top.
This method is ideal for those who want to see results quickly. The "Jelly Roll Race" quilt, where you sew strips end-to-end and then fold and sew them together repeatedly, is a popular variation that can produce a quilt top in just a few hours.
Working with pre-cut Jelly Rolls removes the pressure of achieving perfectly straight, uniform cuts. This lets you build confidence in your sewing skills, particularly in maintaining a consistent quarter-inch seam allowance over long distances. It also provides an easy introduction to working with a coordinated fabric collection without having to choose each piece yourself.
The Nine-Patch is a classic building block in quilting, consisting of nine small squares arranged in a three-by-three grid. It elevates the skills learned from simple patchwork by introducing the concept of block construction, a fundamental technique in creating more intricate designs. This project is one of the most versatile quilt projects for beginners because it teaches precision piecing and can be arranged in countless ways to form complex secondary patterns.
Mastering the Nine-Patch block opens the door to countless traditional and modern quilt patterns, including the beloved Irish Chain or Friendship Nine-Patch quilts. It’s the perfect next step after a basic square quilt.
This block introduces beginners to the process of sewing rows together and nesting seams to achieve perfectly matched corners. It’s an excellent exercise in accuracy and understanding how smaller units combine to create a larger, cohesive design. The simplicity of the nine squares allows you to focus on color placement and the visual impact of your fabric choices.
Many creators have found success sharing their Nine-Patch projects through brand partnerships. Find out more about how you can showcase your work by checking out the gifted collaboration application on prpackage.com.
Once you've mastered straight seams, the Half-Square Triangle (HST) quilt is the perfect next step. This project introduces diagonal sewing by creating versatile blocks from two right triangles sewn together. HSTs are foundational units that can be arranged into countless dynamic patterns, making them one of the most rewarding quilt projects for beginners looking to expand their skills beyond basic squares.

From classic Pinwheel designs to intricate Hourglass blocks, the creative possibilities are nearly endless. This project teaches precision and opens the door to more complex and visually interesting quilt designs without being overly difficult.
The HST quilt introduces a new skill, diagonal seaming, in a manageable way. There are multiple beginner-friendly methods to create HSTs that ensure accuracy and minimize fabric waste. Learning this single block type exponentially increases the number of quilt patterns you can tackle, building your confidence and creative toolkit.
To see how creators are using these fundamental blocks in modern designs, explore more on the Half-Square Triangle (HST) Quilt UGC creator signup page.
The Layer Cake Charm Quilt is another excellent entry point for new quilters, leveraging pre-cut fabric bundles to simplify the creation process. This project uses 10-inch "layer cake" squares or smaller 5-inch "charm pack" squares, which come coordinated by color and theme. This approach minimizes cutting and fabric selection stress, making it one of the most encouraging quilt projects for beginners who want a beautiful result with less prep work.
This method allows you to jump straight into sewing and arranging, building confidence as you see your quilt top come together quickly. The coordinated nature of pre-cuts ensures a polished and professional look, even for your very first project.
Using layer cakes or charm packs is all about efficiency and design cohesion. These bundles are curated by fabric designers, removing the guesswork from color and pattern matching. You can create stunning quilts like charm pack baby quilts or simple turn-around charm quilts by focusing solely on block arrangement and fundamental sewing techniques.
Working with pre-cut fabric bundles is a smart strategy, much like how top brands use specialized platforms to manage their campaigns. To learn how leading companies streamline their outreach, you can get details on the best influencer gifting platforms on prpackage.com.
The Log Cabin quilt is a timeless pattern where fabric strips are sewn around a central square, building outwards in a spiral. This method teaches the valuable skill of strip piecing and block construction, creating intricate geometric designs that look far more complex than they are to assemble. Its traditional construction makes it one of the most rewarding quilt projects for beginners, offering a glimpse into quilting history while building modern skills.
This project is fantastic for understanding how block orientation can completely change a quilt's final look. By arranging blocks in different ways, you can create patterns like "Barn Raising" or "Courthouse Steps."
The Log Cabin block is constructed with a simple, repetitive process that quickly builds confidence. You only need to sew straight lines, but the result is visually dynamic. Using pre-cut 2.5-inch strips, often sold as "Jelly Rolls," makes the process even more accessible by removing the need for extensive cutting.
Explore the art of precision piecing by signing up for one of our local Bernina quilting classes.
The four-patch block is a fundamental building block in quilting, created by sewing four same-sized fabric squares into a simple two-by-two grid. This project takes the single square concept a step further, introducing the crucial skill of nesting seams to create sharp, precise intersection points. Its simplicity makes it one of the best quilt projects for beginners, as it provides a gentle introduction to block construction without complex piecing.
This method is perfect for using up scraps or featuring a few favorite fabrics. The resulting blocks can be arranged in countless ways, from a simple repeating grid to more dynamic "on-point" layouts, offering significant design flexibility from a basic component.
A four-patch quilt is ideal for practicing accuracy. Joining just two pairs of squares and then joining those pairs requires careful seam alignment. Mastering this simple block builds the skills and confidence needed for more intricate patterns like the nine-patch or log cabin blocks.
The Quilt-As-You-Go (QAYG) method flips the traditional quilting process on its head. Instead of assembling a large, cumbersome quilt top before quilting, this technique involves piecing, batting, and quilting individual blocks or sections separately. These smaller, finished sections are then joined together to create the final quilt. Its modular nature makes it one of the most manageable quilt projects for beginners, as it breaks down the entire process into small, easy-to-handle steps.
This approach is perfect for those with smaller sewing spaces or standard domestic sewing machines, as you never have to wrestle with a large quilt sandwich. Popularized by educators like Wendy Sheppard, QAYG is ideal for projects like table runners, cushion covers, or baby quilts.
QAYG eliminates the intimidation factor of quilting a large project. By focusing on one block at a time, you can practice and perfect your free-motion or straight-line quilting on a small scale. This builds confidence and allows you to experiment with different quilting designs on each block without committing to a single pattern for the entire quilt.
The string quilt is a resourceful and creative project that breathes new life into leftover fabric strips. This technique involves sewing fabric scraps of varying widths onto a foundation fabric, such as muslin, creating wonderfully unique and textured blocks. Its improvisational nature makes it one of the most freeing quilt projects for beginners, as it doesn't require precise cutting or intricate patterns, focusing instead on color play and sustainable crafting.
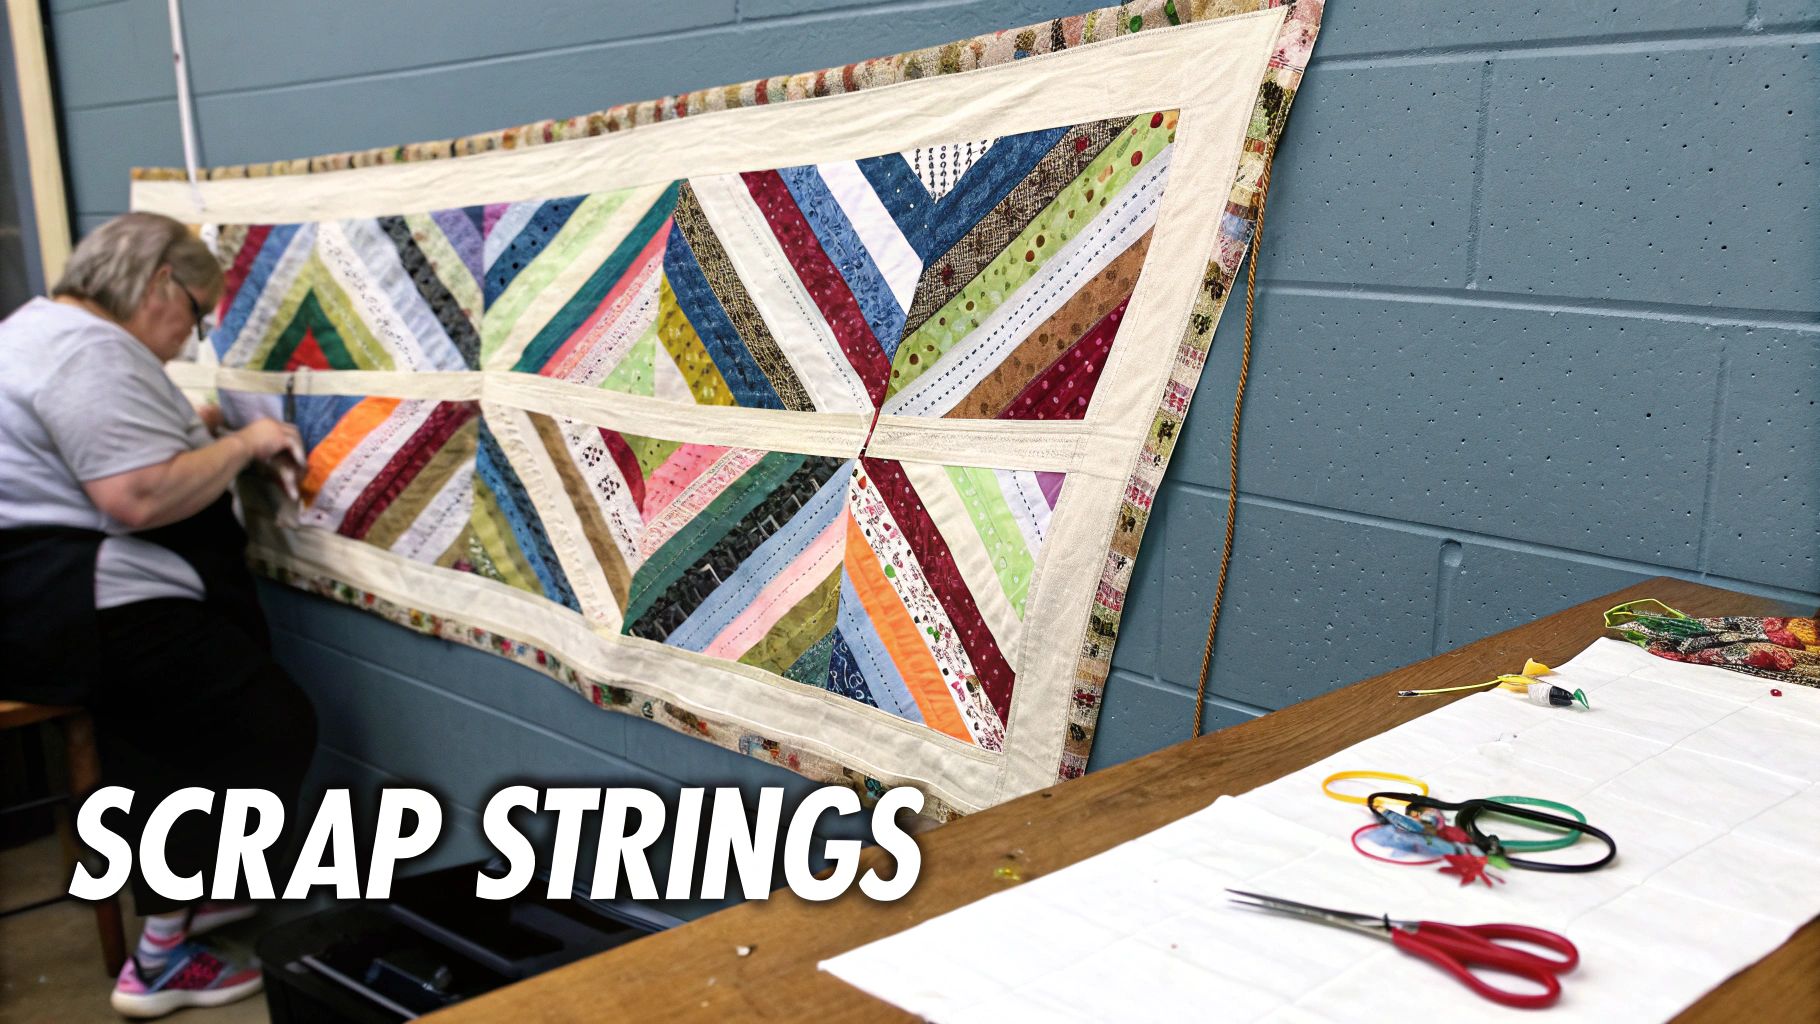
This method, rooted in the resourcefulness of Depression-era quilting, is perfect for using up every last piece of beloved fabrics. It teaches valuable skills in scrap management and building a design organically, resulting in a quilt that is truly one-of-a-kind.
A string quilt liberates beginners from the pressure of perfection. There are no fussy points to match, and "mistakes" often add to the charm. It’s an excellent way to practice straight-line sewing and pressing while building confidence. This project turns a potentially overwhelming scrap pile into a planned and beautiful creation.
An appliqué quilt with fusible web introduces you to the art of adding fabric shapes onto a background, creating a picture or decorative pattern. This technique uses a special heat-activated adhesive paper (fusible web) to attach your shapes, making it one of the most approachable quilt projects for beginners who want to move beyond simple piecing. It bypasses the need for intricate hand-stitching or needle-turn techniques, offering a fast and forgiving method for creating detailed designs.
This project is perfect for adding personalization to your work, such as monogrammed pillows, wall hangings with animal shapes, or a baby quilt decorated with stars and hearts. The fusible web holds everything securely in place, allowing you to focus on the fun part: stitching the edges down with your sewing machine.
Fusible web appliqué is an excellent skill-builder because it teaches precision in cutting shapes and the basics of decorative machine stitching without the frustration of pieces shifting. It’s a creative gateway to making more illustrative quilts and opens up a new world of design possibilities beyond geometric blocks.
For those interested in sharing their quilting journey and creations with a wider audience, learning about creator platforms can be a great next step. You can get more details by exploring UGC creator platforms on whopaysinfluencers.com.
| Project | Complexity 🔄 | Resources & Speed ⚡ | Outcomes 📊⭐ | Ideal Use Cases 💡 | Key Advantages ⭐ |
|---|---|---|---|---|---|
| Simple Square Patchwork Quilt | 🔄 Low — straight seams, forgiving piecing | ⚡ $50–150; 2–4 weeks; basic tools (rotary, ruler, machine) | 📊 Teaches core skills; Quality ⭐⭐ — clean, versatile | Beginner practice, charm-pack projects, quick gifts | Builds confidence, minimal supplies, fast completion |
| Jelly Roll Strip Quilt | 🔄 Low — minimal cutting, simple seam lines | ⚡ $40–120; 1–3 weeks; pre-cut 2.5" strips | 📊 Fast visual impact; Quality ⭐⭐⭐ — coordinated, professional look | Speedy lap/baby quilts, group or class projects | Eliminates cutting errors, very fast, fabric bundles coordinated |
| Nine-Patch Quilt Block | 🔄🔄 Medium — requires precise cutting & intersections | ⚡ $60–150; 3–6 weeks; accurate cutting & ¼" seam guide | 📊 Complex patterns from simple blocks; Quality ⭐⭐⭐ | Skill-building, foundation for advanced designs, traditional quilts | Teaches precise seaming, highly customizable, scalable |
| Half-Square Triangle (HST) Quilt | 🔄🔄 Medium — diagonal seams/angles to manage | ⚡ $50–130; 2–5 weeks; triangle rulers or sew‑and‑cut method | 📊 Dynamic motion and variety; Quality ⭐⭐⭐ | Modern designs, pinwheels, learning diagonal piecing | Multiple construction methods, creates visual movement |
| Layer Cake / Charm Quilt | 🔄 Low — pre-cut squares, minimal prep | ⚡ $30–100; 1–3 weeks; 10" or 5" pre-cuts | 📊 Quick polished results; Quality ⭐⭐–⭐⭐⭐ | Quick gifts, beginner classes, stash-busting with collections | No cutting, coordinated palettes, very quick to assemble |
| Strip-Piecing Log Cabin Quilt | 🔄🔄 Medium — spiral construction, pressing order matters | ⚡ $60–140; 3–6 weeks; consistent strip widths (rotary recommended) | 📊 Dramatic geometric impact; Quality ⭐⭐⭐ | Statement quilts, learning strip-piecing, organized designs | Impressive visuals, systematic assembly, forgiving patterning |
| Four-Patch Quilt Block | 🔄 Very Low — simplest 2×2 block | ⚡ $30–80; 1–3 weeks; minimal tools | 📊 Basic skill reinforcement; Quality ⭐⭐ | Absolute beginners, quick sampler quilts, confidence building | Easiest block, fast to construct, low error risk |
| Quilt-As-You-Go (QAYG) Project | 🔄🔄 Medium — modular joining requires planning | ⚡ $40–120; 2–4 weeks; small quilting tools, fusible or batting options | 📊 Even quilting on small sections; Quality ⭐⭐⭐ | Quilting without a frame, portable projects, staged timelines | Breaks project into pieces, easier to handle, no large machine needed |
| String Quilt from Fabric Scraps | 🔄 Low — improvisational foundation piecing | ⚡ $20–70; 3–7 weeks; muslin foundation, scraps | 📊 Unique, textured results; Quality ⭐⭐ — highly variable | Scrap-busting, sustainable projects, charity quilts | Low cost, zero waste, very forgiving and creative |
| Appliqué Quilt with Fusible Web | 🔄🔄 Medium — simple placement, finish edges needed | ⚡ $40–110; 2–4 weeks; fusible web, stabilizer, finishing stitches | 📊 Bold graphic outcomes; Quality ⭐⭐⭐ | Personalized motifs, kid-friendly quilts, non-pieced designs | No complex hand‑appliqué, fast placement, great for bold motifs |
You have now journeyed through ten distinct and accessible quilt projects for beginners, each offering a unique entry point into the rich and rewarding world of quilting. From the foundational simplicity of a Simple Square Patchwork Quilt to the clever efficiency of a Jelly Roll Strip Quilt and the creative freedom of a String Quilt, you've seen firsthand that starting this craft doesn't require years of experience, only a willingness to learn and a spark of inspiration. The key takeaway is that quilting is a skill built one block, one seam, and one project at a time.
The projects we've explored, such as the classic Nine-Patch and the versatile Half-Square Triangle, are more than just patterns; they are fundamental building blocks. Mastering these simple techniques opens the door to countless future designs. Remember, the goal of your first project isn't perfection, but completion. It's about learning how to handle fabric, how to achieve a consistent quarter-inch seam, and how to see a project through from a pile of cut squares to a finished, tangible item that brings you pride.
The most important step you can take right now is to simply begin. Choose the project from this list that excites you the most. Is it the structured geometry of the Log Cabin block or the playful potential of Appliqué? Whichever one you pick, that enthusiasm will be the fuel that carries you through the learning curve.
Here are your actionable next steps:
As you complete your first projects, you will not only gain technical skills but also develop an eye for color, pattern, and design. You might find yourself exploring how to integrate these beautiful, functional items into your home’s decor. For instance, a small lap quilt can double as a vibrant throw. If you're interested in this aspect, you can Learn more about choosing a throw blanket and how it can complement your living space. This journey is about creating pieces that are both meaningful and beautiful.
Ready to take the first stitch? At High Country Quilts in Colorado Springs, we specialize in helping new quilters succeed. Visit our shop to find beautiful fabrics, beginner-friendly kits, expert advice, and the perfect BERNINA machine to launch your new passion. High Country Quilts
At High Country Quilts we care deeply about community. With our experiences in retail, we know that a store is not only a place to shop but also a place for the community to gather and share. During this busy...

Hi! We’re Adam and Renee Wheaton, the new owners of High Country Quilts! For more than 40 years, we’ve owned and operated vacuum and sewing businesses. Following in Renee’s father’s footsteps after he retired from All Discount Vacuum and Sewing in Colorado...


Leave a comment