

We Love Our Quilting Community
At High Country Quilts we care deeply about community. With our experiences in retail, we know that a store is not only a place to shop but also a place for the community to gather and share. During this busy...


Have you ever admired a quilt with perfectly matched points and impossibly intricate patterns and wondered, "How did they do that?" The answer is often a time-honored technique called quilt english paper piecing, or EPP for short. It’s a classic method beloved for its stunning precision and incredible portability.
At its heart, EPP is like creating a perfect mosaic with fabric. You use paper templates as a guide to shape your fabric pieces, which allows you to stitch together flawless geometric designs by hand. This heritage craft opens up a world of intricate patterns, making it a favorite for quilters of every skill level.
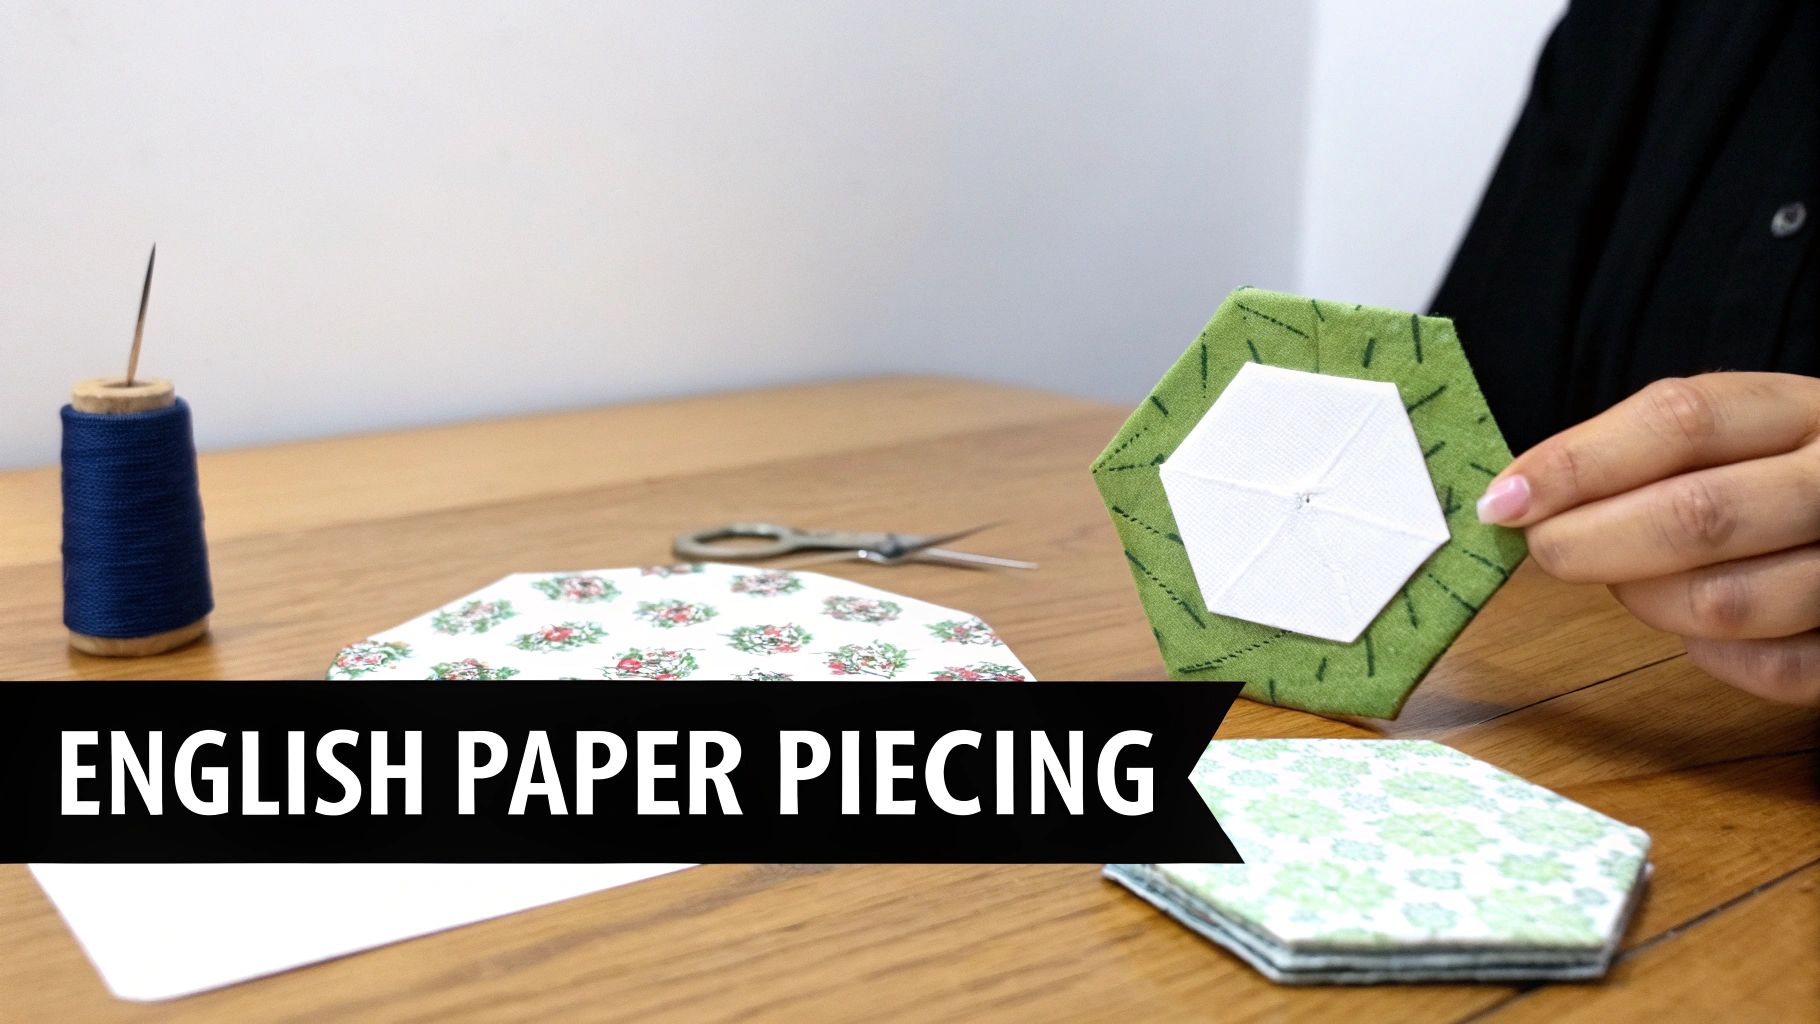
English paper piecing is a hand-sewing technique where you wrap fabric around paper templates before stitching them together. This is quite different from standard machine piecing, where you're sewing fabric directly to fabric. In EPP, the paper shape acts as a temporary stabilizer—a little internal skeleton—that ensures every angle is crisp and every side is perfectly straight.
The process itself is wonderfully simple. You start by basting (which just means temporarily tacking) your fabric around a paper shape like a hexagon or diamond. Then, you place two of these basted shapes together and whipstitch their folded edges. The result? A clean, precise seam that’s often hard to replicate on a sewing machine, especially when you're working with tricky shapes and sharp points.
Part of the charm of EPP is its rich history. The technique stretches all the way back to the 1770s in England, making it one of the oldest patchwork methods still practiced today. It became wildly popular in the early 1800s and soon made its way across the ocean. In fact, the earliest known hexagon quilt in the United States dates back to 1807. If you're a history buff, you can learn more about the fascinating journey of EPP at faithandfabricdesign.com.
This deep-rooted history adds another layer of enjoyment to the craft. It connects you to generations of quilters who sat with needle and thread, using the very same techniques to create beautiful and functional art.
Today, quilt english paper piecing isn't just surviving; it's thriving. Its enduring popularity comes from a unique blend of benefits that resonate with modern makers. It's a meditative, screen-free hobby you can truly take anywhere.
The true beauty of English paper piecing is its blend of portability and precision. It turns idle moments—waiting at an appointment, traveling, or relaxing in the evening—into productive, creative time.
We see quilters at High Country Quilts fall in love with EPP for so many reasons, but a few stand out:
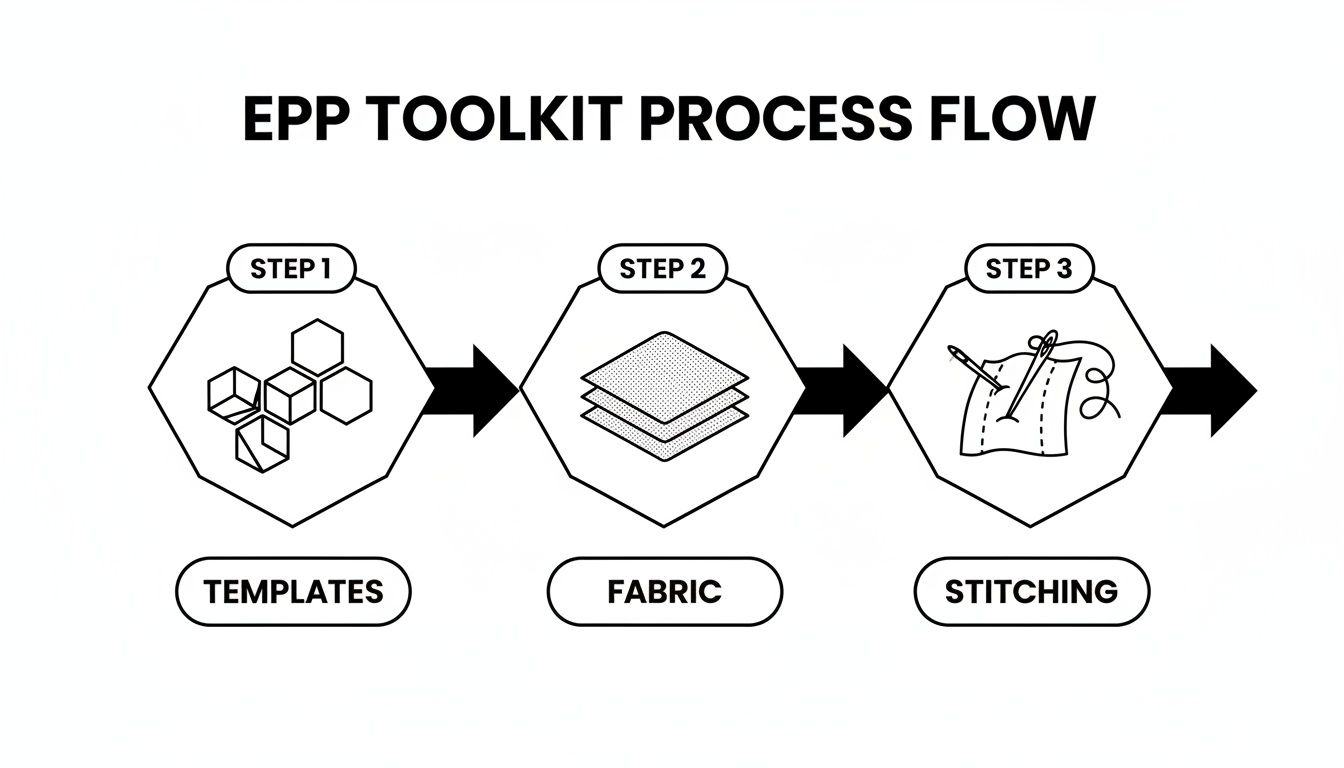
Stepping into English paper piecing is a bit like packing for a fun trip—you just need to gather a few key supplies. The great thing about EPP is that you don't need a mountain of expensive gear to get started. Its beauty lies in its simplicity, and with just a handful of essentials, you can create something truly stunning.
Think of it as setting up your kitchen for a new recipe. Each tool has a specific job, and when they all work together, the result is precise, beautiful, and so satisfying. Let's walk through what you'll want to have on hand. And the best part? You can find everything you need to begin your journey right here at High Country Quilts.
First things first, you'll need fabric and paper templates. These are the absolute soul of your project, forming the very structure of your design. Getting these right is your first big step toward a beautiful finish.
This craft is deeply rooted in the materials it uses. During the 19th century, EPP really took off as a favorite pastime for upper-class women. With a boom in cotton imports, they transformed scraps into family heirlooms. Interestingly, the paper templates were often just recycled bits of personal letters and newspapers. This connection to personal correspondence initially made EPP a bit exclusive before it became the craft we all love today. You can dive deeper into this incredible backstory over at the English Paper Piecing Journey.
Once you have your fabric and papers, it’s time to gather the tools that will bring them all together. These next few items are all about making the process smooth, precise, and genuinely enjoyable.
Needles: A fine, strong needle will quickly become your best friend. Look for milliner's or straw needles in a size 10 or 11. They're long and thin, which helps you pick up just a few threads of fabric at a time—the secret to those practically invisible stitches everyone strives for.
Thread: The whole point of EPP stitching is for it to disappear. A fine, 50wt or 80wt cotton thread in a neutral color like grey, beige, or off-white is perfect for almost any project. Its fine weight lets it sink right into the fabric folds, making it completely undetectable from the front.
Cutting Tools: You don’t need a lot here, but what you have should be accurate. A small rotary cutter, a self-healing mat, and a clear acrylic ruler are the ideal trio for cutting your fabric pieces. It's also smart to keep a small, sharp pair of scissors nearby just for snipping threads.
A Quick Tip: When you're cutting your fabric, aim for a seam allowance of about 1/4 to 3/8 inch all the way around your paper template. That gives you plenty of fabric to fold over securely without creating too much bulk in your seams later on.
Before we move on, let's pull all these tools together into a simple checklist. Think of this as your EPP shopping list to get you started on the right foot.
| Tool Category | Essential Items | Helpful Extras (Optional) |
|---|---|---|
| Fabric & Templates | 100% quilting cotton fabric, Pre-cut paper templates (e.g., 1" hexagons) | A design board or flannel to lay out pieces |
| Cutting | Small rotary cutter, Self-healing mat, Clear acrylic ruler, Small sharp scissors | Pinking shears to reduce fabric fraying |
| Stitching | Milliner's/straw needles (size 10 or 11), 50wt or 80wt cotton thread (neutral color) | A thimble, Needle threader |
| Basting & Prep | A fabric glue pen, Thread wax or conditioner, Wonder Clips |
This table covers the basics you'll definitely need and a few nice-to-haves that can make the process even smoother.
While the items above will get the job done, a few extra tools can turn a good EPP session into a great one. These aren't strictly necessary, but many seasoned stitchers would never be caught without them.
First, consider picking up a fabric glue pen. This is a fantastic, fast alternative to thread-basting your fabric to the paper pieces. A tiny dab of glue is all it takes to hold the fabric folds in place, letting you prep a whole stack of shapes in no time.
Another little luxury is thread wax or conditioner. Just run your thread through it once, and you’ll find it glides through the fabric with less resistance, tangles less, and generally behaves much better. Think of it as a small investment that saves you from a world of frustration with knotted thread.
Alright, this is where the real fun begins. Once you have your tools, you can get started on the three core skills that transform simple fabric and paper into those stunning, precise quilt blocks you see everywhere. I always tell beginners to think of it like learning the basic chords on a guitar—once you get these simple motions down, you can create just about anything.
We'll walk through preparing your pieces, the art of basting, and that satisfying little whipstitch that pulls it all together. These are the building blocks for every single EPP project, and I promise, they're easier to master than you might think.
Taking a little extra care here is the secret to getting those perfect, crisp points later. The whole idea is to cut your fabric just a bit bigger than your paper template. This creates a seam allowance that you'll fold over the paper's edge. A consistent seam allowance is what helps your pieces lie flat and keeps your seams from getting too chunky.
Getting this prep work done first sets you up for success. It’s like laying out all your ingredients before you start cooking; it just makes the whole process smoother and way more enjoyable.
Basting is how you temporarily wrap the fabric around the paper template. This little step is what gives EPP its signature sharp edges and makes stitching the pieces together so incredibly accurate. There are two main ways to do it, and honestly, most quilters I know use both, depending on the project.
I always suggest trying both methods to see what feels right for you. It really comes down to a personal preference for speed, convenience, and what feels most comfortable in your hands.
In recent years, glue basting has become a huge favorite, and for good reason—it’s fast and clean. You just run a thin line of fabric-safe glue from a glue pen along the edge of the paper template and press the fabric over it. Simple as that.
Glue basting is fantastic for getting incredibly sharp corners and prepping a ton of pieces in a short amount of time. It’s a modern shortcut that really streamlines the whole process.
The main perks of glue basting are:
Thread basting is the classic way it’s been done for generations. You use a needle and thread to tack the fabric folds down at the corners. The key is that you don't stitch through the paper; your stitches just catch the fabric on either side of a corner, holding it snugly in place.
This method doesn't require any special tools beyond your basic needle and thread. A lot of people also swear by it because it makes the paper templates much easier to pop out when you’re done, since there’s no glue residue.
Now for the best part—joining your basted pieces and watching your design come to life. The go-to stitch for quilt english paper piecing is the whipstitch. It's a simple, strong stitch that, when you get the hang of it, becomes almost completely invisible from the front of your quilt.
Here’s how to do a perfect little whipstitch:
The secret to an invisible seam is to make sure you never stitch through the paper template itself. Your needle should only ever pass through the fabric folds along the edge. After a little practice, this rhythmic stitching becomes a wonderfully relaxing and meditative process, bringing your quilt top together one perfect seam at a time.
Now that you have the basic moves down—prepping, basting, and stitching—it’s time for the fun part: turning those skills into something beautiful. The journey into quilt english paper piecing happens one satisfying stitch at a time, and the best way to start is with simple projects that build your confidence before you tackle more intricate designs.
Think of it like learning to cook. You wouldn't start with a five-course gourmet meal, right? You'd begin with a simple, delicious recipe that gives you a taste of success. We'll start with a project you can finish in an afternoon, giving you that immediate "I made this!" feeling, and then move on to patterns that have been loved by quilters for generations.
Your first project should be fun, fast, and gratifying. A simple hexagon coaster is the perfect place to start. All it takes is seven one-inch hexagons—one for the center and six surrounding it. This small scale lets you practice every core EPP skill without feeling overwhelmed.
Making a coaster walks you through the entire EPP process:
This small victory is incredibly motivating. It proves you can do this, and you’ll have a charming, handmade item for your coffee table to show for it. It's also a fantastic way to use up those small fabric scraps in your stash or find the perfect precuts at High Country Quilts.
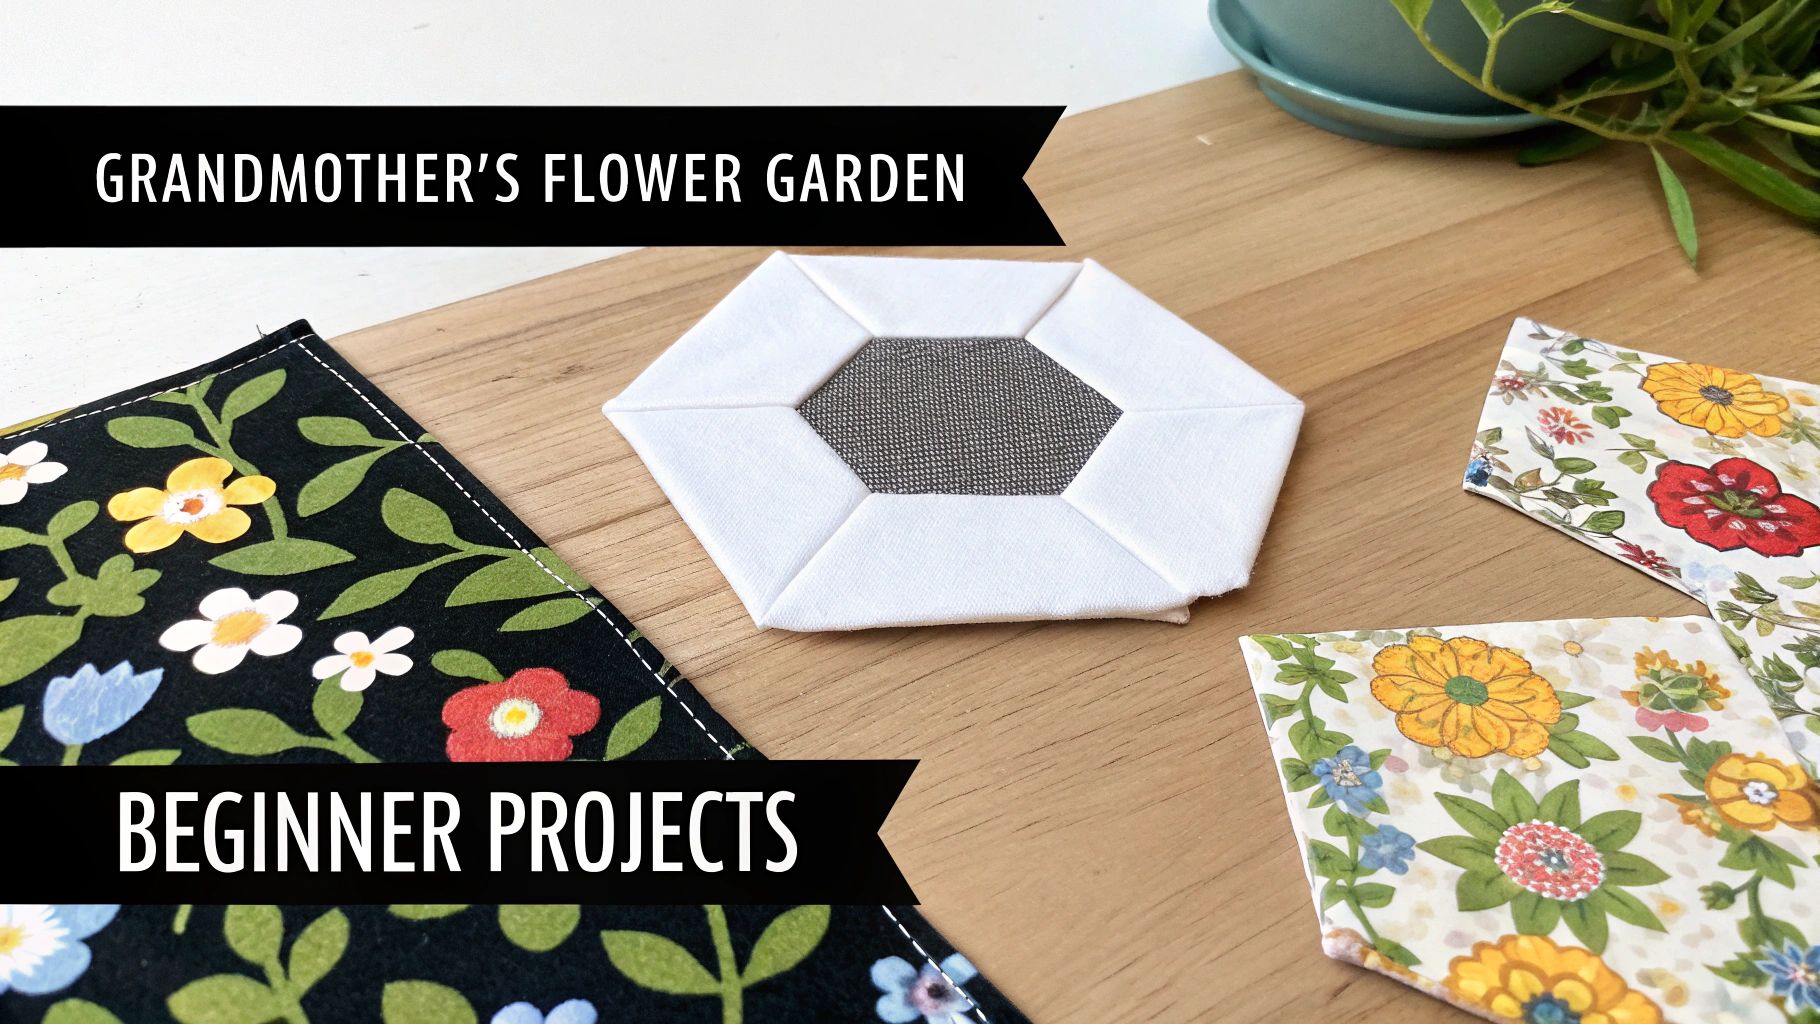
Once you've conquered the coaster, you're ready for one of the most iconic patterns in the quilting world: the Grandmother's Flower Garden. This beloved design is really just a larger version of your coaster. It's made of many hexagon flowers joined together to create a stunning, honeycomb-like field of color.
The Grandmother's Flower Garden pattern is a rite of passage for many EPP enthusiasts. Its timeless appeal lies in its simplicity and the endless creative possibilities it offers for color and fabric placement.
This project is an amazing skill-builder. It teaches you how to join larger sections and manage a project as it grows. What was once considered a bit old-fashioned after WWII has been rediscovered by a new generation of quilters, and antique honeycomb quilts are now highly sought after. At a shop like High Country Quilts, you can find everything from vintage-inspired prints to modern batiks to create your own version of this classic 1800s design. You can read more about its rich history over at sewandquilt.co.uk.
As you get more comfortable, you can start adding some real artistic flair to your work. One of the most exciting techniques in EPP is fussy cutting. Don't let the name fool you—it’s not about being picky! It's the art of intentionally cutting your fabric to isolate a specific motif, creating a stunning kaleidoscopic effect.
Imagine you have a fabric printed with little birds. Instead of cutting your hexagons randomly, you’d carefully center a bird on each template. When you stitch those pieces together, you create a beautiful, symmetrical design of birds all facing in or out.
Fussy cutting lets you:
This technique is where quilt english paper piecing transforms from a craft into an art form. It encourages you to look at your fabric with a designer's eye, unlocking a whole new level of creativity. Grab some of your larger-scale prints and see what amazing effects you can create
Every creative journey has its little puzzles to solve, and English paper piecing is no different. Even after years of stitching, I still run into the occasional hiccup. Think of this as your friendly guide to navigating those common bumps in the road before they grow into real frustrations. We’ll look at the most frequent snags and how to fix them with simple, practical solutions.
Honestly, it's best not to see them as problems at all. Instead, think of them as opportunities to really dial in your technique. With just a few small adjustments, you can keep your stitching smooth, your points sharp, and your creative flow right on track.
One of the first questions I hear from newcomers to quilt english paper piecing is, "Why isn't my project lying flat?" If you're noticing some puckering along your seams or your finished block feels a bit puffy, the culprit is almost always your stitch tension.
It’s a totally natural instinct to pull your stitches tight, thinking you're making them more secure. But yanking on that thread too hard is exactly what causes the fabric to gather up.
Try to relax your hands and find a comfortable, consistent rhythm. The goal is a seam that's both secure and invisible, one that lets the fabric lie naturally flat once you take the papers out.
There are few things more frustrating than stopping mid-seam to deal with a knotted, tangled mess of thread. It happens to everyone, but a few simple tricks can keep your thread gliding smoothly, saving you time and a whole lot of headaches.
First off, take a look at the length of your thread. It might feel more efficient to cut a super long piece, but anything over 18-20 inches is just asking for trouble. It's far more likely to twist and knot on itself as you work. Shorter threads simply mean less tangling.
Pro Tip: Use a thread conditioner or beeswax. Just run your thread over the wax once before you start stitching. This tiny step coats the thread, making it stronger and helping it resist tangles as it passes through the fabric.
This little bit of prep makes a huge difference and leads to a much more relaxing and enjoyable stitching session.
So, what do you do when multiple points all meet in one spot, like in the center of a star or a Grandmother's Flower Garden block? All those seam allowances converging can create a stubborn, bulky lump that keeps your block from lying perfectly flat.
The solution is a technique often called finessing the seams.
By tackling the bulk as you build your block, you prevent that stubborn bump from ever forming. This is the secret to getting a professional, flat finish on your beautiful quilt english paper piecing project.
After so many hours of patient stitching, your EPP top is finally complete. It's a beautiful mosaic of fabric, and now it's time for the magic to really happen. This is where your detailed handiwork gets ready to become a finished, durable piece of art. The final steps—removing papers, pressing, and quilting—are just as important as the piecing itself. They’re what give your project that polished, professional look.
Think of this stage as building the bridge from your handcrafted top to a finished quilt. Let's walk through the essential finishing touches that will turn your pieced panel into something you can truly treasure.
One of the most satisfying moments in any EPP project is popping out those paper templates. At this point, your stitches are doing all the work, holding everything together securely. You can carefully remove each paper piece with your fingers, or gently use the tip of a seam ripper to help lift them out.
With the papers gone, your EPP top needs a good press to get it to lie perfectly flat.
This pressing stage is where you really get to relax the fabric and all those seam allowances. Taking your time here is the secret to a perfectly flat quilt top that's ready for the next step.
A lot of EPP projects aren’t full-sized quilts but are instead gorgeous panels meant to be the star of a larger item—think a stunning pillow, a unique tote bag, or the centerpiece of a quilt. The most popular way to attach your EPP panel to a background fabric is with appliqué.
It’s simple: just center your pressed EPP panel on the background fabric, pin it down so it doesn't shift, and then use a neat, nearly invisible appliqué stitch to sew it down around the outer edge. This creates a clean, seamless look.
Finally, you get to quilt it! Quilting is what adds that lovely texture and dimension, turning your top into a proper quilt sandwich. You've got a few wonderful options here:
Whether you fall into the gentle rhythm of hand quilting or prefer the clean lines of a machine, this is the step that brings all your hard work together into one complete, stunning piece.
When you're trying a new craft, a few questions are bound to come up, no matter how clear the instructions seem. We get it! Think of this as your go-to spot for quick answers to the most common things people ask about English paper piecing. We want you to feel confident and ready to keep stitching.
Let's clear up some of those "what ifs" and "how-tos" that might be buzzing around in your head.
Honestly, the best thread for EPP is one you can't see in the finished project. Your goal is a fine, strong thread that just melts into the fabric. Most of us in the shop swear by a good 50wt or even an 80wt cotton thread. It’s so fine that it sinks right into the fabric folds, making your stitches practically disappear.
A neutral color is your best friend here—think gray, beige, or a soft cream. It will work with almost any fabric you throw at it. If you notice your cotton thread is snapping a bit, a fine polyester thread is a fantastic, durable alternative.
Ah, the quest for the invisible stitch! This is what gives EPP its polished, professional look, and the secret is all in how you take your stitches. Your needle should only grab a couple of threads from the very edge of the folded fabric on each piece.
The real trick is to avoid piercing the paper template. If your needle only passes through the tiny fabric folds at the edge, your stitches stay hidden on the back, and the front of your work looks absolutely seamless.
Also, try to keep your stitches small and consistent, maybe about 1/16th of an inch apart, and maintain a gentle, even tension.
I get this question all the time, but the simple answer is no. At its heart, English paper piecing is a hand-sewing technique. The delicate control required to join those tiny, fabric-wrapped edges just isn't possible with a machine.
You’ll definitely bring out your machine for the final quilting stage, but the piecing itself is all about the quiet, meditative process of working by hand. It’s part of the charm!
Ready to dive in and find all the supplies we've been talking about? The team at High Country Quilts has everything you need, from precut papers and beautiful fabrics to the perfect needles and thread to start your first project. Explore our EPP collection online to get started.
At High Country Quilts we care deeply about community. With our experiences in retail, we know that a store is not only a place to shop but also a place for the community to gather and share. During this busy...

Hi! We’re Adam and Renee Wheaton, the new owners of High Country Quilts! For more than 40 years, we’ve owned and operated vacuum and sewing businesses. Following in Renee’s father’s footsteps after he retired from All Discount Vacuum and Sewing in Colorado...


Leave a comment