

We Love Our Quilting Community
At High Country Quilts we care deeply about community. With our experiences in retail, we know that a store is not only a place to shop but also a place for the community to gather and share. During this busy...


Kaleidoscope quilts are a quilter's magic trick. By carefully cutting and arranging pieces from a single, large-scale print, you can create breathtaking, symmetrical designs that look incredibly complex. It’s all about using fabric with a long pattern repeat to create a stunning optical illusion.
This technique is what turns a yard of fabric into a one-of-a-kind piece of art.
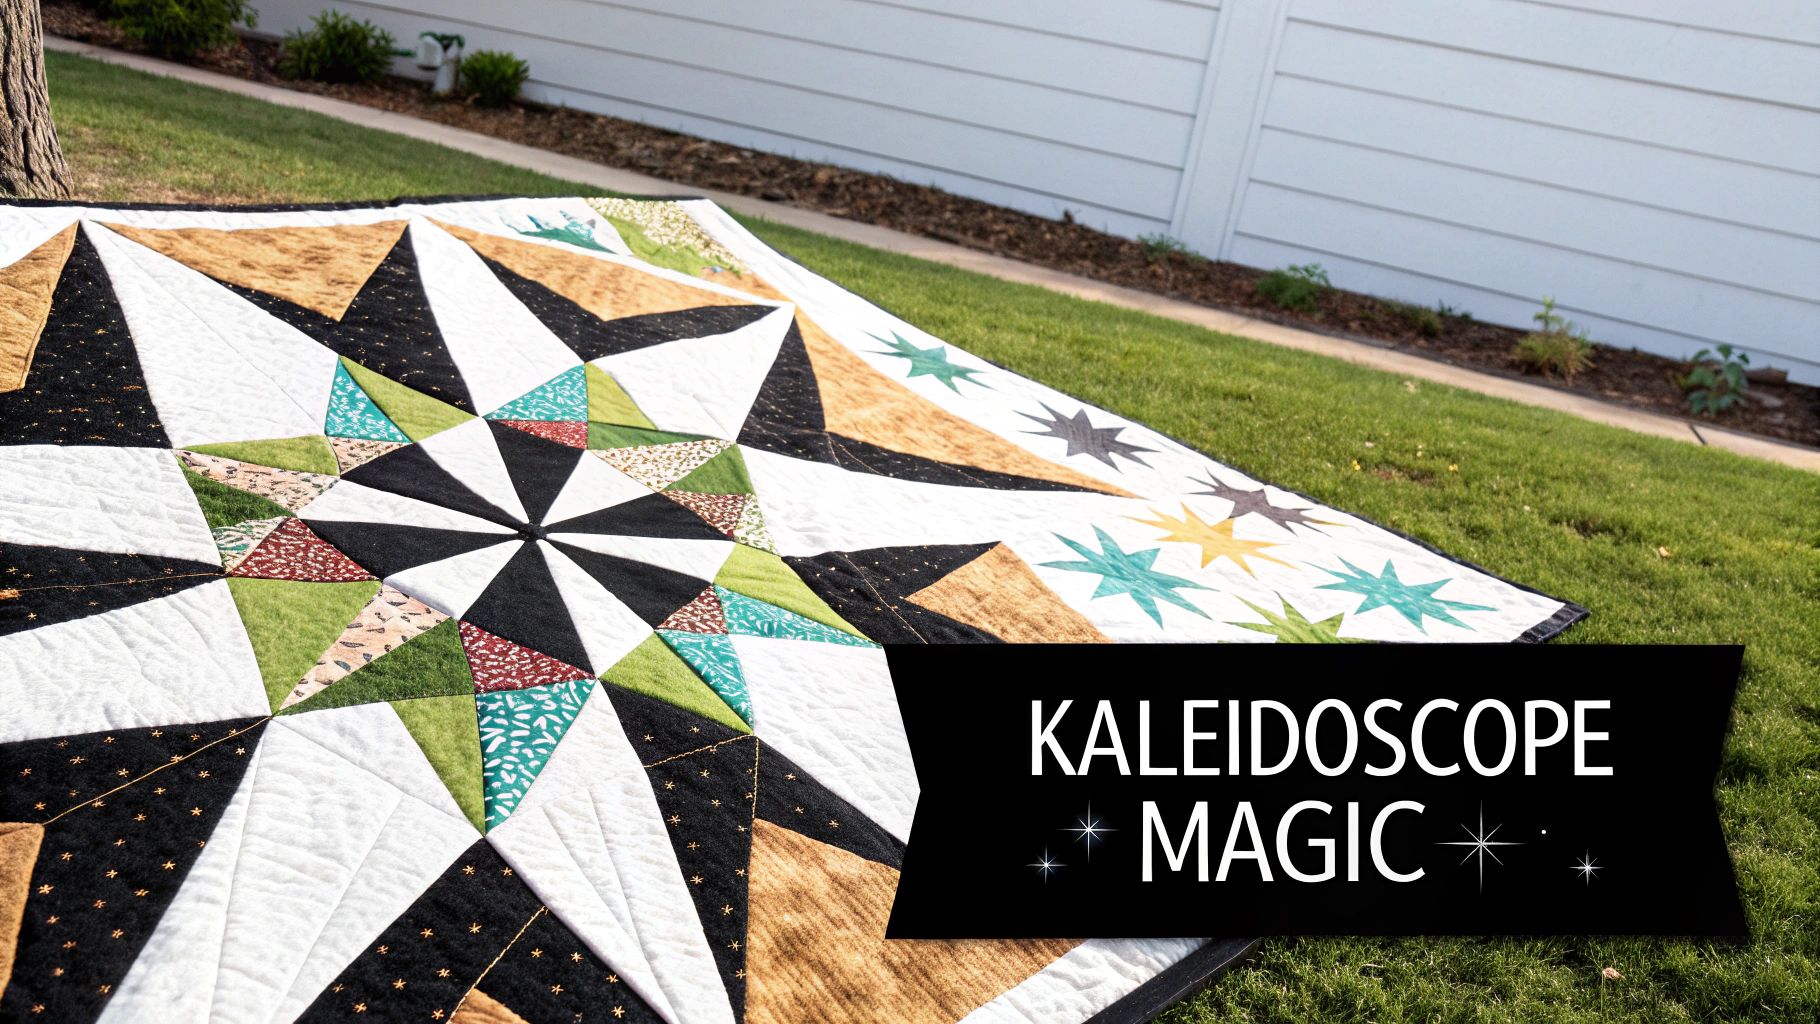
There's something truly mesmerizing about a kaleidoscope quilt. The way the colors explode and the patterns create perfect symmetry just pulls you in. For quilters, the real joy is in the process itself—taking one bold, dynamic print and unlocking all the hidden designs within it.
The secret is in the cut. It all comes down to cutting identical triangles from the repeating motifs in your fabric. We call this "fussy cutting," and it's what makes the magic happen. Every slice is intentional, designed to isolate a specific element that, when joined with others, builds a block that seems far more intricate than it really is.
These quilts have a history just as rich as their patterns. The idea actually goes back to the invention of the kaleidoscope in 1816 by Scottish physicist Sir David Brewster. His fascinating device, which made beautiful, symmetrical patterns out of bits of glass and light, quickly inspired artists and designers.
By the 1870s, quilters were already figuring out how to recreate those incredible visuals with fabric. Once the kaleidoscope made its way to America in 1818, its influence boomed. In fact, research shows that over 70% of documented 19th-century star-pattern quilts in museum collections have a symmetry that's a direct nod to kaleidoscope optics. You can delve deeper into the artistic evolution of these quilt patterns and their history.
A kaleidoscope quilt is more than just a blanket; it's a testament to how creativity can transform the ordinary into the extraordinary. By carefully selecting and cutting your fabric, you become the artist controlling the final illusion.
So, what makes this technique so enduringly popular? It’s a delightful mix of challenge and reward that keeps quilters coming back.
Whether you're gearing up for your first kaleidoscope project or looking for new inspiration, the right fabric is everything. For those in the Atlanta area, I always recommend checking out a local resource like Famcut.com. They have a fantastic selection and the kind of hands-on expertise that can help you find the perfect print for your next masterpiece.
The secret to a stunning kaleidoscope quilt isn't complicated piecing or advanced math. It's the fabric. Everything starts and ends with the print you choose. The right one will practically design the quilt for you, revealing dozens of hidden patterns you never knew were there. The wrong one? Well, that can lead to a muddled mess, no matter how precise your cutting is.
Think of it this way: your fabric is doing all the heavy lifting. You're simply the curator, cutting and rearranging its inherent beauty to create something spectacular.
So, how do you spot a winner? Not every fabric on the shelf has what it takes. You're on the hunt for a print with some specific personality traits that allow it to transform into those mesmerizing, symmetrical blocks.
First and foremost, go for a large-scale print. Tiny, ditsy florals or small geometrics just don't have enough going on. When you cut them into small triangles, the design gets lost. You need bold motifs, clear lines, and even some "negative" space to create contrast and let the new patterns shine.
Next, pay close attention to the pattern repeat—that's how long the fabric runs before the design starts over again. Look for a long repeat, ideally 24 inches or more. This is crucial because a long repeat gives you a much larger, more diverse playground of motifs to cut from. A short repeat will mean all your blocks end up looking nearly identical, which can make for a pretty monotonous quilt.
Finally, try to find a non-directional print. This means the design looks good from any angle. Fabrics with a clear top and bottom, like a landscape scene or a one-way stripe, really limit your options. They lock you into one orientation, robbing you of the beautiful, unexpected designs that pop up when you can freely rotate your pieces.
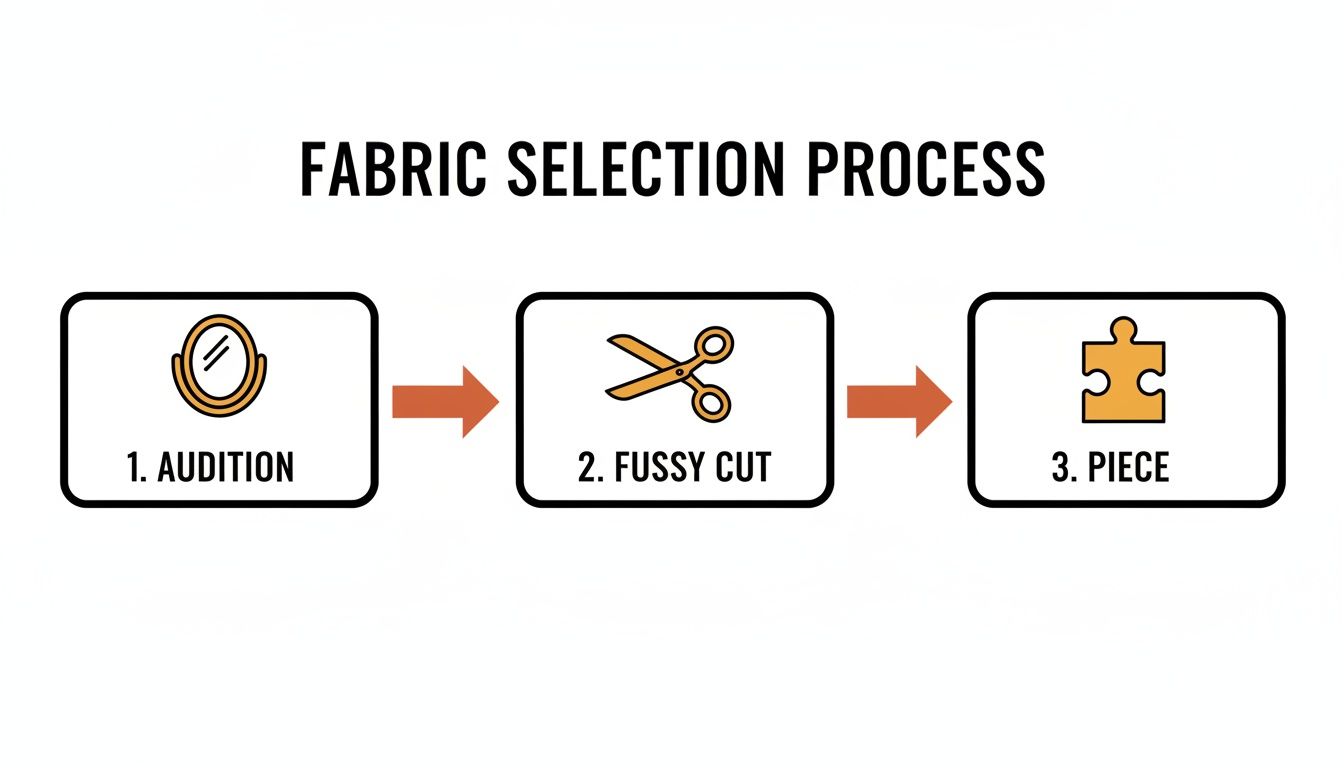
Before you even think about laying a rotary cutter on that beautiful fabric, you need to audition it. The best way to do this is with a simple tool: a pair of hinged quilter's mirrors. This little gadget lets you see exactly how a section of fabric will look as a finished block, taking all the guesswork out of the process.
This is my favorite part of the process! It's like a treasure hunt. You'll quickly see which parts of the print create incredible stars and which parts just fall flat. It saves you from wasting expensive fabric on a print that just doesn't have the right stuff.
My Pro Tip: As you're auditioning, keep an eye on the color value. A print that has a good mix of light, medium, and dark tones within the mirrored wedge will create blocks with incredible depth and movement. If the value is too uniform, your final design can look a bit one-dimensional.
We owe a lot of what we know about kaleidoscope quilts to pioneers like Paula Nadelstern. She really cracked the code back in the 1980s, inspired by a single bolt of Liberty of London fabric. She realized that by "fussy cutting" eight identical wedges from each pattern repeat, she could create a hypnotic symmetry that exploded the visual complexity by an estimated 300% compared to random cutting. You can get lost in her incredible work over at the American Folk Art Museum.
Her work is a powerful reminder that the fabric is your partner in this creative dance. So when you're shopping, whether online or in a local shop like Famcut.com, take your time. Ask them to unroll the bolt. Use your mirrors. Really get to know the landscape of the print before you commit. A thoughtful choice now is what separates a pretty quilt from a truly breathtaking one.
Choosing the right fabric is the first, and most important, step in creating a dynamic and visually stunning kaleidoscope quilt. The print you select directly influences the complexity, color play, and overall impact of your finished piece. This table breaks down different types of fabric prints to help you make the best choice for your project.
| Fabric Print Type | Ideal Characteristics | Kaleidoscope Effect | Best For |
|---|---|---|---|
| Large-Scale Florals | Big blooms, defined petals, flowing leaves, long repeat (24"+) | Creates organic, star-like, and blossoming patterns. Very forgiving. | Beginners and those wanting a classic, beautiful kaleidoscopic look. |
| Geometric/Abstract | Bold shapes, clean lines, high contrast, non-directional designs | Produces sharp, symmetrical, and modern-looking blocks with strong lines. | Quilters aiming for a contemporary or graphic style. |
| Paisley & Damask | Swirling motifs, intricate details, good color variation | Results in elegant, swirling, and intricate patterns with a lot of movement. | Achieving a rich, traditional, or sophisticated aesthetic. |
| Stripes & Plaids | Consistent, linear patterns. Diagonal or varied-width stripes work best. | Can create stunning chevrons, starbursts, and radiating lines. | Creating controlled, linear effects. More advanced and requires precise cutting. |
| Small/Ditsy Prints | Tiny, repeating motifs, short pattern repeat | The pattern tends to get lost, resulting in a mottled or "muddy" effect. | Backgrounds or blender fabrics, but generally not the main feature fabric. |
| Novelty/Scenic Prints | Directional, recognizable objects (animals, scenes) | Difficult to create symmetry; often results in disjointed or partial images. | Isolating a single motif for a specific "I Spy" effect, but not for overall kaleidoscopes. |
Ultimately, the best fabric is one that excites you. Use this guide as a starting point, but always trust your mirrors and your creative instincts. The most amazing results often come from prints you might not have expected to work.
Alright, you've auditioned your fabrics and you're excited about the possibilities. Now comes the part where the real magic happens—and where precision becomes your best friend.
Getting your cuts just right is the bedrock of a great kaleidoscope quilt. It’s what makes the difference between a block with crisp, perfect points and one that just looks… messy. The whole optical illusion hinges on cutting absolutely identical wedges from your fabric's pattern repeat.
This is where a technique called fussy cutting comes into play. You're not just cutting strips; you're intentionally targeting and isolating a specific motif in your print, over and over again.
As you can see, this isn't just a random process. The care you take in the fussy cutting stage directly sets you up for success when you start piecing everything together.
You could draft your own templates, but trust me on this one: investing in a good quality acrylic kaleidoscope ruler will save you a world of time and headaches. The most common templates you’ll run into are the 45-degree triangle (for an eight-wedge block) and the 60-degree triangle (for a six-wedge block).
Here’s what your cutting station should look like:
Before you even think about cutting, lay your fabric out flat and find one full pattern repeat. Now, start playing. Move your acrylic template over different areas until you see a design that looks really compelling inside that triangle. It could be a flower, a geometric shape, or just a cool swirl of color.
Once you’ve found that sweet spot, your mission is to cut a bunch of identical triangles from that exact same position in every pattern repeat. And I've got a great time-saving trick for this.
Pro Tip: The Stack and Whack Method. Instead of cutting one little triangle at a time, you can stack several layers of your fabric. Find the identical motif on 4 to 6 pattern repeats and carefully align them right on top of each other. Pin the layers together (well outside where you'll be cutting!) to lock them in place. This lets you cut multiple perfect wedges at once.
With your fabric layers stacked and secured, it’s time to slice. Place your acrylic ruler over your chosen motif, taking a moment to double-check that it’s perfectly aligned.
Press down firmly on the ruler with your non-dominant hand, spreading your fingers to distribute the pressure. Then, with your rotary cutter straight up and down, make your first cut along the ruler's edge in one smooth motion. Always cut away from yourself!
Now for the key part: rotate the mat, not the fabric. This is the best way to line up for the next cut without risking any slippage. Make the remaining cuts, and you’ll have a perfect little stack of identical wedges.
This is why we take our time here. This level of detail is what creates that stunning kaleidoscope effect when the pieces finally come together.
Even with all the right gear, a couple of things can go wrong. The most common culprit I see is pattern drift. This happens when a fabric isn't printed perfectly square to the grain. As you work your way down the yardage, the design can slowly shift to one side.
The fix? Always align your ruler with the printed design itself, not the edge of the fabric. It’s far more important for the motifs to be identical than for your cuts to be perfectly on-grain.
Another classic mistake is forgetting the seam allowance. Most specialty kaleidoscope rulers already have the quarter-inch seam allowance built in, but if you’re drafting your own pattern, you have to add it. An inaccurate seam allowance is the #1 reason why blocks won't lie flat or points refuse to match up.
Putting in the effort during the cutting phase really pays off. It's the secret to creating those beautiful, crisp kaleidoscope quilts you'll be excited to show off.
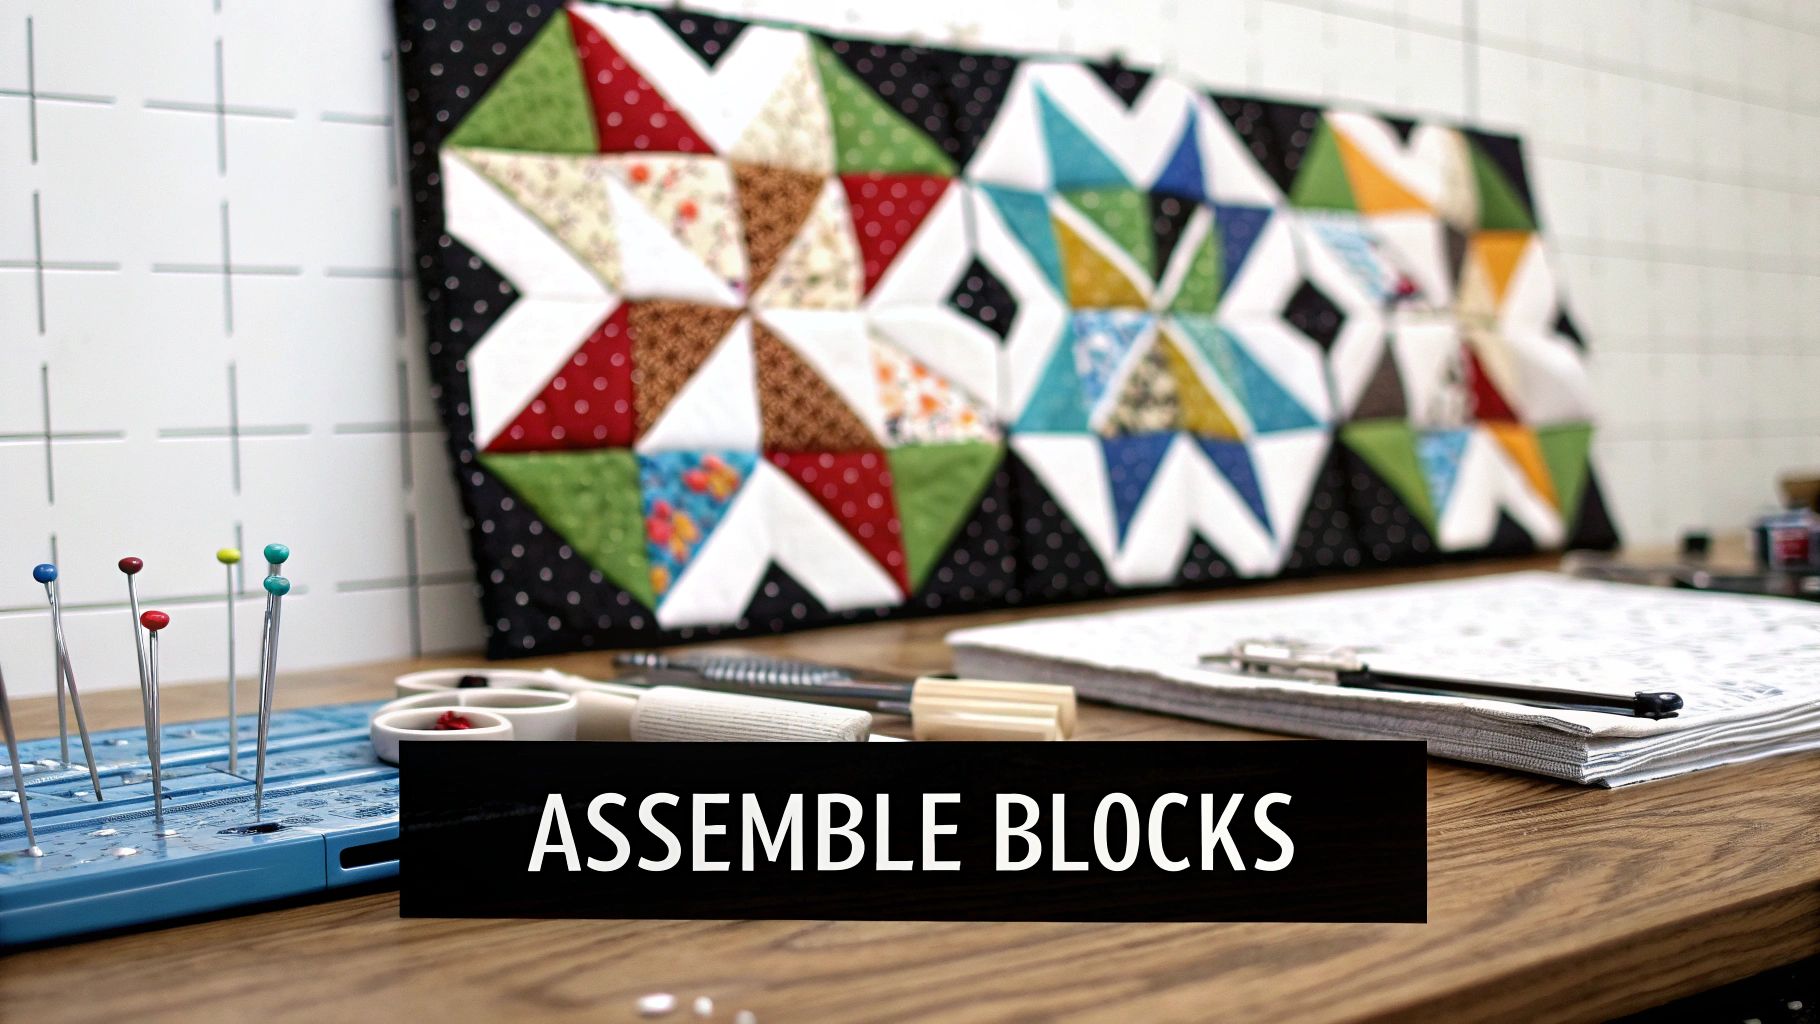
You’ve done the careful cutting, and now you have stacks of beautiful fabric wedges waiting. This is where the real magic happens. It’s time to transform those individual pieces into mesmerizing blocks and watch them come together to tell a larger story across your quilt top. A little precision here goes a long way toward a polished, professional finish.
The first step is to piece your wedges. If you're working with an eight-wedge block, a common approach is to sew two wedges together along one long edge. This creates a larger triangle that I like to call a "fan." Just keep going until all your wedges are paired up into four fans.
From there, you’ll join two fans to make a half-block. Then, finally, you sew the two halves together, and just like that, you have your first complete kaleidoscope block.
The center of a kaleidoscope block is where up to eight seams converge, and it can quickly become a bulky, frustrating mess. Getting that center point to lay flat with sharp, matching points is a hallmark of skilled piecing, but it’s more about technique than magic.
I can't stress this enough: strategic pinning is your best friend. When you’re ready to join the final two half-blocks, line them up and push a pin directly through the seam intersection at the center. Make sure it goes through the exact same spot on the seam below. This locks the seams in place and is the secret to a perfect match.
Pressing also plays a huge role in taming that central bulk. While we’re often taught to press seams to one side, kaleidoscope blocks are a special case where breaking the rules pays off.
Pinning isn't just about holding fabric together; it's about telling the fabric exactly where to go. A well-placed pin at a seam intersection is your best tool for achieving those crisp, professional-looking points that make kaleidoscope quilt patterns so stunning.
Once you have a nice stack of finished blocks, the real design fun begins. The way you arrange them can completely change the final look of your quilt by creating secondary patterns where the corners meet. Don't rush this! Lay your blocks out on a design wall or a big patch of floor and just play.
The most common layout is a simple straight set, where you arrange the blocks in a standard grid. This often creates stunning secondary patterns like stars or circles at the intersections, allowing the kaleidoscopic effect to flow beautifully across the quilt.
This method has deep roots in quilting history. Using repeating geometric blocks to form larger designs is a classic tradition. In fact, quilt databases show that kaleidoscope-style motifs appeared in 8-12% of American quilts in the 19th and early 20th centuries. These symmetrical designs, often pieced from whatever was on hand, show how quilters have always found beauty in geometry. You can see some amazing historical examples and learn more about the history of these quilt motifs.
If your blocks feel a bit crowded or you want to introduce another color, sashing is a fantastic solution. Sashing is simply strips of fabric sewn between your blocks, creating a frame for each one.
You have a few options here:
For a look with a little more movement, try setting your blocks on-point. This means rotating them 45 degrees so they sit like diamonds. An on-point layout requires adding setting triangles to the edges to square off the quilt, but the visual impact is huge. It creates strong diagonal lines that pull your eye across the quilt, making the whole design feel more energetic and complex.
Each layout offers a completely different experience. Take your time, audition different arrangements, and see what you like best before you start sewing those rows together. This is your chance to make sure your quilt top is everything you imagined.
You've done the hard work—your quilt top is pieced, pressed, and just waiting to come to life. The final steps, quilting and binding, are where a beautiful quilt top becomes a true family heirloom. The choices you make here will either complement or compete with the stunning kaleidoscope patterns you've created, so let's make them count.
The first big question is how to quilt it. With so much going on in the piecing, your goal is to add texture and definition, not more noise. A super busy, all-over quilting design can sometimes muddy the waters, obscuring those gorgeous secondary patterns that emerged as you built your blocks.
A much better approach is to use quilting that echoes or outlines the shapes already in your blocks. This adds a beautiful layer of texture and makes your piecing the star of the show.
You want to add stability and dimension, but you have to honor the geometric magic of the blocks. I've found a few approaches that work wonderfully with kaleidoscope quilts time and time again.
Stitch-in-the-Ditch: This is a classic for a reason. By stitching right in the seam lines (the "ditch"), you secure all three layers of your quilt and, more importantly, make your pieced shapes pop. It gives the whole quilt a crisp, almost topographical look. Even if you plan to add more quilting later, this is a fantastic place to start.
Echo Quilting: Just like it sounds, this technique involves quilting lines that shadow your piecing. You might stitch a line a quarter-inch away from the main star points or trace the perimeter of each block. This adds a gentle, radiating texture that really plays up the kaleidoscopic effect.
Custom Free-Motion Quilting: If you're comfortable with free-motion, this is your chance to get creative. Think about quilting graceful feathers inside the "background" wedges or subtle swirls in the larger, more open areas. The key here is creating a textural contrast—dense quilting in some areas, open in others—to really bring out the different elements of the design.
Don't just grab any batting off the shelf! The batting you choose has a massive impact on the final drape, texture, and feel of your quilt.
For something as intricately pieced as a kaleidoscope, a low-loft batting is almost always the right answer. A 100% cotton or an 80/20 cotton-poly blend will give your quilt a soft, traditional feel and that lovely crinkle you get after its first wash. These options are thin enough that they won't puff up and swallow your beautiful seam work. Stay away from high-loft polyester battings; they're great for comforters but can make your quilt top look pillowy and hide all those sharp points you worked so hard to perfect.
The quilting stage is really a conversation with your quilt top. Listen to what it needs. Does it need definition? A bit of texture? Or just a simple frame to let the piecing shine? Let the pattern itself guide your hands.
A great binding is like a custom frame on a painting—it provides a clean, durable edge that completes the whole piece. Getting this right is a skill that instantly gives any quilt a professional polish. For kaleidoscope quilts, a standard straight-grain binding cut at 2.5 inches wide is perfect.
First things first, you have to square up your quilt. Using a long acrylic ruler and a fresh blade in your rotary cutter, trim the excess batting and backing. Make sure all four corners are perfect 90-degree angles. This single step is the secret to getting sharp, tidy mitered corners on your binding.
Once you’ve made your continuous binding strip, press it in half lengthwise (wrong sides together). Line up the raw edge of the binding with the raw edge of the quilt top and attach it with a walking foot, using a quarter-inch seam.
Now for the part that trips people up: the mitered corners. As you approach a corner, stop sewing a quarter-inch from the edge and backstitch. Take the quilt off your machine. Fold the binding strip straight up, away from the quilt, which will create a 45-degree angle. Then, fold it back down along the next edge you're about to sew. This creates a neat little triangular fold of fabric in the corner. Start sewing again right from the top edge to continue down the next side.
After sewing the binding to the front, all that's left is to flip it to the back and stitch it down. You can do this by hand for a classic, invisible finish, or use your machine for a quicker, more modern look. Taking your time here is what ensures your quilt will stand up to years of love and use.
Diving into your first kaleidoscope quilt is exciting, but it’s natural to have a few questions pop up. Getting those little details right can be the difference between a project you love and one that causes a headache. I've heard these questions come up time and again in workshops and quilt guilds, so let's tackle them head-on.
Think of this as a conversation with a quilting friend who’s been there before. We'll clear up the common sticking points and get you quilting with confidence.
Choosing the right fabric is probably the most critical step for your first kaleidoscope. You want to make it easy on yourself, so go for a high-quality 100% cotton with a medium-scale print—florals and geometrics are fantastic.
The secret sauce is a clear pattern repeat of at least 6 to 8 inches and some nice color contrast within the design. This is what creates that stunning visual magic.
A word of caution: steer clear of tiny prints, as the pattern will just turn to mush when you cut it. Also, I'd recommend avoiding fabrics with one-way directional designs or distinct stripes for your first go. They can be tricky to work with and can really fight against that beautiful, blended kaleidoscope look you're going for.
There's no substitute for seeing the fabric in person. If you're in the Atlanta area, I always suggest stopping by a shop like Famcut.com. You can use a pair of mirrors to preview how a print will look before you even buy it, which is a total game-changer for finding that perfect kaleidoscope fabric.
Ah, the age-old struggle of perfect points! It’s a common frustration, but it’s almost always caused by one of three things: how you cut, how you sew, or how you press. First, slow down and be a fanatic about your cutting. Even a tiny slip of the rotary cutter will get magnified with every seam you sew.
Next, pay close attention to your seam allowance. Aim for a scant quarter-inch. That little bit of extra fabric gives you the wiggle room you need to make sure your pieces line up perfectly without getting swallowed by the seam.
Finally, your iron is your best friend here.
You sure can! While the specialty acrylic templates are a fantastic investment if you get hooked, you don't need one to start. Just grab a piece of template plastic, a good ruler, and a protractor.
You can easily draft your own wedge template. The most common angles are 45 degrees if you're making an 8-point block or 60 degrees for a 6-point block.
Just don't forget the most important step: add a quarter-inch seam allowance around all the edges of your homemade template. It's a simple tool, but it works beautifully for your first project.
Figuring out yardage is a bit of an art, but it all comes down to your pattern repeat. First, lay out your fabric and see how many identical wedges you can "fussy cut" from one single repeat of the print. If your block needs eight wedges, you'll need one full pattern repeat for every block.
Once you have that number, just multiply it by how many blocks you want in your quilt. My personal rule of thumb? Always buy at least an extra half-yard, maybe even a full yard. It's your insurance policy against cutting mistakes and gives you extra material for a border or matching binding.
Ready to find the perfect fabric for your next masterpiece? Famcut.com has an incredible selection of high-quality prints and all the tools you need to start your kaleidoscope quilting journey. Explore our collection and get inspired at https://famcut.com.
At High Country Quilts we care deeply about community. With our experiences in retail, we know that a store is not only a place to shop but also a place for the community to gather and share. During this busy...

Hi! We’re Adam and Renee Wheaton, the new owners of High Country Quilts! For more than 40 years, we’ve owned and operated vacuum and sewing businesses. Following in Renee’s father’s footsteps after he retired from All Discount Vacuum and Sewing in Colorado...


Leave a comment