

We Love Our Quilting Community
At High Country Quilts we care deeply about community. With our experiences in retail, we know that a store is not only a place to shop but also a place for the community to gather and share. During this busy...


Washing a handmade quilt can feel like a high-stakes operation, but the safest method is actually quite simple: hand-wash it in a clean tub with cold water and a gentle, pH-neutral detergent. This gentle approach is your best bet for protecting delicate stitches and keeping colors from bleeding, especially if you're dealing with an antique quilt or a treasured family heirloom.
A handmade quilt is so much more than a blanket. It’s a piece of art, a story stitched together with care, and often, a whole lot of love. So it’s no wonder the thought of washing it can spark a bit of panic. What if the colors run? What if the seams give way?
Let's replace that worry with confidence. This guide will walk you through the entire process, step-by-step, so you can clean your quilt and preserve it for years to come.
The secret to a successful wash actually starts long before your quilt even gets wet. It's all in the prep work—a thorough inspection and a quick colorfast test can prevent most common mishaps. From there, we’ll dive into the two main options: the classic, gentle hand-washing technique and, for more modern quilts, the strategic use of a washing machine.
Knowing how to wash a handmade quilt isn't just about getting it clean; it's about preservation. The choices you make—from water temperature to detergent—directly impact how long your quilt will last and how vibrant it will stay.
The quilting community has long championed a careful approach. In fact, studies from quilting organizations suggest that hand-washing can extend a quilt's life by up to 30% compared to machine washing. For more insight into textile care, learning how to clean a cross stitch project flawlessly offers some great overlapping principles. You can also find more handy tips over at https://www.famcut.com/blogs/tips-and-tricks.
Before we dive into the nitty-gritty of hand-washing versus machine-washing, let's get a bird's-eye view of the entire process.
This table breaks down the entire journey of washing your quilt into manageable stages. Think of it as your roadmap to a clean and beautiful quilt.
| Stage | Action Required | Primary Goal |
|---|---|---|
| Preparation | Inspect for damage, perform a colorfast test. | Prevent further damage and color bleeding. |
| Washing | Choose hand or machine wash; use cold water & gentle soap. | Gently remove dirt without stressing the fabric or seams. |
| Drying | Squeeze out excess water (no wringing!), lay flat to dry. | Avoid stretching, misshaping, or damaging the fibers. |
| Finishing | Reshape while damp, fluff in the dryer (no heat). | Restore the quilt's original shape and loft. |
| Storage | Store in a cool, dry place away from direct sunlight. | Protect the quilt from environmental damage long-term. |
With this overview in mind, you're ready to tackle the process with a clear plan.
Before you even think about getting your quilt wet, there’s a little bit of prep work to do. Taking a few minutes to give it a once-over can mean the difference between a fresh, clean quilt and a heartbreaking laundry mishap. This is where you spot potential problems before they happen.
Think of it as a quick health check-up for your quilt. Rushing this part is how seams pop, fabrics fray, and colors run. A careful inspection is your best insurance policy for keeping that beautiful quilt safe and sound through the washing process.
First things first, lay your quilt out flat somewhere with good light. You need to see the whole thing, front and back.
Start with the quilt top. Look closely at where the fabric pieces meet. Are there any stitches that look loose or broken? These are the little weak spots that can easily give way once the quilt is heavy with water.
Next, flip it over and do the same for the backing. Pay special attention to the binding—that’s the fabric edge that frames the entire quilt. It gets the most handling and is usually the first place to show wear and tear. Run your hand along it to feel for any frayed bits or corners where the stitching is coming loose.
Here’s a quick checklist of what to look for:
It’s so much easier to make these little fixes now. A few reinforcing stitches with a needle and matching thread can save a seam from completely unraveling later.
This is the one step you absolutely cannot skip, especially if you have bold, saturated colors like deep reds or blues right next to white or cream fabrics. While most modern quilting cottons are quite stable, hand-dyed fabrics and older textiles can be a real wild card.
A Little Advice from Experience: Never, ever assume a fabric won't bleed. I’ve seen brand-new fabrics from reputable companies bleed unexpectedly. A quick test takes two minutes and can save you from a quilt covered in pink splotches. It's just not worth the risk.
Here’s how to do a quick bleed test:
If you find a bleeder, don't panic. Just be sure to toss a handful of color-catcher sheets into the wash with your quilt. They’re designed to soak up any loose dye in the water and will be your best friend in protecting the lighter parts of your quilt.
Finally, figuring out what your quilt is made of will steer all your other choices, from the soap you use to how you dry it. You’ve got three parts to consider: the quilt top, the backing fabric, and the batting in the middle.
The vast majority of quilts today are made from 100% cotton, which is a wonderfully durable and forgiving fiber. The batting inside is often cotton, too. For example, a reliable choice many quilters use is Hobbs Heirloom 100% cotton batting because it holds up so well.
But if you have an older heirloom or a more artistic quilt, you might find other materials in the mix.
Knowing these details is key. A sturdy all-cotton quilt might do just fine in a gentle machine wash, but a wool-batt quilt is going to demand a careful hand-wash in the tub. Putting in this prep work ensures you’re choosing the safest, most effective cleaning method for your handmade treasure.
So, it's time to wash your quilt. This is where many quilters hold their breath, because the choice you make next—hand wash or machine wash—is the most important one in the entire process. There’s no single right answer, and anyone who tells you otherwise isn't giving you the full picture. The best method really depends on your specific quilt: its age, the fabrics it’s made from, and how it was pieced and quilted.
For those irreplaceable antique heirlooms, quilts with delicate appliqué work, or any piece that feels too precious to risk, hand washing is the only way to go. It gives you absolute control and puts the least amount of stress on every seam and stitch. But what about a sturdy, modern quilt made from high-quality cottons? It might do just fine in a machine, as long as you have the right kind and use the right settings.
Let’s walk through both options so you can make the best call for your treasured quilt.
Deciding between the two methods can feel overwhelming. I've put together this quick comparison to help you weigh the pros and cons based on what matters most for your quilt's longevity.
| Factor | Hand-Washing | Machine-Washing |
|---|---|---|
| Best For | Antique, delicate, hand-quilted, or fragile quilts. Any quilt with silk, wool, or unknown fabrics. | Sturdy, modern quilts made from pre-washed, high-quality cottons with secure machine stitching. |
| Pros | The absolute gentlest method. You have complete control, minimizing stress on seams and preventing damage. | Much faster and requires less physical effort. Convenient for quilts in regular use. |
| Cons | Very time-consuming and labor-intensive. A wet quilt is extremely heavy and difficult to handle. | Higher risk of damage, such as popped seams or fabric tears, even on a gentle cycle. Requires a specific type of machine. |
Ultimately, your quilt’s specific needs should guide your decision. When in doubt, always choose the gentler option: hand-washing.
Hand washing is the gold standard for a reason—it’s hands-down the safest, most gentle method you can use. If your quilt is an antique, has intricate hand-quilting, or includes fragile fabrics like silk, this is really the only path you should take. Yes, it takes more time and muscle, but the peace of mind you get is worth every bit of the effort.
For this job, your bathtub is your best friend. Just make sure you give it a good scrub beforehand to get rid of any soap scum or cleaning residue.
After it has soaked, you can gently push down on sections of the quilt with your hands to move the water through the fibers. Avoid any rubbing, twisting, or wringing—that’s how seams pop and fabrics stretch. Drain the tub, then refill with clean, cold water to rinse. You’ll probably have to repeat the rinse cycle a few times until the water is clear and free of suds.
Crucial Tip: A waterlogged quilt is astonishingly heavy. Never, ever try to lift it by a corner or an edge. You’ll risk stretching the fabric and breaking threads. The only safe way is to gather the entire quilt into a big, supported bundle in your arms before lifting it out of the tub.
This careful process starts before the quilt even gets wet. Following the prep steps ensures you catch any potential issues before they become real problems.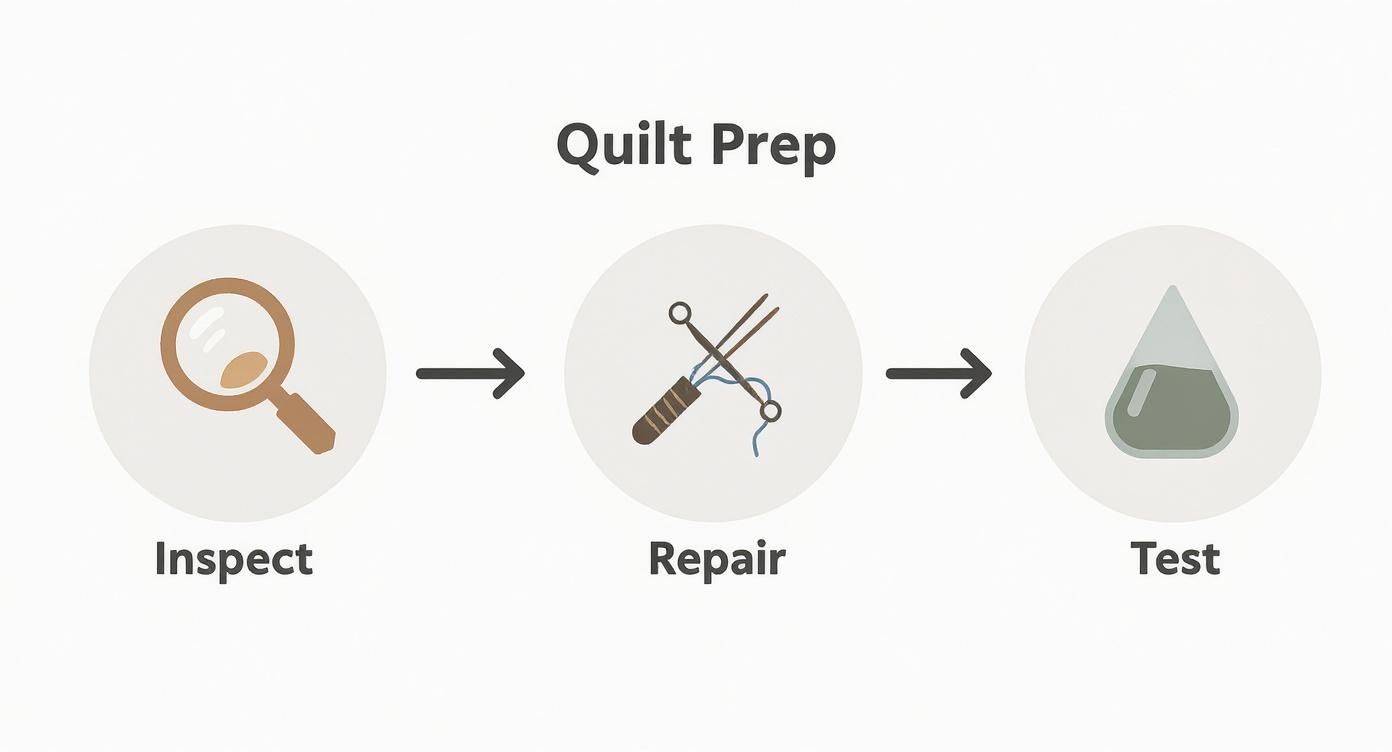
For even more detailed techniques, especially for delicate items, this guide on the best way to hand wash clothes offers some great additional tips.
Machine washing can be a perfectly fine option for many modern quilts, especially those that live on a bed and see regular use. But—and this is a big but—not just any machine or cycle will do.
Your quilt is a good candidate for the machine only if it’s sturdy, made entirely of pre-washed, high-quality cotton, and has strong machine stitching. If you’re not sure what kind of batting is inside, this Hobbs batting recommendation chart is a fantastic resource for understanding how different materials behave.
If you’re going the machine route, you absolutely must use a large-capacity, front-loading washing machine. Critically, it must not have a central agitator. That tall spindle in the middle of most top-loaders is a quilt’s worst enemy; it can twist, pull, and tear seams with terrifying efficiency. A front-loader gently tumbles the quilt, which is far kinder to its construction.
Ready to machine wash? These settings are non-negotiable:
Here’s a great little trick I swear by: color catcher sheets. Even if you’ve tested your fabrics for colorfastness, toss a few of these in with your quilt. They’re like magnets for any stray dye that might come loose in the wash, saving your beautiful white fabrics from that dreaded accidental-pink look. I’ve seen them save more than one quilt
You've done the hard part and washed your quilt. But don't relax just yet—how you dry and store it is every bit as important as the wash itself. Getting this wrong can stretch fabrics, pop stitches, and undo all the careful work you just put in.
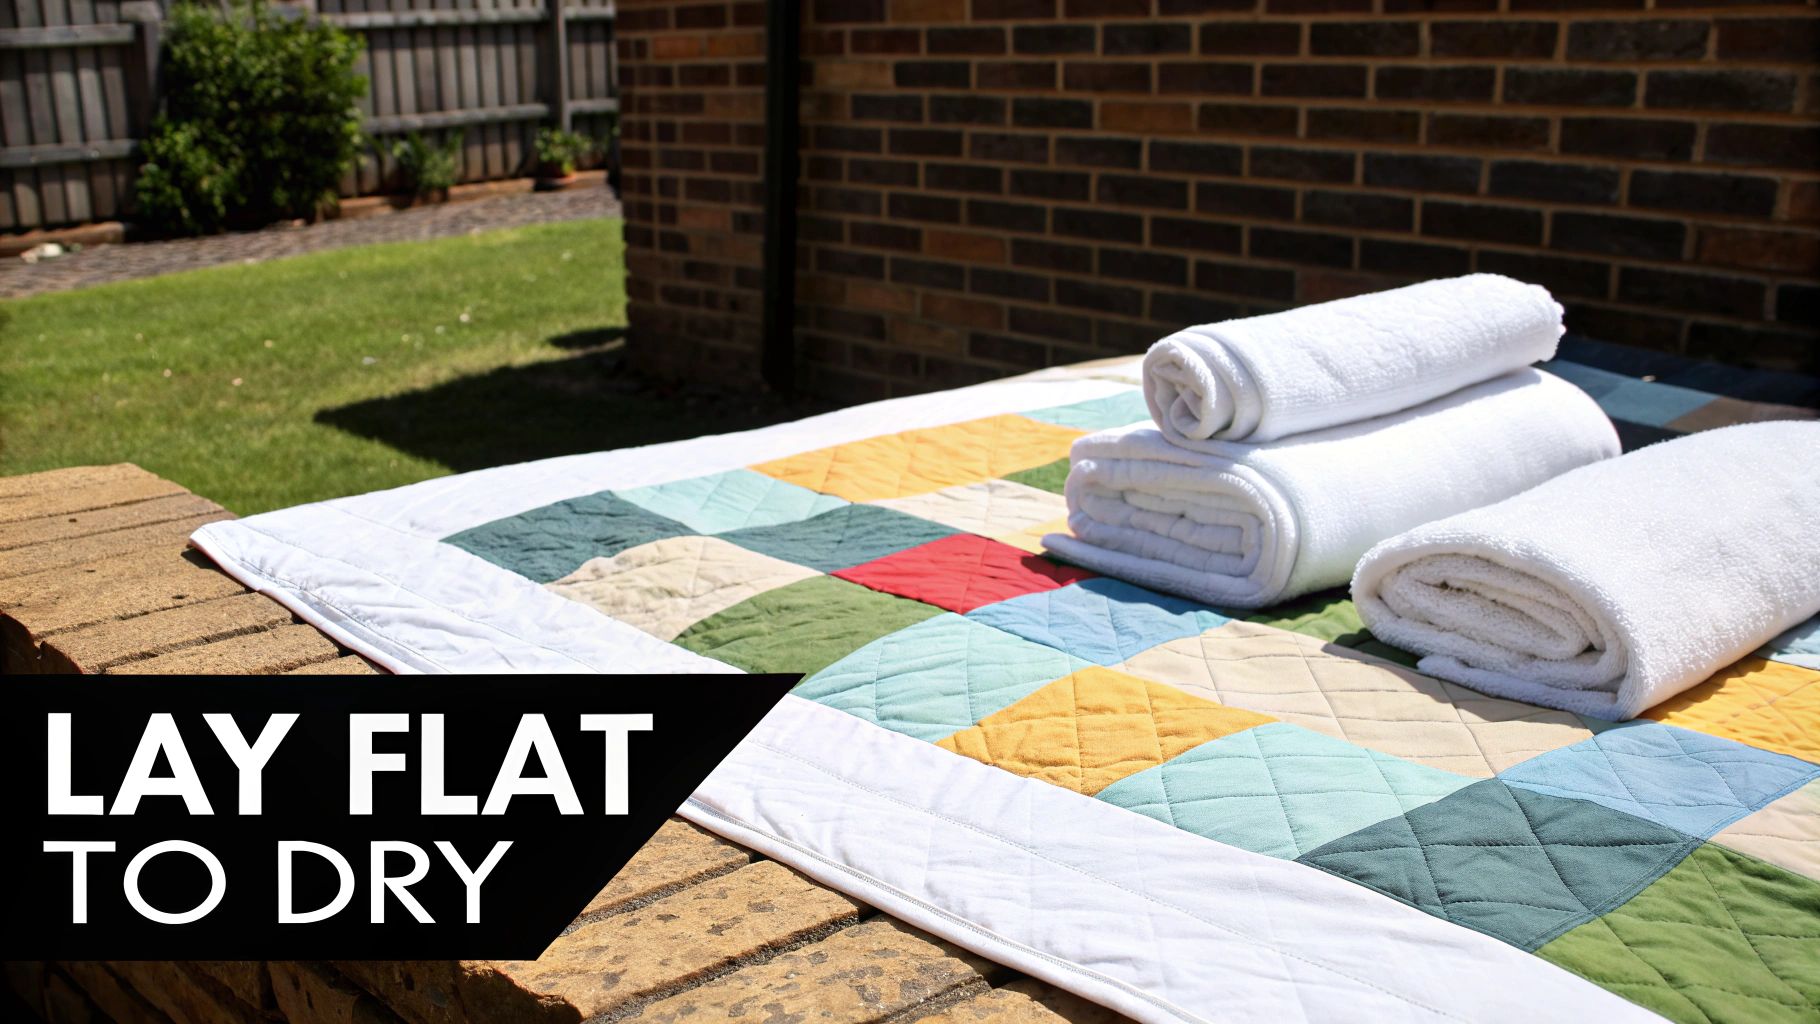
If you remember only one thing, make it this: never, ever hang a wet quilt. The sheer weight of the water will pull on every seam and fiber, leading to distorted shapes and heartbreaking damage. The only truly safe method is to lay the quilt completely flat, letting it dry evenly without any stress on the construction.
Air drying is, without a doubt, the kindest method you can choose, especially for antique quilts or those with delicate appliqué. It takes the risks of heat and tumbling completely out of the equation. All you need is a large, flat surface with decent air circulation.
You don't need any fancy equipment. A spare bed covered with a clean sheet works beautifully. You can also lay a "bed" of thick, clean towels on a section of the floor where no one will step on it.
A few tips from my own experience:
While the quilt is still damp, this is your chance to gently reshape it. Smooth out the edges and pat the corners into place, making sure it’s laying perfectly square. This small step ensures it dries back into its proper shape, preventing puckering later on.
For a modern, sturdy cotton quilt, a machine dryer can be an option—but you have to be extremely careful. Heat is the number one enemy. It shrinks cotton fibers and batting, which is what gives you that crinkled, puckered look (unless that's what you're going for!).
If you decide to risk the dryer, follow these rules religiously:
Here's a hybrid approach that works well: use the dryer on an air-fluff setting just to get the quilt from sopping wet to damp. Once it feels much lighter and just slightly cool to the touch, pull it out and lay it flat to finish air drying. You get the speed of the machine without most of the risk.
When it’s time to put your masterpiece away, where you store it matters immensely. The ideal spot is cool, dark, and dry. This immediately rules out most attics and basements, where temperature and humidity swings can wreak havoc on textiles.
And please, avoid plastic bags or bins. They trap moisture and don't allow the natural fibers to breathe, creating a breeding ground for mildew and fabric rot.
The Right Way to Store a Quilt
Lastly, try not to store your quilt with sharp, permanent creases, as this can weaken the fibers along the fold lines over time. A better method is to roll it loosely around a cardboard tube that you've first covered in acid-free paper.
If you must fold it, take it out once or twice a year to refold along different lines. For smoothing out any wrinkles after storage, a handy little tool like the Oliso M3Pro Mini Iron is fantastic for gently pressing seams and blocks without the hassle of a full-sized iron and board.
No matter how careful you are, accidents happen. A splash of morning coffee, a funky smell from the linen closet, or the gut-wrenching sight of bleeding dye can feel like a disaster. But take a deep breath—most of these common quilt problems have surprisingly simple fixes that can bring your treasure back from the brink.
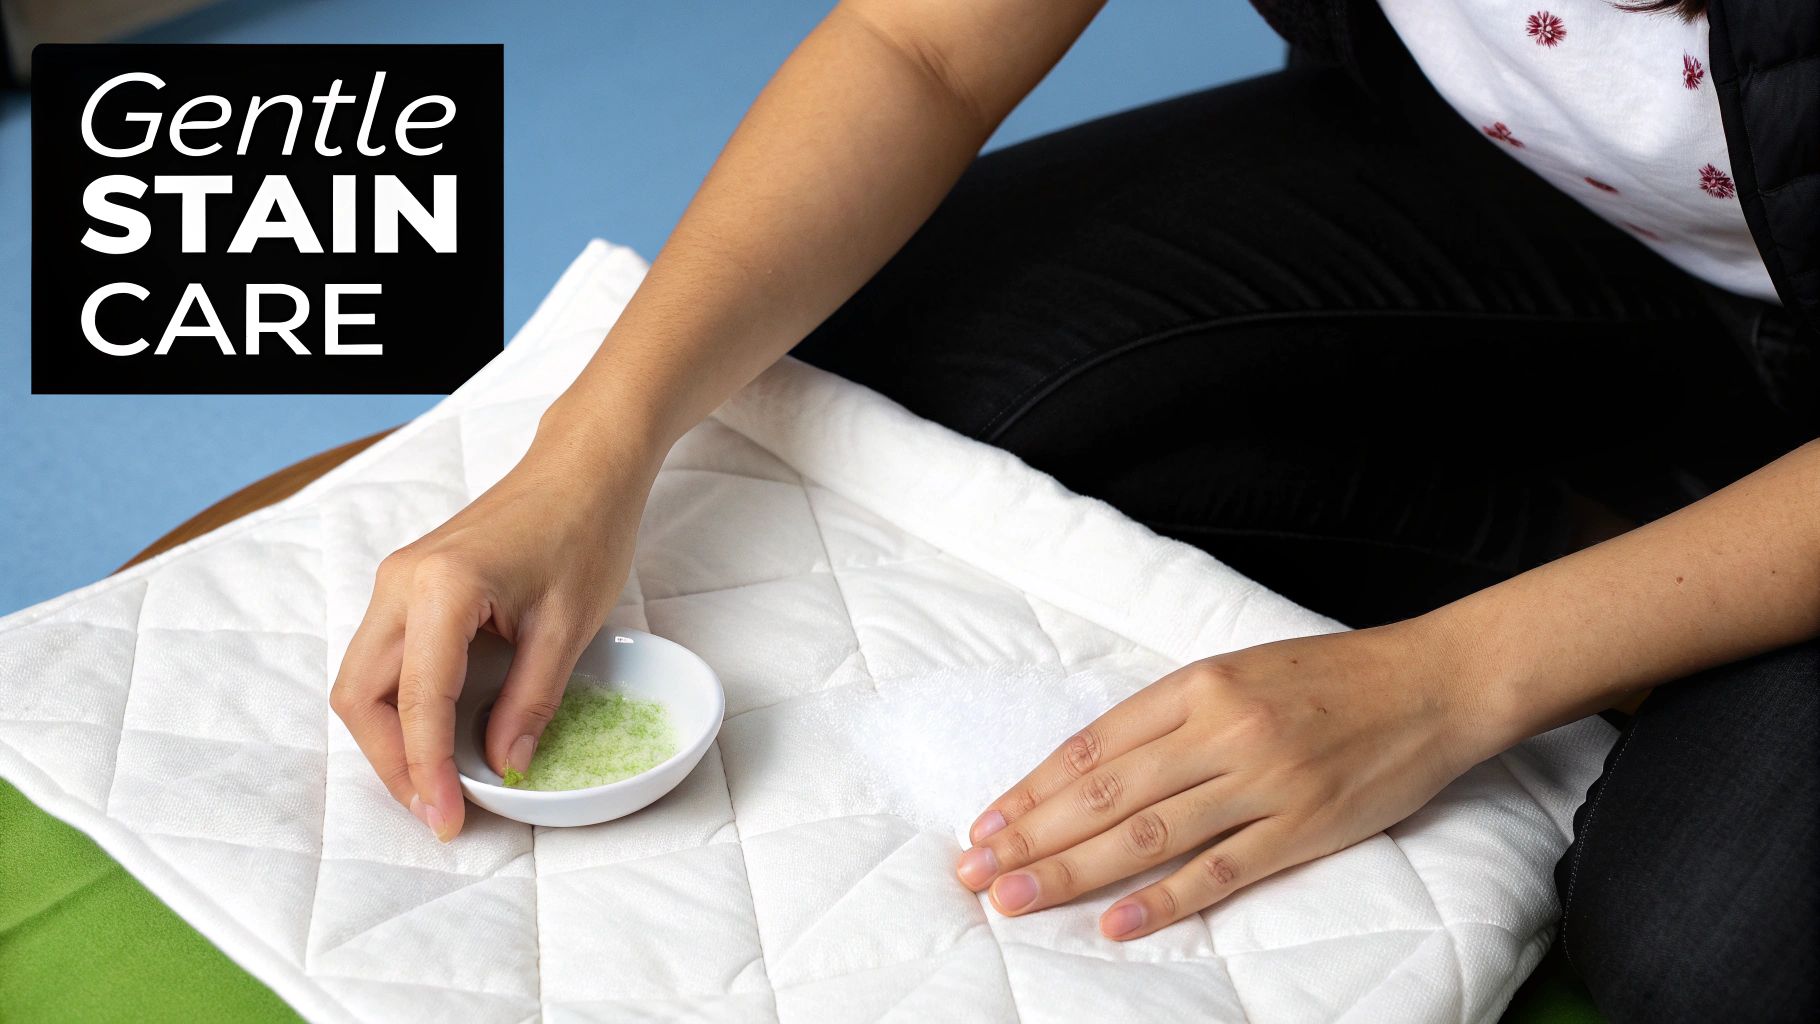
Think of this as your emergency guide. With a little know-how and a calm approach, you can tackle these issues without making things worse. The golden rule? Act fast and always start with the gentlest solution.
When a spill occurs, your immediate reaction might be to scrub furiously. Don't do it! That's actually the worst thing you can do. Aggressive rubbing just pushes the stain deeper into the cotton fibers and can easily break those delicate quilting stitches. Your mission is to lift the stain, not grind it in.
The right treatment depends entirely on what you're up against. Figuring out the culprit is your first step.
Protein Stains (Blood, Egg, Dairy): Heat is the enemy here; it will set these stains for good. Always use cold water. Gently blot the spot with a clean white cloth dipped in cold water, lifting as much as you can before moving on to a specific cleaner.
Oily Stains (Salad Dressing, Grease, Lotions): Water alone won't touch these. Start by sprinkling cornstarch or talcum powder over the stain. Let it sit for about an hour to draw out the oil, then gently brush it off. You can then treat what’s left with a tiny dab of clear dish soap.
Tannin Stains (Coffee, Tea, Wine, Juice): If you catch them right away, you can often flush these out with cool water. For a more stubborn mark, a diluted mix of white vinegar and water can work wonders at breaking down the tannins without damaging the fabric.
Here’s a piece of advice I can't stress enough: always test your cleaning solution on a hidden part of the quilt first, like the back of the binding. This quick check ensures it won’t bleach or fade your fabrics before you tackle a more visible area.
It’s a heart-stopping moment: you look into the wash basin and see a dreaded pink or blue tinge bleeding into the water. If you act fast, you can usually save the quilt.
If you’re hand-washing, drain the soapy water immediately and refill the tub with fresh, cold water. Now, grab a box of color-catcher sheets and don't be shy—toss in 10 to 12 sheets for a large quilt. Gently swish the quilt to help the sheets soak up all that loose dye. You might have to repeat this rinse-and-catch process a few times until the water runs clear.
If it happens in a machine, stop the cycle right away. Throw the color catchers directly into the drum and start a cold-water rinse-and-spin cycle. The goal is simple: get the rogue dye out of the water and away from your quilt as quickly as possible.
Sometimes a quilt doesn't need a full-on bath; it just needs some fresh air. If you pull a quilt from storage and it has that faint, stale smell, the problem is likely trapped moisture.
The easiest, most effective fix is to let the quilt "breathe" outdoors. But direct sunlight is a huge no-no—UV rays are notorious for fading fabric.
Instead, pick a breezy, overcast day. Lay a clean, dry sheet on the lawn or drape the quilt over a clean patio table (or a few chairs). Let it air out for several hours, flipping it over at the halfway point. The moving air is often all it takes to carry the odor away, leaving your quilt smelling fresh without ever touching water.
Every so often, washing can reveal a loose thread or a tiny tear. Having the right tools makes these fixes far less daunting. For precise work, a specialized tool like a dual seam fix thread remover is invaluable. It lets you carefully snip and remove compromised stitches without damaging the surrounding fabric, setting you up for a clean, strong repair that will blend right in.
https://www.youtube.com/embed/_ILwFOYFyhE
Even after walking through all the steps, a few specific questions always seem to pop up right when you're about to dunk that precious quilt in the water. It’s completely natural to want that last bit of reassurance.
This is where we can talk through some of the most common "what if" scenarios I hear from quilters and new quilt owners. Let's clear up those lingering doubts so you can feel totally confident.
This is the big one, and there’s no single right answer. It all comes down to how you use it. A quilt living on your bed needs a different cleaning schedule than one that's purely decorative. Your goal is to find that sweet spot between keeping it fresh and avoiding the wear and tear that comes from too many trips to the tub.
Here’s a good rule of thumb:
The real secret is to wash your quilt as infrequently as you can get away with. Over-washing can be just as harmful as letting it get too dirty. If you notice a small spot, always try to spot-clean it first before you commit to a full wash.
I know it’s tempting, but this is one shortcut to skip. Most commercial fabric softeners and dryer sheets leave behind a thin coating of chemicals on the fibers. Over time, this buildup can make cotton less absorbent and can even make your vibrant colors look a bit murky.
If you want to add a touch of softness, here’s a much better, quilt-safe trick:
This is a hard no for most handmade quilts. It seems like a gentle, professional alternative, but the harsh solvents used in dry cleaning can wreak havoc on the materials that make up your quilt.
Those chemicals are particularly tough on polyester-blend threads, which many modern quilters use for their strength. The solvents can cause the thread to erode and the polyester batting to break down or even melt. Unless you are 100% certain that every single component—top, back, batting, and thread—is made of cotton, it's a gamble you don't want to take.
Good old-fashioned soap and water is almost always the kinder, safer choice for a handmade quilt.
First off, don't panic! A little bit of shrinkage, especially after the very first wash, is perfectly normal. In fact, it's what gives a quilt that classic, crinkly, lived-in texture that we all love.
How much it shrinks depends on a couple of things. If the quilter didn't pre-wash their fabrics, you can expect some shrinkage—high-quality quilting cotton can shrink by 3% to 5%. The batting is also a big factor. Cotton batting is specifically designed to shrink just a tiny bit, which helps pull the quilting stitches tight and creates that gorgeous, puckered look.
The key to keeping it under control is to avoid high heat. Sticking with cold water and drying on a no-heat or low-heat setting will minimize shrinkage and prevent it from becoming too extreme.
At Famcut.com, we understand the love and care that goes into every single stitch. We're here to support your creative journey with everything from premium fabrics to the best tools and advice. Discover our collection of quilting supplies and get inspired for your next masterpiece.
At High Country Quilts we care deeply about community. With our experiences in retail, we know that a store is not only a place to shop but also a place for the community to gather and share. During this busy...

Hi! We’re Adam and Renee Wheaton, the new owners of High Country Quilts! For more than 40 years, we’ve owned and operated vacuum and sewing businesses. Following in Renee’s father’s footsteps after he retired from All Discount Vacuum and Sewing in Colorado...


Leave a comment