

We Love Our Quilting Community
At High Country Quilts we care deeply about community. With our experiences in retail, we know that a store is not only a place to shop but also a place for the community to gather and share. During this busy...


There's nothing more maddening than getting to the end of a seam only to find your fabric layers have shifted, leaving you with puckers and misaligned patterns. If you've ever fought this battle, I've got good news: there’s a tool that solves this problem for good. It's called a walking foot, or sometimes an even feed foot, and it's a game-changer.
This specialized presser foot has its own set of feed dogs that grip the top layer of your fabric, moving it in perfect time with the machine's feed dogs pulling the bottom layer. This synchronized movement is the secret to avoiding those frustrating shifts and puckers, especially when you're quilting or working with difficult materials.
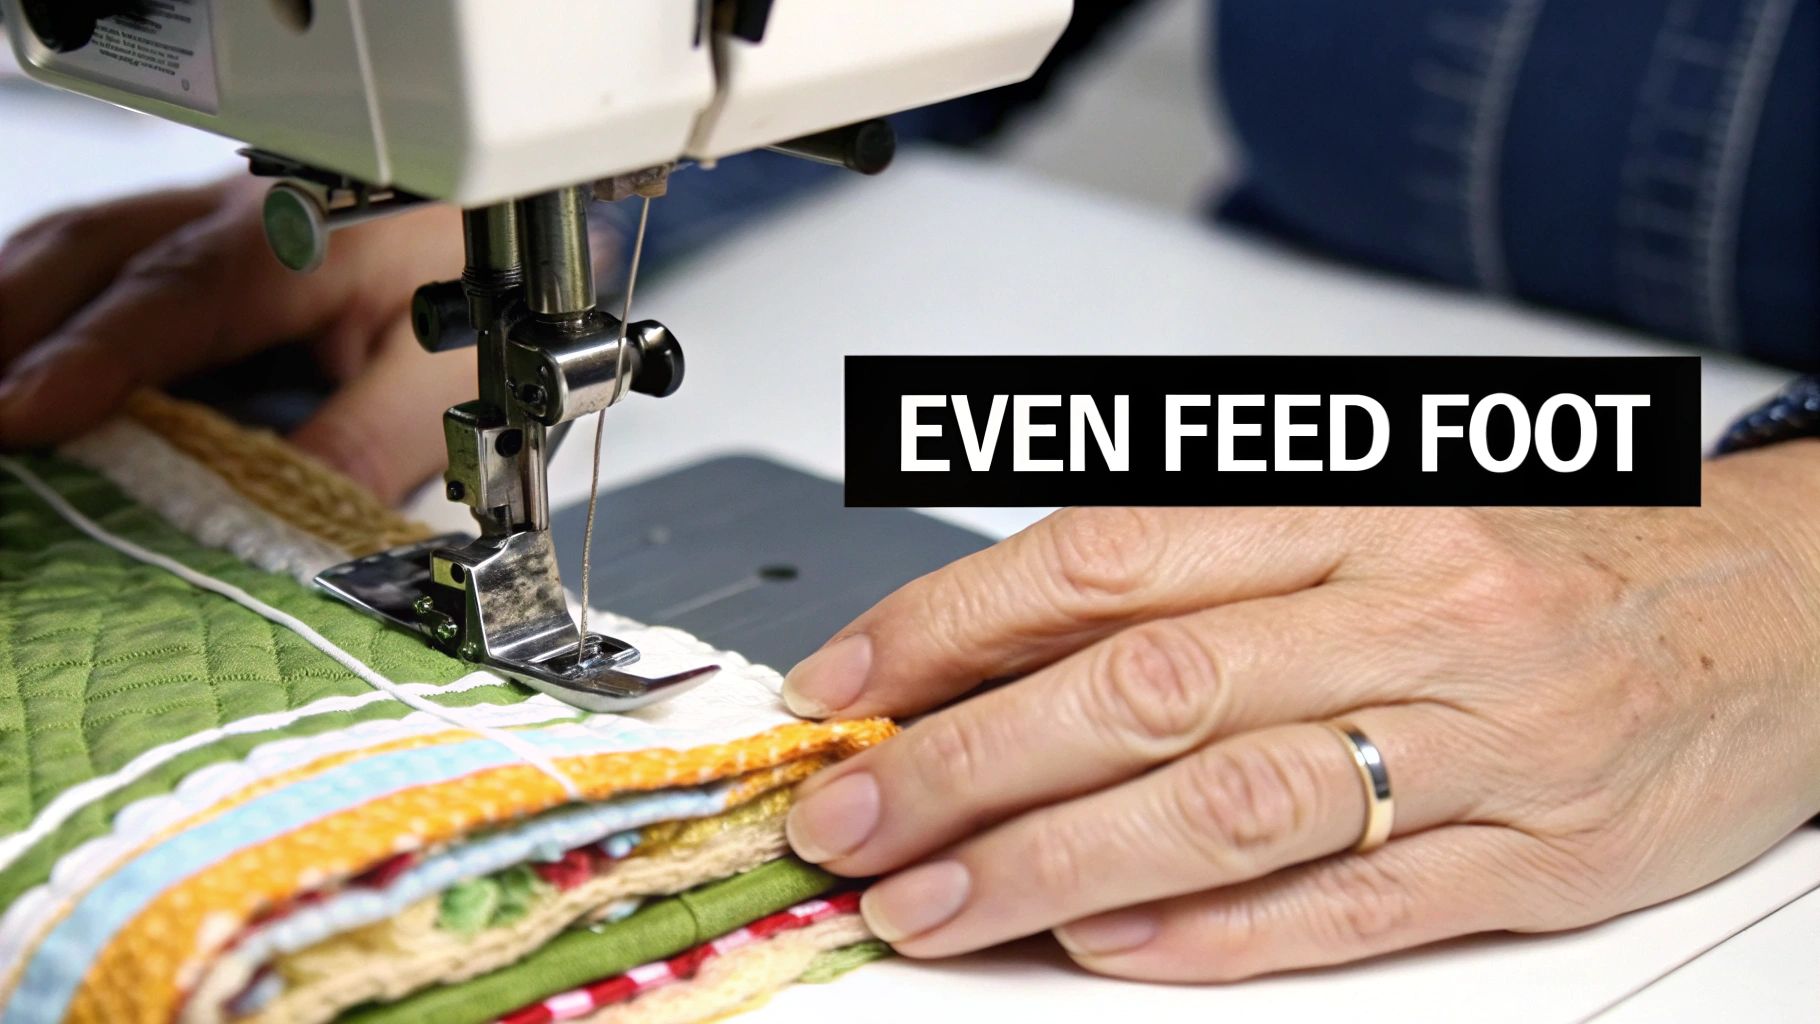
I like to think of a walking foot as an extra set of hands guiding my fabric. Your sewing machine's feed dogs—those little metal teeth under the needle—are great at moving the bottom piece of fabric. The problem is, a standard presser foot just skates along the top. This often causes the top layer to stretch, slip, or get left behind.
This issue really shows up when you're tackling more ambitious projects. A walking foot makes the difference between a project that looks homemade and one that looks truly professional.
Not sure when to make the switch? This quick guide breaks down common sewing situations where a walking foot will save you a ton of headaches.
| Sewing Task or Fabric Type | Standard Foot Challenge | How a Walking Foot Helps |
|---|---|---|
| Quilting Layers | Top layer shifts, causing puckers and pleats. | Grips all three layers (top, batting, backing) to feed them evenly. |
| Slippery Fabrics (Velvet, Silk, Minky) | Layers slide against each other, creating uneven seams. | Prevents slipping by holding both layers securely as they move. |
| Stretchy Knits | Seams become wavy and stretched out of shape. | Feeds the fabric gently without distorting it, keeping seams flat. |
| Matching Plaids & Stripes | Patterns become misaligned at the seam line. | Ensures patterns stay perfectly matched from start to finish. |
| Stitching in the Ditch | It's difficult to stay precisely in the seam line. | Provides superior control for accurate, straight-line quilting. |
| Binding | The binding strip can twist or stretch as you sew it on. | Keeps the binding and quilt edge aligned for a clean, flat finish. |
In short, if your fabric is thick, slippery, stretchy, or needs to be perfectly aligned, a walking foot is the tool for the job.
The idea of actively feeding the top layer of fabric has been around for a long time. In fact, inventors Wilson & Wheeler introduced a walking foot mechanism all the way back in 1853 to help their machines handle multiple layers more effectively. It’s a testament to how fundamental this accessory is that it remains a vital tool for sewers today. You can find more fascinating tidbits about early sewing machine history on siuvimomasinos.lt.
Key Takeaway: The walking foot solves the core problem of fabric shifting by feeding the top and bottom layers of your project through the machine at the exact same speed. This simple mechanism is what separates homemade-looking projects from professional, polished results.
Don't let the look of a walking foot intimidate you. It might seem like a complex piece of equipment, but swapping it onto your machine is surprisingly straightforward. Think of it less like a complicated repair and more like changing out a regular presser foot—just with one extra step. Getting this part right is the key to unlocking everything this amazing tool can do.
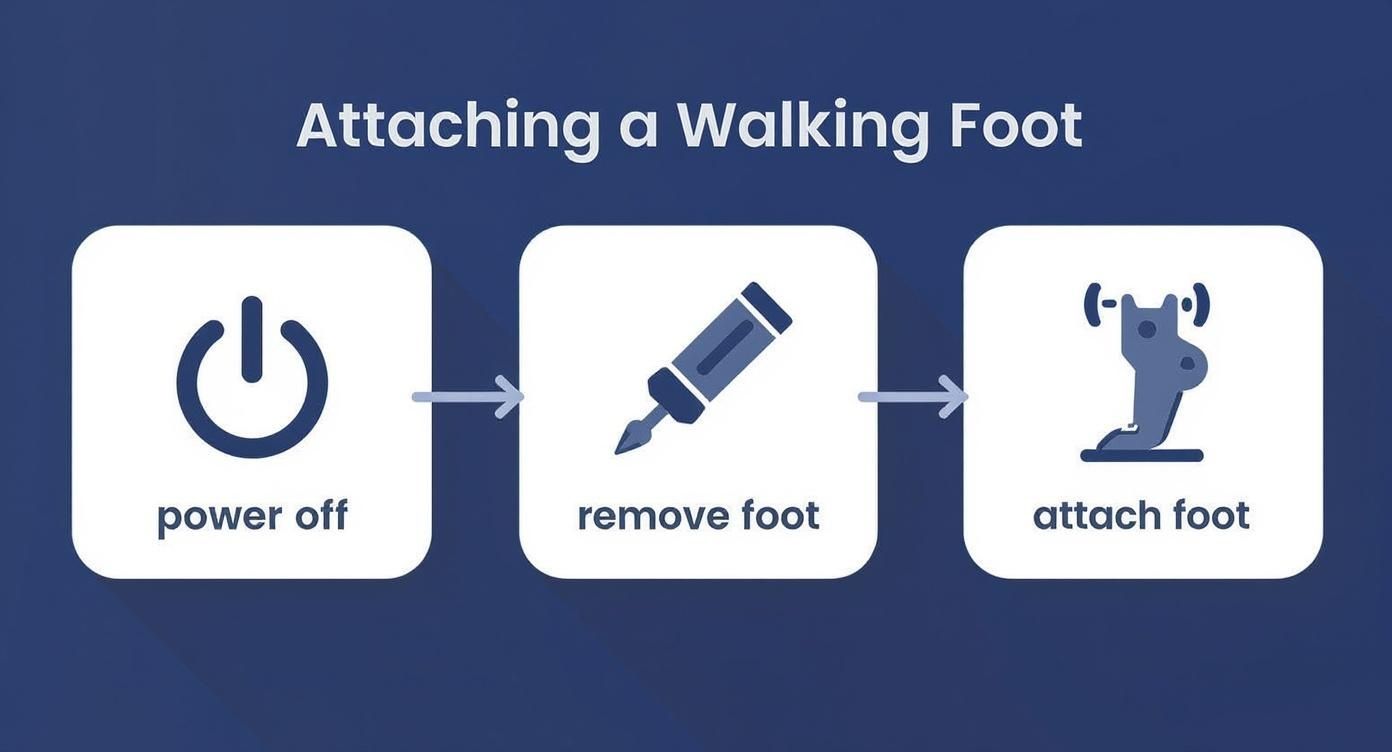
First things first: turn off and unplug your sewing machine. Seriously, this is the most important safety rule in sewing. Once you're powered down, lift the presser foot lever all the way up and raise your needle to its highest point.
Next, you'll need to take off whatever presser foot is currently on your machine, along with its shank (that's the little "ankle" part holding the foot). On most machines, there's a single screw on the side of the presser bar that holds the whole assembly. Grab the little screwdriver that came with your machine, loosen that screw, and the entire piece should come right off.
Your walking foot has two parts that need to connect to your machine. The main clamp will wrap around the presser bar, right where the old shank used to be. But the most important part is the little C-shaped lever or fork that sticks out on the right side.
This is the part everyone gets wrong: That C-shaped lever must go around the needle clamp screw. It needs to sit right over the same screw you loosen to change your needle. This is how the foot syncs up with the needle's movement, and if you miss this step, you'll get a terrible clunking noise when you try to sew.
Here’s a little trick that has saved me more than once: snap a quick photo with your phone of how your machine looks before you take the old foot off. It’s a lifesaver when you can't quite remember how it all fit together.
Now, with the C-shaped lever hooked over the needle screw, slide the walking foot’s main clamp onto the presser bar. Make sure it's pushed up as far as it will go, and then tighten the shank screw. Get it hand-tight, then give it one last little turn with the screwdriver to make sure it won’t wiggle loose from the machine's vibrations.
Before you plug anything back in, give the handwheel a few slow turns toward you. Watch the needle and the walking foot's lever move together. If they're moving in sync and you don't hear any clanking or feel any resistance, you've done it! You’re ready to plug in your machine and start quilting.
Alright, with your walking foot securely attached, you're ready for the fun part. This is where you'll see just how much of a difference this tool makes, turning frustrating sewing tasks into projects you can be proud of. Let's walk through a few core techniques where the walking foot truly shines.
First, here's a quick visual recap of the attachment process we just covered. Getting this right is non-negotiable for good results.
Think of it this way: a properly installed foot is the foundation for any successful walking foot project. It's what stops skipped stitches, prevents fabric damage, and gives you that flawless quality you're after.
Straight-line quilting is probably what the walking foot is most famous for, and the little guide bar that comes with it is your secret weapon for perfection. Just slide the bar into the slot on the back of the foot and set it to the width you want your quilting lines to be—let's say an inch apart for this example.
Once you’ve stitched your first line, the rest is easy. You’ll simply glide the guide bar right on top of that first line of stitching as you sew the next one. The trick is to watch the guide, not your needle. This simple shift in focus guarantees your lines are perfectly parallel every time, without ever having to mark your quilt top.
A little tip from my own experience: always start quilting from the center of your project and work your way out to one edge. Then, turn the whole thing around and do the same for the other side. This method smooths out any fullness toward the edges and is the best way I know to avoid those dreaded puckers on the back of your quilt.
"Stitching in the ditch" is a classic quilting technique where you sew directly inside the seam lines of your quilt blocks. When done right, the stitches virtually disappear. The walking foot is a huge help here because its even feed gives you the control to stay precisely in that ditch.
For this, I usually lengthen my stitch to about 3.0mm to 3.5mm. A slightly longer stitch looks cleaner and has a better chance of sinking right into the seam, making it invisible.
If you've ever tried to sew knits with a regular presser foot, you know the pain of wavy, stretched-out seams. The fabric gets pushed and pulled all over the place. The walking foot is the solution. Because it pulls both the top and bottom layers of fabric through at the exact same rate, your seams will come out beautifully flat and professional.
You’ll be amazed at the difference. No more accidental "lettuce-edge" hems!
This kind of innovation is what moves sewing forward. Think about it: the original sewing machine cut the time to make a dress shirt from 14 hours by hand down to just over one hour. Specialty feet like this one continue that legacy by making difficult materials much easier to handle, which is a huge boost for any sewist. You can learn more about the incredible history of sewing machine advancements on Wikipedia.
Once you've got the hang of the basics, a few small tweaks can take your stitch quality from good to great. These are the little secrets that really make a difference, helping you sidestep common frustrations before they even happen.
Let's start with your sewing speed. It's so tempting to floor it when you have a long, straight seam ahead of you, but with a walking foot, slow and steady truly wins the race. A controlled pace gives the foot's feed dogs the time they need to properly grip and move all those layers together. This is your best defense against puckers and uneven stitches, especially with thick quilt sandwiches.
Another thing to watch out for is the reverse stitch. While it's our go-to for locking seams, jamming the reverse button can sometimes cause the walking foot’s complex mechanism to bind up. A better way to lock your stitches is to shorten your stitch length to almost zero for the first and last couple of stitches. It secures the thread just as well without risking a jam.
If your machine has an adjustable presser foot pressure dial, it's time to make it your best friend. For those really thick quilts or lofty fabrics like minky, lowering the pressure is a game-changer. It stops the foot from squishing down on the layers, which can cause stretching and distortion.
Your needle choice also plays a huge role. You wouldn't use a delicate needle on denim, and the same logic applies here. For most quilting projects, a 90/14 Quilting or Topstitch needle is a fantastic all-around choice. They have a stronger shaft to punch through layers and a larger eye that helps prevent your thread from shredding under stress.
Expert Insight: A little bit of maintenance goes a long, long way. Before you dive into a big quilting project, take a moment to grab a small brush and clear any lint that's built up around the moving parts of your walking foot. A clean foot is a happy foot—it will work more smoothly and last for years.
The sewing machine world has come a long way since brands like Singer first became a household name. Modern innovations, like Janome’s AcuFeed system, are perfect examples of how technology keeps making sewing better for everyone. You can read more about the evolution of walking feet on sewingmachineman.substack.com to see how far they've come.
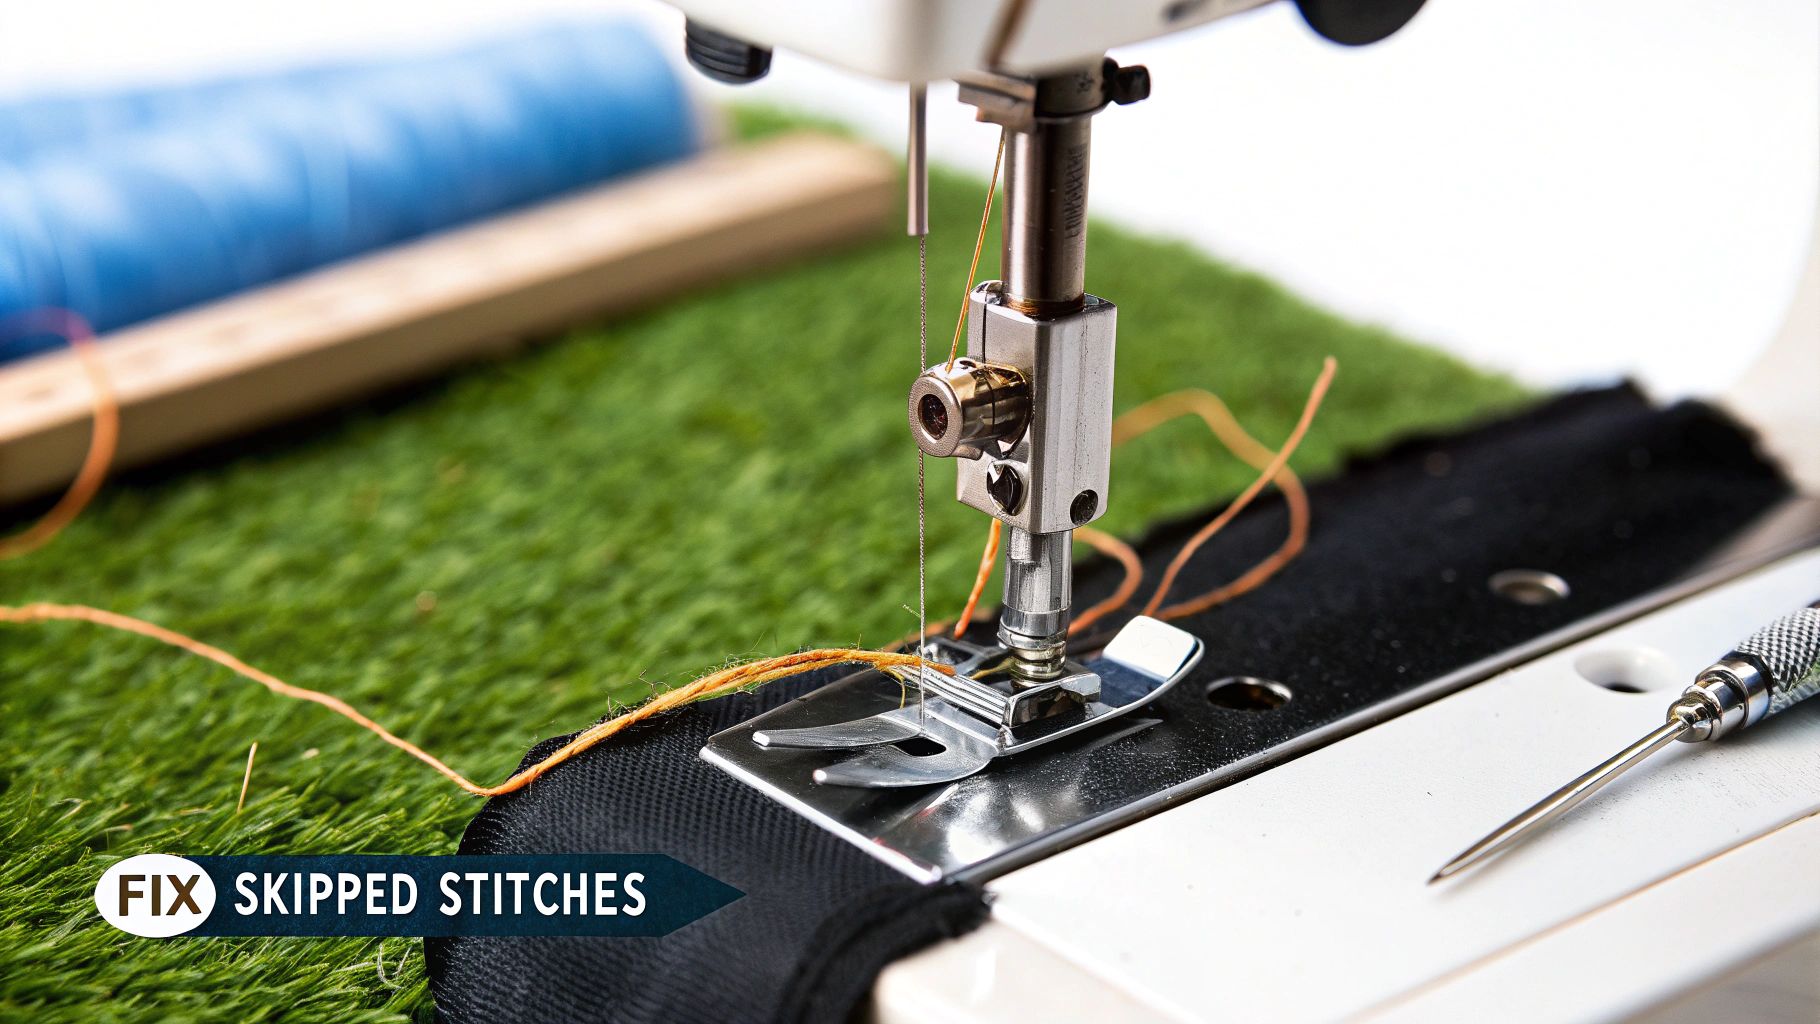
Even with the best setup, sometimes things just don't go right. When your walking foot starts acting up, don't get discouraged. The fix is almost always surprisingly simple and usually boils down to the installation, your needle, or the machine's settings.
The problem I hear about most often is skipped stitches. Before you even think about touching your tension, the very first thing you should do is put in a fresh needle. I can't tell you how many times a dull, bent, or wrong-sized needle has been the culprit—it’s the cause well over 90% of the time. While you're at it, double-check that the new needle is pushed all the way up into the shaft.
Then there's that dreaded clunking noise. It can sound pretty alarming, but it's nearly always a sign that the foot isn't on there quite right.
Any looseness in these connections will cause that clunking as the foot knocks against the machine with every stitch.
Seeing those ugly tangles of thread on the bottom of your fabric? That's what we call "bird's nesting," and it's almost always an issue with the top thread, not the bobbin.
Take a deep breath and unthread your entire machine. Rethread it from the very beginning, but here’s the key: make sure the presser foot is up. This opens up the tension discs and allows the thread to settle in properly.
My Go-To Fix: When my stitches start looking funky, I have a two-step ritual I always follow before I do anything else: rethread the entire machine and put in a new needle. This simple trick solves most of the walking foot issues I run into and saves me a world of frustration.
By systematically checking these three things—your needle, the foot's installation, and your threading—you can quickly get to the bottom of most problems. It makes the whole process of learning how to use a walking foot a lot less intimidating and way more rewarding.
Even after you get the hang of attaching your walking foot, a few common questions tend to pop up. Let's tackle some of the most frequent ones I hear from other quilters and sewers.
It’s tempting, I know, but a walking foot really isn't your everyday, all-purpose foot. Think of it as a specialist. It’s brilliant for sewing straight lines or gentle curves, especially when you're quilting through multiple layers or working with slippery knits.
However, for things that need quick pivots and tight turns, you'll want to switch back to a standard presser foot. Trying to sew a sharp corner with a walking foot can feel clunky and slow you down. For simple cotton seams, it’s just overkill.
That rhythmic clacking or clunking noise is almost always a sign that something’s not quite right with the installation. It's the number one troubleshooting issue I see.
Before you panic, check two things:
A Quick Tip from Experience: Make sure you have the right walking foot for your specific machine model. While some "universal" feet exist, sewing machines have different shank heights (low, high, etc.). A brand-specific foot is designed to move perfectly in sync with your machine's feed dogs, which makes all the difference.
At High Country Quilts we care deeply about community. With our experiences in retail, we know that a store is not only a place to shop but also a place for the community to gather and share. During this busy...

Hi! We’re Adam and Renee Wheaton, the new owners of High Country Quilts! For more than 40 years, we’ve owned and operated vacuum and sewing businesses. Following in Renee’s father’s footsteps after he retired from All Discount Vacuum and Sewing in Colorado...


Leave a comment