

We Love Our Quilting Community
At High Country Quilts we care deeply about community. With our experiences in retail, we know that a store is not only a place to shop but also a place for the community to gather and share. During this busy...


Getting your design onto your fabric is ground zero for any embroidery project. It's that first crucial step that sets you up for success. You’ve got a few different ways to transfer embroidery patterns to fabric, from old-school tracing with pens and pressing with carbon paper to more modern tricks like heat-transfer paper and amazing water-soluble stabilizers.
Honestly, the best method really boils down to your fabric—its color, its thickness, and even its texture will point you in the right direction.
Choosing how you'll get your pattern onto the cloth is a bigger deal than you might think. It’s the literal foundation for your entire piece, the bridge between the design you love on paper and the stitched art you’re about to create.
Get it right, and you’ll have crisp, clear lines that are a joy to follow, making the whole process smoother and the final result look much more polished. But a mismatch between your technique and your fabric? That can lead to a whole lot of frustration—smudged lines, a wonky design, or marks that stubbornly refuse to wash out.
Before you even think about threading a needle, take a good look at your material. A lightweight, light-colored cotton is a completely different beast than a dark, heavy denim or a fuzzy piece of felt. Each one has its own quirks. The trick is to pick a transfer method that plays nicely with your fabric and helps you stitch with precision.
The way your transfer tool interacts with the fabric is everything. For example, a heat-erasable pen is fantastic on smooth quilting cotton, but it could melt or damage delicate synthetic fabrics. In the same vein, tracing your pattern on a lightbox is a breeze with sheer linen, but completely impossible on black canvas. This is where knowing your tools really pays off.
To make this a little easier, we put together a simple decision-making flowchart to give you a solid starting point based on what you're stitching on.
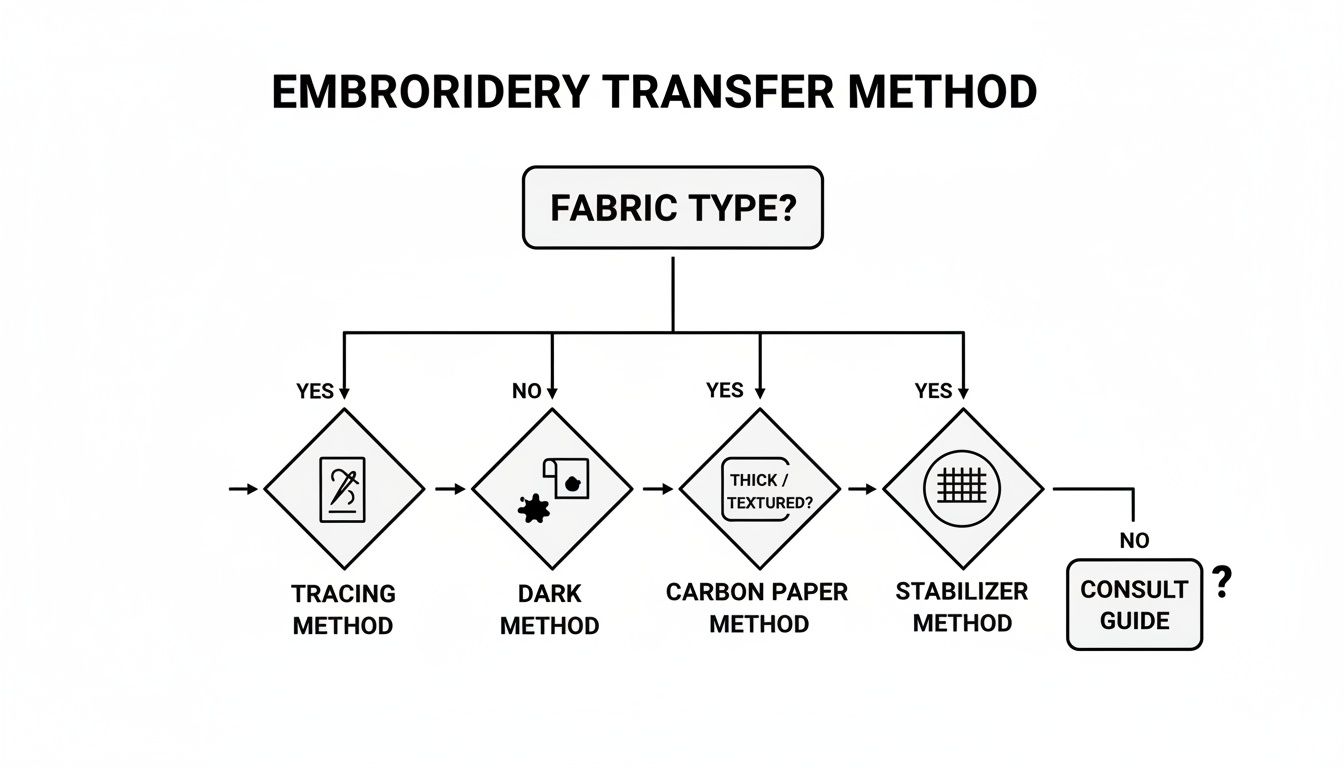
As you can see, the fabric is really the boss here. It guides you toward simple tracing for light fabrics, carbon paper for darker ones, and stabilizers for anything tricky, thick, or textured.
To make things even clearer, here's a quick-reference guide matching the best transfer methods to different fabric types. This should help you get great results and avoid accidentally damaging your project before you even begin.
| Fabric Type | Recommended Methods | Methods to Avoid |
|---|---|---|
| Light-colored, smooth cotton/linen | Lightbox/window tracing, water-soluble or heat-erasable pens, printable stabilizer | Dark carbon paper (can smudge), thick iron-on transfers |
| Dark-colored, smooth cotton/linen | White/yellow carbon paper, water-soluble stabilizer (stick-on type), chalk pencil | Tracing with dark pens, lightbox (won't show up) |
| Thick fabrics (denim, canvas, felt) | Water-soluble stabilizer (stick-on is best), iron-on transfers, carbon paper (requires firm pressure) | Lightbox/window tracing, fine-tipped pens (can snag) |
| Delicate fabrics (silk, sheer organdy) | Water-soluble stabilizer (stick-on type), pricking and pouncing method | Heat-transfer methods (can scorch), carbon paper (can stain) |
| Stretchy fabrics (knits, jersey) | Sulky Sticky Fabri-Solvy (or similar printable stabilizer), iron-on stabilizer (for support) | Tracing (distorts fabric), carbon paper (can distort) |
| Textured fabrics (terry cloth, fleece) | Water-soluble stabilizer (stick-on or topper) | Any direct drawing or tracing method (impossible to get a clean line) |
This table is a great starting point, but don't be afraid to do a small test on a scrap piece of fabric first—it's the best way to ensure your chosen method will work perfectly.
Kicking off your embroidery with a clear, reliable pattern is like having a good map for a road trip. It gives you the confidence to stop worrying about the lines and just focus on your stitching, your colors, and the creative part of the process.
Think of it this way:
Here at High Country Quilts, we see it all the time—a solid transfer technique is what empowers stitchers to take on bigger, more ambitious projects. By exploring all the different options available, from classic tracing to the latest printable stabilizers, you’ll find the perfect approach for any project you can dream up.
When you're just starting out, some of the most dependable ways to get an embroidery pattern onto your fabric are also the simplest. Classic tracing with specialized pens is a fantastic entry point—it's accessible, straightforward, and gives you complete control over your design's outline.
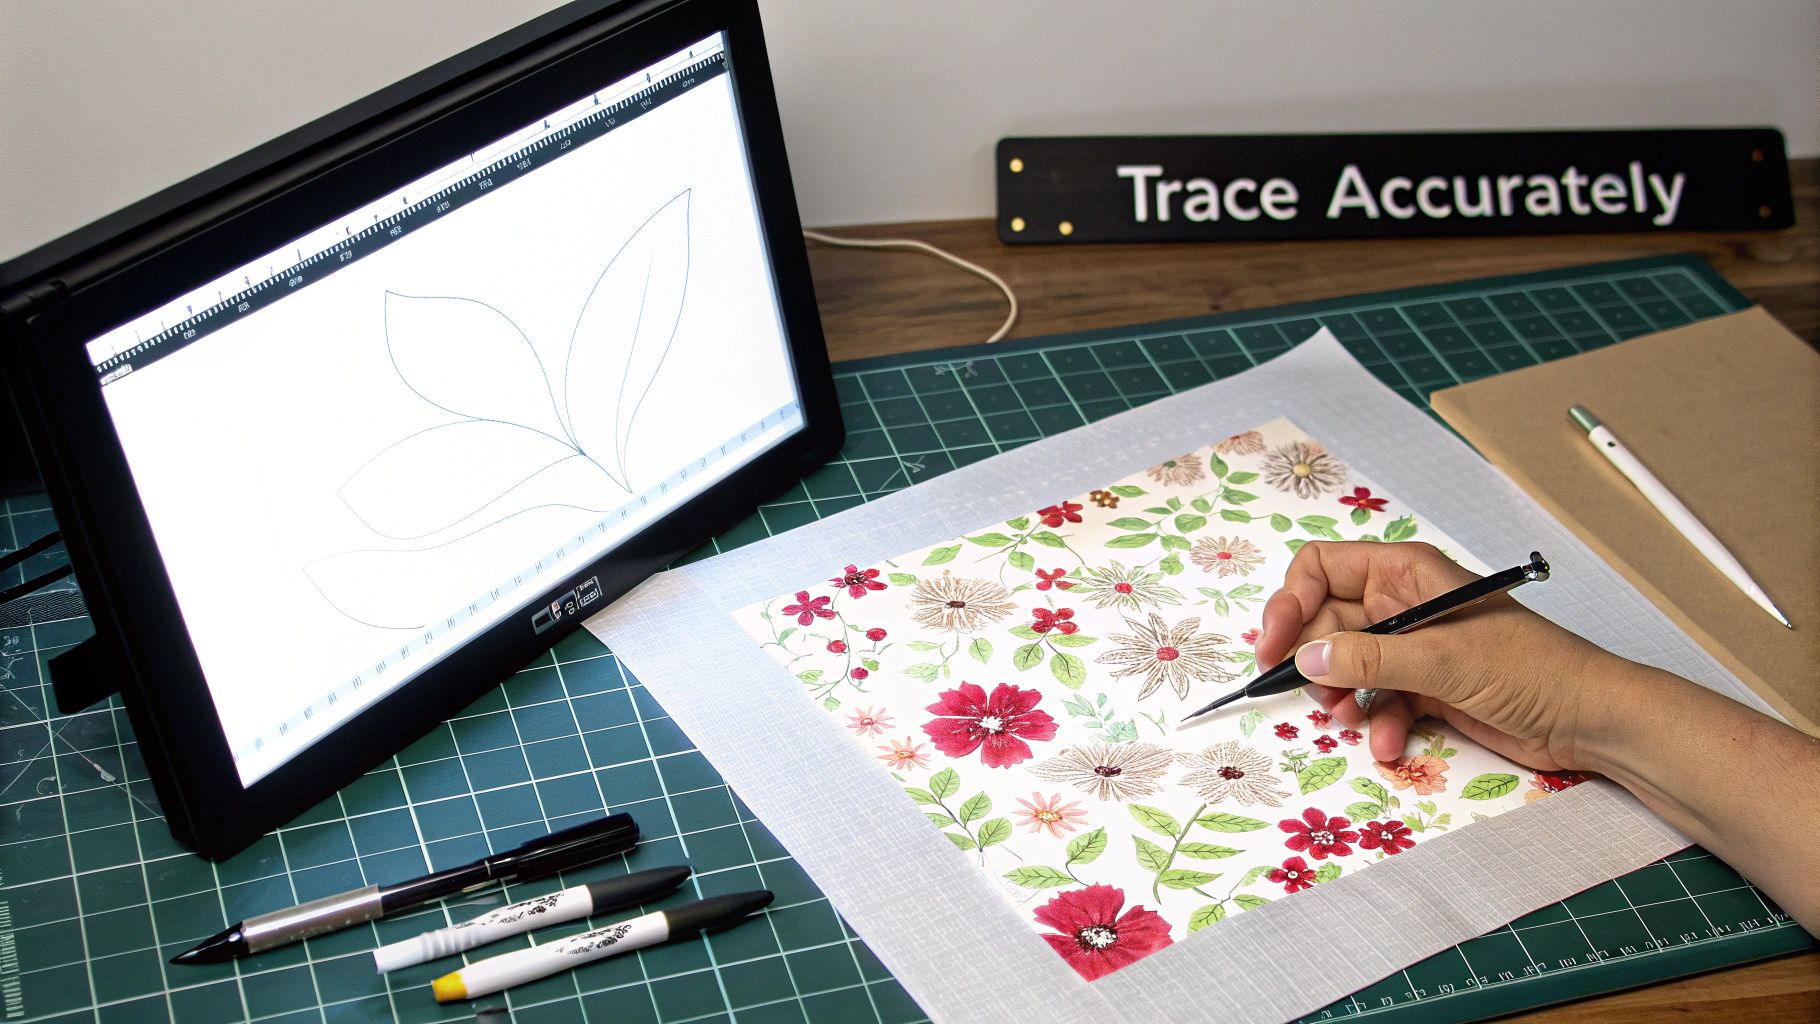
This approach works wonders on light-colored, smooth fabrics like cotton or linen, where your traced lines will pop. Let's walk through how to get a crisp, accurate transfer every single time.
The most basic transfer method just needs your pattern, your fabric, and a good light source. It’s a technique that’s been around forever for a reason—it’s intuitive and you don't need much to get started. You’ve got two great options here.
First up is the lightbox. A lightbox is basically a thin, lit-up panel. When you place your pattern and fabric on top, it shines a light through both, making the design underneath perfectly clear and easy to trace. It provides a nice, even surface that makes tracing a breeze, even if your room is a bit dark.
The other option, which costs nothing, is a bright window on a sunny day. Just tape your pattern to the windowpane, then carefully tape your fabric right over it. The sunlight acts as a perfect natural lightbox, illuminating your design so you can trace it directly onto the material.
A few tips to make this method foolproof:
Once your setup is ready, you need the right tool for the job. This is where transfer pens really shine. They're designed specifically for fabric arts, and unlike a regular pen, their marks are meant to be temporary.
The best one for you really depends on your project and how you plan to finish it. Let's break down the main types you’ll find at a shop like High Country Quilts.
These are a classic for a reason. The ink in a water-soluble pen stays visible while you stitch but washes away completely with a little cool water. They usually come in blue or purple, which shows up really well on most light fabrics.
This type is perfect for any project you plan on washing anyway, like a quilt block, pillowcase, or t-shirt. All it takes is a quick spritz or a gentle soak to make the lines disappear, leaving just your gorgeous embroidery.
Pro Tip: Always let your fabric air-dry completely after rinsing out the lines before you even think about ironing it. If you apply heat while the ink is still present (even if it's invisible), you can accidentally set it for good.
A huge favorite among both quilters and embroiderers, heat-erasable pens are like magic. These pens, like the popular FriXion brand, use a special thermal ink that vanishes when you apply heat from an iron.
This is a lifesaver for projects you can't or don't want to get wet, like a wall hanging or something made from a delicate material. A quick pass with a hot iron, and your guidelines are gone in an instant.
But there’s a little catch you should know about: the ink doesn't actually go away, it just turns invisible. In very cold temperatures, those lines have been known to ghost back into view. Because of this, it’s best to use them for designs where your stitches will completely cover the traced lines, just in case.
Last but not least are air-soluble pens, which you might also hear called disappearing ink pens. Just as the name implies, the marks from these pens fade away all on their own over time as they're exposed to the air.
The vanishing time can be anywhere from 24 to 72 hours, depending on the pen's brand and even the humidity in your room. This makes them ideal for small, quick projects you know you can finish before the lines fade. You definitely wouldn't want to trace a huge, complex piece with one of these only to have your pattern disappear halfway through!
No matter which pen you choose, the golden rule is to always test it on a scrap of your project fabric first. This quick check makes sure the pen marks cleanly and, more importantly, that it comes off completely without leaving a stain or a faint shadow. It’s a simple step that can save you a world of heartache later.
If you're after crisp, clean lines and a design you can use over and over, heat-activated transfer methods are your best friend. These techniques use a hot iron to press your pattern onto the fabric, leaving you with a clear, semi-permanent guide for your stitches. They’re incredibly reliable, especially when you're working with your own custom art or need to make several identical pieces.
Let's look at two of the most popular ways to do this: classic commercial iron-on patterns and the wonderfully versatile heat-transfer pens. Each has its own strengths, depending on what your project calls for.
Commercial iron-on patterns are a time-tested favorite for a reason, particularly if you're just starting out. These pre-printed designs give you a sharp, consistent outline with almost no fuss—just place the pattern, press with an iron, and you're ready to stitch. You don't have to worry about tracing errors, which makes them perfect for traditional patterns with lots of detail, like you see in Redwork or vintage-style projects.
This simple method truly changed the game for home embroidery. The boom of iron-on patterns in the early 20th century made needlework so much more accessible. It fueled the huge Redwork craze in America from the 1890s to the 1930s. Crafters could buy stamped 'Penny Squares'—pre-transferred fabric panels—and get right to stitching. This convenience was a huge draw, and by 1935, industry data showed that an impressive 25% of American farmwives reported embroidering Redwork. Even today, the Sewing Trades Association reports that iron-on methods are still used in about 65% of beginner projects worldwide. To see how these patterns evolved, you can dive into their history and impact on quilting culture over at the Quilt Index.
Here are a few tips I've learned for getting a perfect transfer:
But what if you want to stitch a design you drew yourself or found online? That’s where heat-transfer pens and pencils shine. They let you turn literally any design into a custom iron-on.
The process couldn't be simpler. You just trace your design onto a piece of paper (regular printer paper or tracing paper both work great). Then, you place your tracing ink-side down on the fabric and press it with a hot iron. The heat lifts the ink right off the paper and onto the fabric, creating a mirror image of your drawing.
The most crucial thing to remember with a heat-transfer pen is that the final result will be a reversed image. Always trace your pattern backward, especially if you have text or any asymmetrical elements!
For anyone wanting to dive deeper into making their own patterns at home, this guide on creating your own iron-on transfers is a fantastic resource.
Heat-transfer inks are wonderfully effective, but they are also permanent. They are not designed to wash out or disappear over time. This makes them the perfect choice for embroidery styles where your stitches will completely cover the pattern lines.
This method works beautifully for projects like:
Because the marks aren't going anywhere, this method is less ideal for more delicate, open styles like thread painting, where the transfer lines might peek through between your stitches. Always think about your stitch plan to make sure you'll get full coverage for a flawless finish.
So far, we’ve covered methods that work beautifully on light, smooth fabrics like cotton or linen. But what happens when you want to stitch on something a little trickier? Many of us hit a wall when faced with dark denim, thick canvas, or plush velvet. Standard tracing with a lightbox is impossible, and most pens either snag or just don't show up.
This is where you need to get a bit more creative with your tools. Don't worry, there are fantastic, time-tested solutions for these challenging materials that will give you a clear and accurate pattern to follow. Let's dive into two of my favorite techniques for those tough-to-trace fabrics.
Dressmaker’s carbon paper, often just called transfer paper, is a powerhouse for opaque or dark fabrics. This isn't the inky, smudgy stuff from old office forms; this version is coated with a wax-based pigment that transfers cleanly when you apply a little pressure. It’s an ideal solution for getting a design onto sturdy materials like denim, canvas, or even dark-colored linen.
The process is pretty straightforward. You'll create a simple sandwich: your fabric on the bottom, the carbon paper with its colored side facing down, and your printed pattern right on top. Then, you just trace over the pattern lines with a firm tool.
Once you’ve traced the entire design, carefully lift the paper and the pattern away, and you'll find a crisp outline waiting for you on the fabric.
A critical tip here is to choose a carbon paper color that really pops against your fabric but isn't too overpowering. White or yellow works beautifully on dark denim, while blue or red is great for medium-toned fabrics. Always, always test your pressure on a scrap piece first to make sure the line is visible but not too heavy.
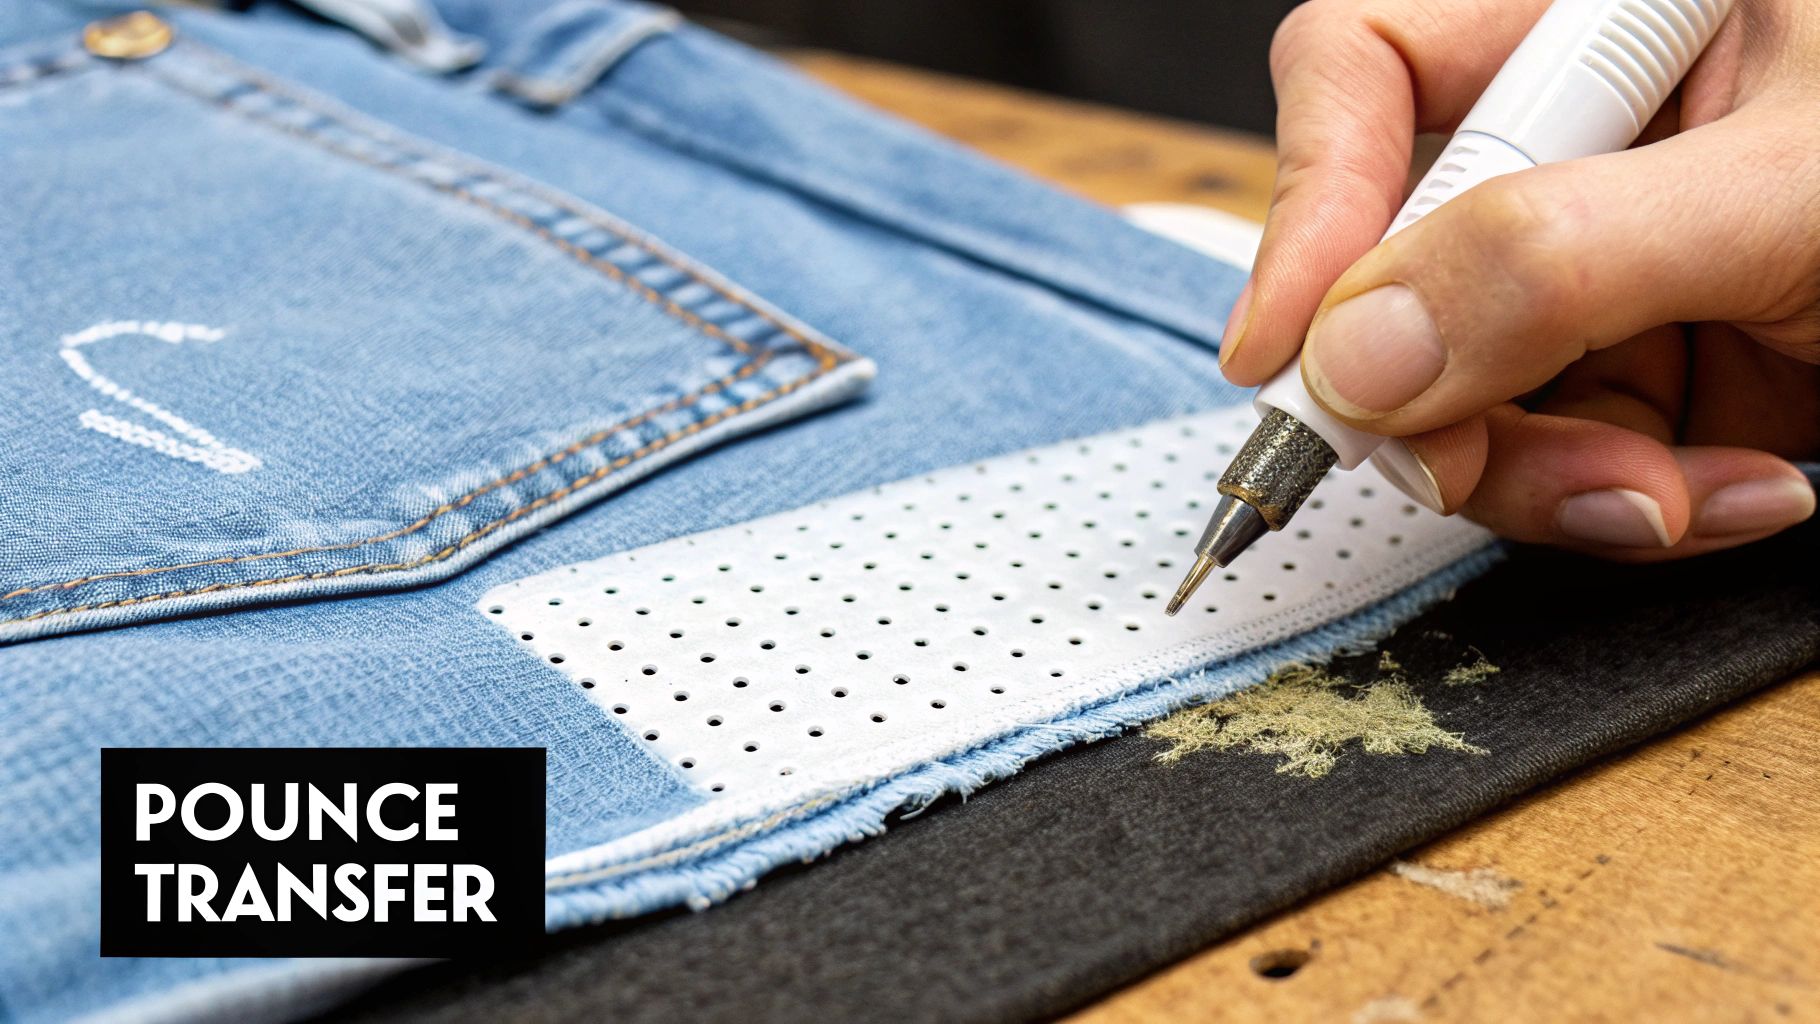
For incredibly delicate or textured fabrics like velvet, corduroy, or even some wools, you need a method that applies the pattern without pressure or heat. This is where pouncing, an elegant and historic technique, truly shines. It’s a gentle process that leaves a temporary, dotted guideline that's perfect for stitching over.
Pouncing has a rich history rooted in both efficiency and precision. Back in the 18th century, it was a cornerstone of domestic needlework. Stitchers would meticulously prick designs into paper and then "pounce" them with chalk—using charcoal for light fabrics or chalk for darker ones. This genius trick allowed a single pattern to be reused dozens of times, which was vital when embroidery became a source of income. You can learn more about these historic transfer techniques and see examples from the 1700s, preserved by the Nordic Museum in Sweden, over at The IK Foundation.
To try this method today, you first need to perforate your pattern. You can do this by placing your paper pattern on a soft surface (like a felt mat or corkboard) and using a needle or a specialized pricking tool to punch tiny, evenly spaced holes along all the design lines.
Next, you'll secure your perforated pattern onto your fabric. Then, take a pounce pad—a small, fabric-covered pad filled with chalk powder—and gently rub or "pounce" it over the holes. The fine powder sifts through, leaving a perfect dotted outline of your design on the fabric below.
This method is especially useful for:
Once you’ve stitched your design, the chalk dust can be gently brushed or shaken off, leaving no trace behind. It’s a beautifully simple way to tackle fabrics that other methods just can't handle.
Let's talk about what many of us in the embroidery world consider an absolute game-changer: the printable, water-soluble stabilizer. If you've ever struggled to transfer a detailed pattern or tried to draw on a dark or fuzzy fabric, this method is for you. It takes all the guesswork out of the equation and gives you perfectly crisp lines to follow, every single time.
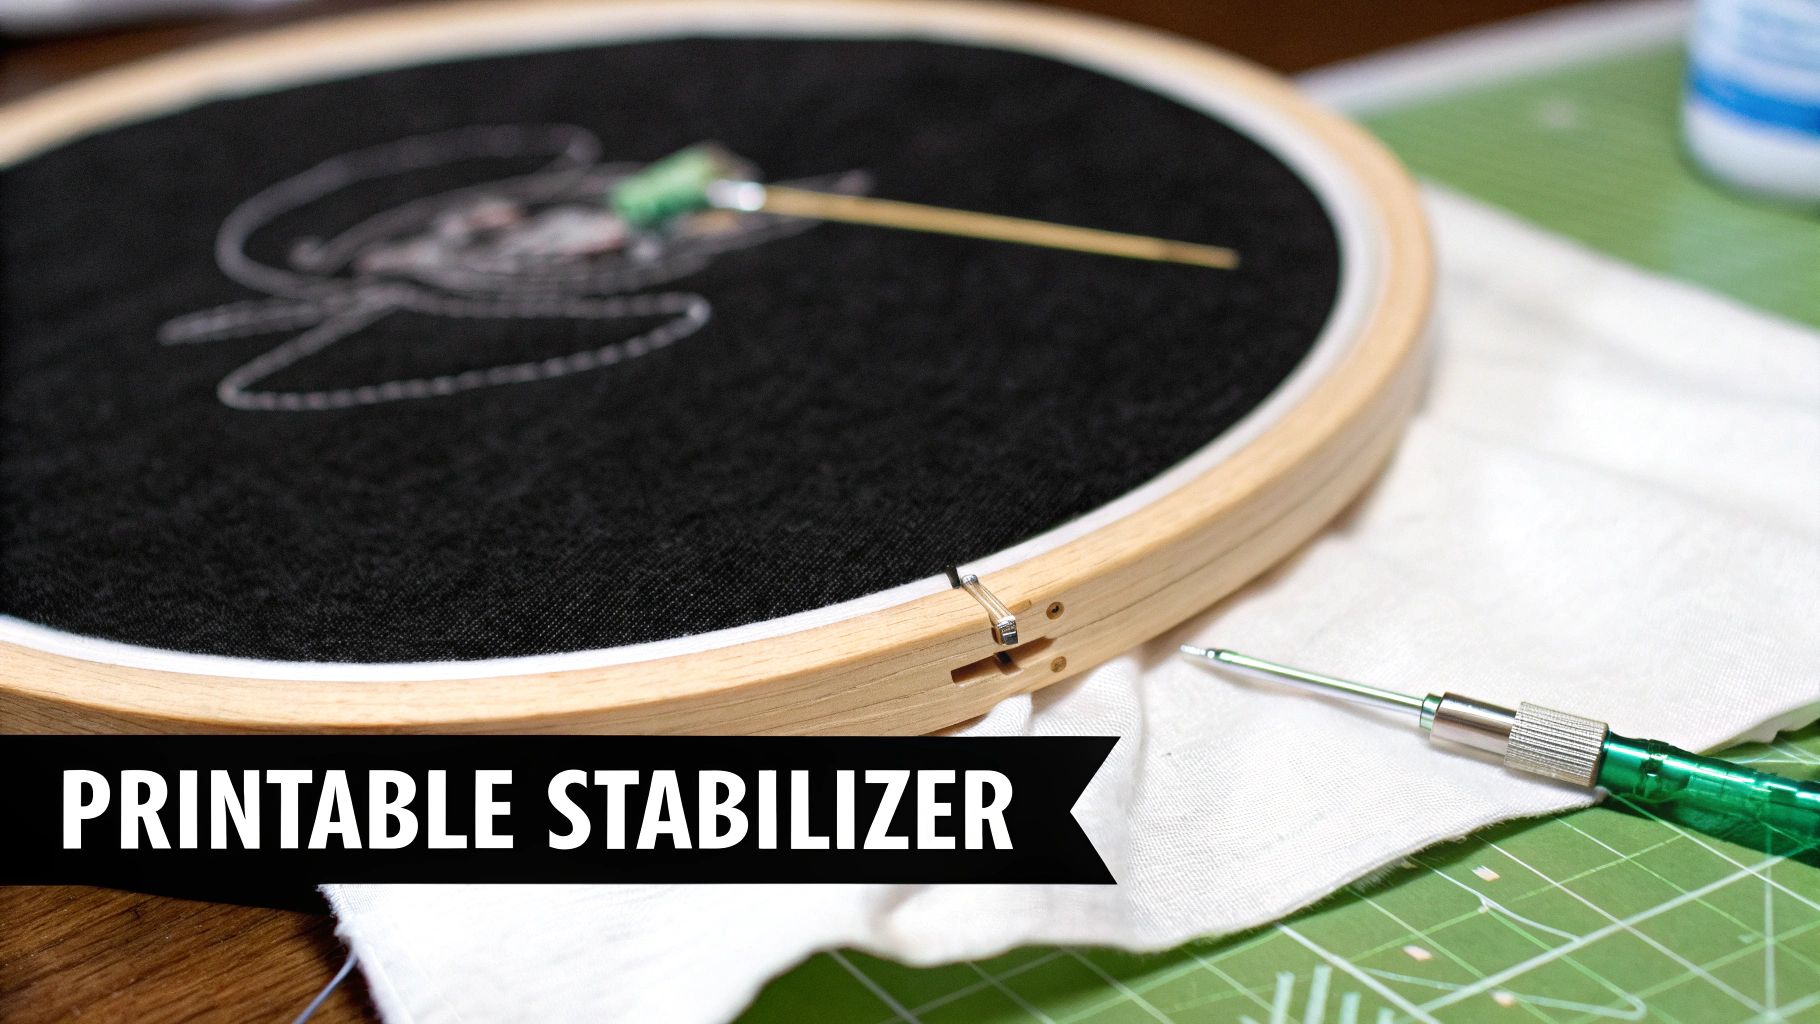
While there are a few kinds of stabilizers out there, the one that truly revolutionizes pattern transfer is the printable, sticky-backed paper. The concept is brilliantly simple: you print your design onto a special sheet, peel it off like a sticker, place it on your fabric, and stitch right through it. For complex designs or impossible-to-trace fabrics like felt, dark denim, or even knit sweaters, this stuff is pure magic.
At its heart, a printable stabilizer is a thin, almost fabric-like sheet with a paper backing and a light adhesive. You can run it through a standard inkjet or laser printer, allowing you to transfer any digital pattern with perfect precision. No more wobbly traced lines or details lost in translation.
This technique just blows the doors wide open for creativity. Suddenly, you can confidently stitch on:
The best part? When you're done stitching, the stabilizer dissolves completely in water. It just vanishes, leaving behind nothing but your beautiful embroidery.
Using this stuff is wonderfully easy, but a few little tricks I've learned along the way will guarantee a flawless finish.
My Go-To Trick for a Sticky Needle: You might notice your needle getting a bit gummy from the adhesive as you stitch. It's a common issue! Just keep a cotton ball with a little rubbing alcohol next to you. A quick wipe of the needle every so often keeps it gliding smoothly through the fabric.
While this method is pretty foolproof, a couple of things can pop up. If your fabric feels a bit stiff after it dries, it probably means a little stabilizer residue is left behind. No worries—just give it another good soak and rinse in warm water.
Proper storage is also key. I always keep my unused sheets in their original packaging and tucked away in a drawer. This keeps them away from moisture and humidity, which can make them clump together or lose their stickiness.
If you're really getting into printing your own designs, checking out something like a good printable sticker paper guide can give you some surprisingly useful tips. The principles are very similar, and understanding how printers handle specialty adhesive papers can really help you perfect your technique. It’s a simple tool that makes even the most intricate embroidery projects feel totally achievable.
Even with the best tools, you're bound to run into a few head-scratchers during an embroidery project. We hear them all the time at the shop—from tackling tricky fabrics to cleaning up those last few stray marks. Getting the right answers can be the difference between a project you love and one that gets shoved in a drawer.
We’ve gathered some of the most common questions right here to help you sidestep those little frustrations. Let's get you stitching with more confidence.
Getting rid of your guidelines all comes down to the tool you used to make them. Each type of pen, pencil, or paper has its own "off switch," and you definitely don't want to mix them up.
Here’s a quick rundown on how to clean up your finished piece:
Quick pro-tip: If you're using a water-soluble or heat-erasable pen, never, ever hit it with an iron until you're positive the marks are gone. Heat can set those "disappearing" inks permanently.
Absolutely, but your approach needs to be smart. Trying to trace a pattern directly onto a knit or jersey fabric is a one-way ticket to a stretched-out, distorted mess. The fabric moves with your pen, making it almost impossible to get a clean line.
For stretchy materials, your best friend is a printable, sticky-backed water-soluble stabilizer. This stuff is brilliant—it solves two problems at once. You get a perfect pattern printed right on the stabilizer, so there's no tracing involved. Plus, it temporarily stiffens the fabric, which stops it from shifting and stretching while you stitch.
Once you’re done, the stabilizer dissolves completely in water, leaving your beautiful embroidery behind on a perfectly relaxed fabric. I’d steer clear of any iron-on methods here, as the high heat can easily damage or warp delicate synthetic knits. A stabilizer is just the safest, most accurate way to go.
When your pattern is full of tiny, intricate details, precision is everything. A slightly shaky hand during tracing can turn a beautiful, complex design into a blurry suggestion of one. For this kind of work, you want a method that takes human error out of the equation.
Again, the printable water-soluble stabilizer is the clear winner. By printing the design directly onto it, you get a flawless copy of your pattern right on the fabric. You just stitch over the lines, guaranteeing every little detail is captured exactly as intended.
If a stabilizer isn’t an option, your next-best bet is a lightbox paired with a very fine-tipped water-soluble pen. This lets you see the design clearly and trace with much more control. Methods like dressmaker’s carbon or pouncing just aren't precise enough for super fine details—the lines they create are often too thick and can obscure the very details you're trying to stitch.
Ready to try some of these methods for yourself? At High Country Quilts, we have all the tools you need, from heat-erasable pens and carbon paper to the latest in printable stabilizers. Stop by our Colorado Springs shop or visit us online to explore our collection and get expert advice for your next embroidery project. Find your perfect transfer solution at https://hcquilts.com.
At High Country Quilts we care deeply about community. With our experiences in retail, we know that a store is not only a place to shop but also a place for the community to gather and share. During this busy...

Hi! We’re Adam and Renee Wheaton, the new owners of High Country Quilts! For more than 40 years, we’ve owned and operated vacuum and sewing businesses. Following in Renee’s father’s footsteps after he retired from All Discount Vacuum and Sewing in Colorado...


Leave a comment