

We Love Our Quilting Community
At High Country Quilts we care deeply about community. With our experiences in retail, we know that a store is not only a place to shop but also a place for the community to gather and share. During this busy...


A welt pocket is a classic tailoring detail that creates a clean, professional-looking slit for a pocket, most often seen on tailored jackets, vests, and trousers. It's built by carefully cutting into the garment fabric and attaching a separate welt piece (or two) to form the finished opening, with a pocket bag hidden on the inside. Getting this technique down is a game-changer, instantly making your handmade garments look polished and high-end.
For any serious cosplayer, the welt pocket isn't just a functional detail—it's a signature of high-quality craftsmanship that can take a costume from good to truly screen-accurate. Learning this skill is a genuine level-up for your sewing. It’s the kind of subtle, professional finish that competition judges look for and what gives your creations that extra layer of authenticity.
This guide is here to walk you through the entire process, from prepping your fabric to adding those flawless final stitches. We’ll break down the anatomy of single welts, double welts, and even pockets with flaps, explaining how they can help you create incredibly authentic-looking jackets, vests, and trousers for any character you’re bringing to life.
Learning to sew a perfect welt pocket is like adding a secret weapon to your sewing toolkit. It's a technique that screams precision, patience, and a solid grasp of garment construction. This is about more than just making a spot to stash your phone; it's about replicating the high-end tailoring that gives your cosplay structure, credibility, and a truly professional edge.
A well-executed welt pocket lies perfectly flat against the garment, boasts sharp, clean corners, and is built to last. It’s a subtle yet powerful sign of quality that separates an impressive cosplay from an unforgettable one.
A little bit of fashion history can go a long way, especially when you're working on period costumes. Welt pockets first showed up as a major tailoring innovation back in the late 1600s, primarily in men's clothing. By the time the Victorian era rolled around, the construction of a welt pocket had become a status symbol. The finished openings were often a precise 4 inches wide, a measurement that was a deliberate showcase of a tailor's skill.
For those who are really passionate about garment construction and want to take their craft to the next level, understanding the bigger picture of fashion history and technique is invaluable. You might even consider looking into formal training to delve deeper into fashion design skills. This kind of practical knowledge is what turns a great costume into something truly exceptional.
Before you even think about that first stitch, let's talk about setting up for success. Getting those crisp, professional-looking welt pockets you admire on high-end jackets is all about preparation. The right tools don't just make the job easier; they're your best defense against common headaches like puckering and crooked lines.
Think of this as gathering your ingredients before you start cooking. It makes everything flow so much better.
Your non-negotiables are pretty simple, but they are absolutely key for precision. You'll need a clear, gridded ruler, a sharp rotary cutter for those perfectly clean cuts, and a good fabric marking tool. Whether you prefer a chalk pen, a water-soluble marker, or a classic tailor's chalk pencil, just make sure it makes a fine line and disappears when you need it to.
If there's one thing that will make or break your welt pocket, it's fusible interfacing. Seriously, this is the magic ingredient. Applying a patch of interfacing to the wrong side of your garment fabric, right where the pocket will sit, is the most critical step for getting a stable, pucker-free result.
This little patch of reinforcement keeps the fabric from stretching and distorting as you cut and sew—which is the number one reason welt pockets gape or look wonky. This isn't just a suggestion; it's a must-do, especially for any fabric with a bit of give or a loose weave.
For a sturdy wool suiting, a medium-weight interfacing adds structure without creating a stiff board. If you're working with lighter cotton or linen, a lightweight fusible is all you need to add support while staying completely invisible.
Choosing the right interfacing for your fabric is a bit of an art, but it's one you can master quickly. If your interfacing is too heavy, the pocket area will feel stiff and out of place. Too light, and it won't do its job.
To help you get started, here's a quick guide I've put together from my own experience.
This table will help you select the right weight of fusible interfacing for some of the most common garment fabrics. The goal is to get a stable, smooth pocket that doesn't pucker.
| Garment Fabric Type | Recommended Interfacing Weight | Pro Tip |
|---|---|---|
| Wool Suiting, Heavy Twill | Medium-Weight Woven Fusible | A woven type will mimic the fabric's natural drape, which is exactly what you want. |
| Cotton, Linen, Chambray | Lightweight Woven or Non-Woven Fusible | Always pre-wash both your fabric and the interfacing to get any potential shrinking out of the way. |
| Rayon, Tencel, Viscose | Lightweight Tricot Fusible | A tricot knit interfacing is fantastic here because it offers support without killing the beautiful drape of these fabrics. |
| Faux Suede, Corduroy | Medium-Weight Non-Woven Fusible | Always, always test press on a scrap first! You want to make sure the heat doesn't damage the fabric's unique texture. |
The idea is to stabilize the pocket area just enough for precise work, while still letting it move and blend naturally with the rest of the garment.
My best advice? Always test your fabric, interfacing, and heat setting on a scrap piece first. It takes two minutes and can save you from a major sewing headache.
It’s fascinating to think that while welt pockets have been a staple in menswear for ages, they only really made their way into women's fashion much later. The technique gained popularity in the 1940s as more women entered the workforce and started wearing tailored suits. By 1951, you can see in vintage sewing patterns that double welt pockets were standard in dressmaking. Many sewists back then finished the internal raw edges by hand—a beautiful practice still used today, especially in historical cosplay. You can take a deep dive into these vintage sewing techniques on SewHistorically.com.
Having the right materials ready to go, especially the perfect interfacing, makes bringing these classic techniques to life so much more achievable.
This is where the real work—and the real fun—begins. Let's move from theory to practice and walk through the steps for sewing a classic single welt pocket. It's an iconic detail for a reason, and getting it right is completely within your reach. Our journey starts with precision marking, because that’s the bedrock of a beautiful result.
From there, we'll tackle what many people find to be the most nerve-wracking part: cutting into your main garment fabric. I’ll show you my technique for snipping the corners into perfect little triangular tabs. This small but absolutely critical detail is what makes the pocket lie completely flat, avoiding the dreaded puckering that can sabotage an otherwise perfect project.
With a steady hand and a bit of guidance, you'll see just how achievable this hallmark of fine sewing truly is.
Before a single stitch is sewn, the most important work happens with your marking tool and a ruler. An accurately marked pocket is more than half the battle won.
Start by transferring your pattern's pocket markings to the right side of your garment fabric. Then, flip it over and do the same on the wrong side, marking directly onto the interfacing. Having identical guides on both sides is a non-negotiable for the steps ahead.
Now it's time to cut. Using a sharp rotary cutter or fabric shears, slice down the center line of your marked box, stopping about a half-inch from each end. Here comes the critical part: from the end of that center cut, snip diagonally into each of the four corners, creating small triangles. You want to get as close to the marked corners as you can without actually cutting through your future stitch line. This precision is what allows the fabric to turn cleanly and lie perfectly flat.
This visual guide breaks down these crucial first phases.
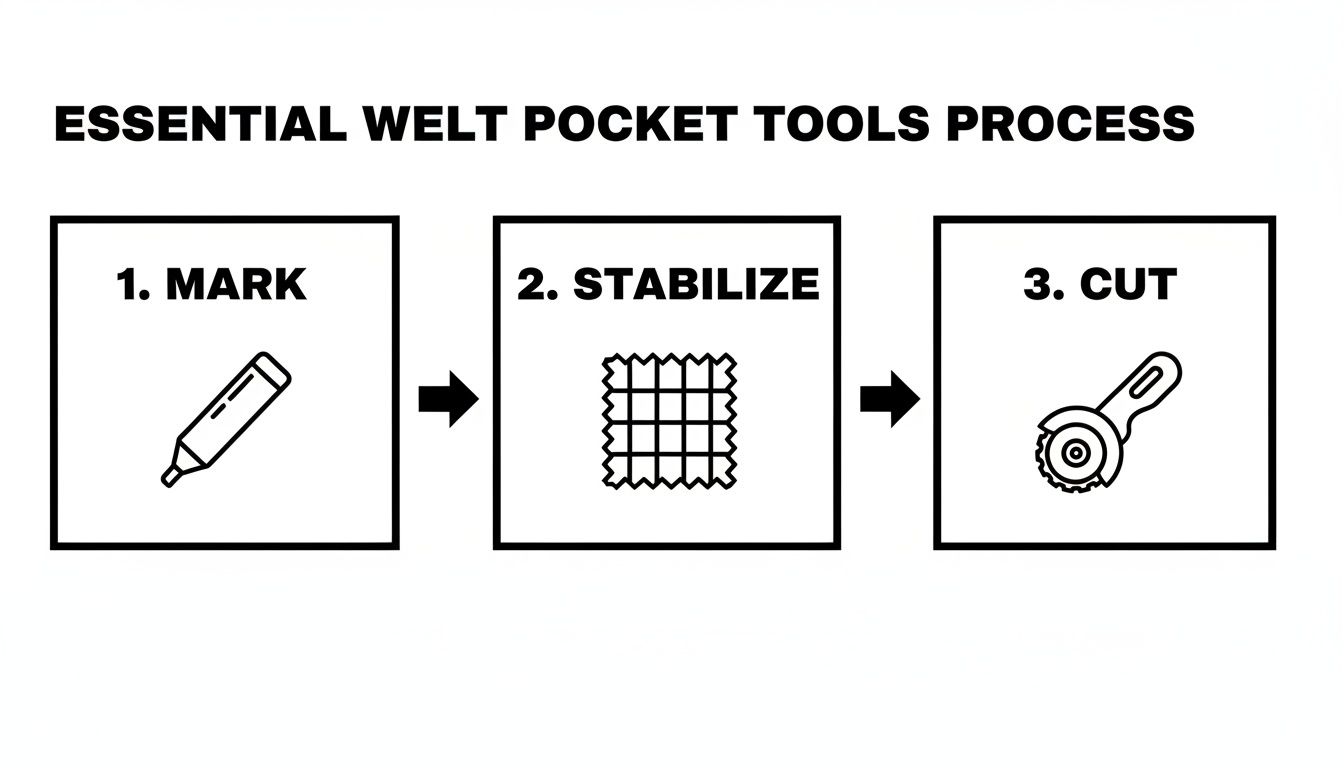
As the diagram shows, a successful welt pocket boils down to three core actions done in order: Mark, Stabilize, and Cut. Each one demands the right tools for a precise outcome.
The technical complexity of welt pockets has stayed remarkably consistent over the centuries, often involving between 8 to 12 precise steps. Historical tailoring manuals called for seamlines marked exactly 1/2" from raw ends to create finished 4-inch openings. For sewers today, the most delicate step is still snipping those corners completely to prevent puckering—it’s a careful balance, especially with fabrics like wool that can fray. You can dive deeper into these Victorian tailoring methods and pocket construction for a fascinating historical perspective.
With your fabric cut, it's time to create that clean rectangular opening. This is where those little triangular tabs and your interfaced seam allowances do their magic. Push the seam allowances and the corner tabs through the opening to the wrong side of the garment.
Next, head to your ironing board. Pressing isn't just an optional step here; it's an active part of shaping the pocket. Carefully press the folded seam allowances flat, making sure you get sharp, crisp edges that form a perfect rectangle on the right side of your garment.
Pro Tip: If you have a tailor's clapper, now is the time to use it. After hitting the seam with steam, hold the clapper down firmly for a few seconds. It traps the heat and moisture, setting an incredibly sharp, professional-looking crease.
At this point, you should have a neat, interfaced rectangular hole in your garment, all ready for the welt. Take a moment to admire it—the hardest part is officially behind you.
Now we get to build the components that turn that opening into a functional pocket. The "welt" itself is the visible band of fabric that creates the pocket's lip. To prepare it, you'll typically fold the welt piece in half lengthwise with wrong sides together and give it a good press.
Next up are the pocket bag pieces. You'll have two of them: one attaches to the lower edge of the pocket opening, and the other attaches to the top. The lower pocket piece is usually sewn to the welt first, creating a single unit to work with.
Here’s how it all comes together:
To finish, lay the two pocket bag pieces together and stitch all the way around the sides and bottom, making absolutely sure you don't catch the main garment fabric in your seam. And don't forget to catch those tiny triangular tabs at the corners of the opening into your side seams! This is what anchors the pocket and gives it strength.
One final press, and you’ve done it—a flawless single welt pocket.
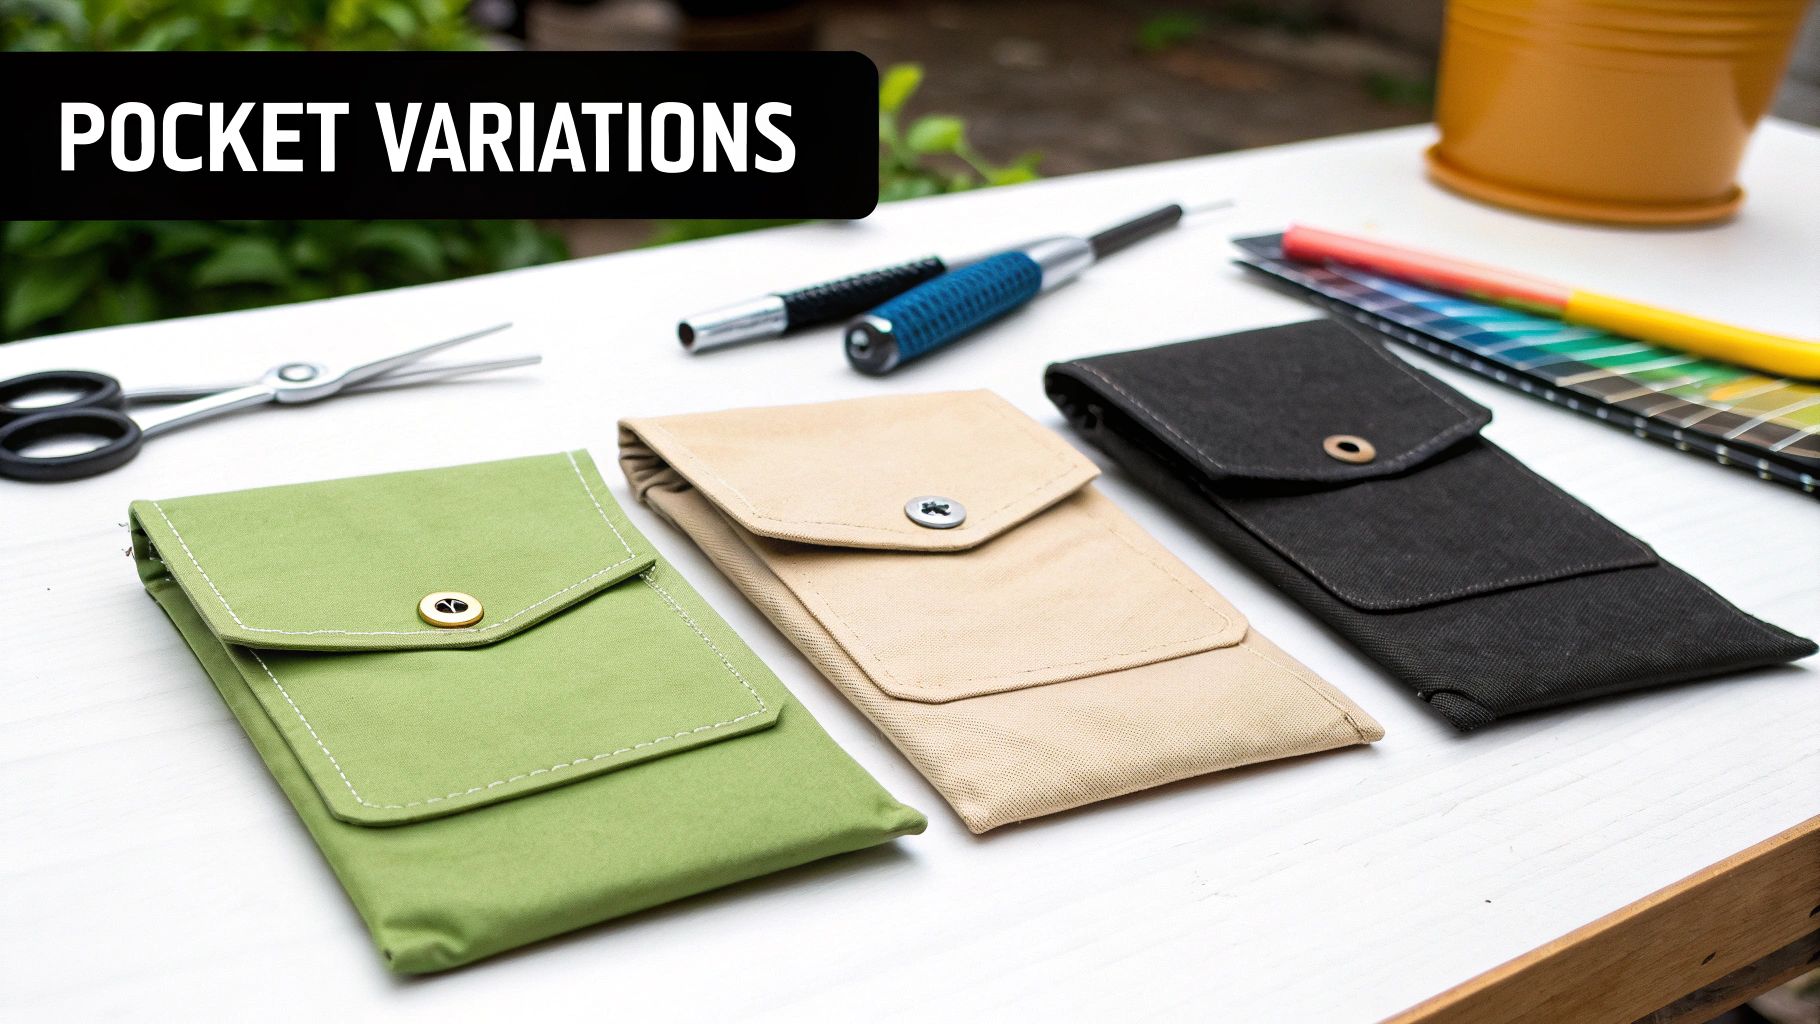
Once you've mastered the single welt pocket, you've really built the foundation for so much more. Think of that basic welt as your gateway to adding truly custom, professional details to your garments. This is where the fun starts, and you can begin to inject your own style into every project.
These variations aren't just for looks, though—each one brings its own unique function and aesthetic to the table. Whether you're aiming for that sharp, tailored blazer look or want to add a vibrant pop of color to a cosplay vest, knowing how to tackle these different styles is a game-changer.
Often seen as the next big challenge, the double welt—which you'll also hear called a besom pocket—is a true sign of high-end tailoring. Instead of one lip, it has two skinny welts that meet perfectly in the center, giving you a super clean, minimal opening. You’ve definitely seen this style on formal trousers, suit jackets, and elegant coats.
The construction is surprisingly similar to a single welt, but it requires a much higher degree of precision. The whole game is getting those two welts perfectly parallel and exactly the same width. If your stitching is off by even a fraction, the welts will look lopsided, so your marking has to be spot-on. I always recommend drawing your stitch lines directly on your welt fabric with a disappearing ink pen so you have a foolproof guide to follow.
You’ll be making two separate welt pieces. One gets attached to the top edge of your marked rectangle, and the other goes on the bottom edge before you slice into your main fabric. This locks both welts in place before you make that scary, no-turning-back cut.
A pocket flap is a fantastic way to add both visual interest and a bit of extra security to your welt pocket. It’s a staple on everything from rugged field jackets to sophisticated blazers. The flap itself is made separately and then slipped into the pocket opening as you’re building it.
First things first, you’ll construct the flap. This usually means cutting two identical flap shapes, sewing them right sides together, and turning them out. A good press and maybe some topstitching will give it that crisp, professional look.
The real trick is in the insertion. You'll typically place the flap upside down over the pocket opening and baste it along the top seam allowance. This happens before you attach the upper pocket bag. Once you turn the pocket pieces to the inside and finish the construction, the flap will naturally flip down to cover the opening, neatly hiding its raw edge inside the pocket.
Here's a pro tip I've learned over the years: A well-proportioned flap should be just a little wider than the finished pocket opening. I aim for about 1/4 inch on each side. This stops the pocket opening from peeking out and just looks more balanced.
If you want a truly eye-catching, custom detail, the bound welt pocket is your best friend. This technique uses a contrasting fabric to create a striking frame around the pocket opening. You see this a lot in high-fashion pieces, and it’s a brilliant way to tie different colors in a garment together or just add a unique focal point.
Instead of folding a single piece of fabric to create the welt, you use strips of your contrast fabric to bind the raw edges of the opening, almost like you'd bind a quilt. This one demands incredibly precise cutting and stitching to keep the binding an even width all the way around.
The process involves stitching the binding strips to the right side of the pocket opening, then carefully wrapping them over the raw edge to the inside and stitching them down. The result is a sharp, colorful outline that makes the pocket's clean lines pop. It's the perfect way to add a bold accent to a cosplay costume or a bespoke jacket.
To help you decide which style is right for your next project, here's a quick breakdown of what makes each one unique.
| Pocket Style | Key Feature | Best For | Difficulty Level |
|---|---|---|---|
| Double Welt (Besom) | Two thin, parallel welts | Tailored blazers, formal trousers, tuxedos | Advanced |
| Flapped Welt | A fabric flap covering the opening | Outdoor jackets, sport coats, utility pants | Intermediate |
| Bound Welt | Contrasting fabric frames the opening | Designer garments, custom cosplay, statement pieces | Advanced |
Each of these variations builds on the core welt pocket technique, offering you a new way to refine and elevate your sewing. By practicing these styles, you'll not only sharpen your skills but also gain the confidence to add those beautiful, intricate details to any garment you can dream up.
Even after years of sewing, a welt pocket can still throw you a curveball. It happens. But the great thing about these little challenges is that most of them are absolutely fixable. Think of this as your sewing triage guide—a way to figure out what went wrong and how to make it right.
When a pocket doesn't quite come together, don't get frustrated! See it as a learning opportunity. Let’s walk through the most common hiccups with welt pockets and, more importantly, how to rescue your garment with confidence.
This is probably the number one issue sewers run into: puckering right at the corners of the pocket opening. You turn everything through, expecting a crisp, flat rectangle, but instead, you get a little gather or twist. Nine times out of ten, this points to one specific thing.
The problem is almost always in those tiny triangular tabs you create when you slice the opening. If you don't snip the diagonal cuts deep enough into the corners, the fabric simply doesn't have the space it needs to turn cleanly. It's essentially pulling against itself, which creates the pucker.
To fix it, just turn the pocket pieces back out to the wrong side. Grab a pair of small, sharp scissors and snip just a thread or two deeper into that corner. You want to get as close as you possibly can to the stitch line without actually cutting through it. Turn it right-side out again, and you’ll likely see that the tiny extra clip was all it took to get it to lie perfectly flat.
A Quick Diagnostic Tip: If your corners are puckered, the cause is almost always under-clipping. If the corner looks bulky or rounded, the cause is often a seam allowance that wasn't graded or trimmed enough.
So you've finished the pocket, you step back to admire your work, and… your welts are uneven. Maybe one is a hair wider than the other on a double welt, or a single welt looks thicker at one end. This is a precision issue, and it usually starts right at the beginning of the process.
The root cause is typically one of two things:
For very minor unevenness, a good shot of steam from your iron can sometimes work wonders, helping you coax the fabric into a better shape. If the error is more obvious, though, the best fix is to carefully unpick the stitching. Get out a high-quality seam ripper and gently take out the stitches holding the crooked welt. Press the area flat, re-mark your lines if you need to, and then stitch it again. This time, go slowly and keep your eye right on the guide.
A well-made welt pocket should lie flat against the garment, creating a clean, professional finish. If yours is gaping open, it's a sign of a structural problem, and it's almost always caused by a lack of support.
This is exactly why interfacing is non-negotiable. Forgetting to fuse a patch of interfacing to the wrong side of your garment fabric before you start is the biggest reason for a gaping pocket. That interfacing is what stabilizes the fabric, preventing it from stretching out of shape as you work on it and as you wear it later.
If the pocket is already finished and gaping, a fix is tricky but not impossible. You can try to carefully hand-sew a small piece of lightweight interfacing or stay tape to the seam allowances on the inside of the pocket. Another trick is to place a few strategically hidden tacking stitches at the corners to hold the opening closed, but this can make the pocket less functional. Honestly, this is a classic case where an ounce of prevention is worth a pound of cure.
If you're really passionate about nailing these details, taking a local sewing class can provide invaluable hands-on feedback. Here in Atlanta, we offer workshops at Famcut that cover these exact tailoring techniques.
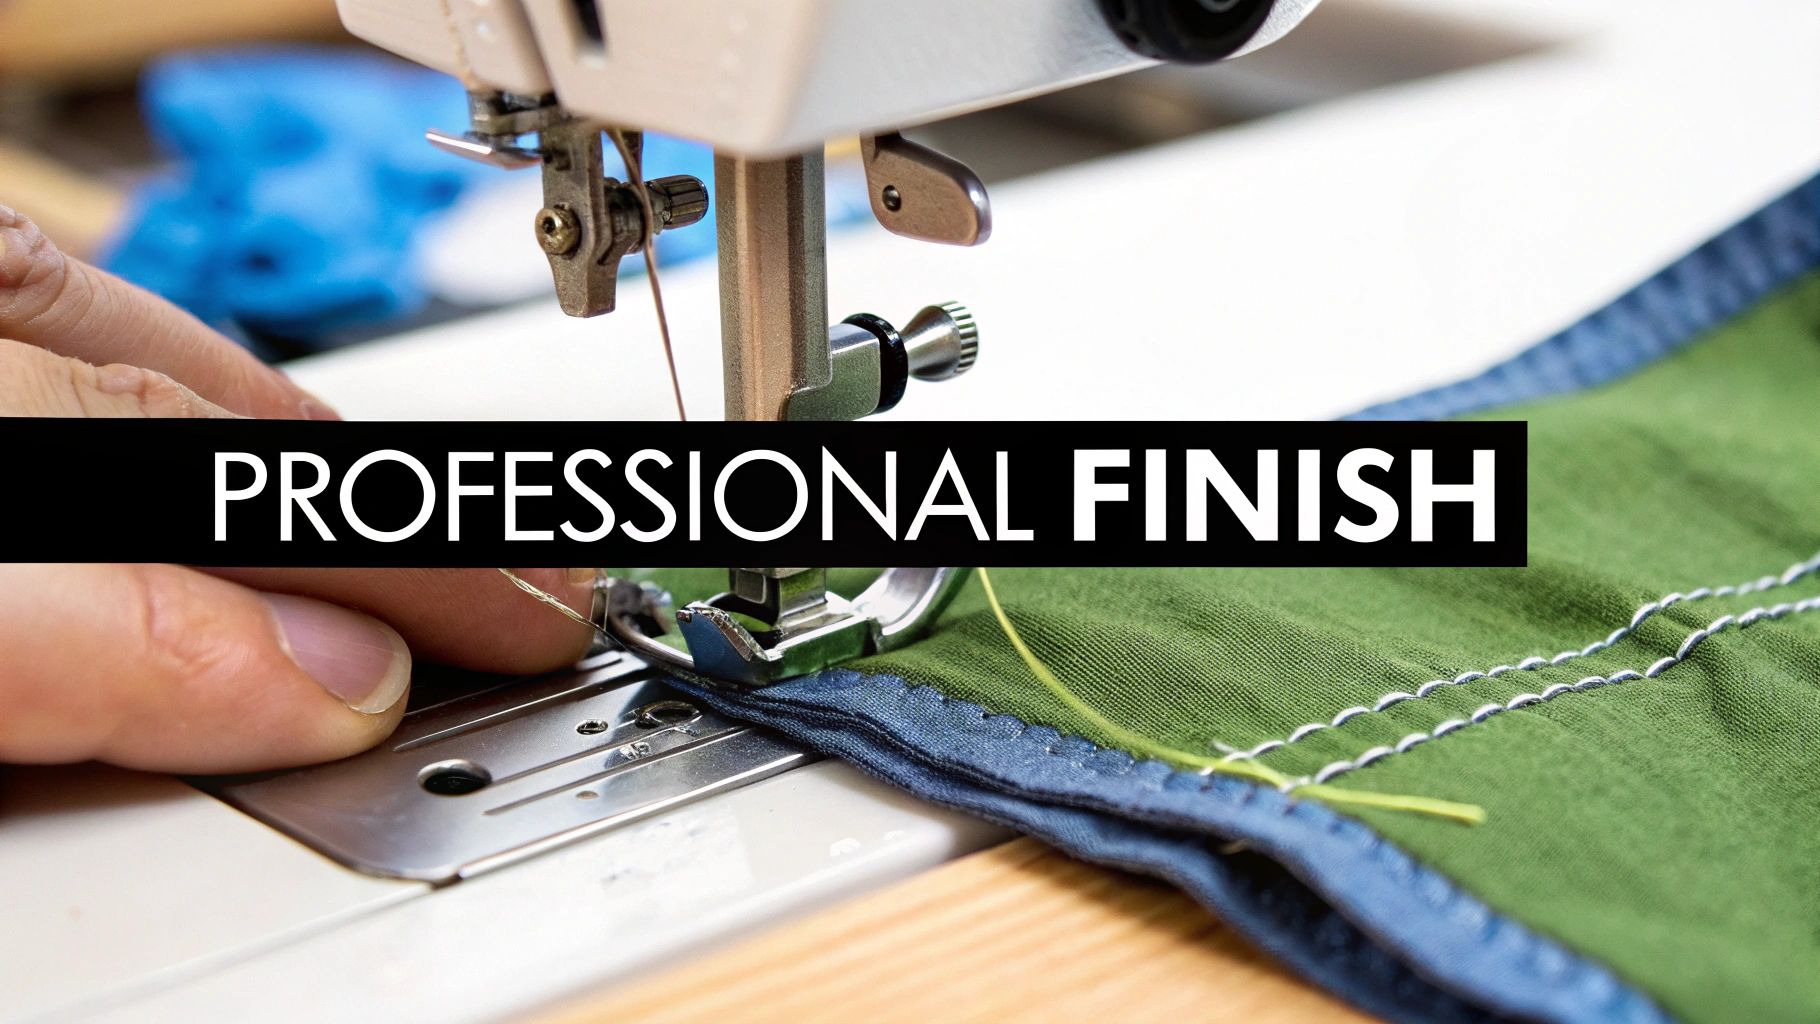
It's the little details that really elevate a handmade garment from simply "done" to truly professional. These last few steps are my secret weapons for making welt pockets look impeccable, ensuring they're as sturdy and clean on the inside as they are beautiful on the outside.
One of the most valuable techniques in my arsenal is understitching. It’s a simple row of stitches sewn close to the seam, attaching the pocket bag to its seam allowance. This clever trick keeps the pocket lining from peeking out and ensures it stays neatly tucked away inside, exactly where it belongs.
Nothing screams "homemade" like a bulky, lumpy seam. That's why grading the seam allowances is a non-negotiable step for a flawless welt pocket. It’s a simple concept: you just trim the layers of the seam allowance to different widths. By staggering the edges, you eliminate that tell-tale ridge that can telegraph through to the right side of the fabric, allowing the pocket area to lie perfectly flat and crisp.
Here’s how I typically approach it:
This subtle contouring makes a world of difference when you give it that final press.
Your sewing machine settings can also make or break the final look. Whenever I’m topstitching around the pocket opening, I like to bump up my stitch length just a bit, usually to 3.0 or 3.5 mm. A longer stitch looks cleaner, straighter, and more deliberate, giving it that polished, ready-to-wear finish.
And don't forget about durability. If you're sewing a jacket that's going to get a lot of wear or a cosplay costume that needs to survive a convention, reinforcing the pocket corners is an absolute must. A small bar tack—just a tight little set of zigzag stitches—at each end of the opening adds incredible strength. It's the best way to prevent the corners from ripping out when hands are constantly going in and out of the pocket.
These small but critical steps are what separate good sewing from great sewing. Taking the time to master techniques like understitching, grading, and corner reinforcement is how you create welt pockets that are not only beautiful but truly built to last.
Even with the best instructions, you're bound to run into a few head-scratchers when you first start sewing welt pockets. It's a rite of passage! Here are my answers to the questions I hear most often from fellow sewers, hoping to help you smooth out those tricky spots.
When you're just starting out, grab a stable, medium-weight woven fabric. Something like cotton twill, canvas, or even a sturdy linen blend is perfect. These fabrics don't wiggle around much and they hold a press beautifully, which is exactly what you need.
This lets you focus on getting your lines straight and your cuts precise without wrestling with the material itself. I'd definitely steer clear of anything slippery, stretchy, or super lightweight until you've got a few successful welts under your belt.
Ah, the dreaded corner pucker! Nine times out of ten, this little problem comes down to one thing: not clipping the corners quite far enough. Those little triangular tabs you create when you slash the pocket opening need to be clipped right up to the stitch line. Be brave, but don't snip the threads!
My best tip here is to sneak up on it. Clip a little short of the corner stitching, turn the pocket through, and take a look. If you see a pucker, just turn it back to the wrong side and clip a fraction more. Repeat until it lays perfectly flat.
You absolutely can, though it requires a bit of courage and careful planning. The biggest hurdle is getting access to the inside of the garment to attach the pocket bag, so this works best on unlined pieces like jackets, vests, or trousers.
Before you even think about cutting, make sure to fuse a patch of interfacing to the wrong side of the garment fabric where the pocket will go. This adds crucial stability and prevents the fabric from stretching or fraying as you work.
Ready to tackle your next big project with the best materials? From durable twill for practice to luxurious fabrics for your final masterpiece, Famcut.com has everything you need. Explore our curated cosplay and sewing collection at https://famcut.com and get inspired today.
At High Country Quilts we care deeply about community. With our experiences in retail, we know that a store is not only a place to shop but also a place for the community to gather and share. During this busy...

Hi! We’re Adam and Renee Wheaton, the new owners of High Country Quilts! For more than 40 years, we’ve owned and operated vacuum and sewing businesses. Following in Renee’s father’s footsteps after he retired from All Discount Vacuum and Sewing in Colorado...


Leave a comment