

We Love Our Quilting Community
At High Country Quilts we care deeply about community. With our experiences in retail, we know that a store is not only a place to shop but also a place for the community to gather and share. During this busy...


Before you even think about putting fabric under the needle, let’s talk setup. The secret to a perfectly straight line isn't some mystical sewing talent—it starts right at your machine. Getting the foundation right by using the right needle, thread, and presser foot for your fabric is non-negotiable.
This simple checklist ensures your machine is working with you, not against you, from the get-go.

It’s tempting to just jump right in, but fighting with your machine over crooked seams is a surefire way to kill your creative buzz. Taking a few minutes to configure everything properly will save you hours of frustration and seam-ripping later. Think of it as creating the perfect environment for straight-line success.
Every single part, from the tiny needle to the presser foot, has a job to do. When they're all matched correctly to your fabric, the machine practically does the hard work for you. All you have to do is guide.
Before we dive into the machine settings, having the right tools on hand makes a world of difference. Here's a quick rundown of the gear that will make your life easier.
This chart is your quick-reference guide to the must-have tools that help guarantee straight seams.
| Tool | Primary Purpose | Pro Tip for Straight Lines |
|---|---|---|
| Universal Needle | General-purpose sewing | Start with a fresh needle for every new project to avoid skipped stitches. |
| Walking Foot | Evenly feeding multiple layers | A non-negotiable for quilting and slippery fabrics to prevent layers from shifting. |
| Quality Thread | Creating strong, smooth seams | Avoid old, brittle thread. Stick with a good all-purpose polyester for reliability. |
| Seam Guide | Maintaining a consistent seam allowance | Use a magnetic or screw-on guide for a physical barrier your fabric can follow. |
| Fabric Marker | Drawing guidelines on fabric | A disappearing ink or chalk pen is perfect for marking your first few stitching lines. |
With these tools ready, you can tackle almost any straight-stitching challenge.
First up, let’s pick the right needle for your fabric. A universal needle is fine for basic quilting cotton, but trying to use one on delicate chiffon or heavy denim is asking for trouble. A needle that's too big will leave gaping holes, while one that's too small will bend or snap.
Your thread is just as crucial. A good quality, all-purpose polyester or cotton thread is the workhorse of my sewing room. Steer clear of old or bargain-bin thread—it's often weak, shreds easily, and creates a ton of lint buildup in your machine, which messes with tension and stitch quality.
Your machine came with a standard presser foot, and honestly, it’s a champ for most straight-stitching tasks. But sometimes, you need to call in the specialists for tricky fabrics.
The quest for perfect straight lines in sewing has a long history, tracing back to 1800 when German inventor Balthasar Krems engineered a needle with its eye near the point, paving the way for mechanized straight stitching. Pro tips born from this era endure, like adjusting stitch length to 2.5mm and using guides for laser-straight paths. Learn more about the sewing revolution and its impact on modern techniques.
With your tools in place, it’s time to tweak the machine itself. The two most important settings for a straight stitch are the stitch length and tension.
For most projects, a stitch length of 2.5mm is the sweet spot. It's long enough to unpick easily if you make a mistake but short enough to create a strong, secure seam.
Thread tension is all about the balance between the top thread and the bobbin thread. If it's off, you'll see ugly loops on either the top or bottom of your fabric. While most modern machines do a great job of managing tension automatically, you should always know how to make small adjustments.
The best way to know for sure? Always, always test your settings on a scrap of your project fabric first. This simple check confirms your stitches are balanced and flat before you ever touch your actual garment or quilt. It's your final green light for sewing a perfectly straight line.
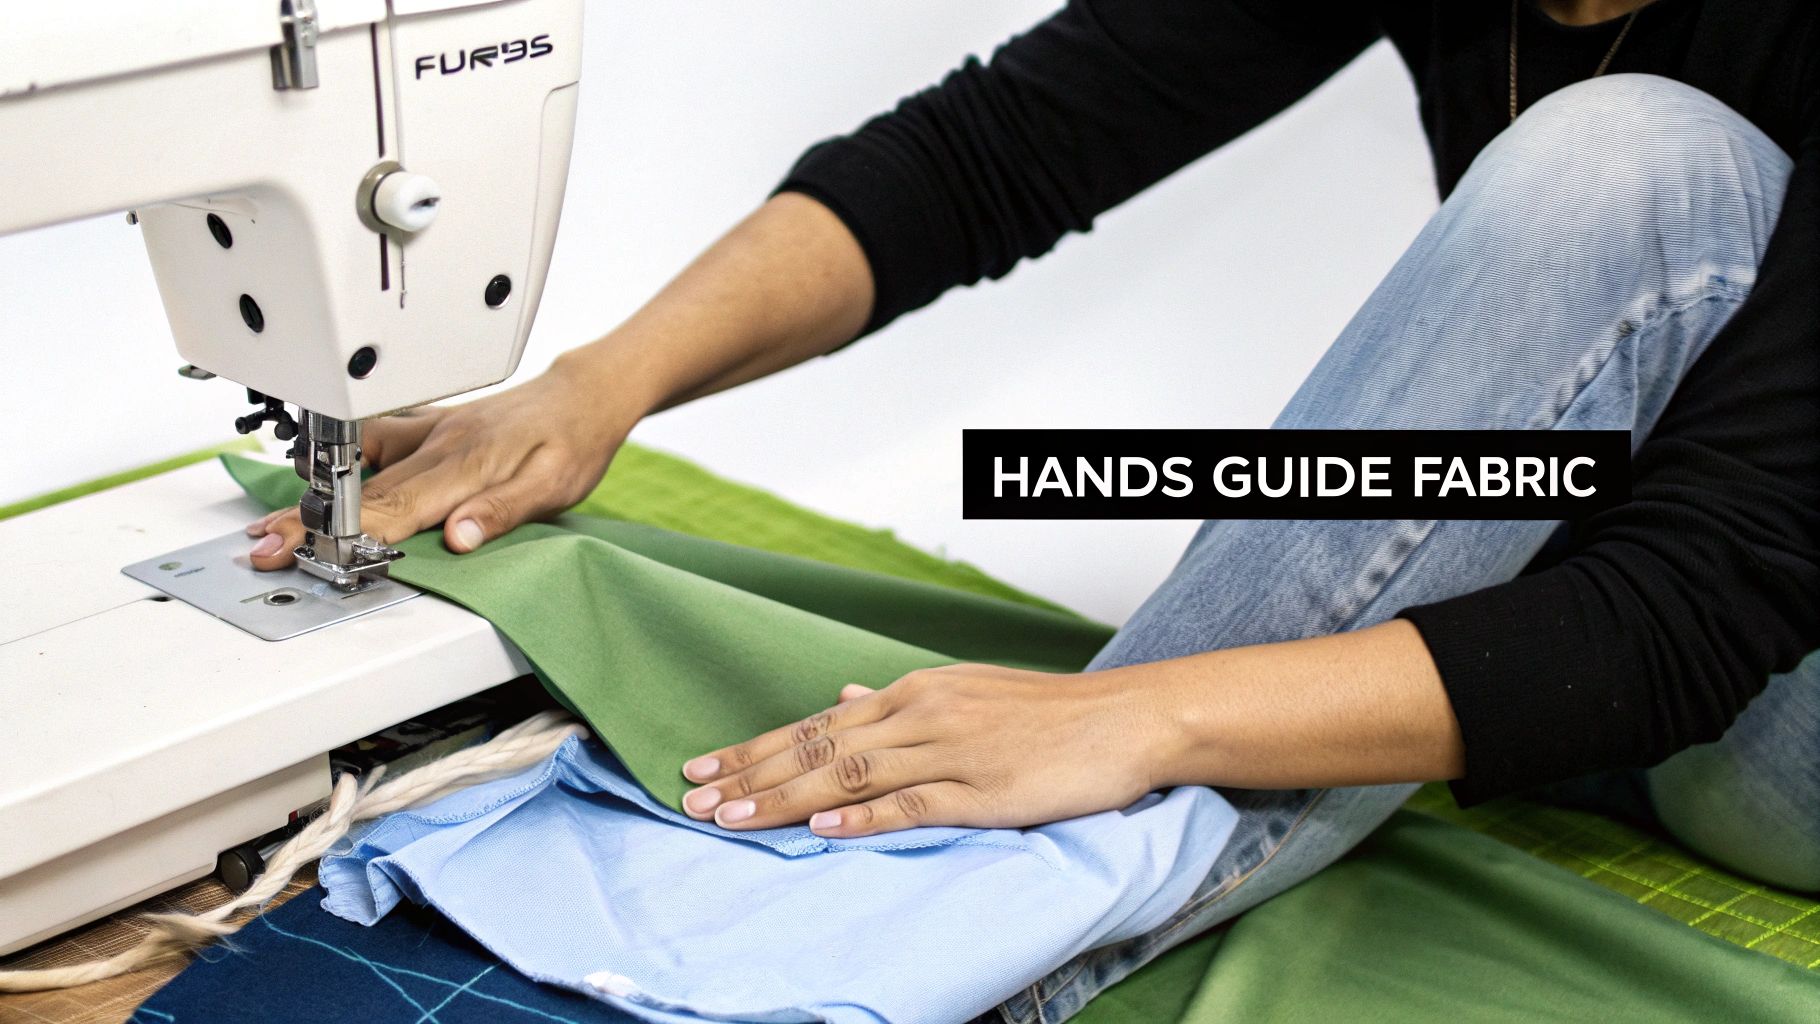
It’s easy to blame the machine for wobbly stitches, but more often than not, the real culprit is how you’re sitting and guiding the fabric. Getting that perfect, laser-straight seam starts before you even press the foot pedal. It starts with your body.
Good posture isn’t just about avoiding a sore back; it’s about creating stability. You and your machine need to work as a team. Sit squarely in front of your machine, with the needle directly in front of you. Plant both of your feet flat on the floor. This simple setup gives you a solid, balanced base and stops you from unconsciously leaning or twisting, which is a surefire way to send your stitches veering off-course.
One of the biggest hurdles for new sewers is the urge to force the fabric through the machine. You have to fight that instinct! That’s the job of the feed dogs—those little metal teeth under the presser foot that grip and move the fabric for you.
Your role isn't to push or pull. It’s simply to guide. Think of yourself as the pilot, gently steering. The machine is the engine. Over-handling the material is a guaranteed path to a crooked seam.
Proper hand placement is everything, especially when you’re tackling long seams. Each hand has a specific job, and getting them to work together is the key to effortless control.
This two-handed approach creates a balanced system where the fabric feeds smoothly and evenly. It's the secret to consistent, straight stitches every single time.
Pro Tip: Stop watching the needle. I mean it. Your eyes should be focused 100% on the edge of your fabric and where it lines up with the seam guide on the throat plate. Watching the needle go up and down makes you overcorrect and creates those wobbly lines we're trying to avoid.
Picture a triangle on your machine bed. The needle is the top point, and the base of the triangle is formed by your two hands, resting on either side of the presser foot.
Maintaining this "sewing triangle" is a game-changer. It keeps the fabric flat and prevents it from bunching up or twisting as it moves toward the needle. It's especially powerful for big projects like quilts or long garment seams where the fabric has a mind of its own.
Once you build this muscle memory, straight stitching will feel completely natural. It stops being a struggle and becomes part of the craft.
Good posture and a steady hand will get you far, but let's be honest—even seasoned pros don't just "eyeball" it. Relying on guesswork is a surefire way to end up with wobbly, uneven seams. The real secret to consistently straight stitches is using a guide.
Think of it as your personal GPS for sewing. Whether you draw a line directly on the fabric or set up a physical barrier on your machine, these guides give your eyes a constant reference point. This is how you stop hoping for a straight line and start guaranteeing one every single time.
One of the most straightforward methods is to draw your sewing line right onto the material before you even start. This is a game-changer for beginners who need a clear, visible path to follow. It's also fantastic for precision work like topstitching, where every stitch is on display.
Of course, you can't just grab any old pen. The right tool depends on your fabric, its color, and whether the mark needs to be temporary or can be washed out later.
A common mistake I see is people pressing way too hard with their marking tool. You only need a gentle, consistent line. A heavy chalk line will just flake off and make a mess, while a deep ink mark can be a pain to remove later. Remember, it's a guide, not a permanent part of the garment.
Drawing lines is great, but setting up a physical guide on your sewing machine is often faster and just as accurate, especially for long seams with a standard seam allowance. This approach also helps you develop a crucial skill: watching the edge of the fabric, not the needle.
Your machine already has a built-in guide. Take a look at the throat plate—that's the metal plate right under your needle. You'll see little etched lines with numbers like 1/2, 5/8, and 3/4. These marks show the distance from the needle in inches. All you have to do is line up the edge of your fabric with the correct mark and keep it there as you sew.
If you want a more tactile guide that you can actually feel, you can easily make your own.
A raised, physical barrier gives the edge of your fabric something solid to glide against, making it incredibly easy to keep a consistent seam allowance. Honestly, this is the method I use most often for everything from quilt blocks to dress seams.
Here are two of my favorite options:
Knowing the theory is one thing, but sewing perfectly straight lines really comes down to muscle memory. It’s a physical skill, just like shooting a basketball or learning an instrument. You have to train your hands and eyes to work in sync.
These drills are your workout. They’re designed to build that coordination and confidence, taking you from wobbly stitches to beautifully straight seams. We'll start simple, using just paper, and then move on to fabric.
Before you even think about fabric, let's get you comfortable with the machine itself. This is my favorite drill for absolute beginners because it removes all the pressure. You can't mess up a stitch if there's no thread!
First, print out some practice sheets. You can find these online or just draw your own with straight lines, gentle curves, and sharp 90-degree corners.
Next, set up your machine but take out the top thread and the bobbin. You’re essentially going to "sew" on the paper, perforating it with the needle. Place a sheet under the presser foot, lower it, and gently press the pedal. Your only job is to guide the paper so the needle follows the lines.
Play with the speed. See how slowly you can go while staying on the line, then speed up. This teaches you how the foot pedal responds and how your hand movements need to adjust.
This simple exercise is all about getting to know your machine's personality. The perforated lines give you instant, honest feedback on your accuracy without wasting a single inch of thread.
This simple three-step process—mark, align, sew—is the foundation for everything that follows.
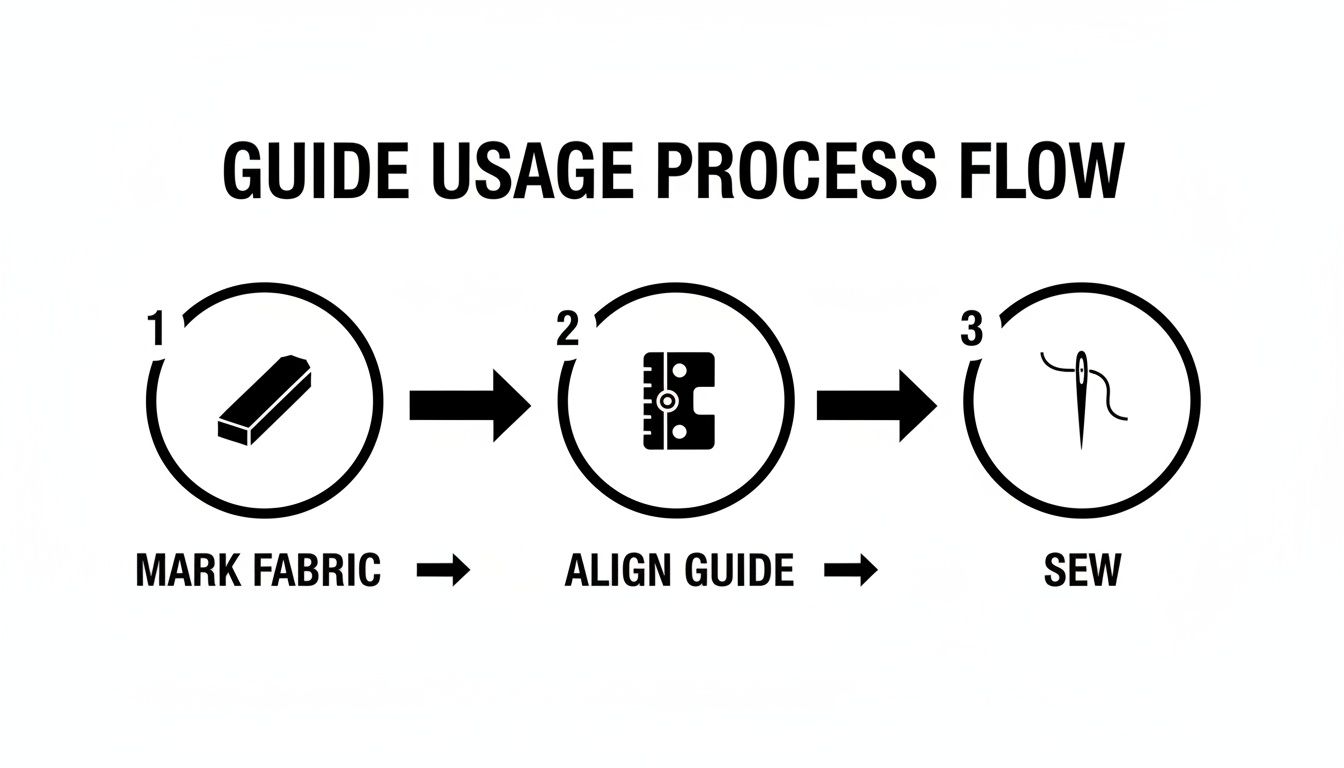
The image above breaks it down visually: mark your fabric, align it with a guide, and then let the machine do the work.
Once you feel good about your paper-stitching, it's time to introduce thread and fabric. Grab some scraps—medium-weight cotton is ideal because it behaves well and doesn’t stretch too much.
Draw the same lines you practiced on paper directly onto your fabric with a disappearing ink pen or chalk. Now, thread your machine and get stitching.
Remember the golden rule: watch your guide, not the needle! Focus on keeping the edge of the fabric aligned with your chosen seam guide on the needle plate. Try to maintain a steady, even speed. Most crooked lines happen when you suddenly speed up or slow down.
Sewing a sharp, clean corner can feel tricky, but it’s actually incredibly simple once you learn the pivot technique. This little move is essential for everything from pockets to pillowcases.
Practice this on a scrap with a few drawn squares until the motion feels automatic. It's a game-changer for getting those crisp, professional-looking corners every time.
Developing these skills is so satisfying. Once you get the hang of it, you might find yourself inspired to explore other creative arts, too. It all starts with consistent practice. That’s what bridges the gap between knowing what to do and actually doing it well.
So you've stitched miles of straight lines on good old-fashioned cotton. You’re feeling confident. Then, one day, you meet a fabric that just refuses to play by the rules. Silky fabrics slip and slide, faux leather gets sticky, and knits want to stretch all over the place.
This is where the real skill comes in. It’s time to move beyond the basics and learn how to adapt your technique to the personality of whatever you’re sewing. Don’t worry, it just takes a little finesse and a few extra tools. Mastering these fabrics opens up a whole new world, from slinky formalwear and detailed cosplay to perfectly pieced quilts.
If you're a quilter, you know that the holy grail of straight sewing is the scant quarter-inch seam. This isn't your everyday 1/4" seam; it’s a hair less than that. Why? That tiny difference accounts for the thickness of your thread and the space the fabric takes up when it's folded and pressed. Nailing this is the secret to getting all those tiny points on your quilt blocks to match up perfectly.
The easiest way to get there is with a dedicated quarter-inch foot. This little gadget has a metal guide on the side that you just snug your fabric edge up against. It makes sewing that perfect scant quarter-inch almost foolproof.
A Quilter’s Secret Weapon: Chain piecing will change your life. Instead of stopping and cutting threads after every little piece, you just feed them through one after another, connected by a few stitches. It helps you build a steady rhythm and, even better, it stops the machine from "eating" the corners of those small fabric pieces at the start of a seam.
You can also create your own guide by placing a strip of painter's tape on your machine's needle plate. This gives you a physical edge to follow, ensuring every piece feeds through with absolute consistency—a must when you're joining hundreds of small pieces.
Anyone who sews garments or cosplay knows the struggle with fabrics that seem to have a mind of their own. Silks and satins want to skate right off your machine, while vinyl and faux leather want to grip the presser foot and cause a mess of skipped stitches.
Here’s how you show them who’s boss:
Before sewing machines, a skilled seamstress might manage 40 stitches per minute by hand. When Isaac Singer's 1853 machine came along, it could churn out 900 stitches per minute—a mind-blowing 2,150% increase in speed. This leap forward is what made complex garments with long, precise seams accessible to everyone. You can learn more about this sewing revolution and its history.
Topstitching is where your straight-line skills are truly on display for everyone to see. To make it pop, lengthen your stitch to around 3.0mm or 3.5mm. This gives it a much more professional, defined look. It's also a good idea to use a topstitching needle; it has a larger eye that prevents thicker thread from fraying as you sew.
We've all been there: you’re hemming jeans and you hit that super thick spot where the seams intersect. The presser foot tilts back, the feed dogs can't grab, and you end up with a tiny, jammed-up mess of stitches.
The solution is a little tool called a hump jumper (or a simple folded-up scrap of fabric). As you approach the "hump," stop with the needle down, lift your presser foot, and slide the hump jumper or fabric scrap under the back of the foot to level it out. This keeps the foot flat, allowing it to feed over the bulky seam smoothly and maintain that perfect, straight stitch.
Even with hours of practice, some of the same frustrating little problems pop up time and again. If you're still wrestling with a wobbly seam or fabric that seems to have a mind of its own, you are definitely not alone. Let’s tackle some of the most common questions sewers have when trying to nail that perfectly straight line.
This is probably the most common headache for new sewers, and the answer is almost always the same: you're trying too hard! It's totally natural to want to manhandle the fabric into submission, but you might be pushing or pulling it without realizing it. Remember, the machine's feed dogs are designed to do all the heavy lifting. Your only job is to steer.
Another sneaky culprit is your posture. If you’re sitting even a little bit off-center from the needle, you’ll naturally guide the fabric at a slight angle. It's a surprisingly easy mistake to make.
Lastly, pay attention to your hands. Are you pressing down harder with one than the other? That imbalance will cause the fabric to pivot right under the needle. The goal is to apply light, even pressure with both hands, just enough to keep the material from bunching up as it feeds through.
For general-purpose sewing on medium-weight fabrics like quilting cotton or linen, a 2.5mm stitch length is the sweet spot. It creates a strong seam that holds up well, but it’s still easy enough to take out with a seam ripper if—or let's be honest, when—you make a mistake.
Of course, you’ll want to adjust that based on what you're sewing:
A Little Analogy: Think of stitch length like font size. A tiny stitch on heavy denim would look silly and make the seam stiff and puckered. A huge, gappy stitch on sheer silk would look weak and sloppy. Matching the stitch length to the fabric's weight is a simple detail that makes a huge difference.
It’s always that first inch and the last inch that are the trickiest, right? There’s just not enough fabric to hold onto. To get a straight start, don't try to begin sewing right on the fabric's edge. Instead, line it up so your needle is about a quarter-inch in from the edge.
Next, gently hold both the top and bobbin thread tails behind the presser foot as you take your first few stitches. This one little trick adds just enough tension to stop the machine from chewing up the corner of your fabric and creating that dreaded "thread nest" underneath.
To end straight, keep your eyes on a point just past the end of the fabric and sew right towards it. And the golden rule applies here, too: stop watching the needle! It's mesmerizing, I know, but you'll be much more accurate if you keep your eyes locked on your seam guide the entire time. Pro tip: using a small scrap of "leader" fabric before your actual project piece is a great way to guarantee a perfect start every time.
Okay, so you're guiding like a pro, but your stitches still look a little shaky. When this happens, the problem is usually mechanical, not user error. It’s a super common frustration, but luckily, the fixes are usually pretty simple.
First things first: change your needle. I can't say this enough. A dull, bent, or wrong-sized needle is the number one cause of skipped stitches, wobbly lines, and all-around poor stitch quality. A fresh needle costs less than a dollar and solves an estimated 70% of these kinds of issues. It's the cheapest, fastest fix in sewing.
Second, check your speed. Stomping on the foot pedal and then letting up can cause inconsistent stitches. Try to maintain a nice, steady pace. If your machine has a speed control slider, use it! Set it to a moderate speed so you can focus on guiding, not driving.
Finally, give your machine a quick clean. Lint and dust can build up around the feed dogs and in the bobbin area, which keeps the fabric from feeding through smoothly. An un-fluffed machine is a happy machine, and a happy machine sews much straighter lines.
At Famcut.com, we believe that mastering these fundamentals is what truly unlocks your creativity. Whether you're a quilter obsessed with perfect points or a cosplayer building an epic design, we have the tools, classes, and community to help you get there. Check out our high-quality materials or join one of our local Atlanta-area workshops by visiting us at https://famcut.com.
At High Country Quilts we care deeply about community. With our experiences in retail, we know that a store is not only a place to shop but also a place for the community to gather and share. During this busy...

Hi! We’re Adam and Renee Wheaton, the new owners of High Country Quilts! For more than 40 years, we’ve owned and operated vacuum and sewing businesses. Following in Renee’s father’s footsteps after he retired from All Discount Vacuum and Sewing in Colorado...


Leave a comment