

We Love Our Quilting Community
At High Country Quilts we care deeply about community. With our experiences in retail, we know that a store is not only a place to shop but also a place for the community to gather and share. During this busy...


If you want to sew knits successfully, it really just comes down to three things: use a ballpoint or stretch needle, choose polyester thread, and select a stretch stitch. Get those three right, and you'll sidestep the skipped stitches, popped seams, and general frustration that can make sewing with stretchy fabrics feel like a battle.
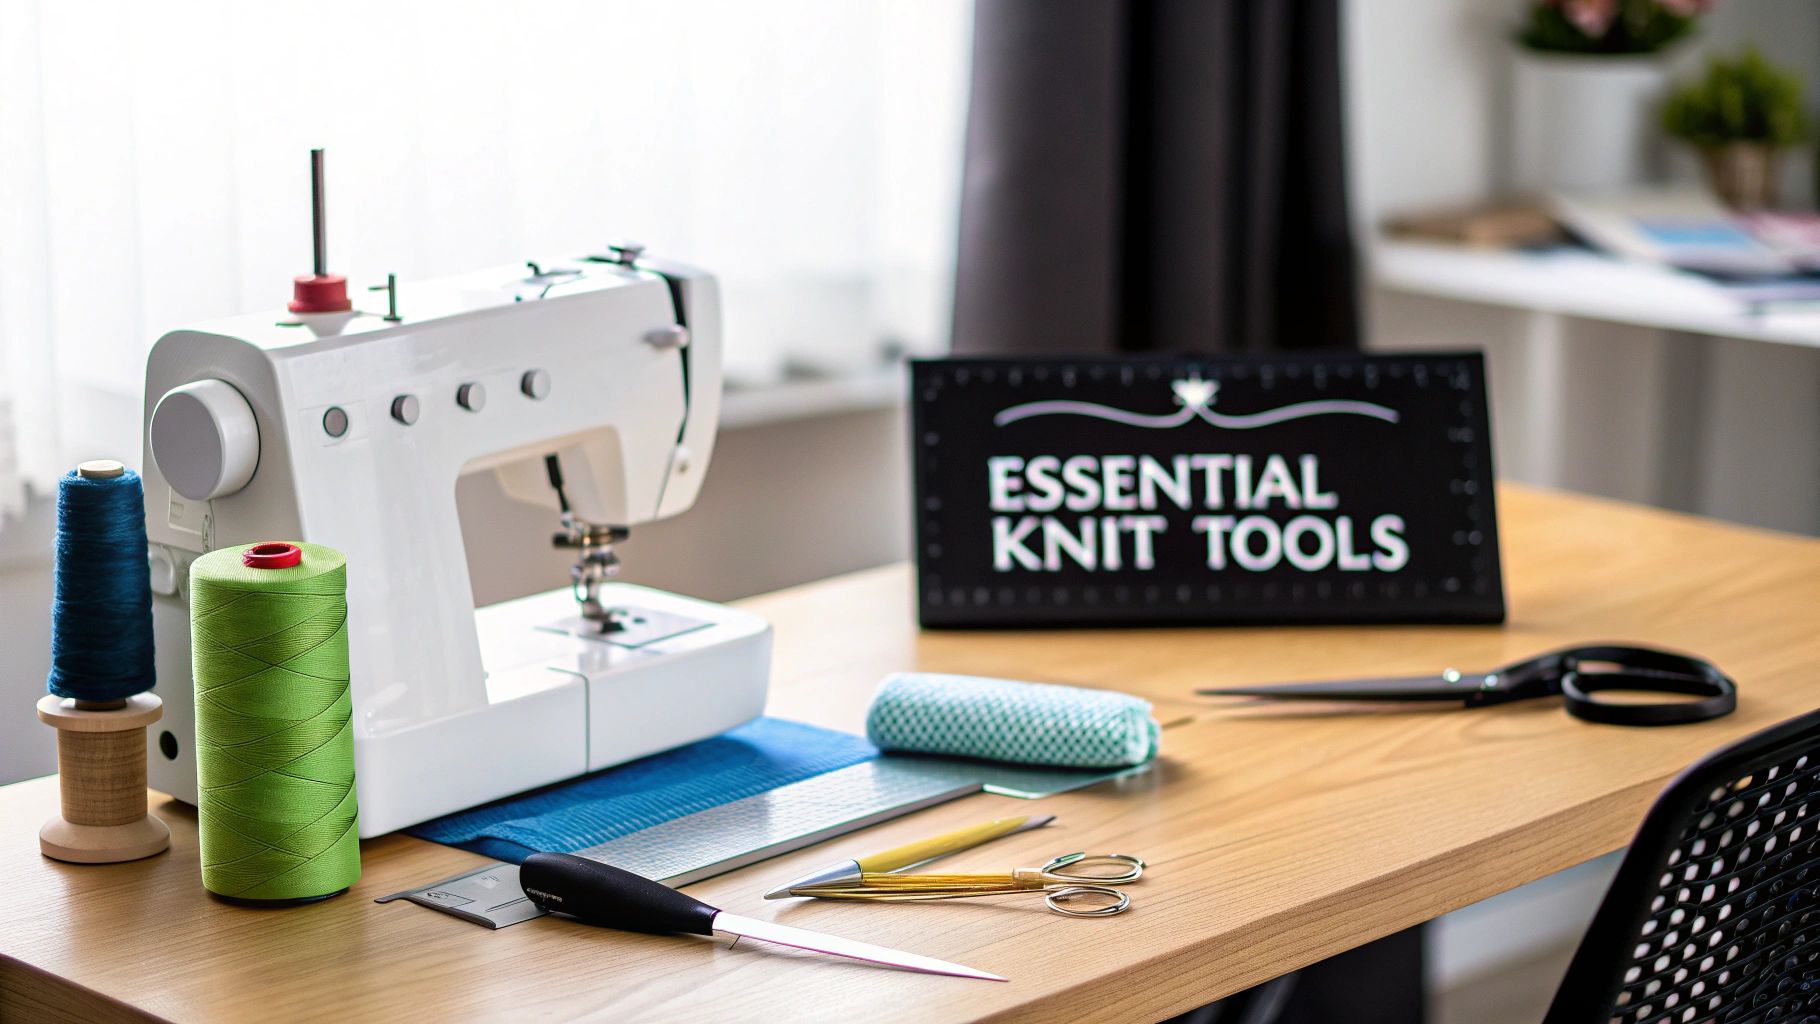
Before you even think about laying out your fabric, let’s talk tools. Setting yourself up with the right gear is the secret to a smooth, headache-free project. And no, you don't need a top-of-the-line machine to get professional results. Your trusty home sewing machine is perfectly capable, as long as you pair it with accessories designed to work with the fabric's stretch, not fight against it.
It all starts with a tiny detail that makes a massive difference: the needle.
Believe it or not, using the wrong needle is the number one reason for skipped stitches and damaged fabric when sewing knits. A standard sharp needle will literally pierce and tear the delicate loops that make up a knit fabric. A ballpoint or stretch needle, on the other hand, has a slightly rounded tip designed to glide between the fibers, preventing snags, runs, and holes.
When it comes to thread, your go-to should always be 100% polyester. Cotton thread has zero give, which is a recipe for disaster with stretchy fabric. Polyester has a small amount of natural elasticity, which is exactly what you need. That little bit of flex allows your seams to move with the garment, making them far less likely to pop when you bend or stretch.
Here’s a quick reference guide to help you pick the right combination for your project.
Choosing the right needle and thread can feel a bit overwhelming at first, but this table breaks it down. Think of it as your cheat sheet for matching the right tools to the specific knit you're working with.
| Fabric Type | Recommended Needle Type | Needle Size | Recommended Thread |
|---|---|---|---|
| Cotton Jersey, Interlock | Ballpoint | 75/11 or 80/12 | All-Purpose Polyester |
| Spandex, Lycra, Activewear | Stretch | 75/11 or 90/14 | All-Purpose Polyester |
| Sweater Knits, French Terry | Ballpoint or Stretch | 80/12 or 90/14 | All-Purpose Polyester |
| Rib Knit | Ballpoint | 70/10 or 80/12 | All-Purpose Polyester |
Matching these correctly is your first, and most important, step toward a successful project.
Beyond the basics, a couple of extra accessories can make your life so much easier. If you find yourself sewing knits often, investing in a walking foot is an absolute game-changer. This attachment has its own set of feed dogs that grip the top layer of fabric and move it in perfect time with the bottom layer.
This simple tool practically eliminates those wavy, stretched-out seams that happen when the layers shift. In fact, a walking foot can reduce that frustrating fabric bunching and stretching by up to 70%. Another invaluable tool is a twin needle, which is the secret to creating professional-looking, stretchy hems right on your regular machine.
It's no wonder sewing with knits is so popular—these fabrics are everywhere, making up about 45% of all apparel fabrics. Hobbies like knitting and crochet are also booming, which means home sewers have access to more beautiful, high-quality knit fabrics than ever before. Just by using the right tools, like ballpoint needles (sizes 10-14), you can prevent up to 90% of skipped stitches. You can dive deeper into the growth of this creative market on Technavio.com.
Key Takeaway: You don't need a serger to sew knits well. A standard sewing machine equipped with a ballpoint needle, polyester thread, and a walking foot can produce beautiful, durable knit garments.
Finally, let's talk cutting. While it's not a machine part, how you cut your fabric makes a huge difference. A rotary cutter and self-healing mat are your best friends here. They let you cut the fabric while it's lying perfectly flat, which is a lifesaver for slinky or lightweight knits that love to slide around. Use them with some pattern weights instead of pins, and you’ll get a far more accurate cut every single time.
A great-looking knit garment doesn't start at the sewing machine—it starts at the cutting table. Honestly, taking the time to prep your fabric and pattern properly is the secret sauce. It's what separates a project you love from one that ends up being a wobbly, frustrating mess.
The absolute first thing you have to do is pre-wash and dry your fabric. I can't stress this enough. Wash and dry it exactly the same way you plan on laundering the finished piece. Knits, especially natural ones like cotton jersey, can shrink like crazy. If you skip this, that t-shirt you sized perfectly might just become a belly shirt after its first wash.
Washing does more than just pre-shrink the fabric; it also gets rid of any sizing or chemicals left over from the factory. For delicate sweater knits or slinky rayons, I'd stick to a gentle cycle and lay them flat to dry. The sturdier stuff, like cotton interlock, can usually handle a normal wash and a low-heat tumble dry.
My Go-To Trick: If I'm working with a new type of knit, I always do a swatch test. Just cut a little 4x4 inch square, measure it, and toss it in with a regular load of laundry. Measure it again when it comes out. This quick test tells you exactly how much it's going to shrink, so there are no nasty surprises later.
Once your fabric is washed, dried, and stable, you're ready to get down to the really precise part: cutting.
Let's be real: knit fabrics love to roll at the edges and slide all over the place. Your tools and technique here will make or break the accuracy of your pattern pieces.
I've learned the hard way that pins and knits aren't always friends. They can snag delicate weaves and create little bumps and puckers that mess up your cutting line. I much prefer using these instead:
Always, always lay your knit fabric out in a single, flat layer. I know it's tempting to fold it to cut two pieces at once, but the bottom layer almost always shifts, leaving you with lopsided pieces. Take the extra minute to lay it out flat—you'll thank yourself later.
Next up is figuring out your fabric's grainline and direction of stretch. This is a non-negotiable step if you want your garment to hang right and fit comfortably. For most clothes, you want the greatest amount of stretch to go around your body.
Here's a quick way to find it:
Getting this wrong can result in a top that twists weirdly on your body or feels tight and restrictive. Imagine cutting a t-shirt where the stretch runs up and down instead of side to side—it would have no "give" for pulling it on or moving around.
Before you make that first cut, think about one small adjustment that can make a huge difference: stabilizing the shoulder seams.
The shoulder seams carry all the weight of the garment, and on drapey knits, they can get stretched out and saggy over time. You can stop this from happening by simply sewing a piece of clear elastic or a thin strip of stay tape right into the shoulder seam. It adds structure without any bulk. This is an especially great trick for cosplay garments that really need to hold their shape through a long day at a convention. It's a tiny step that helps your handmade clothes look fantastic for years.
Alright, with your fabric prepped and ready to go, we've reached the fun part—where your project actually starts looking like a piece of clothing! Choosing the right stitch is everything when it comes to knits. It's the secret to creating strong seams that stretch and move with you, ensuring your handmade garments last just as long as anything you'd buy in a store.
The best part? You don't need a fancy, expensive machine. Your trusty home sewing machine has all the power you need. The most common and reliable tool in your arsenal is the humble zigzag stitch. A straight stitch has absolutely no give and will pop the second you pull on the fabric, but a zigzag is designed to stretch, making it your best friend for knits.
For most seams, a narrow zigzag is all you need. I usually start with a width of 0.5 mm to 1.5 mm and a length of 2.5 mm to 3.0 mm. This creates a seam that looks surprisingly close to a straight stitch but has all that crucial elasticity built right in. As always, run a quick test on a scrap of your fabric first—every knit behaves a little differently, so a quick check saves a lot of headaches later.
Of course, the zigzag isn't your only option. Most modern machines come with a few other specialty stretch stitches that are fantastic for knits. Check your machine's manual or stitch dial for these:
The flowchart below walks you through the fabric prep that should happen before you even get to this stage. It’s a great visual reminder of why those initial steps are so important.
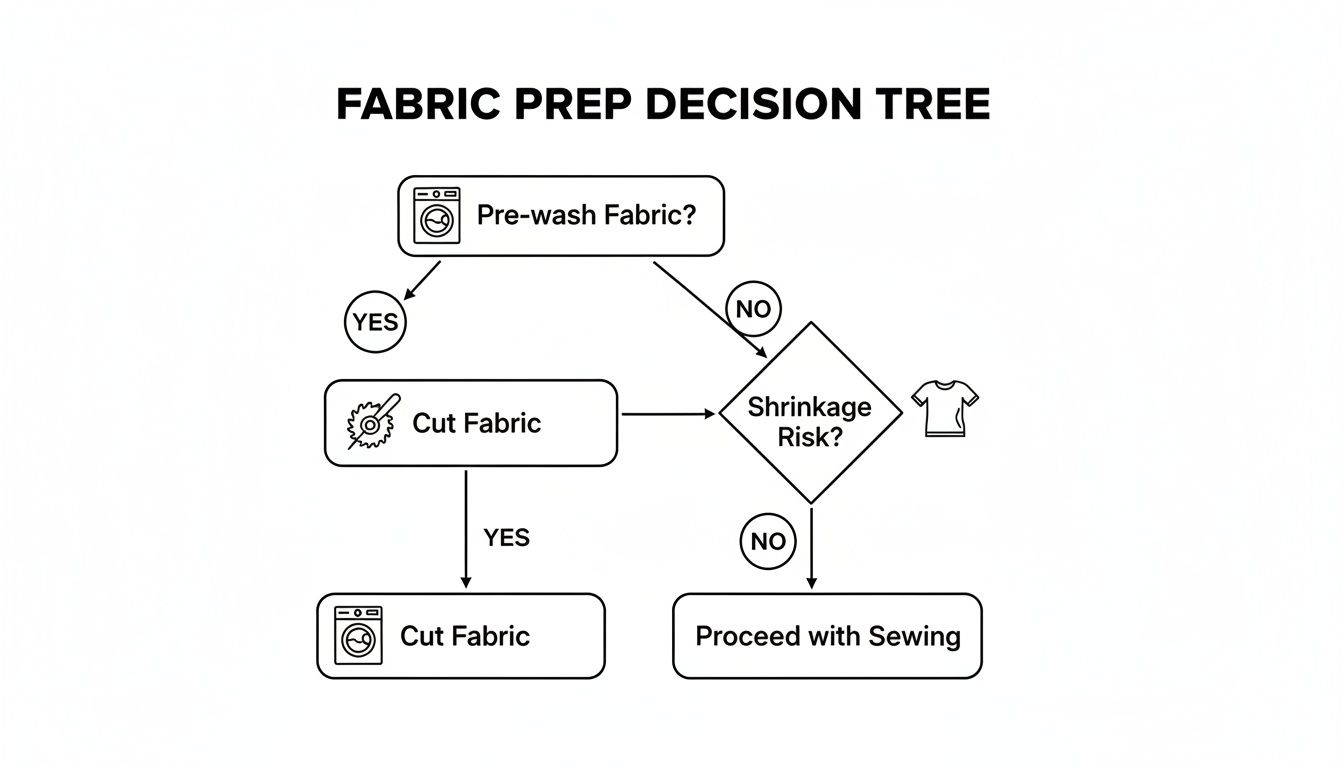
As you can see, pre-washing is non-negotiable. Skipping it is the fastest way to end up with a garment that's a size too small after its first wash.
To help you decide which stitch to use, I've put together this quick comparison table.
This table breaks down the most common stretch stitches you'll find on a home machine, what they look like, and where they work best.
| Stitch Type | Recommended Settings | Best For | Appearance |
|---|---|---|---|
| Narrow Zigzag | Width: 0.5-1.5 mm, Length: 2.5-3.0 mm | General seams, hems, attaching bands. A great all-rounder. | Looks like a straight stitch from a distance but has visible 'zig-zags' up close. |
| Lightning Stitch | Machine's default setting | Strong construction seams on medium to heavyweight knits. | A very narrow, angled zigzag that lies flat and is less bulky. |
| Triple Straight Stitch | Machine's default setting | High-stress areas like crotch seams, activewear, or children's clothes. | A very bold, thick-looking straight stitch. Incredibly durable. |
| Knit Stitch (Overlock) | Machine's default setting | Seam finishing and construction, especially on lighter knits. | Mimics the look of a serger stitch, finishing the edge as you sew. |
Remember, these are just starting points. The best way to find what works is to grab a scrap of your fabric and sew a few test lines with different stitches and settings.
If you're lucky enough to own a serger, the 4-thread overlock stitch is the industry standard for a reason. It sews, trims, and finishes the edge all in one clean pass, giving you that perfect, store-bought look.
But don't worry if you don't have one! You can get a perfectly beautiful and durable finish on a regular sewing machine. After sewing your seam with a stretch stitch, simply trim the seam allowance down a bit and go over the raw edge with a wider zigzag stitch. This simple trick encases the raw edge, stopping it from curling and fraying in the wash.
With knits making up nearly 45% of apparel fabrics and the knitting machine industry growing, knowing how to handle them is a crucial skill. For the best results, always opt for polyester thread—it has stretch that cotton thread lacks—and keep your stitch length between 2.5-3.5 mm.
A Practical Tip: Jersey knits are notorious for curling at the edges, which can be incredibly frustrating. A light mist of spray starch and a quick press with your iron will give the fabric temporary stability, making it so much easier to handle and sew.
Sewing curves, like necklines and armholes, is all about a gentle touch. It's so easy to accidentally stretch the fabric out of shape here. This is one place where I almost always use sewing clips instead of pins. Pins can create tiny distortions in the fabric, while clips hold everything securely without any puckering.
As you sew a curve, your job is to simply guide the fabric—let the machine's feed dogs do the heavy lifting. Don't pull or push it through! For a 20% better drape and a beautifully flat curve, take a moment to clip into your seam allowance every half-inch or so. This releases the tension and allows the seam to lay perfectly flat when you turn it right-side out. It’s a small detail that makes a world of difference.
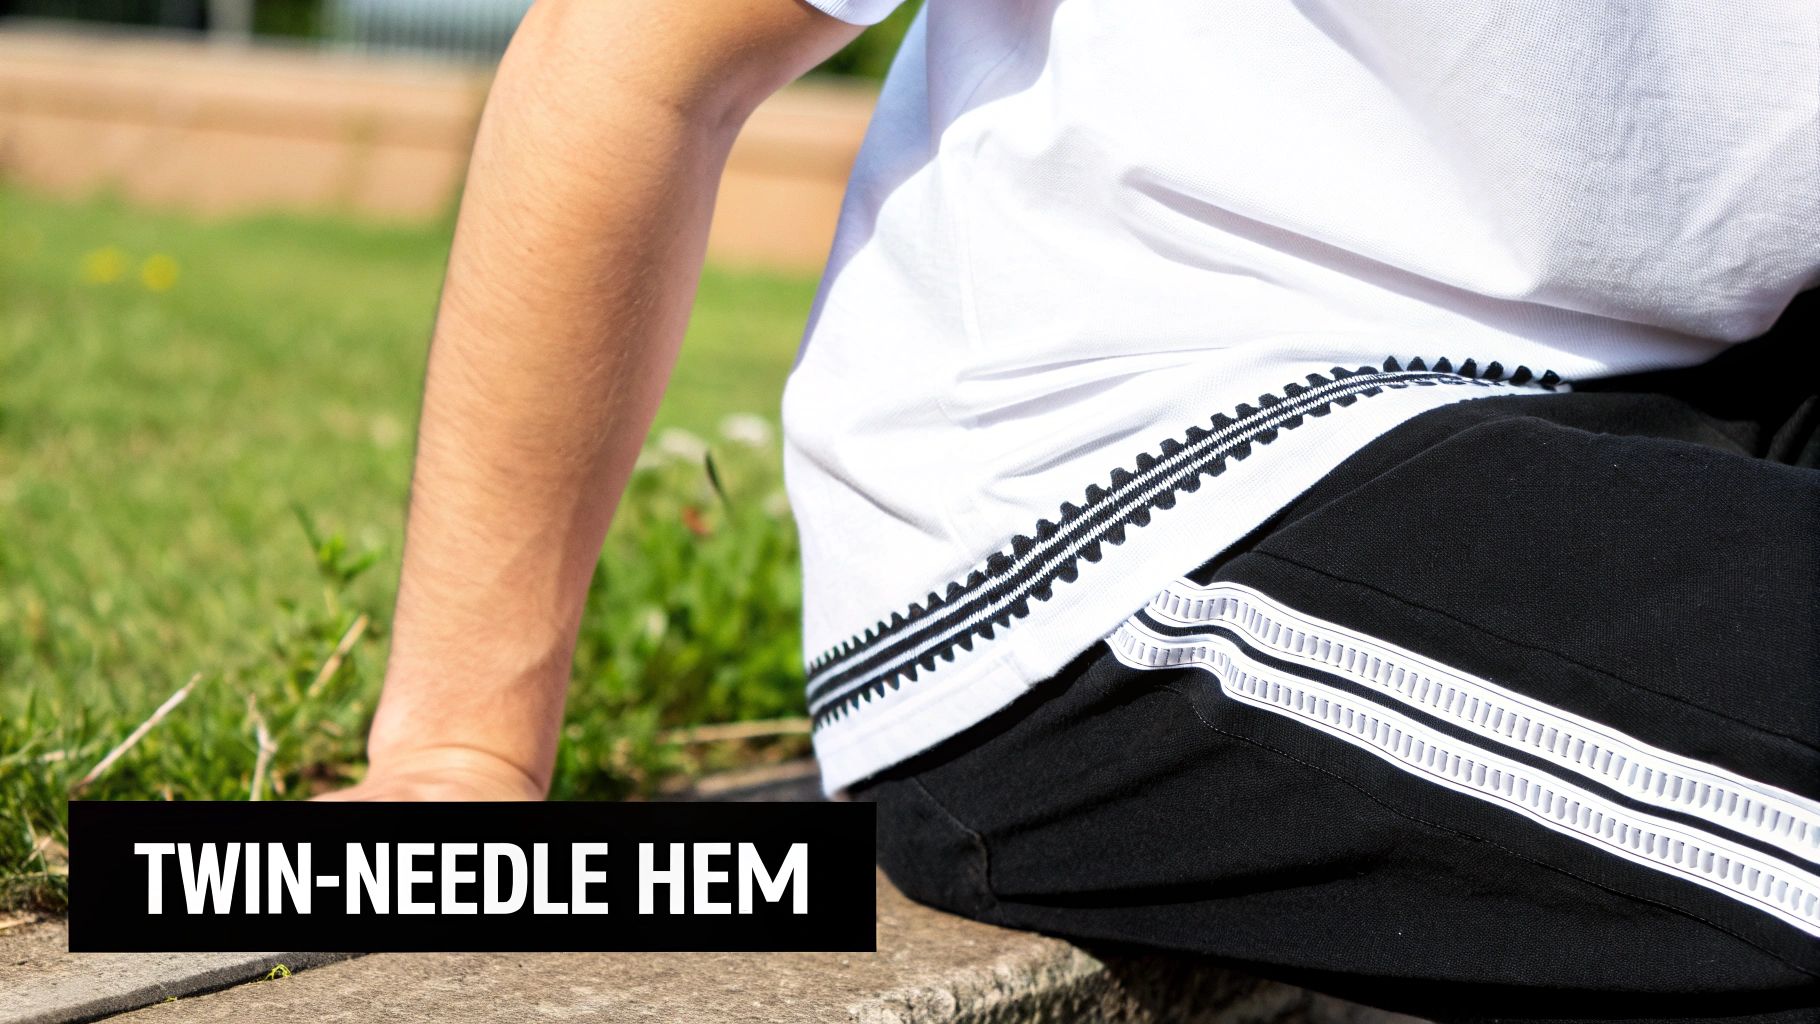
Nothing gives your handmade clothes that polished, professional look quite like a clean hem. Many sewists think you need a pricey coverstitch machine to get that perfect, stretchy finish you see on store-bought t-shirts. But I'll let you in on a little secret: you can get a nearly identical—and incredibly durable—result with your standard sewing machine.
The magic tool for this is the twin needle. This clever little gadget fits into your machine just like any other needle, but it has two points. As you sew, it creates two perfect, parallel lines of stitching on the outside while forming a zigzag on the inside. This built-in zigzag is what gives the hem its beautiful stretch.
Mastering the twin needle is an absolute game-changer for sewing knits. It might seem intimidating, but the setup is surprisingly simple. You'll just need two spools of thread for the top and your usual one for the bobbin.
Most machines come with an extra spool pin that either pops up or attaches to the top. You'll thread both top threads through the machine at the same time, separating them only right at the end to go into their respective needles.
To get beautiful results and sidestep common frustrations, a few details make all the difference:
Pro Tip for Perfect Hems: To really flatten out that hem and prevent tunneling, try using a specialty thread like wooly nylon in your bobbin. This fluffy, stretchy thread has more give and does a wonderful job of pulling the top threads flat against the fabric.
Before you even sit down to sew, always press your hem allowance into place. For an extra crisp edge, especially on slippery or lightweight knits, a fusible hem tape like HeatnBond Soft Stretch is your best friend. This adhesive holds the hem perfectly still, letting you focus on stitching a straight line without any annoying shifting or stretching.
While the twin needle is a superstar, it's not the only way to finish a knit garment. Sometimes, a different fabric or project calls for a totally different approach.
Here are a few other reliable methods I turn to:
Applying bands to necklines, cuffs, and waistbands is a core skill for sewing with knits. The whole trick is to cut the band slightly shorter than the opening you're attaching it to. This creates just enough negative ease, or tension, to help the opening lie flat and snap back into shape after being stretched.
A great rule of thumb is to make your band piece about 85-90% of the length of the opening. For instance, if your neckline measures 20 inches around, you'd cut your band to be 17 or 18 inches long (plus your seam allowance).
Once you've sewn the short ends of the band to form a loop, fold it in half lengthwise with the wrong sides together. Find the quarter points on both the band and the garment opening and mark them with pins or clips. Match these points up, and then gently stretch the band—and only the band, not the garment—to fit the opening as you sew. This technique is the key to a snug, professional finish every time.
Even when you do everything right, knit fabrics can sometimes have a mind of their own. Seams pucker, stitches vanish, and a project you were excited about can grind to a halt. The good news? Almost every problem you’ll run into is a classic one, and the fixes are usually pretty straightforward.
Think of this as your quick-reference guide for those moments of frustration. Instead of getting discouraged, you can quickly figure out what’s going on and get back to making a garment you’ll actually love to wear.
Ah, the dreaded "lettuce edge." It's that wavy, stretched-out seam that’s supposed to be flat and crisp. This happens almost every time because the fabric is being stretched as it goes through the machine. The feed dogs are pulling the bottom layer along, but the presser foot is dragging on the top layer, stretching it out of shape.
Thankfully, you've got a few solid options to combat this:
You’re cruising along, and suddenly you see gaps in your seam. Skipped stitches are a rite of passage when sewing knits, and they usually point to one of two things.
First, check your needle. Are you sure you’re using a ballpoint or stretch needle? A universal needle has a sharp point that can pierce and snag the knit fibers, causing the hook to miss the thread loop. A dull needle will do the same thing, so get in the habit of changing it after every 8-10 hours of sewing.
If the needle is right, re-thread your entire machine from scratch. Sometimes a tiny mistake in the thread path is all it takes to throw off the timing.
Key Insight: Whatever you do, don't push or pull the fabric through the machine. Let the feed dogs do the work. Forcing it, even a little, can flex the needle just enough to misalign it with the bobbin hook, leading to a frustrating line of skipped stitches.
There’s nothing worse than finishing a garment, trying it on, and hearing that dreaded pop of a seam giving way. This is a classic sign you've used the wrong stitch or thread.
A standard straight stitch has zero give. When you stretch the fabric, the thread has nowhere to go but to break. You absolutely have to use a stitch with built-in stretch, like a narrow zigzag or a specialty stretch stitch. The same goes for thread—cotton thread is out. Polyester thread has just enough natural elasticity to flex right along with your fabric.
With knit fabrics making up 45% of worldwide apparel fabrics, getting this right is key to making clothes that last. Sewing pros swear by a ballpoint or stretch needle (a size 75/11 is a great all-rounder) to cut down on skipped stitches by up to 80%. Tension is another piece of the puzzle; a slightly looser tension than you'd use for wovens creates a much more durable seam for everyday wear or demanding cosplay gear. You can read more about the trends in the global knitted fabric market.
Let's talk about those slinky, slippery fabrics like nylon spandex used in activewear and cosplay. They love to shift, slide, and curl at the edges, making them a real handful. A walking foot is your best friend here, but don't be shy with the clips, either—use way more than you think you need.
When it comes to hemming these tricky materials, a fusible hem tape like HeatnBond Soft Stretch can be a lifesaver. It holds that slippery edge perfectly in place before you even get to the machine.
As you start working more with knits, you'll inevitably run into a few head-scratchers. Don't worry, we've all been there! This section is like having an experienced sewing friend on call to answer those common questions that pop up along the way.
Nope! This is probably the biggest myth holding people back from sewing with knits. While a serger is fantastic for creating those super-clean, professional-looking seams quickly, your regular sewing machine is absolutely up to the task.
The real key is using a stitch that can stretch right along with your fabric. A simple narrow zigzag stitch works wonders. Many machines also have dedicated stretch stitches (they often look like a tiny lightning bolt). Pair one of those stitches with a ballpoint needle and some polyester thread, and your seams will be plenty strong and flexible for any t-shirt, leggings, or cozy sweater you can dream up.
Ah, the dreaded "lettuce edge." If your seams are looking wavy, it's a classic sign that your fabric is getting stretched out as you sew. It's an incredibly common problem, usually caused by the presser foot pushing down too hard and elongating the fabric as it feeds through.
Fortunately, there are a few solid ways to fix this frustrating issue:
For that polished, store-bought look, a twin needle is your absolute best friend. It creates two perfect, parallel lines of stitching on the top while forming a zigzag on the underside. This clever setup allows the hem to stretch without any of those dreaded popped stitches.
Another great tip is to use a bit of fusible hem tape to stabilize the edge before you sew. It helps you get a perfectly crisp, pucker-free finish. Of course, other methods work too! A simple zigzag stitch can do the trick, and for stable knits like fleece or some sweater knits, you can even leave the edge raw since they won't fray.
The goal is to create a finish that moves with the garment. A twin needle provides both a clean look and the necessary elasticity, making it the top choice for most knit projects on a home machine.
The right fabric really comes down to what the project needs in terms of drape, stretch, and structure. Most patterns will give you suggestions, but knowing the basics helps you make confident choices.
A cotton jersey or interlock is a fantastic, stable choice for beginners tackling t-shirts or loungewear. They have moderate stretch and are generally easy to work with. But if you’re making something that needs to flow, like a drapey cardigan, a rayon or bamboo jersey would be a beautiful pick.
For activewear, cosplay, or swimwear, you need excellent recovery—that's the fabric’s ability to snap back into shape. Look for knits with a high spandex content, like nylon spandex or performance blends. Always double-check your pattern's recommendations and, if you can, test the fabric's stretch percentage. Making sure it matches what the pattern calls for is crucial for a great fit. For a deep dive into handling all kinds of elastic materials, you can find more expert advice on how to sew stretch fabrics like a pro.
At Famcut.com, we're passionate about helping you succeed with every project, from your first knit t-shirt to intricate cosplay designs. Explore our wide range of fabrics, tools, and classes to bring your creative vision to life. Find everything you need at https://famcut.com.
At High Country Quilts we care deeply about community. With our experiences in retail, we know that a store is not only a place to shop but also a place for the community to gather and share. During this busy...

Hi! We’re Adam and Renee Wheaton, the new owners of High Country Quilts! For more than 40 years, we’ve owned and operated vacuum and sewing businesses. Following in Renee’s father’s footsteps after he retired from All Discount Vacuum and Sewing in Colorado...


Leave a comment