

We Love Our Quilting Community
At High Country Quilts we care deeply about community. With our experiences in retail, we know that a store is not only a place to shop but also a place for the community to gather and share. During this busy...


Learning how to sew a quilt entirely by hand is one of the most rewarding things you can do. It's a slow, beautiful process of taking simple pieces of fabric, layering them with soft batting, and stitching them all together to make something truly special.
The whole journey breaks down into three main parts: piecing the quilt top, basting the layers into a 'quilt sandwich', and finally, hand quilting those final stitches. This guide will take you through every single step, showing you how to turn a pile of fabric into a treasured heirloom.
Let's be honest, in a world that moves at lightning speed, there's something magical about slowing down. Hand quilting isn't just about making a blanket; it’s an invitation to be present. The steady, rhythmic motion of the needle and thread is almost meditative. It’s a quiet escape that lets you create with purpose.
This isn't about chasing perfection. It's about the personal touch you leave behind.
You can always spot a hand-sewn quilt. Unlike the flawless uniformity of a machine, hand quilting creates a wonderfully subtle, organic texture. Those tiny variations in your stitches are what give the quilt its story and soul—a warmth that a machine just can't replicate.
When you pick up a needle and thread to make a quilt, you're not just starting a new project; you're stepping into a long line of history. For generations, people have quilted to provide warmth, celebrate milestones, and simply spend time together. You can almost hear the echoes of old quilting bees, where stories were swapped over every stitch. You’re becoming part of that tradition.
It's a craft that honors the past while giving you complete freedom to express yourself today. And you’re not alone in loving it. We're seeing a huge return to traditional crafts as people look for more authentic, handmade things to bring into their homes.
The global quilt market is booming, and experts predict it will grow to a staggering $7.8 billion by 2031. This isn't just a niche hobby; it's a reflection of how much we've come to value personalized, handmade decor. Learn more about the quilt market's growth.
Ultimately, the best reason to learn is the deep satisfaction it brings. There’s nothing quite like watching a stack of individual fabric squares slowly transform into a beautiful, intricate pattern right before your eyes. You’re not just putting materials together; you’re crafting a piece of functional art that could be snuggled under for generations.
I’ve designed this guide with the absolute beginner in mind, but the core ideas here will help quilters at any level. We'll break down everything—from choosing the right needle to tying off that very last knot. Forget feeling overwhelmed. We'll focus on clear, manageable steps to build your confidence, one stitch at a time. My goal is for you to not just know how to do it, but to understand why each technique matters, so you can create a quilt you'll be proud of for years to come.
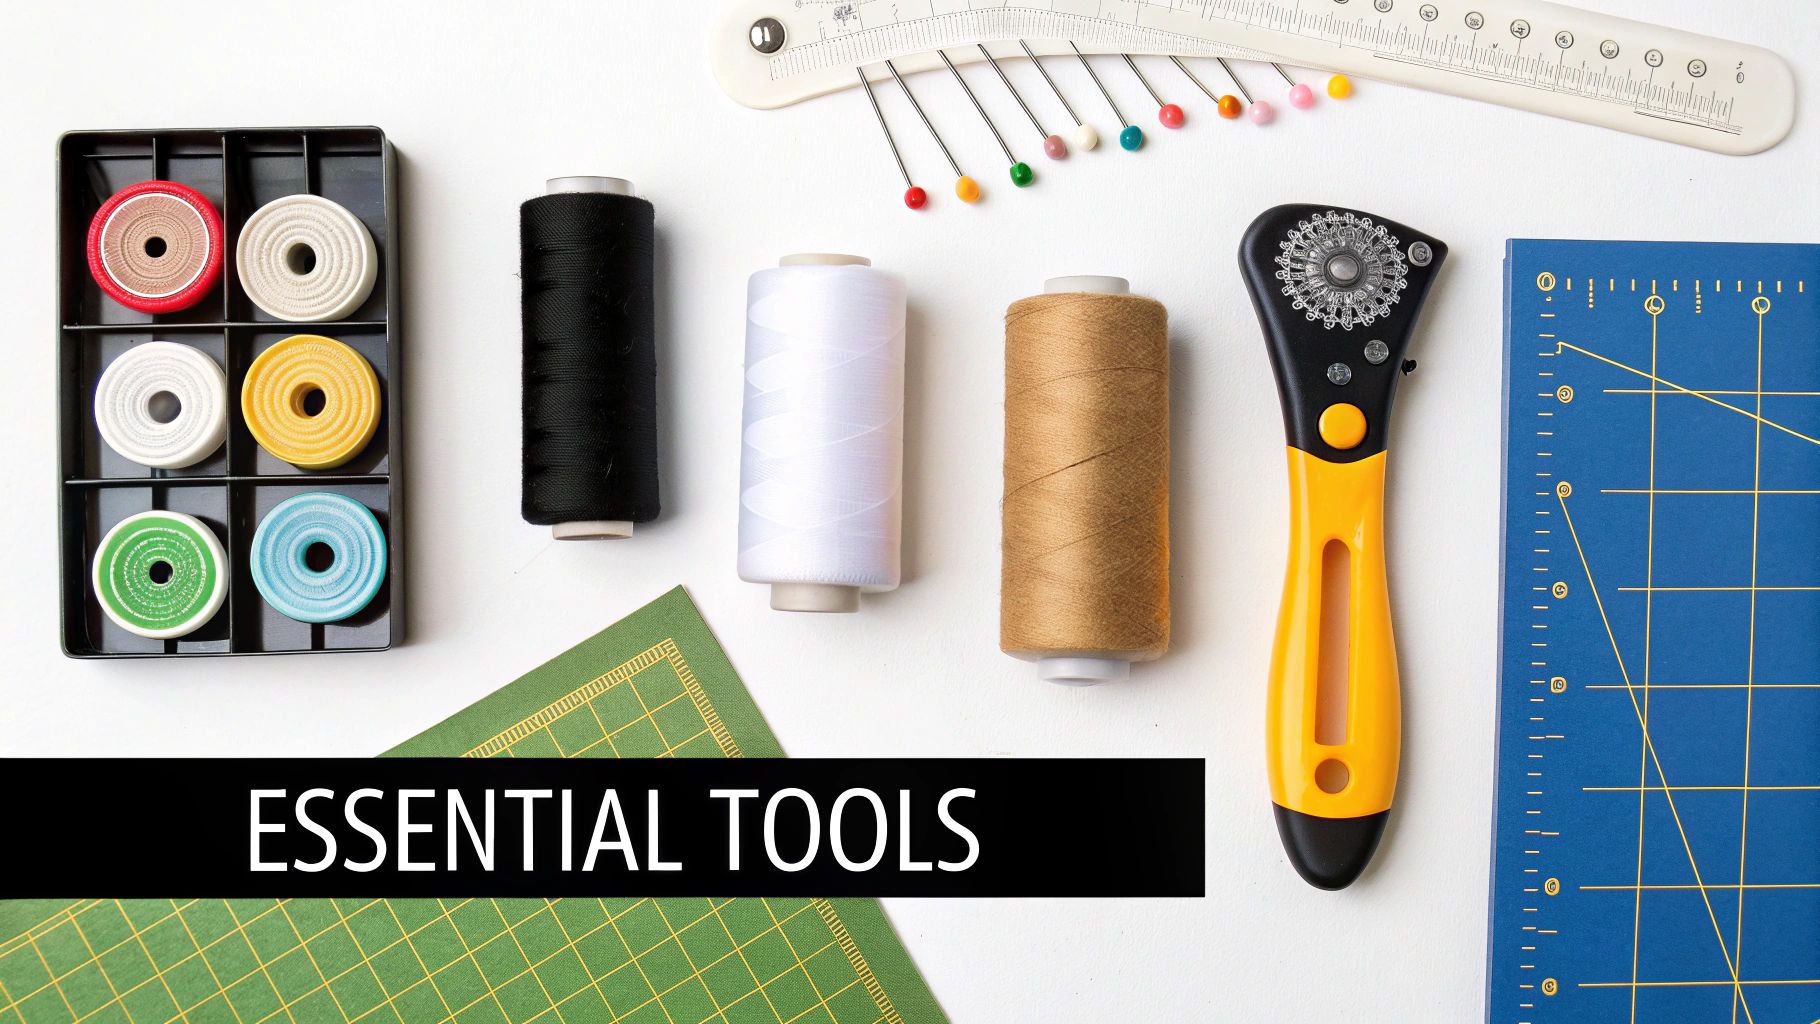
Walking into a craft store for the first time can be completely overwhelming. There are walls of colorful thread, countless gadgets, and so many different types of needles. It's easy to think you need one of everything, but you really don't.
Let's cut through the noise. When you're learning how to sew a quilt by hand, having the right gear makes all the difference. A few key investments will set you up for success and prevent a lot of frustration before you even make your first stitch.
Your needle and thread are your most important companions on this journey, and this is one area where quality really counts.
Not just any needle will do. For hand quilting, you’ll want to look for needles specifically called "betweens." They’re shorter and finer than standard sewing needles, which gives you much better control for making those small, even stitches through the quilt sandwich. I suggest starting with a variety pack of sizes 8, 9, and 10 to find what feels best in your hand.
Your project will have two distinct phases, and you’ll need a different thread for each:
You can cut your fabric with a good pair of scissors, but a rotary cutter and self-healing cutting mat will make the process a hundred times easier and more accurate. Think of it as a pizza cutter for fabric; it lets you slice through multiple layers at once with a perfectly clean, straight edge.
A 24x36 inch mat is a fantastic starting size, giving you plenty of space to work without feeling cramped. You’ll also need a clear 6x24 inch acrylic quilting ruler to guide your rotary cutter. This powerful trio is the secret to getting uniform, perfectly sized pieces, which is essential for your seams to line up beautifully later on.
Pro Tip: That rotary blade is sharper than you can imagine. Get into the habit of closing the safety guard the instant you set it down. It’s one of the most important safety habits you can build as a quilter.
To make things even clearer, here's a breakdown of the tools I consider non-negotiable versus those that are wonderful to have but not strictly necessary when you're just starting out.
| Tool Category | Essential Item | Why It's Essential | Optional Upgrade (Nice-to-Have) |
|---|---|---|---|
| Cutting | Rotary Cutter, Mat & Ruler | Provides unmatched accuracy and speed for cutting fabric pieces. | Die-cutting machine (e.g., AccuQuilt) |
| Stitching | "Betweens" Quilting Needles | Their short, fine design is crucial for making small, even hand stitches. | Needle threader or magnetic needle case |
| Threading | Hand-Quilting Thread | Stronger and waxed/glazed to prevent tangling and breakage. | Full-spool thread rack for organization |
| Marking | Hera Marker or Fabric Pen | Allows you to draw your quilting design onto the fabric top. | Lightbox for tracing complex patterns |
| Protection | Thimble | Protects your finger from the needle, preventing soreness and calluses. | Quilting hoop or frame |
Starting with the essentials will give you a solid foundation without breaking the bank. You can always add the "nice-to-have" items as you fall deeper in love with the craft.
Before you can start quilting, you need a way to mark your stitch lines. My personal favorite is a Hera marker. It's brilliant because it doesn't use any ink; instead, it creates a crisp, temporary crease in the fabric that you can easily follow with your needle. Best of all, it disappears completely. For darker fabrics where a crease might be hard to see, a simple chalk pencil or a water-soluble fabric pen works great. Just remember to test it on a scrap first!
Finally, please don't skip the thimble. I know it feels awkward at first, but it's there to protect your finger as you push the needle through three dense layers of fabric and batting. A soft leather thimble is a comfortable and flexible option for beginners. Finding one that fits snugly will make the rocking motion of hand quilting feel more natural and save you from a very sore finger at the end of the day.
This is where the fun really begins. Walking into a fabric store and seeing all those bolts of color is the moment your quilt starts to take on a personality of its own. It's exciting, but it also pays to have a bit of a strategy.
The fabric you pick influences everything, from the finished look to how much you enjoy the hand-stitching process. For your first project, I can't recommend 100% quilting cotton enough.
There's a reason it's the gold standard. Quilting cotton has a tight, stable weave that holds a press beautifully, doesn't fray easily, and is just a dream to work with when you're using a needle and thread.
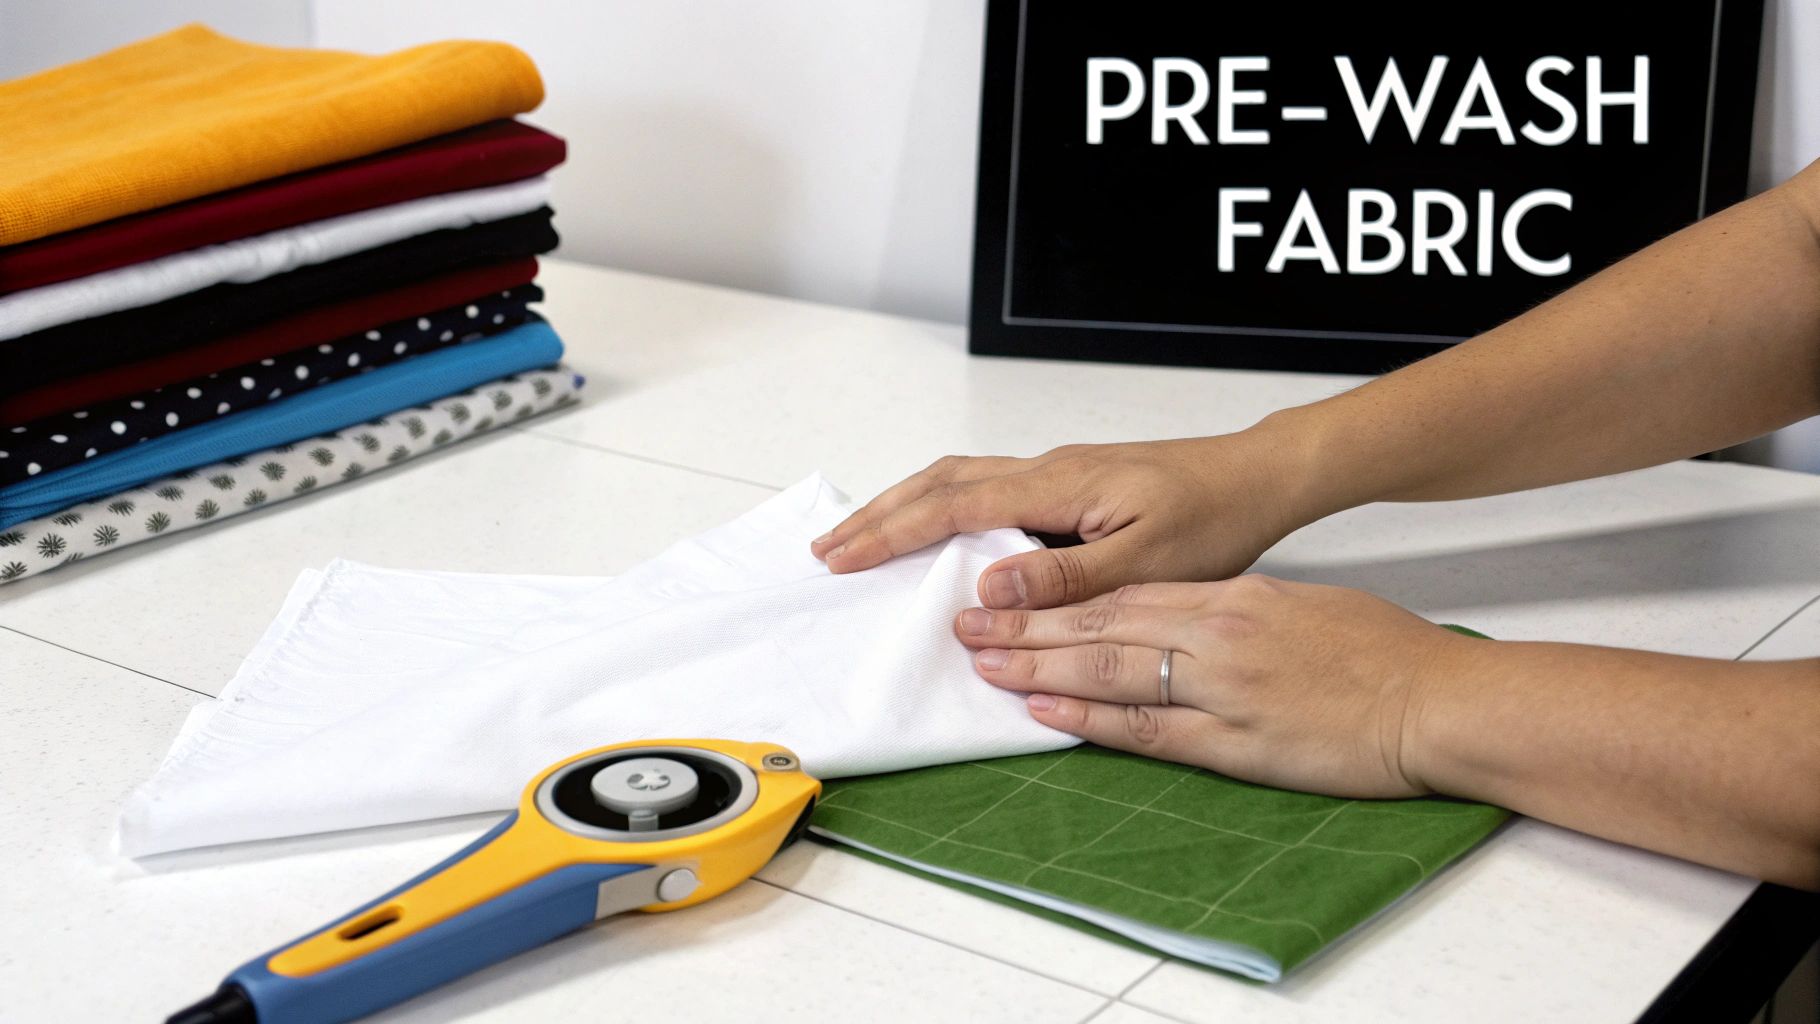
Before you even think about picking up a rotary cutter, there's a crucial step that can save you a world of frustration later: pre-washing your fabric. I know, I know—it feels like a chore when you're eager to start sewing, but trust me on this one.
Here’s why you absolutely shouldn't skip it:
Just toss your fabrics in the machine on a cool, gentle cycle with a bit of mild detergent. A color catcher sheet is a great trick to see just how much dye is coming out. Tumble dry on low, then give everything a good press with a hot iron while it's still slightly damp. Now you’ve got perfectly prepared fabric that’s ready for cutting.
For your first hand-sewn quilt, the pattern is just as important as the fabric. You want to start with simple shapes and straight seams. This lets you really focus on getting your stitches even and consistent without wrestling with tricky angles or curves.
A perfect place to start is the classic Nine-Patch block. It's a timeless design made from nine simple squares arranged in a 3x3 grid. It teaches you all the fundamentals, like how to nest your seams and press them properly, without being overwhelming.
A few other fantastic patterns for beginners are:
When you hand-piece a quilt, you are connecting with a craft that has deep historical roots. Evidence suggests quilting dates back thousands of years, and for centuries, hand-sewing was the only way these beautiful heirlooms were made. You're not just sewing; you're carrying on a timeless tradition. You can explore more about the long history of quilting and the stories behind it.
Once your fabric is washed and your pattern is picked out, it's time to cut. This is the stage where precision is everything. Accurate cutting is the secret to getting all those points and seams to line up perfectly later on. This is where your rotary cutter, mat, and ruler become your best friends.
First, figure out how much fabric you need. Your pattern will give you the yardage, but I always recommend buying a little extra—at least a quarter yard more than what’s listed. It’s a cheap insurance policy against a cutting mistake.
Before you cut any pieces, you have to "square up" your fabric. This just means creating a perfectly straight edge to measure from. Fold your fabric, line up your ruler with the fold, and trim off that messy raw edge. From that clean line, you can cut your strips and squares with confidence. Remember the old carpenter's rule: measure twice, cut once. It's a classic for a reason
You've done the prep work, your fabric is ready, and your tools are waiting. Now for the truly magical part: taking those individual pieces of fabric and turning them into beautiful quilt blocks. This patient, rhythmic process is the absolute heart of hand-sewing a quilt.
The hero of this story is the humble running stitch. It might seem simple, but when done with care, it creates seams that are incredibly strong yet wonderfully delicate. One of the best things about hand-piecing is that it results in softer, more flexible seams that press flatter than you'd ever get with a machine.
Before you dive into your actual quilt pieces, I always suggest practicing on a couple of scrap squares. It’s a no-pressure way to find your rhythm and get a feel for how the needle and thread move through the fabric.
First, thread your needle with about an 18-inch length of your 50-weight cotton thread. Trust me, anything longer will just end up in a tangled mess. Tie a small quilter's knot at the end.
The goal is to follow your marked ¼-inch seam allowance. Don't stress if your first few attempts are a bit wobbly. Your hands will quickly learn the motion, and you'll build muscle memory faster than you think.
In the world of quilting, a consistent ¼-inch seam allowance is non-negotiable. It's the standard that ensures all your geometric shapes fit together perfectly, like a well-made puzzle. When your seams are accurate, your blocks will be the right size, and the points on your triangles and squares will meet just right.
This is exactly why I recommend marking that sewing line, especially when you're starting out. Taking a moment to draw that ¼-inch line on the wrong side of your fabric gives you a clear road map to follow. It removes the guesswork and lets you focus completely on your stitching.
Here’s a tip I picked up early on: check your work as you go. After sewing a seam, give it a quick press and grab your acrylic ruler to measure the allowance. This little check-in can help you spot and fix any issues before they snowball across the rest of your block.
How you press your seams is just as critical as how you sew them. Good pressing habits reduce bulk, help your blocks lay flat, and make joining everything together so much easier down the line. The golden rule is to press your seams to one side, usually toward the darker fabric. This prevents the darker color from peeking through your lighter pieces.
Now, here's where it gets clever. When you're ready to join two finished rows, you'll press the seams of the first row in one direction (say, to the right) and the seams of the second row in the opposite direction (to the left).
This creates what quilters call nesting seams. When you place those two rows right-sides-together, the seams will butt up against each other and lock perfectly into place. You can actually feel it with your fingers—it's a little ridge that tells you the intersections are flawlessly aligned. This is the secret to getting those crisp, sharp points everyone strives for.
Even seasoned quilters run into little snags. Here’s a quick guide to troubleshooting some common issues that might pop up.
Piecing your quilt top is a slow, meditative process. So put on some good music or a favorite podcast, get comfortable, and really lean into the simple joy of creating something beautiful, one stitch at a time.
With your quilt top pieced and looking gorgeous, it's time to turn it into an actual quilt. This means building what we call the "quilt sandwich"—the three-layer combo that gives a quilt its signature warmth and feel.
The whole idea is to layer your backing, the fluffy batting, and your quilt top, then temporarily hold them all together so you can start quilting. Getting this sandwich smooth and secure is the key to avoiding frustrating puckers and getting those lovely, even stitches you're after.
The batting is the heart of your quilt. It's the hidden middle layer that adds insulation and really defines how your quilt will drape and feel. The type you pick makes a huge difference, so it’s good to know your options.
My Two Cents: For your first hand-sewn quilt, I’d strongly suggest a low-loft cotton or a cotton-blend batting. It’s incredibly forgiving, easy to work with, and gives you that timeless, heirloom quality that makes these quilts so special.
First things first, you need to prep your layers. A crucial tip here: make sure your backing fabric and batting are at least 4 inches larger on all sides than your quilt top. This extra fabric is your safety net, giving you plenty of room to work without the layers shifting out from under the top.
Give your quilt top and backing a good press to get rid of every last wrinkle. Now, find a large, clean floor space to work. Lay your backing fabric down, wrong side up. Using painter's tape, tape the corners and edges to the floor, pulling it taut but not stretching it out of shape. The goal is a perfectly flat, smooth foundation.
Next, lay your batting over the backing, smoothing it out from the center to the edges. Finally, place your pressed quilt top, right side up, over the batting. Take a few minutes to carefully smooth this top layer, again working from the middle outwards. All three layers should be lying perfectly flat, with no wrinkles in sight.
Basting is how you temporarily fasten the quilt sandwich together. It’s a non-negotiable step that stops the layers from shifting around while you’re quilting. Skip this or do a rush job, and you’ll likely end up with annoying puckers and tucks on the back of your quilt.
This infographic captures the basic flow of hand piecing that gets you to this point.
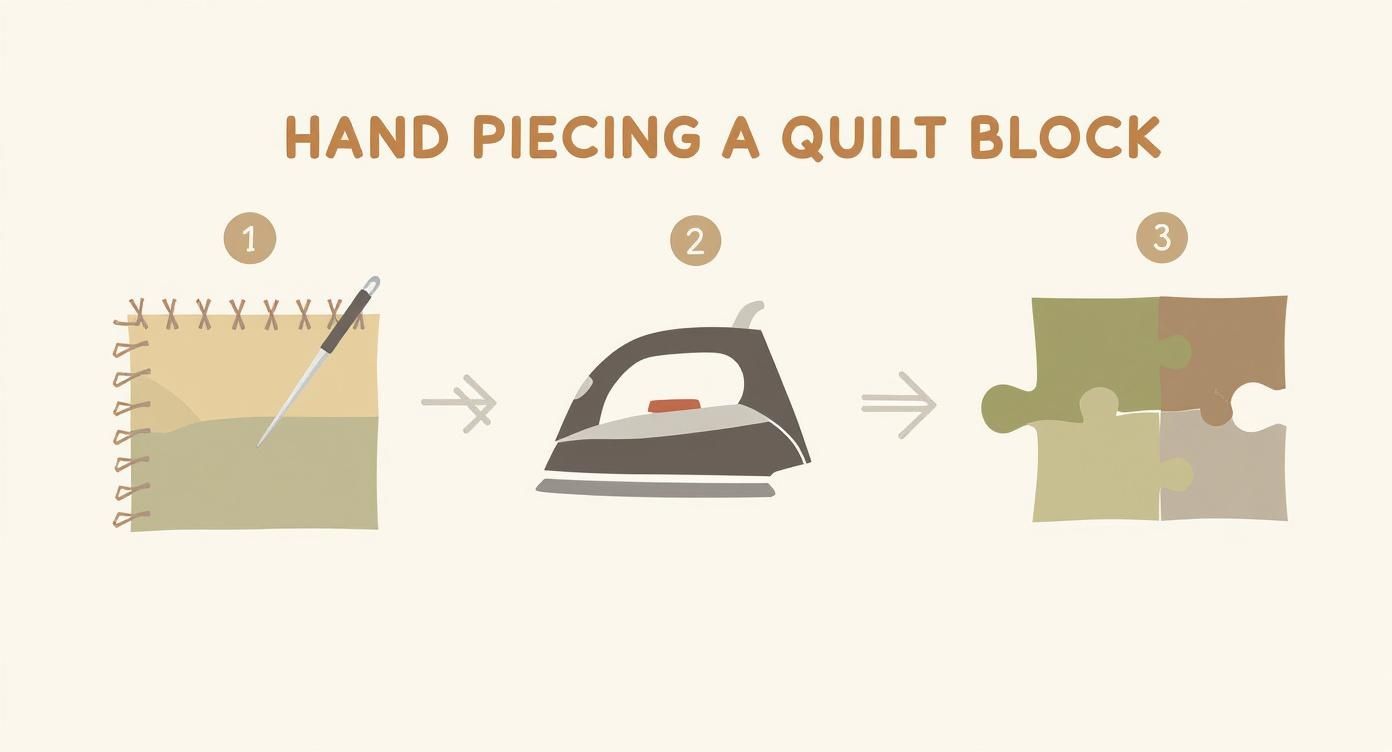
The simple rhythm of stitching, pressing, and joining is what prepares your quilt top for its big moment as the star of the quilt sandwich.
For hand quilters, there are two tried-and-true basting methods:
This is the moment where all your patient work really pays off. Your basted quilt sandwich is now ready for the final, magical stage—the actual quilting stitches that will fuse the layers and give your project that wonderful, crinkled texture that just screams "quilt."
After the quilting comes the binding, which acts as the perfect frame for your masterpiece. Both of these steps are where the soul of a hand-sewn quilt truly shines through.
When you're making your first hand-sewn quilt, simplicity is your best friend. There's no need to jump into a complex free-motion design. Instead, let's focus on a classic and beautiful technique known as "stitching in the ditch."
This approach is exactly what it sounds like: you quilt right alongside your existing seam lines. It's a fantastic way to start because your seams provide a natural guide, helping you keep your lines straight and even. Plus, it beautifully accentuates the patchwork you’ve already worked so hard on.
Even if you're stitching in the ditch, I still recommend marking your lines first with a Hera marker or a water-soluble pen. Having that visible line to follow removes any guesswork and lets you focus on your stitching rhythm.
The fundamental stitch for hand quilting is a fluid, rocking motion. It's all about comfort and efficiency, allowing you to load multiple stitches onto your needle at once before pulling the thread through. This is where your thimble becomes absolutely essential—don't even try it without one!
First, you'll need to tie a small quilter’s knot at the end of your quilting thread. Poke your needle through the quilt top only, about an inch away from where you plan to start stitching. Bring the needle tip up right at your starting point.
Now, give the thread a firm but gentle tug to "pop" the knot through the fabric top. This simple trick hides the knot neatly inside the batting layer. You're ready to start quilting.
Be careful not to pull too tightly. You're aiming for gentle "dimples" in the fabric, not puckers.
Hand quilting is a rhythm you find with your hands. Don't get hung up on making every single stitch identical. Consistency over perfection is the goal, and the subtle variations are what give a hand-sewn quilt its unique and cherished character.
Once all your quilting is done, it’s time to trim the excess batting and backing. Grab your long ruler and rotary cutter to square up the quilt, leaving a clean, straight edge all around. Now, you’re ready for the grand finale: the binding.
Binding is simply a strip of fabric that encases the raw edges of your quilt, giving it a durable and polished finish. We’re going to attach this entirely by hand.
First, prepare your binding strips. You'll need to cut fabric strips that are 2.5 inches wide. Sew them together end-to-end on the diagonal to create one long, continuous strip. Make sure it's long enough to go around the entire perimeter of your quilt, with about 10 inches to spare.
Next, press and attach the binding. Fold the long strip in half lengthwise with the wrong sides together, and press it with an iron to create a crisp crease. Align the raw edges of this folded binding with the raw edge of your quilt top and pin it in place.
Now it's time to stitch it to the front. Using a simple running stitch, sew the binding to the front of your quilt with a ¼-inch seam allowance. When you get to a corner, stop stitching ¼ inch from the edge, backstitch, and cut your thread.
To create those perfect mitered corners, fold the binding strip straight up, creating a 45-degree angle. Then, fold it back down along the next edge of the quilt. This creates a neat little pleat of fabric that will become your mitered corner. Start stitching again right from the edge.
Finally, finish the back. Once the binding is attached to the front, wrap the folded edge around to the back of the quilt. I like to use clips to hold it in place, making sure it just covers the first line of stitching you made. Using a hidden slip stitch (or whip stitch), carefully sew the binding down. This final, invisible stitch is the perfect finishing touch.
When you're first starting out with hand quilting, it's totally normal to have a million questions swirling around. Everyone wonders about things like picking the right supplies or whether their stitches look okay. Let's walk through some of the things I get asked about most often.
Getting a handle on your tools and knowing what to expect can really help you settle in and enjoy the process.
This is a great question, and the answer is you'll actually want two different kinds of thread—one for piecing your top together and another for the actual quilting.
For putting your quilt top together, you can't go wrong with a good 50-weight 100% cotton thread. It’s the workhorse for piecing. It's strong enough to hold your seams securely but thin enough that it won't create bulky ridges when you press your blocks open, which helps keep your quilt top nice and flat.
But when it's time to do the actual quilting (stitching through the top, batting, and backing), you need to switch gears. For this, grab a dedicated hand-quilting thread. It's usually a thicker 12-weight cotton that’s been waxed or glazed. That special coating is a lifesaver—it helps the thread pull through all three layers without getting into a tangled mess.
Ah, the million-dollar question! The honest-to-goodness answer is: it depends. The final time commitment comes down to the size of the quilt, how complex the pattern is, and, of course, how much time you have to sit down and stitch.
I've seen a simple little baby quilt come together in 40 to 60 hours. On the other end of the spectrum, a sprawling queen-sized quilt with a ton of detailed work could easily take a few hundred hours. My best advice? Try to enjoy the journey and not fixate on the finish line.
Everyone wants those perfect, tiny, even stitches, but let me tell you a secret: consistency comes from rhythm and practice, not from stressing about perfection.
Your thimble is your best friend here—seriously. Use it to push the needle through the quilt sandwich. As you do, you can use your other hand underneath to feel for the needle's tip and guide it right back up. A great little trick is to "load" a few stitches onto your needle at a time before pulling the thread all the way through. It helps create a nice, even line of stitching.
Don't worry if they aren't perfect right away. Your hands will build muscle memory, and before you know it, your stitches will become much more uniform on their own. And remember, those slight variations are what make it handmade and beautiful.
At Famcut.com, we're here to cheer you on, whether you're making your first stitch or your thousandth quilt. We've got high-quality supplies and classes to help you bring your ideas to life. Come see what we have to offer at https://famcut.com.
At High Country Quilts we care deeply about community. With our experiences in retail, we know that a store is not only a place to shop but also a place for the community to gather and share. During this busy...

Hi! We’re Adam and Renee Wheaton, the new owners of High Country Quilts! For more than 40 years, we’ve owned and operated vacuum and sewing businesses. Following in Renee’s father’s footsteps after he retired from All Discount Vacuum and Sewing in Colorado...


Leave a comment