

We Love Our Quilting Community
At High Country Quilts we care deeply about community. With our experiences in retail, we know that a store is not only a place to shop but also a place for the community to gather and share. During this busy...


Learning to sew your own napkins is one of the most satisfying projects you can start with. It’s simple, practical, and a fantastic way to build your confidence at the sewing machine. The basic idea is straightforward: cut a square of fabric, press a clean hem around the edges, and stitch it down. Before you know it, you'll have a beautiful, durable set of linens for your table.
Diving into making your own table linens is about so much more than just picking up a new hobby. It's a genuinely rewarding way to bring a personal touch to your home. Crafting a set of cloth napkins is a perfect first project that gives you a beautiful, functional item you can be proud of. This guide will take you through every step, from picking out the perfect fabric to getting that crisp, professional finish on your corners.
Plus, embracing DIY projects like this is a great step toward an environmentally friendly interior design ethos. You’re creating sustainable style right at your own dinner table.
Beyond the simple joy of making something with your own two hands, sewing your own napkins has some real-world advantages that make the effort completely worth it. You get total creative control, from the fabric down to the final size.
When you make a set of reusable cloth napkins, you're also part of a much bigger movement. The global cloth napkin market was recently valued between USD 1.7–2.15 billion and is expected to hit around USD 2.8 billion by 2033. This growth is all thanks to people choosing more sustainable options for their homes. With North America making up about 35% of that market, it's clear that reusable is the way to go.
Key Takeaway: Sewing your own napkins is an easy entry into a more sustainable lifestyle. You get to create beautiful, high-quality items that save you money and cut down on waste in the long run.
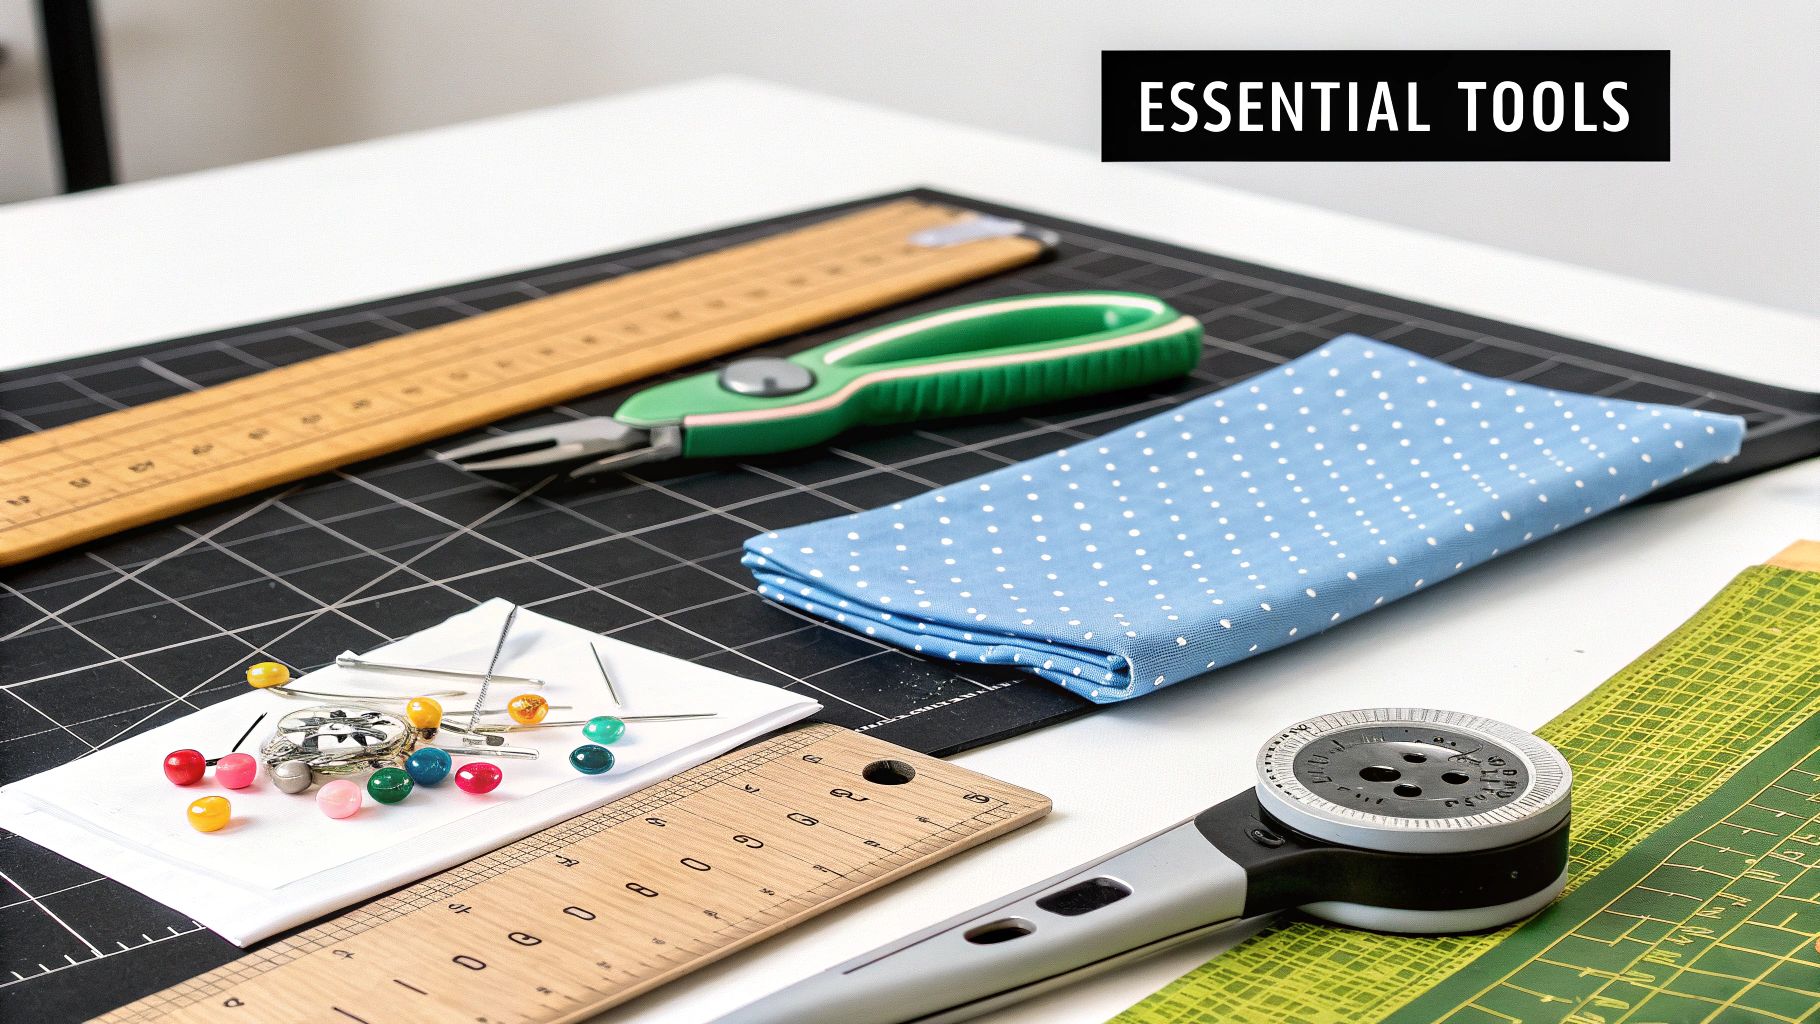
The secret to a beautiful, long-lasting cloth napkin isn't some complicated technique—it all starts with the right materials. The fabric you choose sets the stage for the final look, feel, and durability of your project. And having the right tools ready to go makes the whole process smoother and much more enjoyable.
Before you even think about cutting, there's one step you absolutely cannot skip: always pre-wash and dry your fabric. I know it's tempting to jump right in, but materials like cotton and linen are notorious for shrinking. Pre-washing ensures your finished napkins won't warp into sad, wonky shapes after their first trip through the laundry.
Choosing a fabric can feel overwhelming, but for napkins, you're looking for something that's absorbent, durable enough for frequent washing, and not a nightmare to sew. While you can technically use many woven fabrics, some are definitely better suited for the job than others.
I've put together this quick guide to help you compare some of my favorite options.
| Fabric Type | Best For | Sewing Difficulty | Care Instructions |
|---|---|---|---|
| Quilting Cotton | Beginners, everyday use, and vibrant patterns. An affordable workhorse. | Easy | Machine wash and dry. It's stable and presses beautifully. |
| Linen | A luxurious, heirloom feel that gets softer with every wash. | Intermediate | Machine wash gentle, tumble dry low or line dry to minimize wrinkles. |
| Cotton-Linen Blends | The best of both worlds: the softness of linen with less wrinkling. | Easy-Intermediate | Generally machine washable. Check the bolt for specific blend recommendations. |
| Double Gauze | Super soft and absorbent napkins with a lovely crinkled texture. | Intermediate | Pre-wash is critical! It can be shifty, so use plenty of pins. |
For most projects, I find myself reaching for a good quilting cotton or a cotton-linen blend. They offer a great balance of performance and ease of use, making them perfect for building your skills.
How much fabric do you need? For a standard set of four 18x18 inch dinner napkins, one yard of 44-inch wide fabric is usually plenty. If you're making a set of eight, grab two yards.
The final size of your napkin really comes down to personal preference and how you plan to use it. Just remember, the size you cut will be larger than the finished napkin to account for the hem.
Here are the most common sizes I use as a starting point:
To get these finished sizes, you'll need to add a hem allowance. For a classic ½-inch double-fold hem, that means adding 1 inch to both the length and width. So, for a 17 x 17 inch finished napkin, you would cut an 18 x 18 inch square.
While a sewing machine and thread are the obvious must-haves, a few other tools will make cutting and pressing your napkins much more accurate. Trust me, precision at the start is what gives you those crisp, professional-looking corners later on.
Make sure you have these on hand:
A clean, crisp hem is the secret handshake of a well-made project. It’s what makes a napkin look polished and professional, not just something you whipped up. It also gives your napkins the durability they need to last for years.
We're going to walk through two essential techniques: the simple double-fold hem and the elegant mitered corner. Each has its own strengths, and knowing how to do both will set you up for success on all sorts of sewing projects.
The double-fold hem is your everyday workhorse. It’s strong, it’s straightforward, and it's absolutely perfect for napkins that will see a lot of use and a lot of laundry. The idea is simple: you just fold the raw edge of the fabric over on itself twice. This neatly tucks away any potential fraying.
Think of this simple hem as the foundation for learning how to sew a napkin.
For a standard dinner napkin, a ½-inch double-fold hem is the go-to. This just means you'll press a fold at the ½-inch mark, then fold it over again at another ½ inch to hide the raw edge completely.
Here's a little secret from my own sewing room: the magic isn't in the stitching, it's in the pressing. I'd say about 90% of a perfect hem comes from spending quality time with your ironing board before you ever get to the sewing machine.
Crank up the iron with plenty of steam to get those creases razor-sharp. A good hem gauge or even a small clear ruler will be your best friend here, helping you keep the width perfectly consistent all the way around.
My Go-To Trick: If you're working with a slippery or lightweight fabric that just won't hold a crease, a light mist of spray starch is a game-changer. It gives the fabric just enough body to make it behave for perfectly straight folds.
This technique creates a durable, clean finish that you'll use on everything from tablecloths to simple garments. It's the perfect place for any beginner to start.
Okay, once you’ve got the double-fold hem down, you’re ready to try something a bit more refined: the mitered corner. This is that beautiful, angled finish you see on high-end linens. It gets rid of all the extra bulk where the hems overlap, so your corners lie perfectly flat and crisp.
It might look complicated, but a mitered corner is really just a clever series of folds and one quick snip. The whole point is to remove the excess fabric that would otherwise create a lumpy, clumsy corner.
Let's break it down:
Your corners should now meet up beautifully without any bunching. A final press locks the miter in place, and you’re ready to stitch it down.
Every napkin you sew is a small victory against throwaway culture. Learning how to sew a napkin is a meaningful skill, especially when you consider that the global paper napkin industry was valued at around USD 6.8 billion and is expected to hit USD 10.1 billion by 2030. You can read more about the growing paper napkin market and see just how big the demand for alternatives is.
Alright, you've got your fabric pre-washed and your tools are all laid out. Let's get to the fun part and bring these beautiful napkins to life. This is where all that prep work really pays off, turning a simple square of fabric into something you can be proud to set on your table.
It all starts with a good, clean cut. For a classic dinner napkin that finishes at 17x17 inches, you'll want to cut an 18x18 inch square. That extra inch gives you just what you need for a tidy ½-inch double-fold hem on all four sides.
I always say that sewing a napkin is 90% ironing and only 10% actually using the sewing machine. Getting your folds and creases just right at the ironing board is the secret to a professional finish.
Grab a hem gauge or a small, clear ruler. Carefully fold over one edge of your fabric square by ½ an inch and give it a good press. Use plenty of steam—it really helps set a sharp crease.
Work your way around all four sides, pressing that first ½-inch fold. Once you're done, go back to the beginning and do it all over again. Fold that already-pressed edge in by another ½ inch to completely hide the raw edge, and press it firmly. Now you've got a perfectly neat, double-folded hem just waiting for a line of stitches.
The diagram below shows the two main ways to handle hems: the simple double-fold we're doing here and the more advanced mitered corner technique.
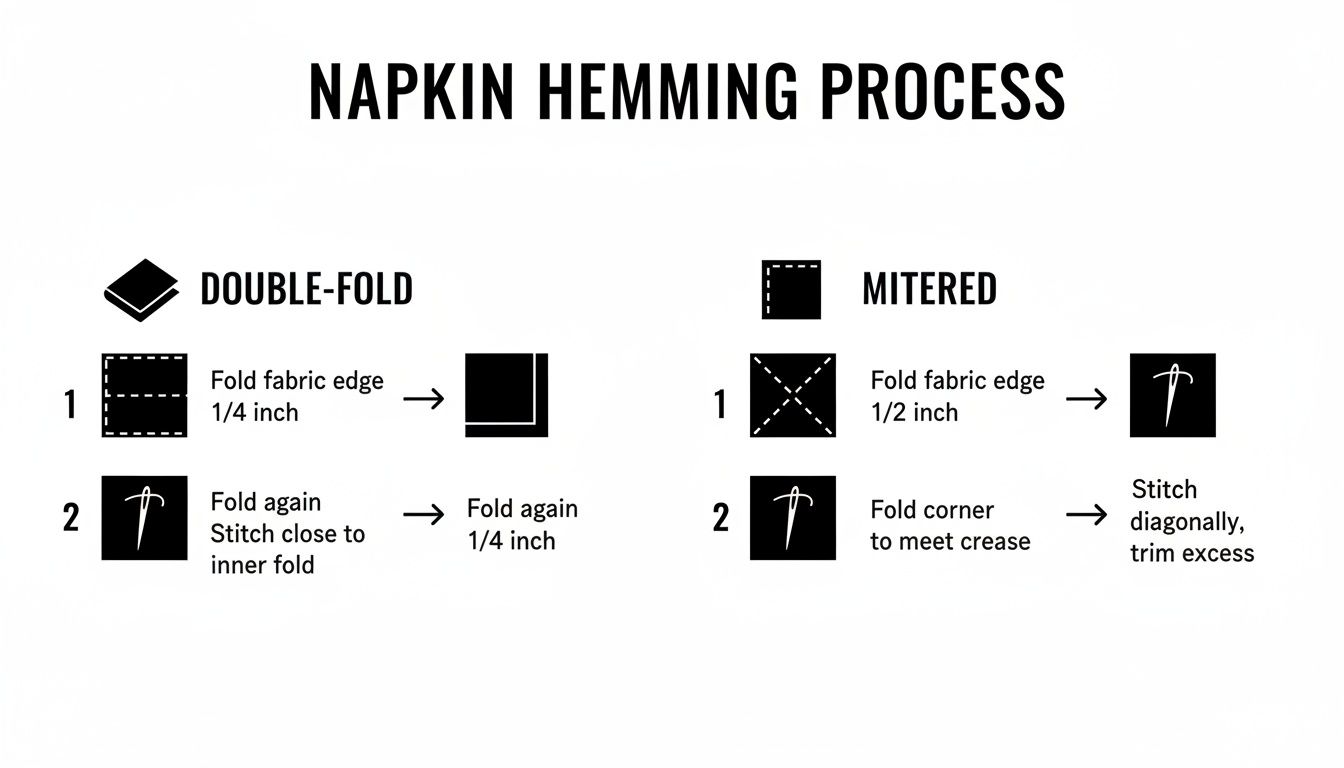
As you can see, the double-fold is straightforward and perfect for beginners. Mitered corners involve a clever little diagonal fold that creates that clean, angled look you see on high-end linens.
Now, let's head over to the sewing machine. For topstitching like this, I find that a slightly longer stitch length looks much cleaner and more professional. My go-to is usually around 3.0mm.
You’ll want to start sewing close to the inner folded edge of the hem. Don't start right at a corner; begin about an inch in and do a few backstitches to lock your thread in place. This little step is crucial for making sure your seams don't unravel after a few trips through the laundry.
Pro Tip for Perfect Corners: As you approach a corner, slow down and stop with the needle down in the fabric. Then, lift your presser foot, pivot the whole napkin 90 degrees, lower the presser foot, and just keep sewing. This is the trick to getting those crisp, sharp corners every single time.
Keep going like this all the way around the napkin. When you get back to where you started, stitch right over your first few stitches and then do one final backstitch to secure everything. Snip your threads, and that’s it—you've officially sewn a napkin!
Learning this one skill can make a real difference in moving away from disposable habits. Think about it: a typical family of four can go through over 2,900 paper napkins a year, which adds up. In contrast, studies show a good set of cloth napkins can last for years of weekly washing, saving money and significantly cutting down on waste. If you're curious, you can read more about the growing market for table linens and see how popular reusable options have become.
You've done the hard work, and your napkins are almost ready for their debut. A few final steps will take them from looking "finished" to looking truly professional and ready for years of dinner parties. The single most important touch? A final, thorough press with a hot iron.
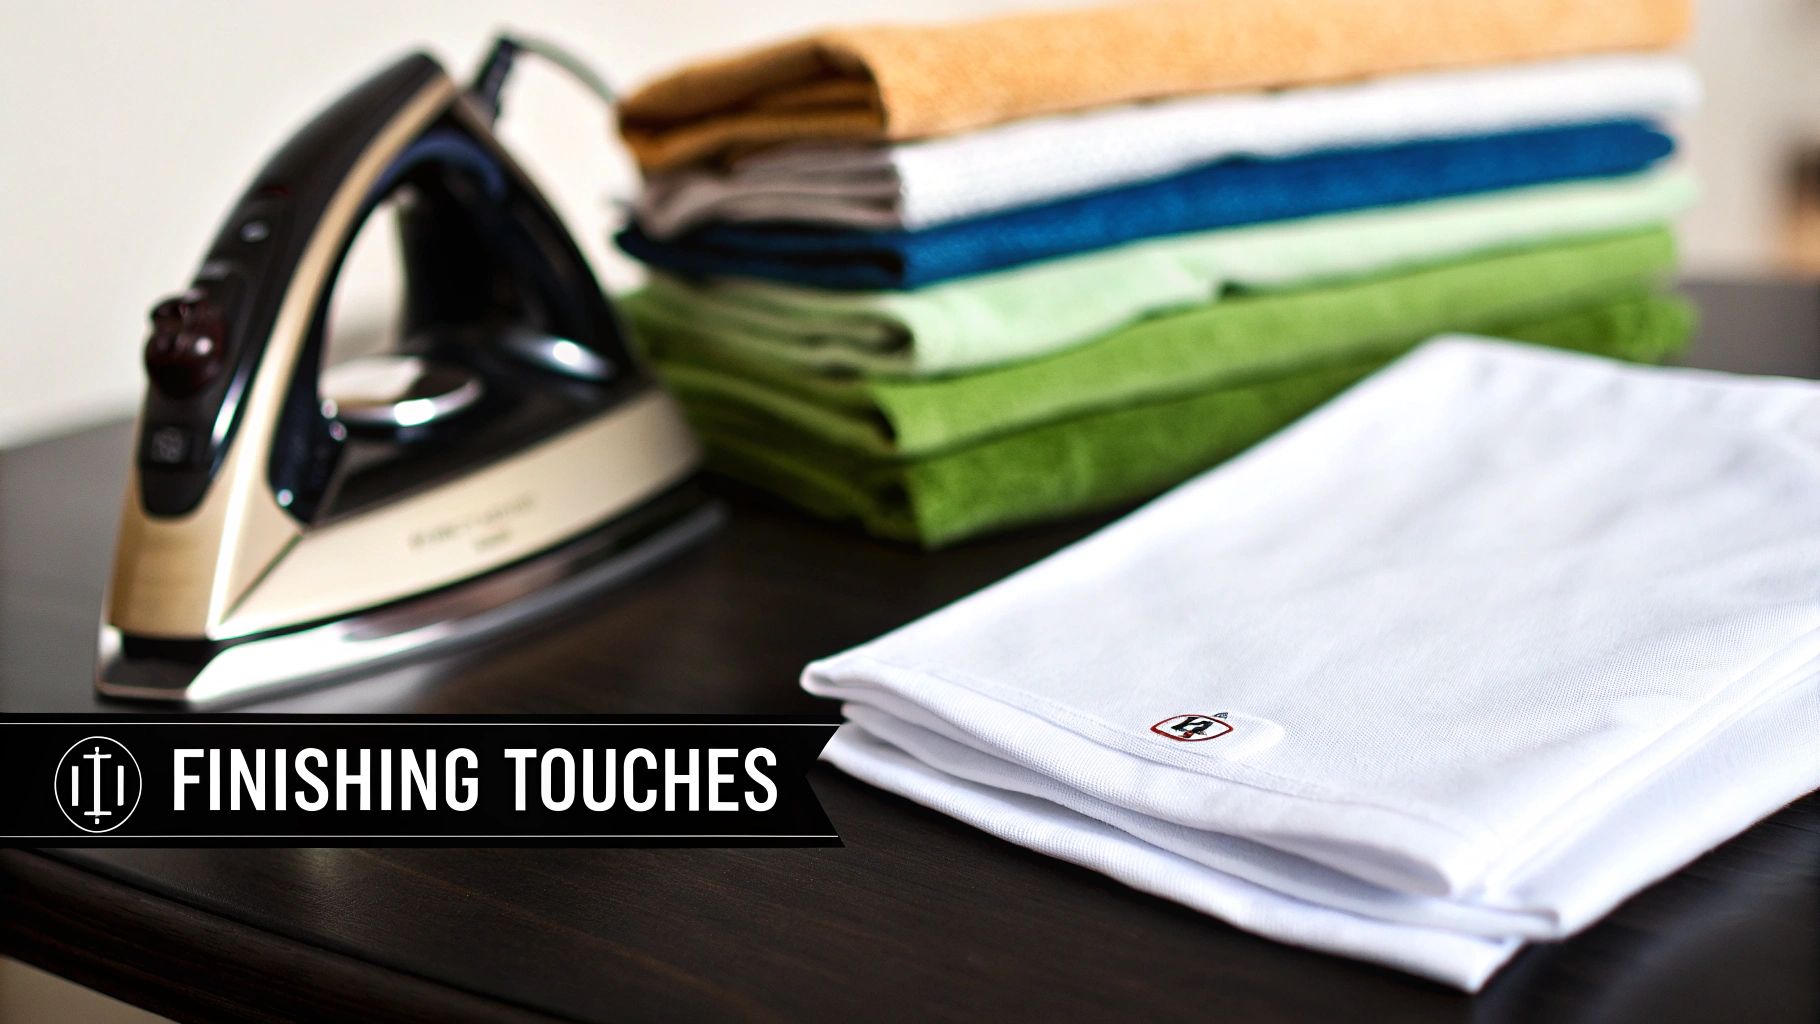
Use plenty of steam and press every single seam and corner firmly. This isn't just about getting wrinkles out; this critical step actually sets the stitches into the fabric, melting the thread just enough to lock it in place. It’s what gives your napkins that crisp, store-bought quality. Honestly, it’s the difference between a project that looks homemade and one that looks handmade with genuine care.
Now that you've put in the effort, you'll want your handmade linens to last. Proper care is all about keeping them clean and vibrant without wearing them out too quickly.
For most cotton or linen napkins, you can simply toss them in the machine on a gentle cycle with cold or warm water. I always wash mine with similar colors, just to be safe and avoid any unexpected dye transfer.
The real trick is in the drying. Tumble dry on low heat, but pull them out while they are still just a little bit damp. A quick press with the iron at this stage makes them look brand new again with almost zero effort.
Life happens, and so do stains. The absolute key to saving your napkins from spills like wine, coffee, or grease is to act fast.
Here's a pro tip I learned the hard way: never, ever apply high heat from an iron or dryer to a stain that hasn't been completely removed. Heat will permanently set the stain, making it nearly impossible to get out later.
Once you've got the basic napkin-sewing process down, the fun really begins. Adding custom touches is how you can make them uniquely yours or create a truly thoughtful, personalized gift.
A simple decorative stitch on your sewing machine, sewn just inside the main hem, is an easy way to add a pop of color and texture. For a more classic touch, a hand-embroidered initial in one corner is a timeless, elegant detail that really elevates the final piece.
After your beautiful napkins are all sewn, you can find some incredible creative dining table setting ideas to showcase your handiwork and truly elevate any meal.
Even with a seemingly simple project like napkins, a few questions always come up. Getting these sorted out early builds your confidence and makes sure you end up with a set you're truly proud to use. Let's dig into some of the things people often ask when they're learning how to sew a napkin.
For a standard dinner napkin, a finished size somewhere between 17x17 and 20x20 inches is a great target. This gives you a nice, generous napkin that feels substantial without being too formal or bulky. If you're making a set for brunch or a light lunch, you could even go a little smaller, like 14x14 inches.
The most important thing is to remember your hem allowance before you cut. If you're doing a standard ½-inch double-fold hem, you’ll need to add 1 inch to both the length and width. So, to get that finished 17x17 inch napkin, you’ll start by cutting an 18x18 inch square.
Key Takeaway: Always cut your fabric larger than your desired finished size. A good rule of thumb is to add double the width of your hem to each measurement.
This is a classic sewing headache! When mitered corners pop up or refuse to lie flat, the culprit is almost always one of two things: inaccurate pressing or imprecise trimming. Sharp, crisp mitered corners demand precision.
First, make sure your initial hem folds are pressed perfectly even all the way around, using a hot iron with plenty of steam. Then, when you trim the corner tip before making the final fold, be careful not to snip too much. Leaving a tiny bit of extra fabric is far better than cutting too close to your intersecting crease lines.
A point turner is a fantastic little tool for this. You can also use something like the dull end of a knitting needle to gently poke the corner out into a sharp point before giving it one final, solid press.
Of course! Hand-sewing napkins is a wonderful, relaxing project. It will definitely take a bit more time, but the finished product has a special, handmade charm that a machine just can't quite replicate.
A couple of hand stitches work particularly well for hemming:
Whatever stitch you choose, just make sure you have a good quality hand-sewing needle and thread that matches your fabric. It makes all the difference.
At Famcut.com, we're passionate about helping you succeed in all your sewing and cosplay projects. From high-quality fabrics to expert advice, we have everything you need to bring your creative ideas to life. Explore our full range of supplies at https://famcut.com.
At High Country Quilts we care deeply about community. With our experiences in retail, we know that a store is not only a place to shop but also a place for the community to gather and share. During this busy...

Hi! We’re Adam and Renee Wheaton, the new owners of High Country Quilts! For more than 40 years, we’ve owned and operated vacuum and sewing businesses. Following in Renee’s father’s footsteps after he retired from All Discount Vacuum and Sewing in Colorado...


Leave a comment