

We Love Our Quilting Community
At High Country Quilts we care deeply about community. With our experiences in retail, we know that a store is not only a place to shop but also a place for the community to gather and share. During this busy...


Ever found yourself in a wrestling match with a king-sized quilt, trying to shove all that bulk through the small throat of your sewing machine? There’s a better way. It’s called Quilt As You Go (QAYG), and it completely flips the script by letting you quilt your project in small, manageable pieces before you put them all together. This is the secret to tackling those ambitious quilts with way less stress and a whole lot more creative joy.
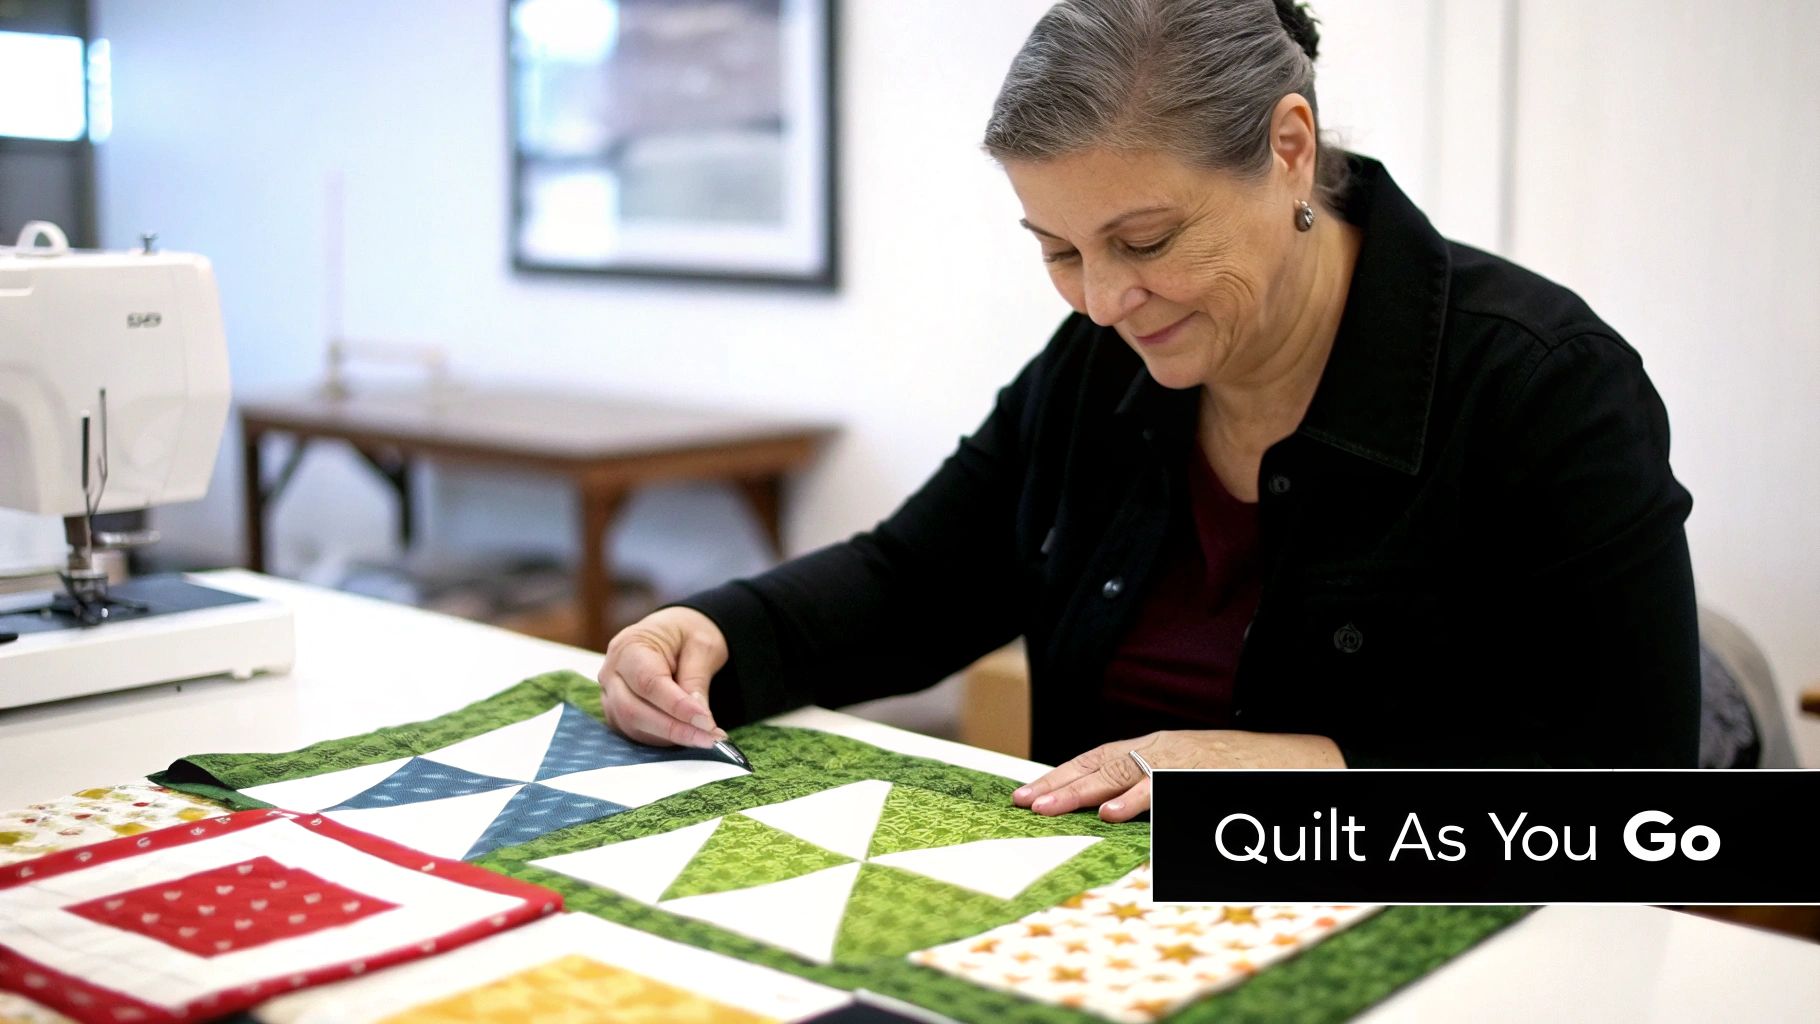
Normally, you'd piece a massive quilt top, layer it with batting and backing to make a quilt "sandwich," and then face the monumental task of quilting the whole thing. Quilt As You Go breaks that intimidating process down. You work on individual blocks or rows, turning each one into a tiny, finished quilt. Only then do you join these quilted sections to create the final masterpiece.
This isn’t just a novelty technique; it’s a seriously practical approach that makes quilting more accessible and, frankly, more fun. While quilting has deep historical roots, modern methods like QAYG have really come into their own with today's incredible sewing machines. The global quilting market is even projected to hit USD 9.67 billion by 2035, and user-friendly techniques are a big reason why. In fact, by removing the "big quilt overwhelm," QAYG is thought to cut down on project abandonment by a whopping 30-40%. You can read more about these growing quilt market trends.
So, what's all the fuss about? The appeal goes way beyond just avoiding that big-quilt struggle. It unlocks a ton of creative and practical benefits that can genuinely change the way you quilt.
Here’s why so many of us have fallen in love with quilting as you go:
This method is a massive confidence-booster, especially for new quilters. Finishing one block at a time gives you a real sense of accomplishment that builds momentum and keeps you excited about your project.
The best part is how adaptable this technique is. You can use it for anything from detailed tote bags and intricate wall hangings to massive, cozy bed quilts. Once you get the hang of a few QAYG methods, you'll be able to confidently tackle any project you can dream up, no matter how big it is or how small your sewing space might be.
Any seasoned quilter will tell you that a great project starts long before you sit down at your machine. This is especially true for quilt-as-you-go. Getting your supplies in order first isn't just about being organized; it's about setting yourself up for a smooth, frustration-free process so you can actually enjoy the creative part.
Think of it as your mise en place. When you have the right tools and materials ready to go, the whole experience flows better, and your results will show it. Let's walk through what you'll need to build a fantastic QAYG toolkit.
The batting is the heart of your quilt sandwich, and in QAYG, its role is even more critical. Since you’re quilting individual blocks and then joining them, the batting’s thickness—or loft—directly affects how flat your finished seams will be. A big, fluffy polyester batt might sound cozy, but it creates bulky joins that are a real headache to piece together later.
For just about any quilt-as-you-go method, I always recommend sticking with a low-loft cotton or an 80/20 cotton-poly blend. These options are the sweet spot. They give your quilting beautiful definition without creating a mountain at every seam, making the final assembly a breeze.
My Go-To Trick: When preparing your blocks, cut the batting to the exact finished size. Then, cut your backing fabric about an inch larger on all sides. That little bit of extra backing fabric is your safety net when you join the blocks together—you can just trim it away at the end.
Quilting is a game of fractions, and accuracy is your best friend. This is where having the right tools isn't a luxury; it's a necessity. Investing in a few quality items will pay for itself over and over in perfectly matched points and beautifully flat quilt tops.
Before you start your next QAYG project, it's a good idea to gather your supplies. Here's a quick checklist of the tools I rely on to get the job done right.
A checklist of required and recommended tools for various QAYG methods, helping you prepare for your project.
| Tool Category | Essential Item | Why It's Important for QAYG | Expert Recommendation |
|---|---|---|---|
| Cutting Tools | Sharp Rotary Cutter | A fresh blade gives you clean, precise edges. A dull one will drag the fabric and ruin your accuracy from the start. | Keep a pack of fresh 45mm or 60mm blades on hand. Change it more often than you think you need to! |
| Cutting Surface | Self-Healing Cutting Mat | Protects your table and your rotary blade while providing a stable, non-slip surface for cutting. | An 18" x 24" mat is a great all-purpose size, but a larger one is even better if you have the space. |
| Measuring Tools | Clear Acrylic Rulers | Essential for accurate cutting. You'll need a long one for strips and a square one for trimming blocks. | A 6" x 24" ruler is a must-have. A 12.5" square ruler is also incredibly versatile for QAYG blocks. |
| Marking Tools | Water-Soluble Marking Pen | Perfect for drawing quilting guidelines or marking join lines that will vanish with a bit of water. | I love the fine-tipped blue markers. The marks are clear but disappear completely. Always test on a scrap first! |
| Machine Accessories | BERNINA Walking Foot #50 | This foot evenly feeds all three layers (top, batting, backing), preventing shifting and puckering for flat, perfect blocks. | For BERNINA owners, this foot is non-negotiable for QAYG. It's the secret to professional-looking results. |
Having these items within arm's reach will make your quilting time more productive and way more fun. And if you ever need a hands-on demonstration, especially with a tool like the BERNINA Walking Foot #50, just stop by High Country Quilts. We're always happy to show you our favorite tips and tricks
Alright, with your tools and fabric at the ready, it's time to get into the heart of it. The wonderful thing about quilt-as-you-go (QAYG) is that there's no single "right" way to do it. It’s more of a philosophy with a few popular paths you can take. We're going to explore the three most common approaches, and I think you'll quickly find one that clicks with your style.
Think of it this way: one method might be your go-to for that intricate sampler quilt you’ve been dreaming up, while another is perfect for whipping up a modern table runner in an afternoon. By the time we're done here, you'll know exactly which one to pick for your next project.
No matter which technique you choose, the basic rhythm is the same: cut, mark, and sew. You're just applying those steps in a slightly different order.
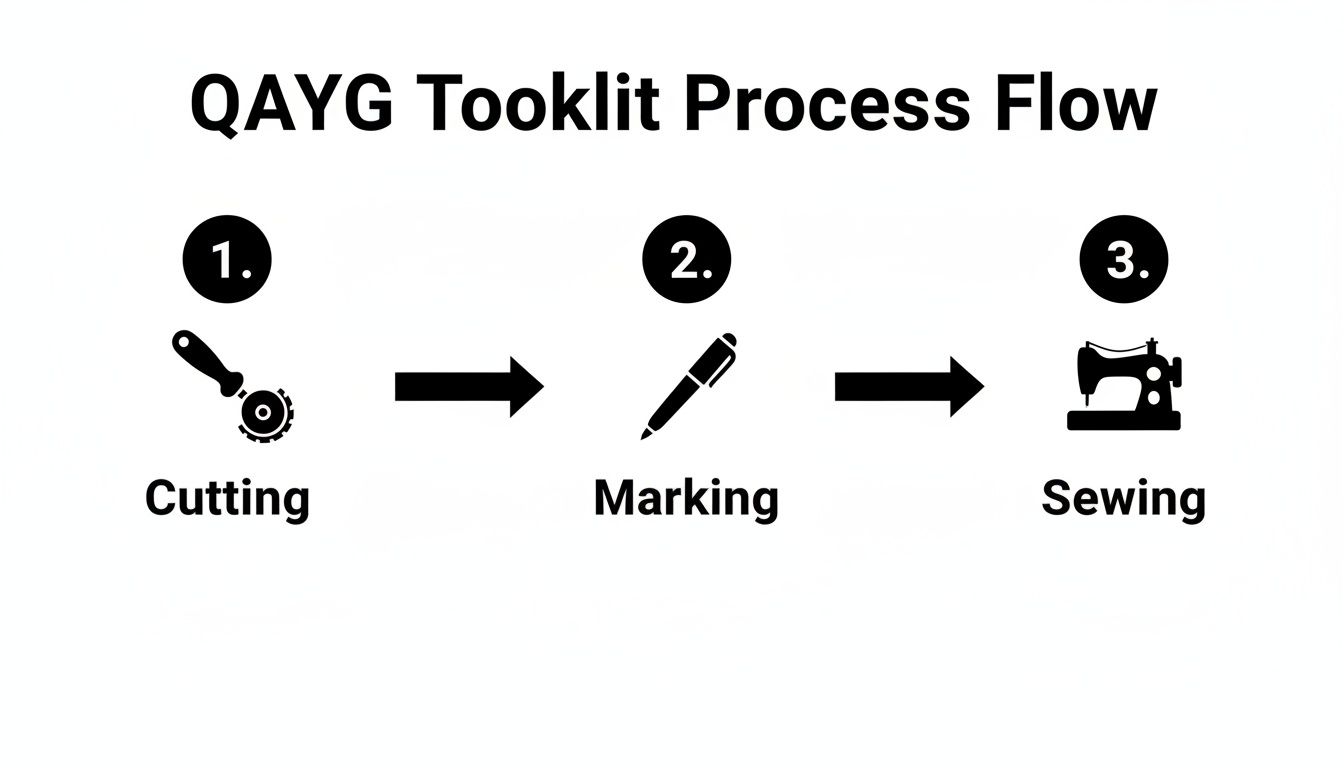
This little visual really nails down the workflow. It's a great reminder of how these fundamental skills are at the core of every QAYG project.
This is the QAYG technique most people learn first, and for good reason. It’s methodical, precise, and feels incredibly satisfying to complete. Just like the name says, you tackle one entire quilt block at a time—the top, batting, backing, and all the quilting—before you even think about the next one.
I especially love this method for a few reasons:
To start, you’ll make little "quilt sandwiches" for each block. Cut your backing and batting about an inch larger all around than your finished block. Then, layer them up: backing (wrong side up), batting, and your pieced top (right side up). Baste them together with your favorite method, whether that's a quick spritz of spray baste or a few pins.
Now for the fun part—quilt that block! Get as creative as you want. Once all your blocks are quilted, you'll trim them down to their exact unfinished size, making sure they're perfectly square before you join them.
For quilts with a linear design—think modern quilts, table runners, or placemats—the strip method is an absolute game-changer. Instead of working with small squares, you quilt long, narrow sections. It’s significantly faster than the block method and leaves you with far fewer seams to join at the end.
Picture making a table runner with bold, vertical strips. You’d piece one long fabric strip, layer it with batting and backing, and quilt that entire panel from top to bottom. Then you do the same for the next strip. When they're all quilted, you just join the long panels together. It's an incredibly efficient way to cover a lot of ground.
A brilliant variation on this is the "flip and sew" technique, which you’ll often find in kits from brands like June Tailor. You start by placing your first fabric piece on the batting, stitch the next piece to it right-sides-together, then simply flip it over and press. You're piecing and quilting at the same time—it’s fast, fun, and a little bit addictive!
This kind of efficiency is a big reason why quilting continues to boom. The North American quilt market is valued at a whopping USD 4.5 billion, and time-saving techniques are a major draw. In fact, many active quilters report that QAYG methods can slash their project finishing time by up to 50%! You can read more about the quilting industry's impressive growth and see why so many are getting hooked.
This hybrid method is a fantastic compromise between the block and row approaches. It’s particularly useful for quilts with a standard grid layout, like a simple nine-patch or a field of squares. With this technique, you piece and then quilt an entire horizontal row of blocks at once.
Here's how it generally works:
This technique is my secret weapon for tackling a bed-sized quilt on my domestic machine. You’re only ever managing the bulk of a single row at a time; the rest of the quilt can be rolled up and kept out of your way. It also streamlines the final assembly, since you connect rows as you go instead of joining dozens of individual blocks at the very end.
Whichever method you choose, dialing in your machine settings is the key to getting that polished, professional look. You’re asking your machine to handle three layers, which requires a bit more muscle. A few simple adjustments will make all the difference.
For your BERNINA, this is my tried-and-true starting point:
Ultimately, choosing the right method comes down to your project and how you like to work. Don't be shy about experimenting! Make a small placemat with the strip method or a set of potholders using the block-by-block approach. The more you practice how to quilt as you go, the more it will feel like second nature.
This is where the magic really starts to happen. All your beautifully quilted blocks, each a little work of art, are ready to come together. Seeing a stack of individual pieces transform into a cohesive quilt top is one of the most satisfying moments in the whole process.
Joining quilted blocks can feel a little intimidating at first. You're dealing with more bulk than a standard quilt top, but don't worry. With the right technique, it's surprisingly manageable. The main goals are to manage that bulk and hide the raw edges neatly. Let's walk through a few of my favorite methods so you can find the perfect one for your project.
A little bit of prep work now will save you a world of headache later. Trust me on this. Taking these steps is the secret to getting a quilt that lies flat and looks professionally finished.
First things first: square up every single block. This is non-negotiable. Grab a good acrylic ruler and your rotary cutter and trim each quilted block to its exact unfinished size. This guarantees that all your pieces will line up perfectly, preventing any wonky seams or mismatched corners as you join them.
Next, you need a strategy for your seam allowances. To get seams that lie incredibly flat, I highly recommend trimming the batting out of the seam allowance on the edges you'll be joining. It makes a huge difference. Just carefully trim about a 1/4 inch of batting away from the two sides of the block that will be sewn to another.
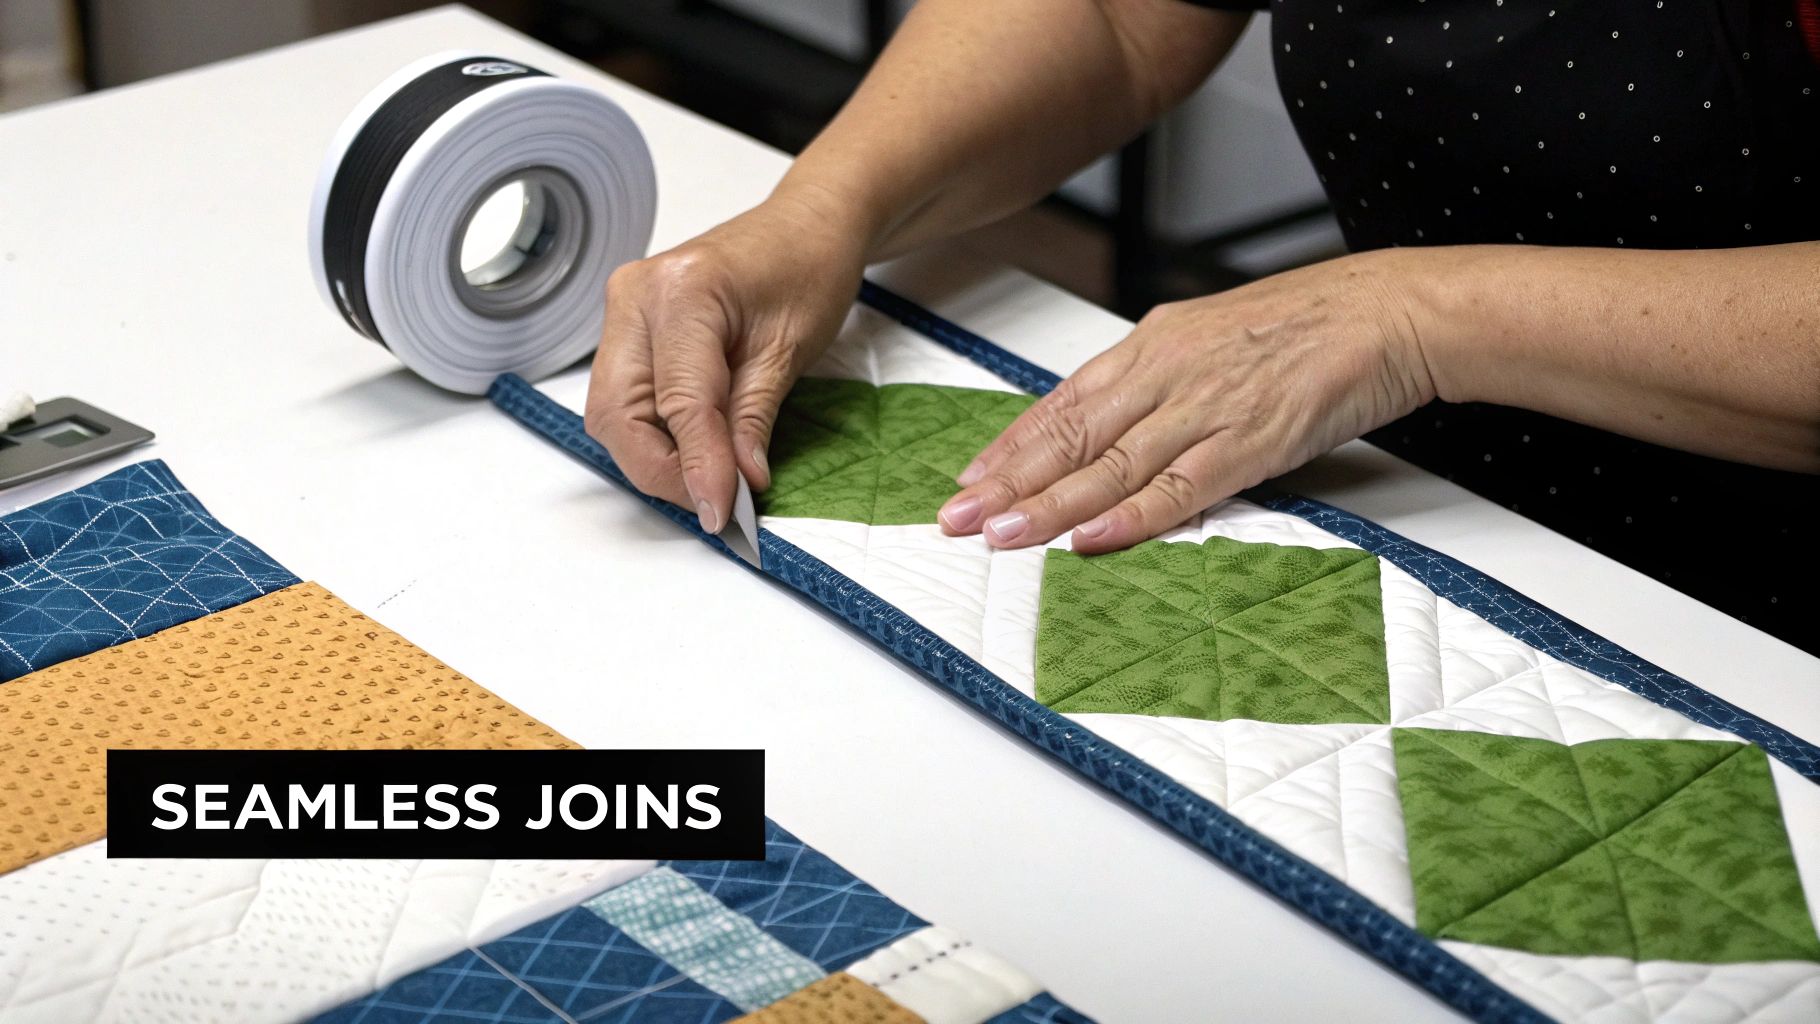
Sashing is the tried-and-true way to join QAYG blocks. It’s more than just a joining strip; it becomes a beautiful design element that frames your blocks and neatly covers up all the raw edges of your quilt sandwiches. You can apply sashing just to the front for a quick finish or to both sides if you're aiming for a fully reversible quilt.
This is the most direct and common approach. It gives you that clean, traditional look on the front of your quilt.
The back will have raw edges at the seams. You can cover these by cutting a slightly wider sashing strip, pressing the edges under, and stitching it down over the seam by hand or machine for a tidy finish.
Choosing how to join your blocks can really change the final look of your quilt. Some methods are traditional and framing, while others create a more modern, seamless design. Here’s a quick rundown of the most popular techniques to help you decide.
| Joining Method | Best For | Pros | Cons |
|---|---|---|---|
| Front Sashing | Traditional quilts, beginners | Very straightforward, creates a classic framed look for blocks, hides minor block size variations. | Requires a separate finishing step for the back to cover raw seams. |
| Front & Back Sashing | Reversible quilts, table runners | Creates a beautifully finished look on both sides with no raw edges visible. | Can be a bit bulky at intersections, requires very precise cutting and sewing. |
| No-Sashing Join | Modern quilts, seamless designs | Results in a completely flat top with no visible sashing, ideal for letting the block design flow. | Less forgiving of block size inconsistencies, requires very accurate seam allowances. |
Each method has its place, and the best one really depends on the quilt you’re making and the look you’re going for. Don't be afraid to experiment with a couple of test blocks to see which one you like best!
If you're making a modern quilt where you want the block patterns to flow right into each other, the no-sashing method is genius. It’s a clever technique that joins the blocks edge-to-edge on the front while neatly encasing the raw seams on the back.
Here’s how it works:
This technique for how to quilt as you go has become a real favorite among modern quilters. It might take a bit of practice to get the hang of it, but the beautifully flat and continuous finish you get is absolutely worth it. Once you've got your joining method down, you're on the home stretch to a finished quilt.
No quilt is truly finished until the binding is on. For a quilt-as-you-go project, this is the final touch that brings all your hard work together into a beautiful, cohesive piece. A great binding does more than just hide the raw edges—it creates a durable frame that prepares your quilt for a lifetime of cuddles and use.
With the right techniques, you can create a clean, polished edge that gives your quilt that professional, heirloom quality. Let's get that binding on.
First things first, let's figure out how much fabric you'll need. It's a simple calculation. Start by measuring the full perimeter of your quilt (add up all four sides). Then, give yourself some breathing room by adding an extra 10 to 12 inches to that total. This little bit of extra length is a lifesaver when it's time to join the ends.
I almost always cut my binding strips between 2.25 and 2.5 inches wide. This is the sweet spot for a classic double-fold (or French-fold) binding, which is hands-down the most durable option out there.
To get one long, continuous strip, you’ll join your shorter strips together with a diagonal seam. Why diagonal? This clever trick distributes the seam's bulk so it doesn't create a noticeable lump in your binding.
Repeat this until all your strips are connected. The final prep step is to press the entire long strip in half lengthwise, wrong sides together. Now you’re ready to head to the machine.
Attaching the binding with your sewing machine is fast, efficient, and creates a seriously strong edge. I always begin by sewing the binding onto the front of the quilt. Leave a generous eight-inch tail at the beginning before you start stitching—you'll need it later to join the ends.
Line up the raw edges of your folded binding with the raw edge of the quilt top. Using a 1/4-inch to 3/8-inch seam allowance, start sewing. This is the perfect job for a BERNINA Walking Foot #50, as it ensures all those layers feed through evenly without any shifting.
When you get close to a corner, stop stitching about a quarter-inch from the edge and backstitch. Pull the quilt out from under the needle. Fold the binding strip straight up, away from the quilt, which creates a 45-degree angle. Then, fold it back down so it lines up with the next side of the quilt. That little fold is the secret to a perfectly crisp, mitered corner. Start stitching again right from the top edge of that side.
The practicality of how to quilt as you go has made it a favorite in the quilting community. This method has exploded in popularity, with tutorials gaining over 10 million YouTube views since 2015. It's perfectly suited for the 75% of quilts made for home use, making large projects far more approachable. You can discover more insights about today's quilting market on craftindustryalliance.org.
To finish it all off, stop sewing about a foot away from where you first started. Take your two binding tails, overlap them, and trim them so they meet up perfectly. Join them with the same diagonal seam you used before. Once they're joined, you can stitch that final open section of the binding down.
The last step is my favorite part. Wrap the binding around to the back of the quilt and secure it with a neat blind stitch by hand. It’s a classic, invisible finish that truly makes every quilt feel special.
Even after years of quilting, I still run into the occasional hiccup, and quilt-as-you-go has its own little quirks. But don't fret! Most of these issues are surprisingly simple to sort out. Let’s walk through some common snags and how to fix them so you can get back to what you love—quilting.
A frequent frustration I hear about is wavy or distorted blocks. You finish quilting a block, and it just won't lie flat. This almost always comes down to uneven quilting density. When one part of the block is quilted much more heavily than another, it starts to pull and pucker the fabric.
To get ahead of wavy blocks, your best bet is to plan your quilting to be evenly distributed across the surface. If you already have a warped block on your hands, don't despair! A good press with plenty of steam can often relax the fibers right back into place. I also swear by using a temporary spray baste to hold the layers together from the get-go; it really prevents that shifting that causes distortion in the first place.
Then there's the issue of bulky seams, especially where all those quilted blocks meet. That extra bulk can make an otherwise beautiful quilt top look a bit lumpy. The fix is incredibly simple: trim the batting out of the seam allowance before you join your blocks. Just snip away that quarter-inch of batting from the edges you'll be sewing. It's a tiny step that makes a world of difference in getting your seams to press nice and flat.
Expert Tip: Whenever you can, press your joining seams open. This distributes the fabric bulk evenly to both sides of the seam line, which is absolutely key for achieving that smooth, professional finish we're all after.
Sometimes the smallest oversight can cause the biggest headache down the line. Before you get too deep into your next QAYG project, do a quick mental run-through of these points. It can save you a lot of seam-ripping later!
As you start exploring quilt-as-you-go, you'll naturally run into a few questions. I've been there! Let's tackle some of the most common ones that come up so you can keep stitching with total confidence.
You absolutely can, and this is where the fun begins. While your standard quilting cotton is the go-to for a reason—it’s stable, predictable, and easy to work with—don't let that limit your creativity. Think about branching out to cozy flannel for a warm lap quilt or even a lightweight denim for a durable tote bag.
The real trick is to match the fabric to what you’re making. The one non-negotiable step? Always pre-wash your fabrics, especially if you're mixing different types. This will save you from the headache of uneven shrinking after all your hard work is done.
My Pro Tip: The fabric choice is flexible, but your batting choice is key. Stick with a low-loft batting, like a smooth cotton or an 80/20 blend. This is crucial for keeping your seams flat and manageable when you join your blocks.
This is probably the #1 challenge quilters face with QAYG, especially where four corners meet. It can get thick! The best way I've found to handle this is to meticulously trim the batting out of the seam allowances before you join your blocks.
Another simple but effective trick is to press your joining seams open whenever the fabric allows. This small step makes a huge difference by distributing the bulk. Taking a moment to pin carefully right at those intersections will also help you keep everything aligned and prevent shifting under the needle.
Feeling ready to give it a try? Here at High Country Quilts, we've got all the tools, fabrics, and BERNINA know-how to help you nail your next QAYG project. Stop by the shop or browse online to get everything you need!
At High Country Quilts we care deeply about community. With our experiences in retail, we know that a store is not only a place to shop but also a place for the community to gather and share. During this busy...

Hi! We’re Adam and Renee Wheaton, the new owners of High Country Quilts! For more than 40 years, we’ve owned and operated vacuum and sewing businesses. Following in Renee’s father’s footsteps after he retired from All Discount Vacuum and Sewing in Colorado...


Leave a comment