

We Love Our Quilting Community
At High Country Quilts we care deeply about community. With our experiences in retail, we know that a store is not only a place to shop but also a place for the community to gather and share. During this busy...


That final step—finishing the edges—is what truly completes your quilt. It’s the frame for your masterpiece, the detail that protects all your hard work and defines the final look. The two most popular roads to take are traditional fabric binding for a durable, classic finish, or a sleek facing for a clean, modern aesthetic.
Your choice really depends on the quilt's destiny and the story you want it to tell.
The edge finish is what elevates your quilt top from a project to a treasured heirloom. It's so much more than a simple border; it's the finishing touch that protects your quilt from the rigors of daily life. This guide will walk you through the most trusted methods, from classic binding to contemporary facing, so you can choose the perfect option with confidence.
We'll look at how the quilt's purpose—is it a cozy bed quilt destined for snuggles or a gallery-worthy wall hanging?—shapes your decision. You’ll learn how to match the finish to your quilt’s style and your own skill level, guaranteeing a result that’s both gorgeous and built to last.
So, how do you decide how to finish quilt edges? It usually boils down to a few key questions you can ask yourself:
Recent trends definitely show a favorite emerging. A global survey revealed that a whopping 68% of quilters now prefer binding as their go-to method for finishing edges. This jump in popularity is largely thanks to the rise of machine quilting and the durable finish it provides.
Your quilt's edge is the final word in its story. A crisp, well-executed binding or facing not only secures the layers but also demonstrates a commitment to craftsmanship from the first stitch to the very last.
Deciding on the perfect finish can feel like a big decision, but it's also one of the most satisfying parts of the process. We'll help you find the right path for your project.
To help you get a quick overview, here's a handy table summarizing some of the most common finishing techniques. Use it to quickly compare methods and see which one might be the best fit for your current quilt.
| Finishing Method | Best For | Appearance | Skill Level |
|---|---|---|---|
| Double-Fold Binding | Bed quilts, baby quilts, heavily used items | Classic, durable frame | Beginner |
| Single-Fold Binding | Wall hangings, decorative items, delicate fabrics | Thinner, less bulky edge | Beginner |
| Faced Edge | Art quilts, modern quilts, irregular shapes | Clean, borderless, "invisible" finish | Intermediate |
| Serged Edge | Quick projects, charity quilts, utility quilts | Fast, functional, exposed-thread look | Beginner |
| Scalloped Edge | Vintage-inspired quilts, decorative throws | Soft, decorative, curved edge | Advanced |
Each of these methods offers a unique look and level of durability. Don't be afraid to experiment with different techniques as you grow your quilting skills
There's a reason double-fold binding is the go-to finish for most quilters. It’s the undisputed champion, creating a strong, classic frame that protects your quilt through years of snuggles and washes. Getting this finish just right is an incredibly satisfying part of the process, a true signal of craftsmanship.
Let's get down to the nitty-gritty of making it happen.
First up, you need to figure out how much fabric you'll need. Just measure the perimeter of your quilt (that’s all four sides added together) and toss in an extra 15 inches or so. This little bit of insurance gives you plenty of room to join your strips and turn the corners without sweating it.
For a standard double-fold binding, cutting your strips 2.5 inches wide is the sweet spot. I've found this width gives you enough fabric to wrap snugly around the quilt's layers without being too bulky or, even worse, too skinny to cover your stitches.
Once your strips are cut, the next big step is joining them together. You could just sew them end-to-end, but that creates bulky, straight seams that are a real pain to fold neatly. The pro move here is to join them with a diagonal seam.
Here's how:
This little trick leaves you with a flat, strong join that distributes the bulk evenly when you fold the binding. It makes all the difference.
After you’ve joined all your strips into one long super-strip, press those diagonal seams open. Then, fold the entire length of the binding in half (wrong sides together) and give it a good press. Now you've got a beautiful, professional-looking strip of binding ready for your quilt.
Deciding on the best finish often comes down to the quilt's purpose, your desired look, and your comfort level with different techniques. This visual guide really breaks it down well.
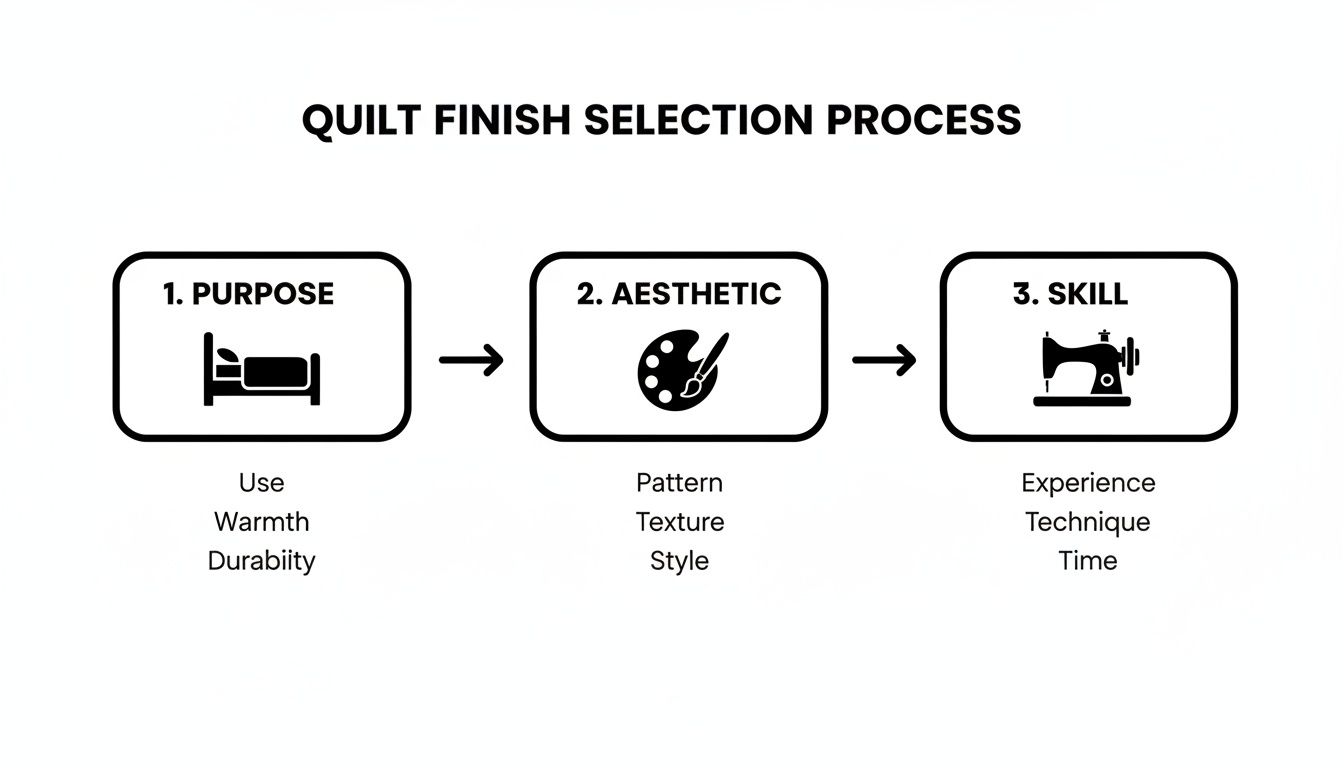
As the chart shows, the first question to ask is what the quilt will be used for—a bed quilt needs a more durable edge than a wall hanging, and that choice sets the stage for everything else.
I always start by attaching the binding to the quilt top by machine. Pick a spot along one of the longer sides and start sewing, but be sure to leave about an 8-inch tail of binding free at the beginning. You’ll need this later to join the ends.
Line up the raw edges of your folded binding with the raw edge of your quilt top and sew with a quarter-inch seam allowance. A walking foot on your BERNINA machine is your best friend here—it ensures all the layers feed through evenly and stops any dreaded puckering.
When you get close to a corner, stop sewing exactly a quarter-inch from the edge and backstitch. Take the quilt out from under the needle. Now, fold the binding strip straight up, creating a neat 45-degree angle. Then, fold the strip straight back down so it lines up perfectly with the next side of the quilt. This creates a little triangular fold of fabric under the binding, which is the magic behind a perfect mitered corner. You can now start sewing again right from the top edge of this new side.
The secret to a crisp mitered corner isn't speed; it's precision. Taking the time to fold the fabric accurately before you continue sewing makes all the difference between a bulky lump and a sharp, professional-looking finish.
Once the binding is sewn all the way around the front, you have a choice to make. Do you want to finish it by machine or by hand?
Honestly, both methods give you a fantastic result. The best choice really just depends on the quilt's destiny and your personal preference.
Sometimes, a traditional binding just doesn't feel right. It can look like a frame that distracts from the quilt top itself. For modern quilts, art pieces, or wall hangings where you want the design to take center stage, facing is the perfect solution. It's a fantastic technique that hides the edge finishing on the back, creating a crisp, borderless look that's ready for a gallery wall.
The effect is an "invisible" border, letting your piecing or quilting run right off the edge. This makes the design the absolute star of the show. It's a must-know method for any quilter who leans toward a contemporary, minimalist aesthetic. It's no wonder this approach has become so popular in the quilting world.
In fact, market data shows facing is used in 22% of high-end quilts sold globally. That tells you a lot about the premium appearance it provides. If you're curious, you can read the full research about quilt market trends to see how modern styles are shaping the industry.
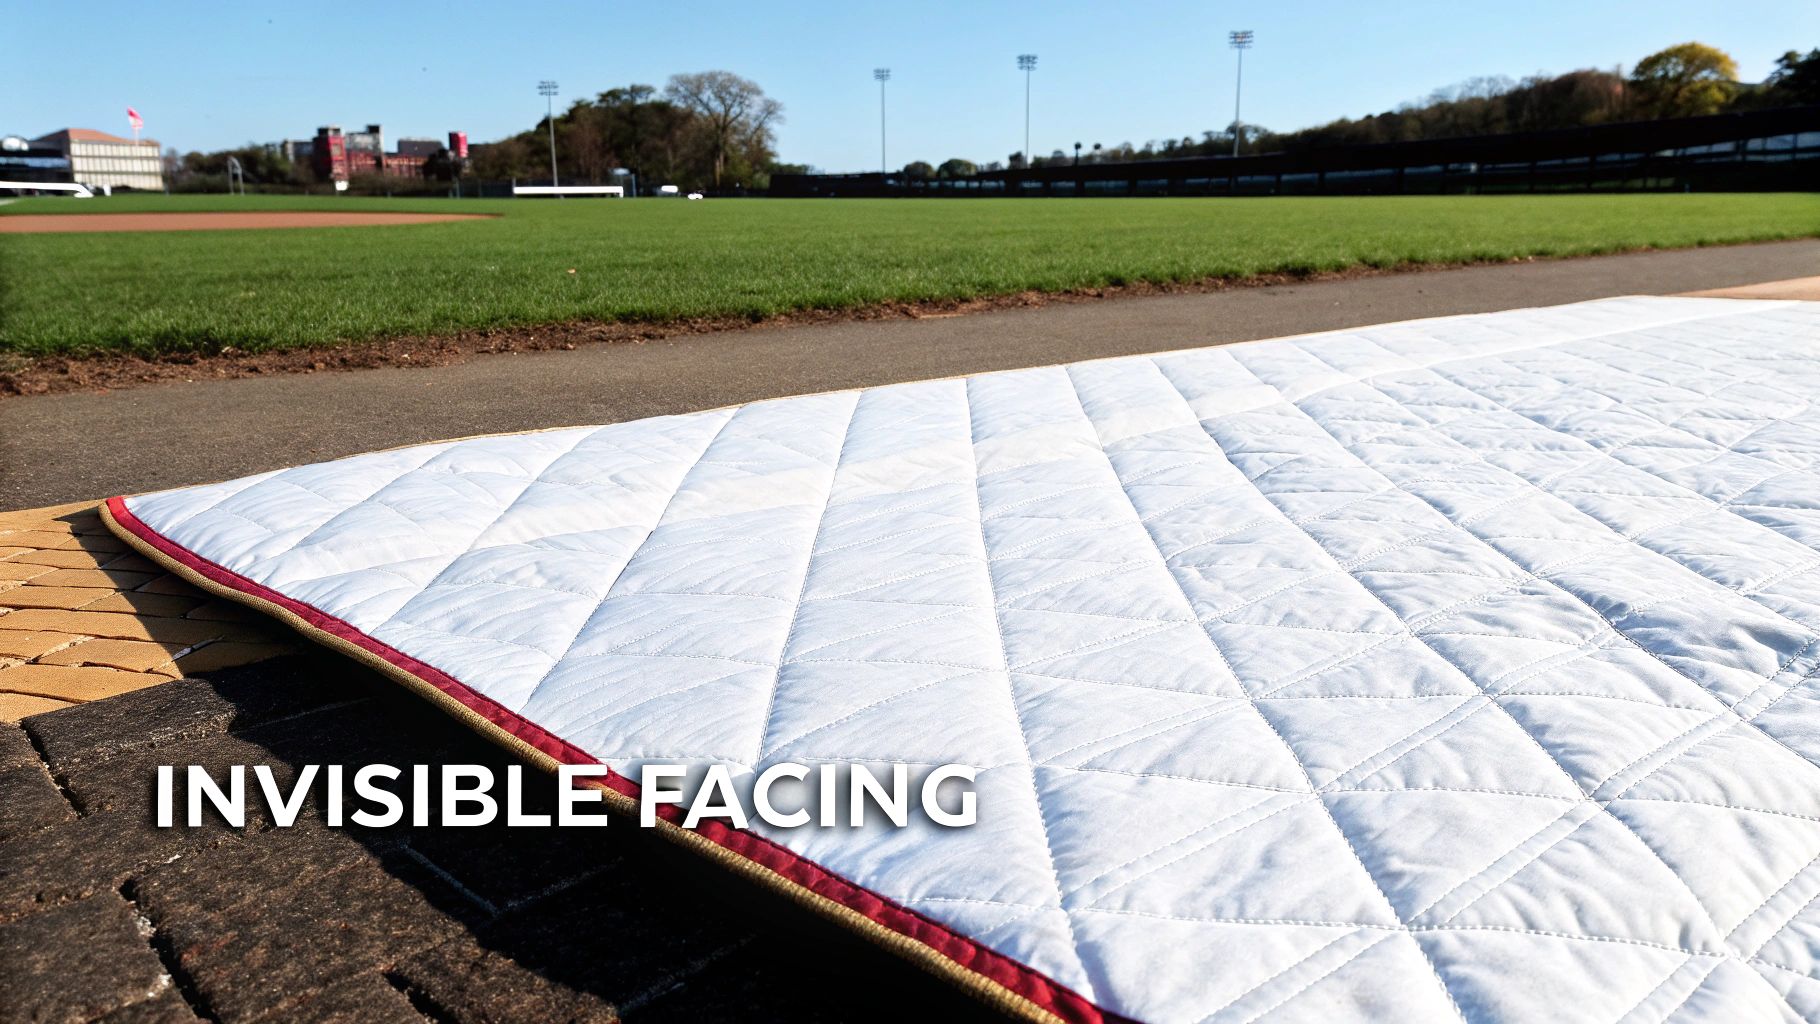
The whole idea behind facing is pretty straightforward. You're sewing fabric strips to the front of the quilt and then turning them completely to the back to hide the raw edges. Think of it as the opposite of a binding, which wraps around the edge from front to back.
First up, you'll need to cut your fabric strips, usually about 2 inches wide. One great thing about facing is that you don't have to join them all into one long, continuous strip. You'll just need four separate pieces—two for the sides and two for the top and bottom.
Start by sewing the side-facing strips to the quilt first, with the right sides of the fabric together, using a standard quarter-inch seam. Once they're attached, press the strips away from the quilt. Next, do the same thing with the top and bottom strips, making sure they extend over the side strips you just sewed down.
Facing is all about precision. Since the goal is a perfectly flat, square quilt, you really have to nail your cutting and maintain a consistent quarter-inch seam allowance. There's not a lot of wiggle room here.
The real magic of a professional-looking faced edge happens at the corners. After you’ve pressed all the strips away from the quilt top, you need to deal with the bulk before turning everything to the back.
The final touch is securing the facing to the back of the quilt. My go-to is a neat hand stitch, like a blind hem or a ladder stitch. The goal is a finish that's completely invisible from the front, leaving you with nothing but your beautiful quilt design from edge to edge. If you're in Colorado Springs and need any notions like specialty needles or the perfect matching thread, stop by our shop
Ready to let your quilt's edges steal the show? While a standard binding or facing gives you that crisp, clean finish, some projects just beg for a little more flair. This is where decorative treatments like piping and scalloped edges come in, transforming a beautiful quilt into a true work of art.
Piping is my go-to for adding a sophisticated pop of color and texture right between the quilt and its binding. It’s a simple fabric-covered cord that creates a firm, raised detail, lending both visual interest and a bit of structure to the quilt's perimeter. It's a high-end touch that truly signals a well-crafted piece.
You'll see this technique on about 15% of commercial quilts, especially in the growing global market, because it looks so polished. That detail isn't just for show, either; it can make the edges about 10% more resistant to wear compared to standard finishes. If you're curious about the business side of quilting, you can explore more about market trends in the quilting industry.
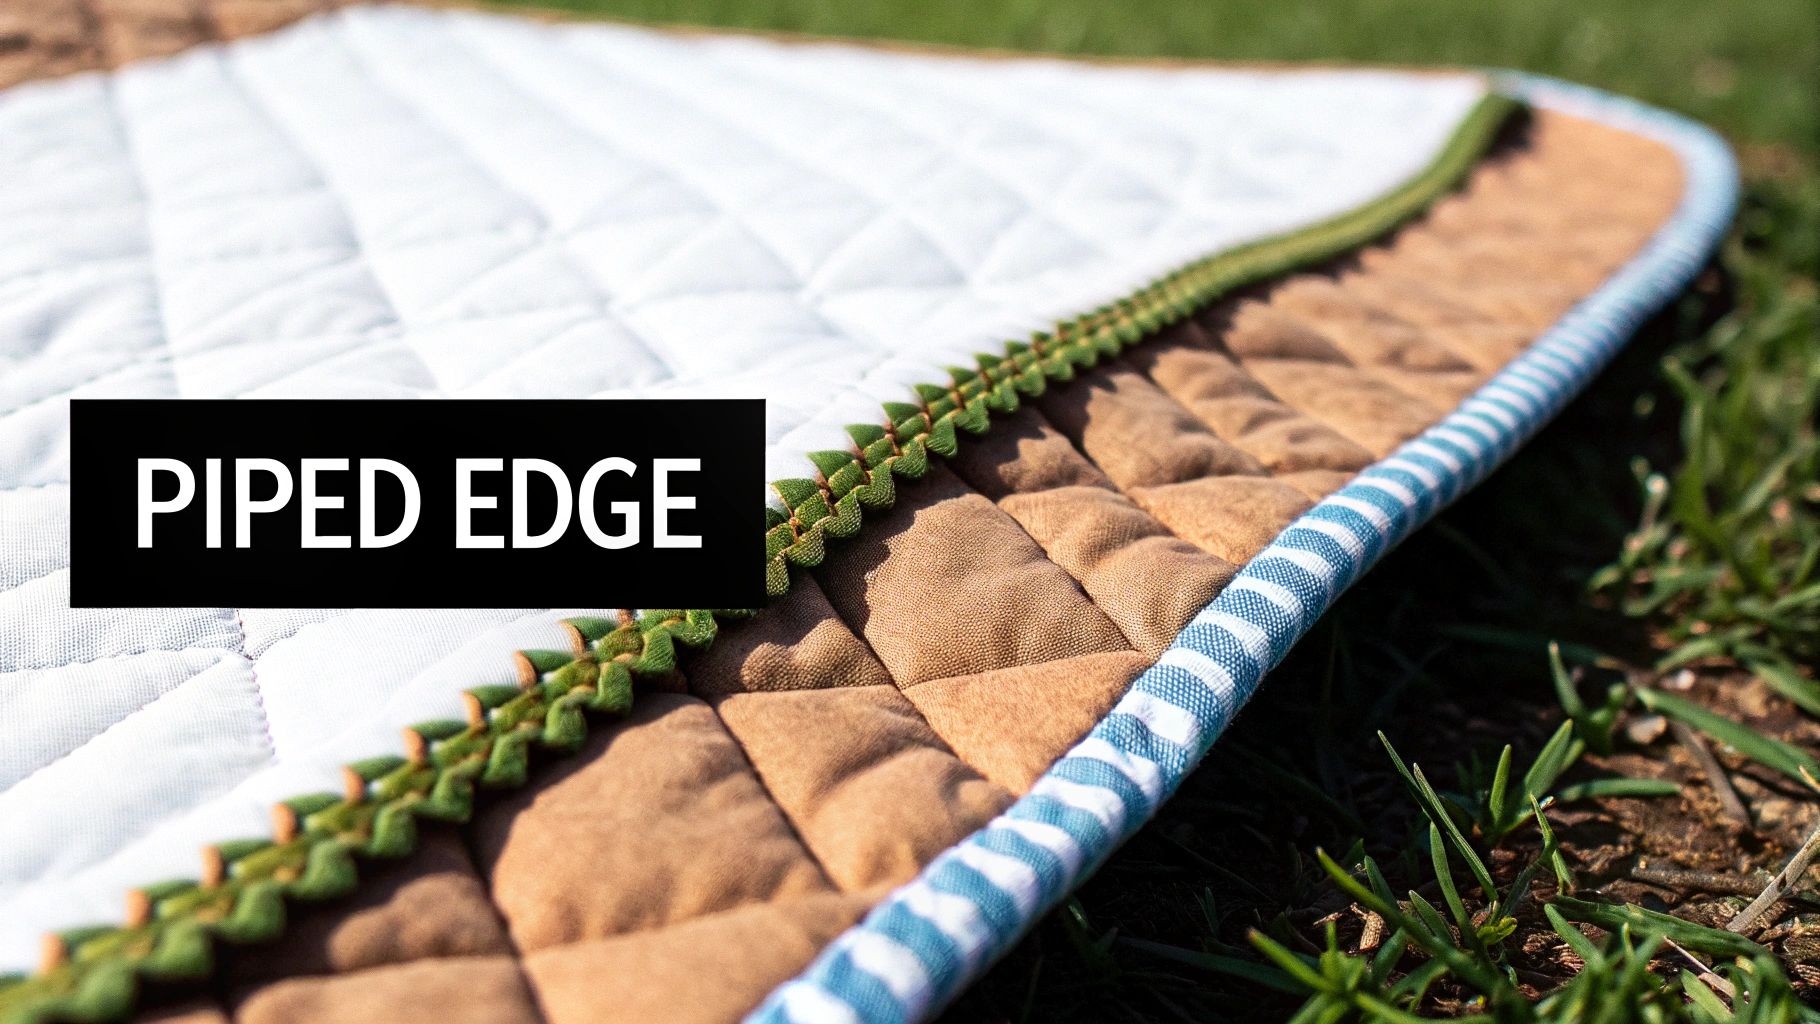
Adding piping sounds a lot harder than it is, I promise. The basic idea is to create a fabric tube around a cord—we have cording in all different thicknesses here in the shop—and then stitch it to the raw edge of your quilt top before adding the final binding.
Here’s how I tackle it:
With the piping securely basted, all that's left is to attach your double-fold binding right on top of it. This sandwiches the piping neatly for a super clean and professional look.
A well-placed piped edge adds this wonderful, subtle layer of dimension and color. It's one of those details that might not scream for attention, but it makes the whole quilt feel custom and complete.
If you're after a softer, more romantic or vintage feel, a scalloped edge is absolutely stunning. This involves creating a series of gentle curves along the quilt's border. You'll then have to finish them with a bias binding that can carefully follow every contour. It definitely takes a bit more time and patience, but the result is a charming, heirloom-quality finish that's just perfect for baby quilts or decorative throws.
Don't forget about the power of your machine's built-in decorative stitches, especially for smaller projects like placemats or mug rugs. Once your layers are quilted, just pick a fun stitch—a classic blanket stitch or a satin scallop, perhaps?—and sew along the perimeter. It’s a fast, fun, and utterly unique way to finish an edge.
Getting that perfect, professional-looking edge on your quilt really comes down to having the right tools on hand. It’s like trying to cook a gourmet meal with a dull knife—you can do it, but it’s a lot harder and the results just aren't the same. Investing in a few key pieces of equipment will make the whole process smoother and seriously upgrade the quality of your finished quilts.
Think of this as your go-to list for success. While there's a whole world of quilting gadgets out there, these are the absolute must-haves for finishing edges. They’re the tools that will help you cut with precision, sew straight, and handle your quilt with confidence.
Clean, precise cuts are the bedrock of a beautiful binding or facing. If your strips aren't straight and consistent, getting that crisp, polished look is next to impossible.
Your sewing machine does the heavy lifting, but a couple of special add-ons can turn a potentially tricky job into a breeze. These accessories are specifically designed to handle the bulk of a quilt and help you get every stitch just right.
A walking foot is probably the single most important tool for attaching binding. It has its own set of feed dogs on top that move in sync with the ones on your machine, so all the layers—top, batting, and backing—are pulled through together. This is the secret to preventing the layers from shifting and causing those dreaded wavy, stretched-out edges.
So many BERNINA machines come standard with a walking foot, or you can easily find one for your specific model. It’s a tool that makes a huge difference, keeping puckers at bay and ensuring your binding lies perfectly flat.
Another little hero is the quarter-inch foot. This presser foot has a handy little guide on the side that helps you sew a perfect quarter-inch seam allowance without even thinking about it. It's especially critical for getting those sharp, beautifully mitered corners.
Beyond the big-ticket items, a few smaller notions can save you a ton of time and make your work much more accurate.
Even the most seasoned quilters run into snags when finishing a quilt. It’s that final step, and after pouring so much work into a project, seeing wavy binding or bulky corners can be maddening. But don't worry—most of these common hiccups have simple fixes.
Let's walk through a few of the most frequent finishing headaches and figure out how to solve them for good.
This is probably the number one frustration I hear about. You sew on your binding, and instead of lying flat, it flares out in waves. The culprit here is almost always stretching.
This sneaky problem happens in two main ways:
The solution is to relax your grip. Let your machine and its feed dogs do all the heavy lifting. A walking foot is your best friend here, as it pulls all three layers of your quilt sandwich through evenly. Your only job is to guide, not to force.
There's nothing quite like the disappointment of a lumpy, rounded corner that refuses to lie flat. A sharp, crisp mitered corner is the goal, and the enemy of that goal is bulk. Usually, this means there’s too much extra fabric packed into that tiny space.
First things first, always square up your quilt before you even think about binding. After quilting, your edges can get a little wonky. Trimming them so they're perfectly straight with true 90-degree corners gives you a clean, stable foundation to work with. When it's time to fold the binding at the corner, be deliberate. A rushed, sloppy fold is guaranteed to trap fabric and create that dreaded lump.
My Go-To Trick: After you've sewn the binding to the front but before you wrap it to the back, snip the quilt's corner off diagonally. Get close to your stitch line, but don't cut it! This one little trim removes a surprising amount of bulk and makes folding a neat miter on the back so much easier.
You're on the home stretch, topstitching your binding, and the stitch line is wobbly. This can happen for a few reasons, but the biggest one is often speed. Sewing too fast, especially when you're wrangling a big quilt, makes it nearly impossible to maintain a perfectly straight line.
Slow down. It's not a race! Focus on keeping a consistent seam allowance from the binding's edge. This is where a specialty presser foot, like a quarter-inch foot or an edge-stitching foot, can be a game-changer by giving you a physical guide to follow.
Also, don't forget the basics: check your thread tension and put in a fresh needle. A dull or bent needle is a classic cause of skipped stitches. I always make it a habit to start with a new needle right before I begin binding. It’s a small step that prevents a lot of potential headaches.
You’ve pieced, quilted, and now you’re standing at the finish line. It's completely normal to have a few questions pop up right before you bind your quilt—after all, this is the final step that frames all your hard work! Getting it just right is what makes a quilt feel truly complete.
Over the years, I've heard just about every question in the book. Here are some of the most common ones, along with some straight-from-the-studio advice to help you tackle this last, crucial stage.
If you want a quilt edge that can stand the test of time, you can't beat a traditional double-fold binding. Hands down, it’s the workhorse of quilt finishes.
This technique wraps two layers of fabric securely around the raw edge, creating a robust border that holds up beautifully to repeated use and washing. It’s my go-to for any quilt that's meant to be truly lived with.
Think about using it for:
While a faced edge is elegant for an art quilt, it just doesn't provide the same level of protection against fraying and wear. When durability is what you're after, double-fold binding is your champion.
Absolutely! Standard quilting cotton is what most of us use, and it works perfectly. For quilts with straight sides, cutting your binding strips on the straight-of-grain (parallel to the selvage edge) is the standard method. It's stable, economical, and gets the job done beautifully.
But here’s the big exception: curves. If you’re finishing a quilt with a scalloped border or any kind of rounded edge, you must use bias binding. Strips cut on the bias (at a 45-degree angle) have a natural stretchiness. This flexibility is what lets the fabric hug those curves smoothly without any awkward puckers or bunching.
A Little Insider Tip: Some quilters, myself included, will occasionally use bias binding even on straight-edged quilts. Why? The diagonal grain of the fabric means the threads aren't perfectly aligned with the quilt's edge. Over a long, long time, this can distribute the wear more evenly, making it just a tad more durable.
You’ve put so much care into finishing your quilt, so let's make sure it lasts. Gentle washing is everything. I always recommend a mild, pH-neutral detergent and a delicate cycle with cold water. It's also a good idea to wash quilts by themselves—zippers and buttons on other laundry items are notorious for snagging bindings. For a really deep dive into quilt care, this ultimate guide to caring for your quilt is packed with great advice.
When it comes to drying, air-drying is your safest bet. Lay the quilt flat on a clean sheet or some towels, or drape it over a drying rack so its weight is evenly supported. This prevents the wet fabric from stretching the binding. If you need to use a machine, stick to the lowest heat setting or, even better, a no-heat, air-fluff cycle.
At High Country Quilts, we believe every quilt tells a story, and the final edge is the perfect punctuation. Whether you need the right tools, the perfect fabric for your binding, or hands-on guidance in one of our classes, we're here to help you finish your masterpiece with confidence. Visit us online to explore our supplies and class schedules. https://hcquilts.com
At High Country Quilts we care deeply about community. With our experiences in retail, we know that a store is not only a place to shop but also a place for the community to gather and share. During this busy...

Hi! We’re Adam and Renee Wheaton, the new owners of High Country Quilts! For more than 40 years, we’ve owned and operated vacuum and sewing businesses. Following in Renee’s father’s footsteps after he retired from All Discount Vacuum and Sewing in Colorado...


Leave a comment