

We Love Our Quilting Community
At High Country Quilts we care deeply about community. With our experiences in retail, we know that a store is not only a place to shop but also a place for the community to gather and share. During this busy...


We’ve all been there. You’re in the middle of a project, hitting your stride, and then it happens: skipped stitches, a tangled mess of thread under your fabric, or tension that suddenly goes haywire. It’s enough to make you want to throw the whole project out the window.
But before you start fiddling with the tension dial or blaming your needle, take a deep breath. The culprit is almost always something much simpler: lint.
It sounds almost too easy, but keeping your machine clean is the single most effective thing you can do for its health and your sanity. Those tiny bits of thread and fabric dust might seem harmless, but they build up in the worst possible places, creating roadblocks that throw off your machine's delicate timing.
Learning how to clean out those nooks and crannies is your best first move for troubleshooting. It’ll save you countless hours of frustration and can often prevent an unnecessary, and expensive, trip to the repair shop.
From my experience, two areas are absolute magnets for lint and cause the most common sewing headaches.
The Feed Dogs: Those little metal teeth under your needle plate are responsible for gripping the fabric and moving it along. When they get packed with lint, they can’t get a good hold, which leads to uneven feeding and wonky stitches. Think of it like trying to walk through a snowdrift—it just doesn't work well.
The Bobbin Area: This is ground zero for lint explosions. The bobbin spins at high speed, creating and collecting a surprising amount of fluff. This gunk gets into the hook mechanism, which is the heart of stitch formation, leading directly to skipped stitches and those dreaded "bird's nests" of thread. No amount of adjusting the tension will fix a problem caused by a clogged bobbin case.
A dirty machine isn't just an annoyance; it's a primary cause of mechanical failure. I always tell my students to think of cleaning not as a chore, but as the secret to perfect stitches and a machine that will last for decades.
The impact is more dramatic than you might think. In the industrial world, it’s estimated that up to 60% of sewing machine malfunctions are caused by a simple buildup of lint, dust, and old oil. Factories that are strict about their cleaning routines see as much as 30% fewer breakdowns. You can find more fascinating data on textile equipment maintenance on indexbox.io.
While you’re probably not running your home machine 24/7, the principle is identical. A clean machine is a happy machine, and a happy machine sews beautifully.
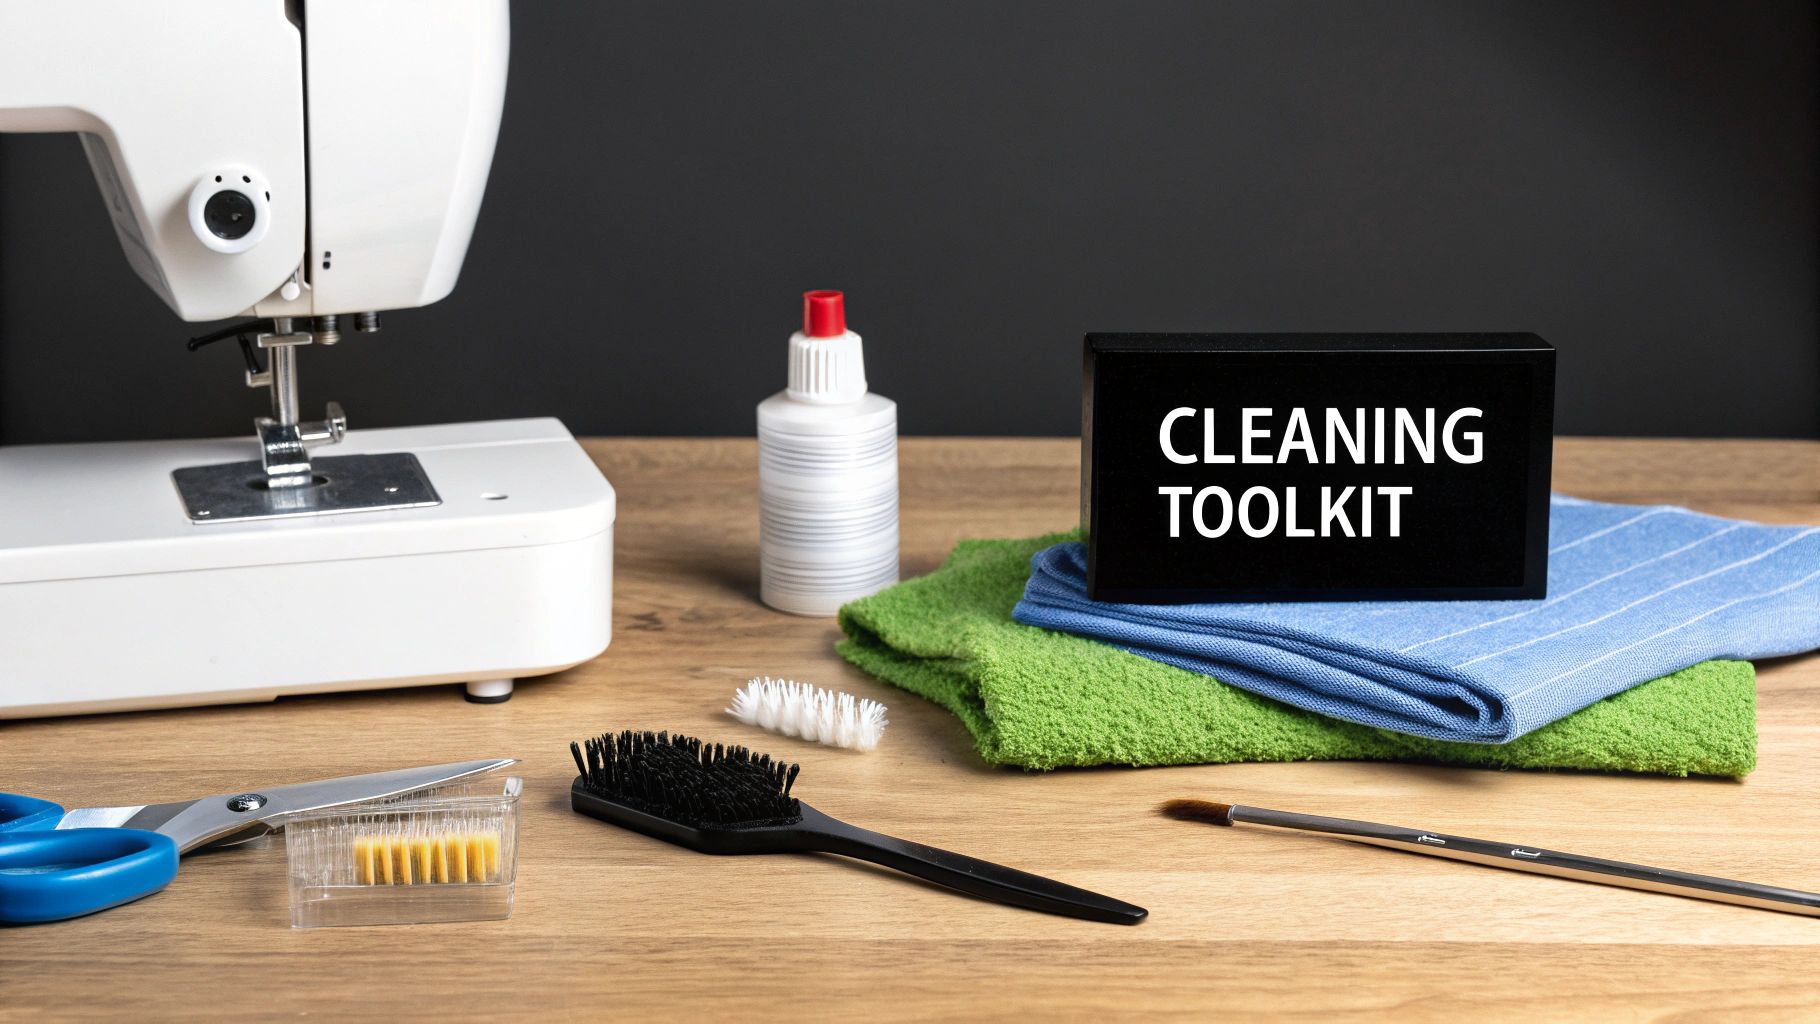
Before you even think about opening up your machine, let's get your tools in order. Having the right supplies on hand makes the whole process smoother and, honestly, a lot more effective. Trying to improvise with the wrong tools is not only frustrating but can actually cause damage. A well-stocked kit turns a necessary chore into a quick and satisfying tune-up.
You'll find that the little brush that came with your machine is a good start, but it's rarely enough to get the job done right. We need to get into all those tight corners where lint loves to hide.
To help you get started, here's a quick reference guide to distinguish between the absolute must-haves and the tools that are great for a more thorough deep clean.
| Tool | Purpose | Why It's Recommended |
|---|---|---|
| Nylon Lint Brushes | Removing lint and dust from internal components. | Stiff bristles effectively dislodge packed-in lint without leaving behind fibers like cotton swabs can. |
| Machine Screwdriver | Removing the needle plate to access the bobbin. | Using the exact size and type that fits your machine’s screws prevents stripping them, which is a massive headache. |
| Microfiber Cloth | Wiping down the exterior surfaces. | This material grabs dust and smudges without scratching your machine's finish or leaving behind new lint. |
| Long Tweezers | Plucking out stubborn threads and lint clumps. | Perfect for grabbing those pesky bits of thread that are wrapped around posts or stuck deep in the machine. |
| Mini Vacuum Attachment | Sucking out dislodged debris from tight areas. | A safer, more effective alternative to canned air for removing lint from the bobbin area without blowing it deeper. |
| Sewing Machine Oil | Lubricating moving parts (if required). | Essential for older or mechanical models; always use oil specifically designed for sewing machines to avoid gumming. |
| Bright Task Light | Illuminating the work area. | Your machine's built-in light often isn't enough. A headlamp or gooseneck lamp helps you see every speck of dust. |
Think of this table as your shopping list. The essentials will get you through routine cleanings, while the optional tools will make you feel like a pro when you tackle a more serious maintenance session.
These are the non-negotiable items every sewist needs. They're inexpensive but absolutely crucial for keeping your machine happy.
For a really meticulous clean, especially in the hard-to-reach spots, a precision micro brush set is a game-changer. These tiny brushes can get way down into the bobbin housing and around the feed dogs where standard tools just can't fit.
A quick but important word of warning about canned air: it seems like a great idea, but it can blow lint and dust deeper into your machine's sensitive gears and electronics. It's best to avoid it completely and stick to brushes and a vacuum instead.
You don't need these for every single cleaning, but they can make a huge difference when you want to do a more thorough job.
Having these tools at the ready means you can confidently tackle any cleaning task. You'll be able to put your knowledge of how to clean sewing machine parts to good use without any last-minute searching for the right tool.
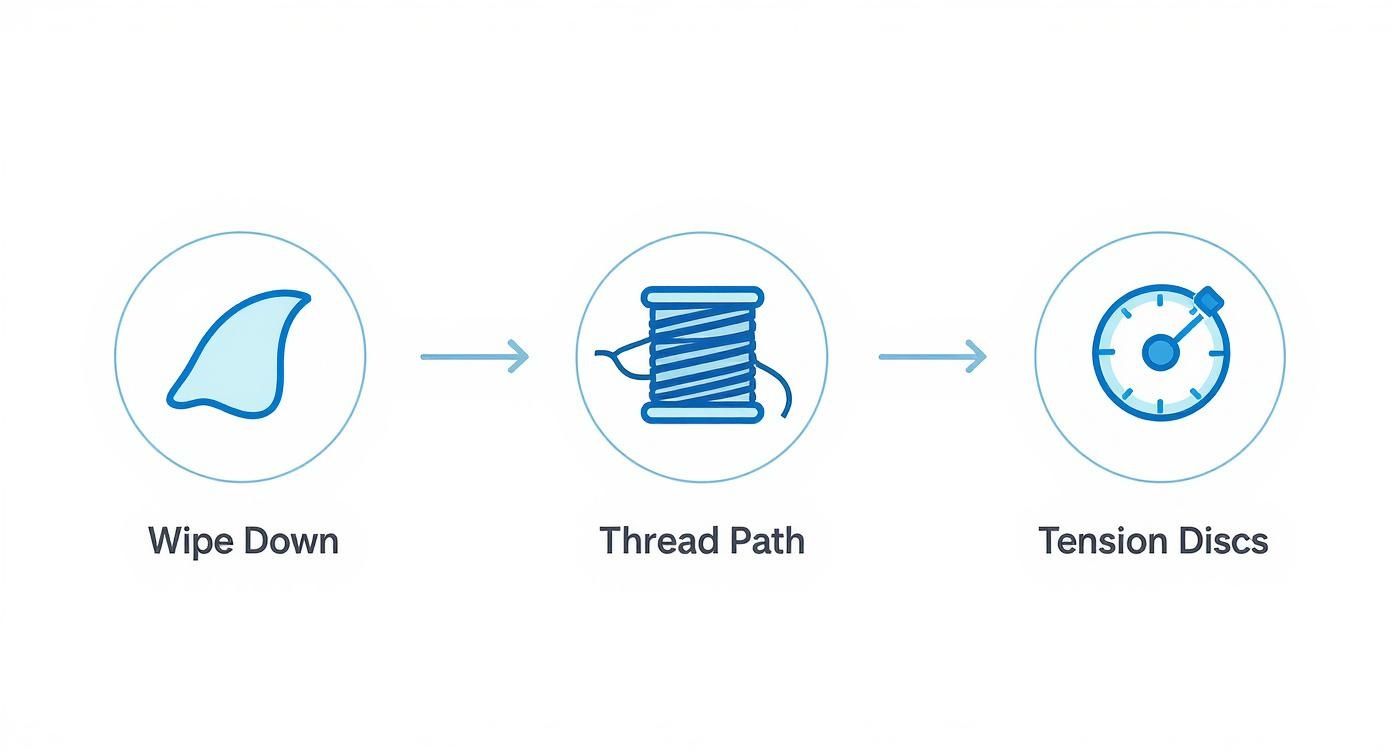
Before we even think about opening up the machine, we need to deal with the outside. This isn't just about making it look nice; any dust, pet hair, or stray fibers on the casing can get sucked right into the inner workings once you start stitching. A good surface clean is a non-negotiable first step.
Grab a soft, dry microfiber cloth and give the entire machine a thorough wipe-down. Pay special attention to the nooks and crannies around the handwheel, stitch selection dials, and the base. Dust loves to mix with oil in these spots, creating a stubborn, gummy film. Stick to a dry or slightly damp cloth—harsh chemical cleaners and furniture polish can yellow or damage your machine's finish over time.
Alright, let's tackle one of the most common—and overlooked—causes of tension nightmares: the thread path. This is the entire journey your thread takes from the spool pin down to the needle. It's amazing how much tiny lint and fiber debris can get snagged in the guides and tension discs, causing all sorts of stitch problems you might otherwise blame on the bobbin.
Here’s a trick for getting the tension assembly truly clean. We call it "flossing" the machine.
This one simple move can instantly solve a whole host of frustrating tension issues by letting the thread glide through smoothly, just as it was designed to.
When someone brings me a machine with wonky stitches, clearing the thread path is one of the first things I check after the bobbin. Nine times out of ten, a hidden ball of lint packed deep inside the tension discs is the real culprit.
Finally, give a quick once-over to the spool pins and the little thread guides along the path. A small, stiff brush is perfect for whisking away dust from the base of the pins. A quick wipe of each guide ensures there’s nothing left to snag your thread. Getting this done now prevents all that surface gunk from becoming an internal problem later.
Alright, let's get to the heart of the matter. The bobbin area and the feed dogs are where over 90% of stitch problems come from, all thanks to a relentless buildup of lint and thread bits. You can think of this area as the engine room of your machine; even a tiny bit of gunk can throw the whole system out of whack. Honestly, tackling this part of your cleaning routine is the single most impactful thing you can do for your machine.
Before you dive in, grab your machine’s screwdriver and a good lint brush. I also highly recommend having a bright task light and a pair of long tweezers nearby—they make the job so much easier.
First things first, you need to remove the needle plate. That's the metal plate your fabric glides over, and it's usually held in place by one or two small screws. Gently loosen them and lift the plate off. What you see underneath might be a bit shocking—it’s not uncommon to find a dense, felt-like mat of compressed lint blanketing everything.
This hidden buildup is the real villain behind frustrating issues like:
With the plate off, take out your bobbin and the bobbin case. Set them aside on a microfiber cloth so they don't roll away. You should now have a clear view of the two most critical areas: the feed dogs and the hook race, which is the channel where the bobbin case sits.
One critical piece of advice: Never, ever use canned or compressed air to blow lint out of the bobbin area. It feels like a quick fix, but it actually forces debris deeper into the machine’s gears and electronics. Down there, it mixes with oil and creates a sticky sludge that only a professional servicing can fix.
Start with your stiff nylon brush and begin sweeping the lint out from between the teeth of the feed dogs. Use firm but gentle strokes to dislodge all those packed-in fibers. You’ll be amazed at how much debris was preventing them from properly gripping and moving your fabric.
Next, shift your focus to the hook race. Carefully brush around the entire circular channel, coaxing out all the lint and stray thread tails. This is where those long tweezers become your best friend, perfect for plucking out stubborn, tangled threads that have wrapped themselves around the internal posts. Just work methodically until you’ve cleared out every visible bit of fuzz.
To get rid of all the loosened lint, a mini vacuum attachment is by far the safest and most effective tool. If you don't have one, you can carefully use your brush to sweep the debris out of the machine and onto a cloth. The main goal is to remove the lint completely, not just push it around inside.
The infographic below offers a great visual reminder of how a simple external cleaning routine can prevent dust from getting into these internal parts in the first place.
As this guide shows, a consistent wipe-down is your first line of defense against internal lint buildup.
Skipping this core maintenance really does have an impact. Some research indicates that around 40% of home sewing machine owners don't clean their machines as often as they should. This oversight leads to a 25% higher chance of mechanical problems and can seriously shorten a machine's lifespan. On the flip side, sewists who stick to a regular cleaning schedule not only face fewer issues but can extend their machine's life by up to 30%. You can dig into more of these sewing machine market insights on MarketResearchFuture.com.
After brushing and clearing everything out, give the area one last visual inspection with your light. Don't forget to check the bobbin case itself for any hidden lint before you pop it back into the machine.
Once you’re confident it’s spotless, carefully place the needle plate back on. Tighten the screws until they are snug—you don't need to crank them down with all your might.
By focusing on this deep clean, you're directly addressing the most common sources of sewing frustration. It's a straightforward process that not only builds your confidence but also ensures your machine runs smoothly, quietly, and reliably, project after project. This really is the secret to flawless stitches.
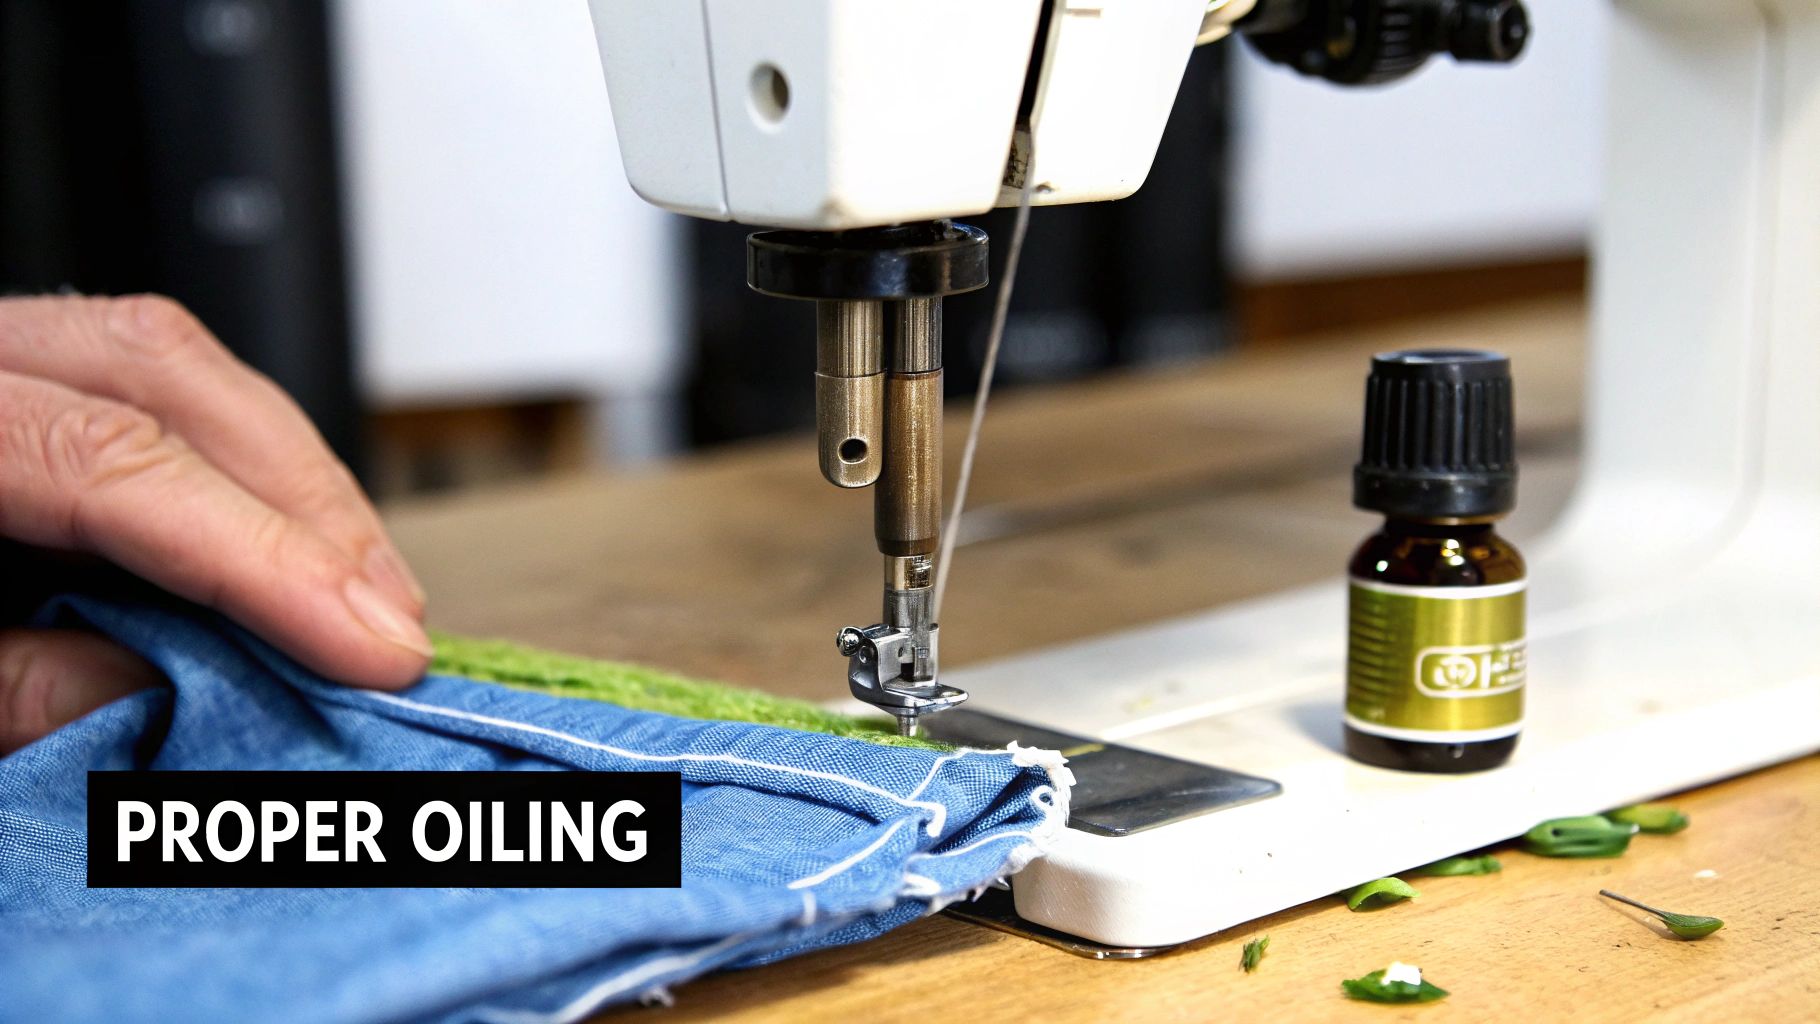
After you've given your machine a good cleaning, oiling is the next step. I find this is where a lot of sewists get nervous, but it's much simpler than you might think. The first and most important thing to figure out is if your machine even needs oiling in the first place.
Many modern computerized machines are actually self-lubricating. They're built with special bearings or sealed oil reservoirs meant to last for years without you ever having to touch them. In fact, adding oil to these machines can do more harm than good, potentially damaging sensitive electronics.
So, how do you know? Your manual is your best friend here. If it doesn't say anything about oiling, don't do it.
If you have a vintage or mechanical machine that does need a drink now and then, the golden rule is less is more. You're just looking to add a tiny, single drop of oil to any point where metal moves against metal. The idea is to create a whisper-thin film for protection, not to drench the parts.
And please, only use a high-quality, clear sewing machine oil. Never reach for household alternatives like WD-40 or 3-in-1 oil. They contain solvents that evaporate and leave behind a gummy, sticky mess that's a nightmare to clean. That gunk will attract lint like a magnet and can eventually seize up your machine completely.
Your manual will show you the exact oiling points for your model. A common spot on nearly every mechanical machine is the hook race, which is the channel the bobbin case nestles into.
For many machines, that’s it! Some older models might have little oiling ports, sometimes marked with red dots, but the same principle applies.
Over-oiling is one of the most common mistakes I see. It doesn't make the machine run better; it just ensures that excess oil will eventually seep out and stain your next quilting project with ugly grey marks.
Once the lubrication is done, it's time to put everything back together. Pop the bobbin case back in and reattach the needle plate, making sure the screws are snug but not cranked down too tightly.
Before you dive back into your project, you need to run a quick test. Grab a folded piece of scrap fabric—some old muslin or cotton works perfectly—and sew a few straight lines. This does two crucial things: it helps distribute the fresh oil through all the moving parts, and more importantly, it catches any excess oil that gets squeezed out.
Check the fabric for any spots. If you see any, just keep sewing on the scrap until your stitches come out clean and dry. This final check is your guarantee that the machine is ready to go without risking an oil stain on your beautiful work.
This whole routine, from cleaning to oiling, is a fundamental part of keeping your machine happy. It's especially critical for today's advanced computerized machines, which are becoming more and more common. Poor maintenance accounts for up to 35% of malfunctions in these models. By simply following the manufacturer's care guidelines, you can prevent up to 50% of technical issues. You can find more data on the growing sewing machine market on mordorintelligence.com.
So, your machine is clean and humming along beautifully. The real trick is keeping it that way. The goal is to make maintenance a quick, simple habit rather than a dreaded annual teardown.
Think of it this way: a little bit of upkeep after you sew prevents small lint buildups from turning into major mechanical headaches. You don’t need a complex spreadsheet—just a simple rhythm that works for you. This is what keeps a machine ready to go whenever inspiration strikes.
There's no single perfect schedule for everyone. A quilter running their machine eight hours a day will have different needs than someone who only does occasional mending. Your routine should match your sewing time.
Here’s a good place to start, and you can adjust it to fit your own habits:
Making maintenance a regular, low-effort habit is the secret sauce. It's the difference between a machine that gives you problems in five years and one that becomes a reliable family heirloom.
A consistent routine is everything. For a broader look at proactive cleaning and maintenance strategies that apply to all sorts of equipment, this is a great resource.
You should also learn to listen to your machine. Is it starting to make a new "clunking" sound? Are your stitches suddenly looking a little off? Is your thread shredding for no obvious reason? These are little cries for help. Addressing them right away with a good cleaning almost always solves the problem before it has a chance to get worse.
Even with the best guide in front of you, a few questions are bound to pop up. That’s perfectly okay! Getting comfortable with your machine's maintenance takes a little practice. Let’s walk through some of the most common things I'm asked, so you can feel totally confident tackling this yourself.
Think of this as our little chat over a cup of tea, clearing up those last few bits of uncertainty. Once you understand the "why" behind these tips, you'll be able to troubleshoot like a pro.
This is the big one, and the honest-to-goodness answer is: it depends on how much you sew. There's no magic calendar reminder for this. A better way to think about it is in sewing hours, not days or weeks.
A good rule of thumb is to give your machine a quick clean after every 8-10 hours of use. For most of us, that's after finishing a big project.
Oh, please don’t! I know it seems like a great idea in theory, but cotton swabs are a sewing machine’s hidden enemy. They have a nasty habit of shedding their own tiny fibers, which get tangled in the delicate gears of your machine. You end up creating a bigger, fuzzier problem than the one you were trying to fix.
Your best friend here is a small, stiff-bristled nylon brush. It’s designed specifically to grab lint without leaving anything behind.
Your machine will absolutely give you hints before it throws a full-on tantrum. Learning to spot these little cries for help means you can fix a small lint issue before it ruins your afternoon.
Keep an ear out and an eye on your stitches if your machine starts:
I can't tell you how many times a sewist has come to me convinced their tension is broken. After a thorough cleaning, the problem disappears 90% of the time without us ever touching the tension settings. It's almost always a hidden clump of lint!
Yes, one hundred percent! While it's true that many modern computerized machines don't need oiling, they are just as vulnerable to lint as the old mechanical workhorses. In fact, sometimes they're even more sensitive.
Lint and dust can easily interfere with the tiny electronic sensors that make all that beautiful stitch magic happen. Keeping the bobbin area and feed dogs clear is absolutely essential. Just be sure to double-check your manual for any specific instructions on how to clean sewing machine parts near sensors to be safe.
At High Country Quilts, we know that a happy machine makes for a happy sewist. Whether you're looking for expert advice or the right tools for the job, we're here to support your creative journey. Come see our selection of maintenance accessories and beautiful BERNINA machines at https://hcquilts.com.
At High Country Quilts we care deeply about community. With our experiences in retail, we know that a store is not only a place to shop but also a place for the community to gather and share. During this busy...

Hi! We’re Adam and Renee Wheaton, the new owners of High Country Quilts! For more than 40 years, we’ve owned and operated vacuum and sewing businesses. Following in Renee’s father’s footsteps after he retired from All Discount Vacuum and Sewing in Colorado...


Leave a comment