

We Love Our Quilting Community
At High Country Quilts we care deeply about community. With our experiences in retail, we know that a store is not only a place to shop but also a place for the community to gather and share. During this busy...


Alright, let's get down to the real nuts and bolts of finishing your quilt: calculating the backing fabric. It's one of those final steps where a little bit of careful planning saves a whole lot of headache later on.
The first thing you need is the exact measurement of your finished quilt top, and I do mean exact.
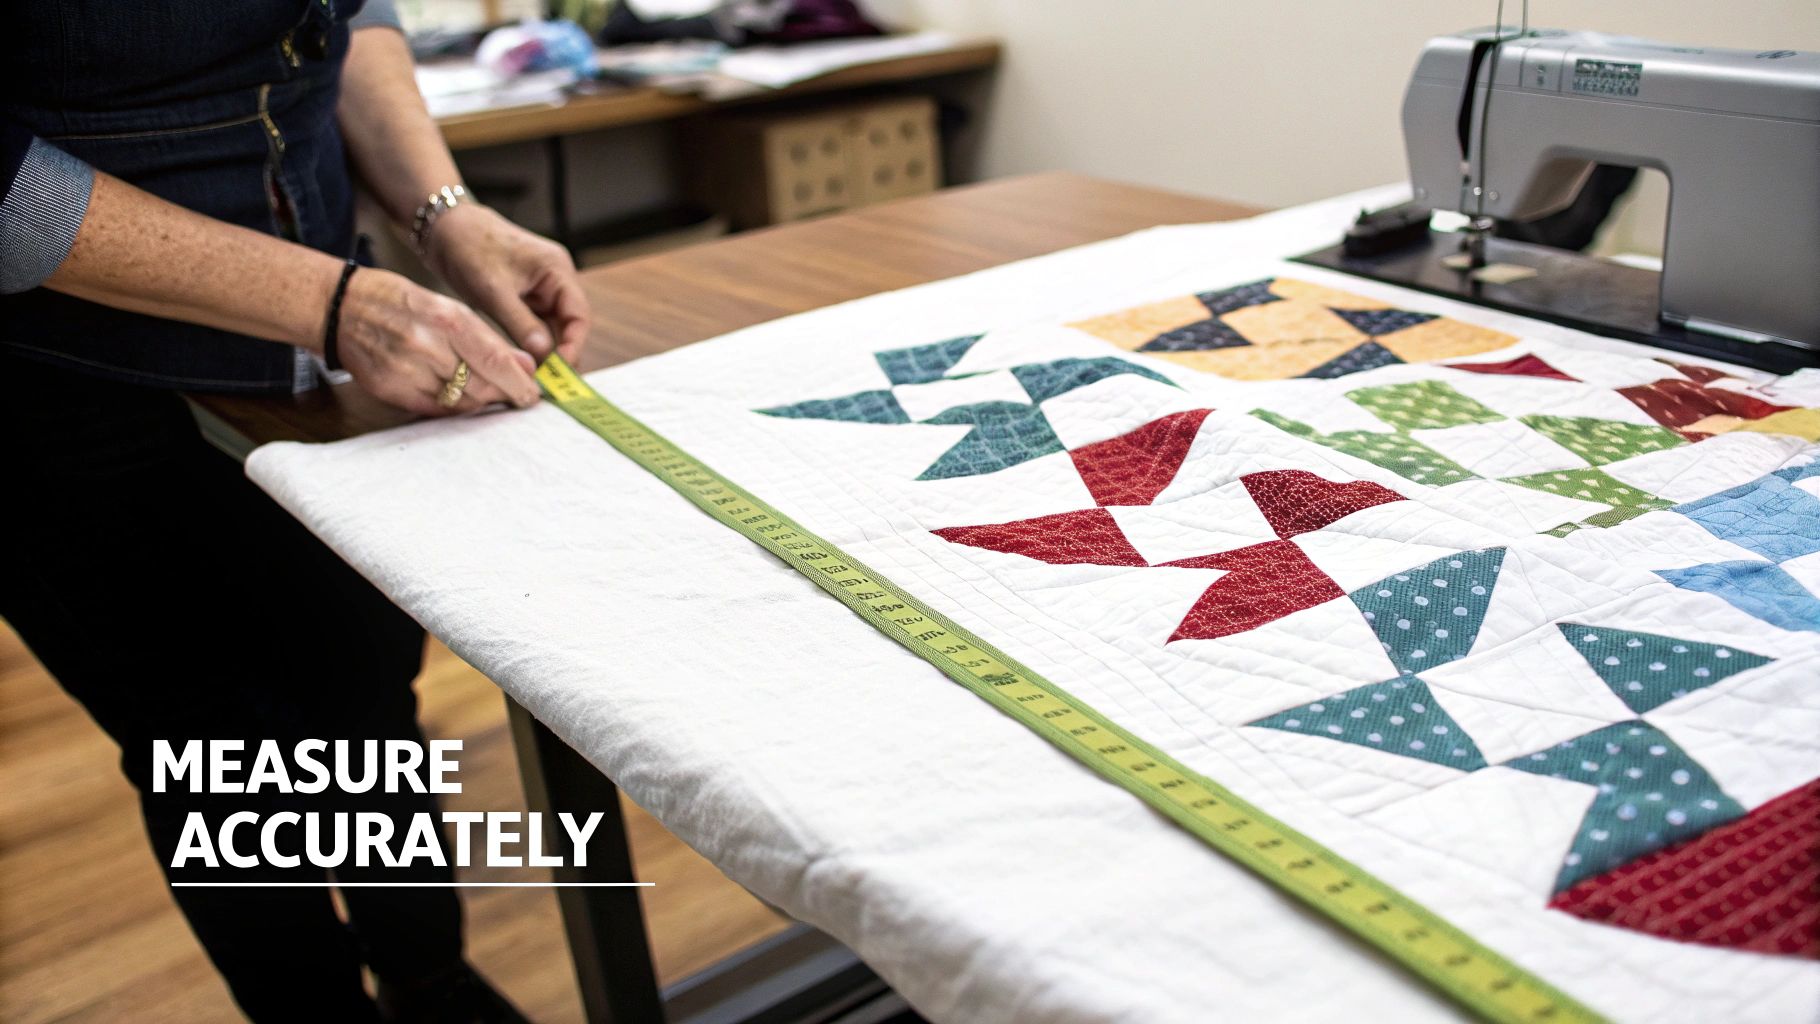
Before you even think about yardage, grab a tape measure. The piecing process, especially on a large quilt, can sometimes cause the edges to stretch or pull a little. Your quilt top might not be perfectly square, and that's completely normal.
To get the most accurate number, don't just measure one side. Measure the width in at least three different spots—top, middle, and bottom—and do the same for the length. Then, take the average of those measurements. This gives you a true, workable dimension to start from.
Now for the most important part: adding extra fabric, or "overage," to all four sides. This isn't just a suggestion; it's a non-negotiable part of the quilting process, especially if you're sending your quilt to a longarmer. They need that extra fabric to properly load the quilt onto their frame and maintain even tension.
Key Takeaway: Overage is your safety net. It gives the longarmer's clamps something to grab, accounts for any shifting or shrinkage during quilting, and leaves you plenty of room to square up the quilt perfectly when it's all done.
A good rule of thumb is to add 6 to 8 inches to both the final length and width measurements of your quilt top. This is the magic number that ensures a smooth and stress-free quilting experience. So, if your quilt top measures 60" x 70", you'll want your backing fabric to be at least 68" x 78".
Even if you're quilting on your home machine, that extra border gives you something to hold onto, which helps you guide the quilt and prevents the edges from getting stretched out of shape.
Once you have that final backing dimension, you can calculate the yardage you need to buy based on the width of your chosen fabric. If you're looking to brush up on your skills, our collection of free sewing lessons covers all sorts of helpful techniques that will make every part of your project easier.

Now that you have the true measurements of your finished quilt top, it’s time to figure out the size of your backing fabric. This means adding a little extra fabric, or "overage," all the way around. This buffer is your best friend during the quilting process—it’s what makes for a smooth, pucker-free finish, whether you're quilting it yourself or sending it to a pro.
The amount of extra fabric you need really boils down to how you plan to quilt your project. If you're handing it over to a longarm quilter, they need that extra material on all four sides to load it onto their machine's frame. Without it, they can’t get the tension just right.
So, what's the magic number? The guidelines vary, so it's smart to know the standards before you make any cuts. A good, large cutting surface like a dual-side cutting mat can be a huge help here, giving you the space to measure and cut accurately.
Here’s a quick guide on how much fabric to add to each of the four sides:
Let's walk through a real-world example. Imagine you just finished a lap quilt that measures 50" x 65".
If you're sending this quilt to a longarmer, you'll want to add at least 4 inches of overage per side. That means adding a total of 8 inches to the width (4 on the left + 4 on the right) and 8 inches to the length (4 on the top + 4 on the bottom). Your target backing size is now 58" x 73".
Nailing this calculation is the first big step toward getting your backing right. It takes the guesswork out of the process and sets you up for a frustration-free finish.
When it comes to figuring out your quilt backing, one of the first decisions you'll make is about the fabric's width. This choice will ripple through your entire project, affecting everything from your yardage and budget to the time you'll spend at the cutting table. The two roads you can take are using standard quilting cotton or opting for a wide-back fabric.
Standard quilting cotton, the kind you see on most bolts, is typically 40-44 inches wide. For anything bigger than a small lap quilt, this means you’ll have to piece together a couple of panels to get a backing large enough for your quilt top. While it adds an extra step, this approach gives you a massive universe of prints and colors to play with, so your creative options are virtually unlimited.
If you go with standard-width fabric, remember to account for a seam allowance when you calculate your cuts. I always use a 1/2-inch seam allowance for joining my backing panels. A quick press with the seam open helps everything lay nice and flat, which makes a big difference when it comes time to quilt.
Piecing a back is a traditional quilting skill, but it's worth noting that you'll have a seam running down the middle (or side) of your quilt's back.
For bigger quilts, wide-back fabrics are a total game-changer. These bolts are seriously wide—usually 108 inches, but you can find some like this handy natural muslin wide-back that are a whopping 120 inches wide. The beauty here is that you get a seamless, single piece of fabric for your backing. No piecing, no extra seams. It's a huge time-saver.
The trade-off? The selection of prints and colors is usually more limited compared to the endless variety of standard cottons. So, you're really weighing convenience against creative choice.
Choosing the right backing fabric often comes down to balancing practicality with creative vision. The table below breaks down the key differences to help you decide which path is right for your current project.
| Feature | Standard Width Fabric (40-44") | Wide-Back Fabric (108") |
|---|---|---|
| Seamless Back | No, requires piecing panels together. | Yes, provides a smooth, one-piece back. |
| Preparation Time | More time needed for cutting and sewing seams. | Minimal; just cut to size. |
| Print/Color Selection | Vast, almost unlimited options available. | More limited selection of colors and prints. |
| Best For | Smaller quilts, scrappy backs, specific prints. | Bed-sized quilts, avoiding seams. |
| Cost | Can be more economical, especially if using stash. | Can be more cost-effective for large quilts. |
| Seam Bulk | A central seam can add a line of bulk. | No seams mean a completely flat surface. |
Ultimately, both fabric types have their place in a quilter's stash. Your project's size, your budget, and how much time you want to spend on prep will guide your decision.
Backing fabric widths vary significantly, influencing how much yardage is needed for quilt backing. Standard bolts require piecing for most quilts, while wider backings cover large quilts without seams, creating a choice between cost and convenience. Discover more insights about choosing backing materials on tourmalinethymequilts.com.
For smaller projects, piecing a back from standard-width fabric is often the most practical and budget-friendly choice. But when you’re tackling a queen or king-sized quilt, a single piece of wide-back fabric is a smart move. It not only saves you a ton of time but is also a favorite of longarm quilters, who love working with that smooth, seamless canvas.
Alright, you've got your final backing dimensions. Now for the big question: how much fabric do you actually need to buy? I've found there are really two tried-and-true ways to figure this out. One is a visual approach that's great for seeing how it all fits together, and the other is a straightforward formula for those who just want the numbers.
I often recommend this method to beginners because it just makes sense. You simply sketch out how you'll cut your backing pieces from a length of fabric. A quick drawing on a scrap of paper can instantly show you whether a horizontal or vertical seam will be more efficient.
For our example backing of 58" x 73", this little sketch would immediately reveal if laying two pieces side-by-side vertically or horizontally will leave you with less wasted fabric. It’s a simple trick that can save you real money.
This infographic breaks down the difference between piecing standard-width fabric and just using a single piece of wide-back fabric.
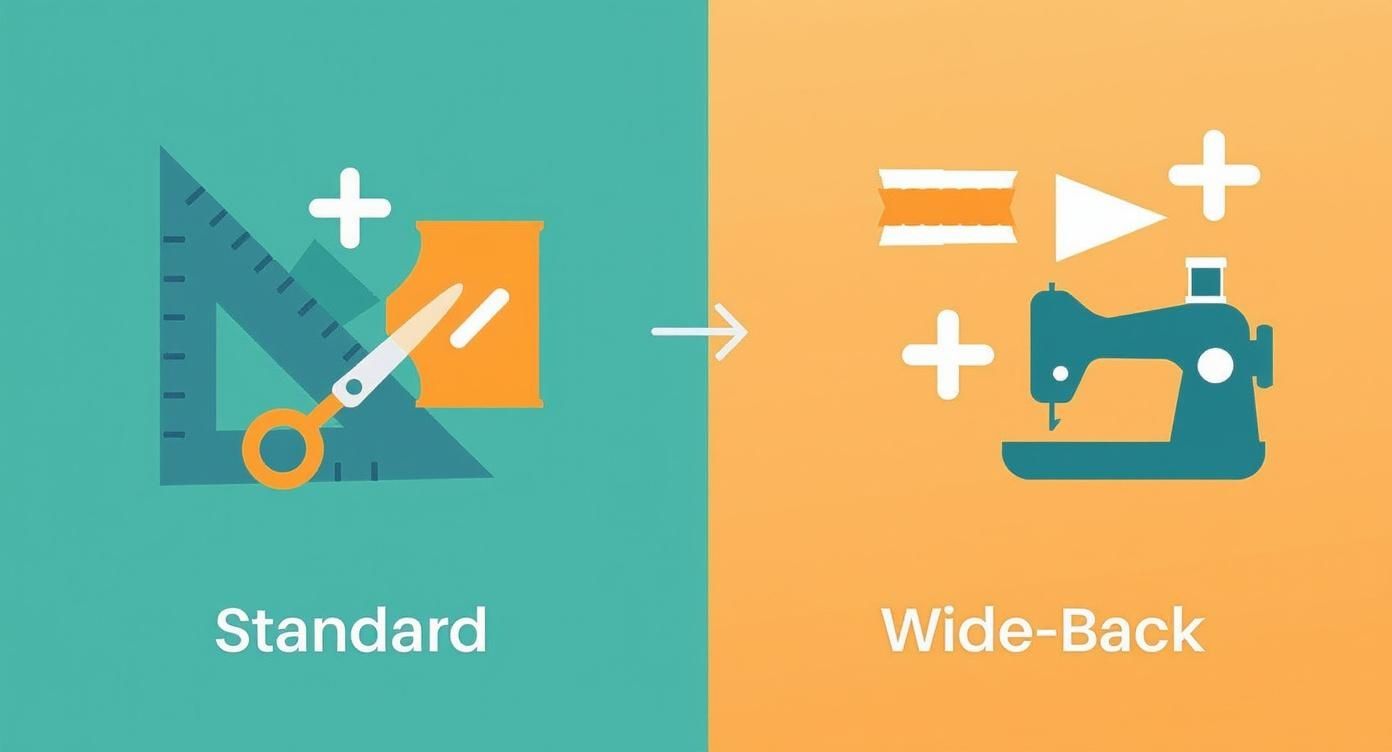
As you can see, piecing standard fabric definitely involves more steps, but sometimes it's the most practical (or creative!) option. Wide-back fabric, on the other hand, is all about simplicity—one big cut and you're done.
If you'd rather just crunch the numbers and get a solid answer, a simple formula is your best friend. A common trick I've seen taught is to double one of your quilt's dimensions and then convert that figure into yards.
Let's say your quilt top is 52 inches wide. You'd double it to 104 inches. Then, divide that by 36 (since there are 36 inches in a yard) to get 2.88. Since you can't buy 0.88 yards, you'd round up and buy 3 yards. Easy.
Let's Do the Math: For our 58" x 73" backing using standard 44" fabric, we know we'll need two lengths.
- With a Vertical Seam: We need two pieces that are each 73" long. That means our total length is 146 inches (73" + 73").
- Calculating the Yardage: 146" ÷ 36" = 4.05 yards. I'd always round that up to 4.25 yards to be safe.
This gives you plenty of fabric for squaring up the edges and accommodates any slight shrinkage during washing. When I'm piecing a backing, I often reach for a reliable neutral like this Natural Bella Solids fabric because it goes with everything.
It's always interesting to see how methodical calculations are used in other fields. For instance, business professionals use specific formulas, and you can see an example in a practical guide to calculating retention ratios.
Ultimately, whether you sketch it out or use the formula, you should get to the same answer. Just go with whichever method feels most comfortable for you.
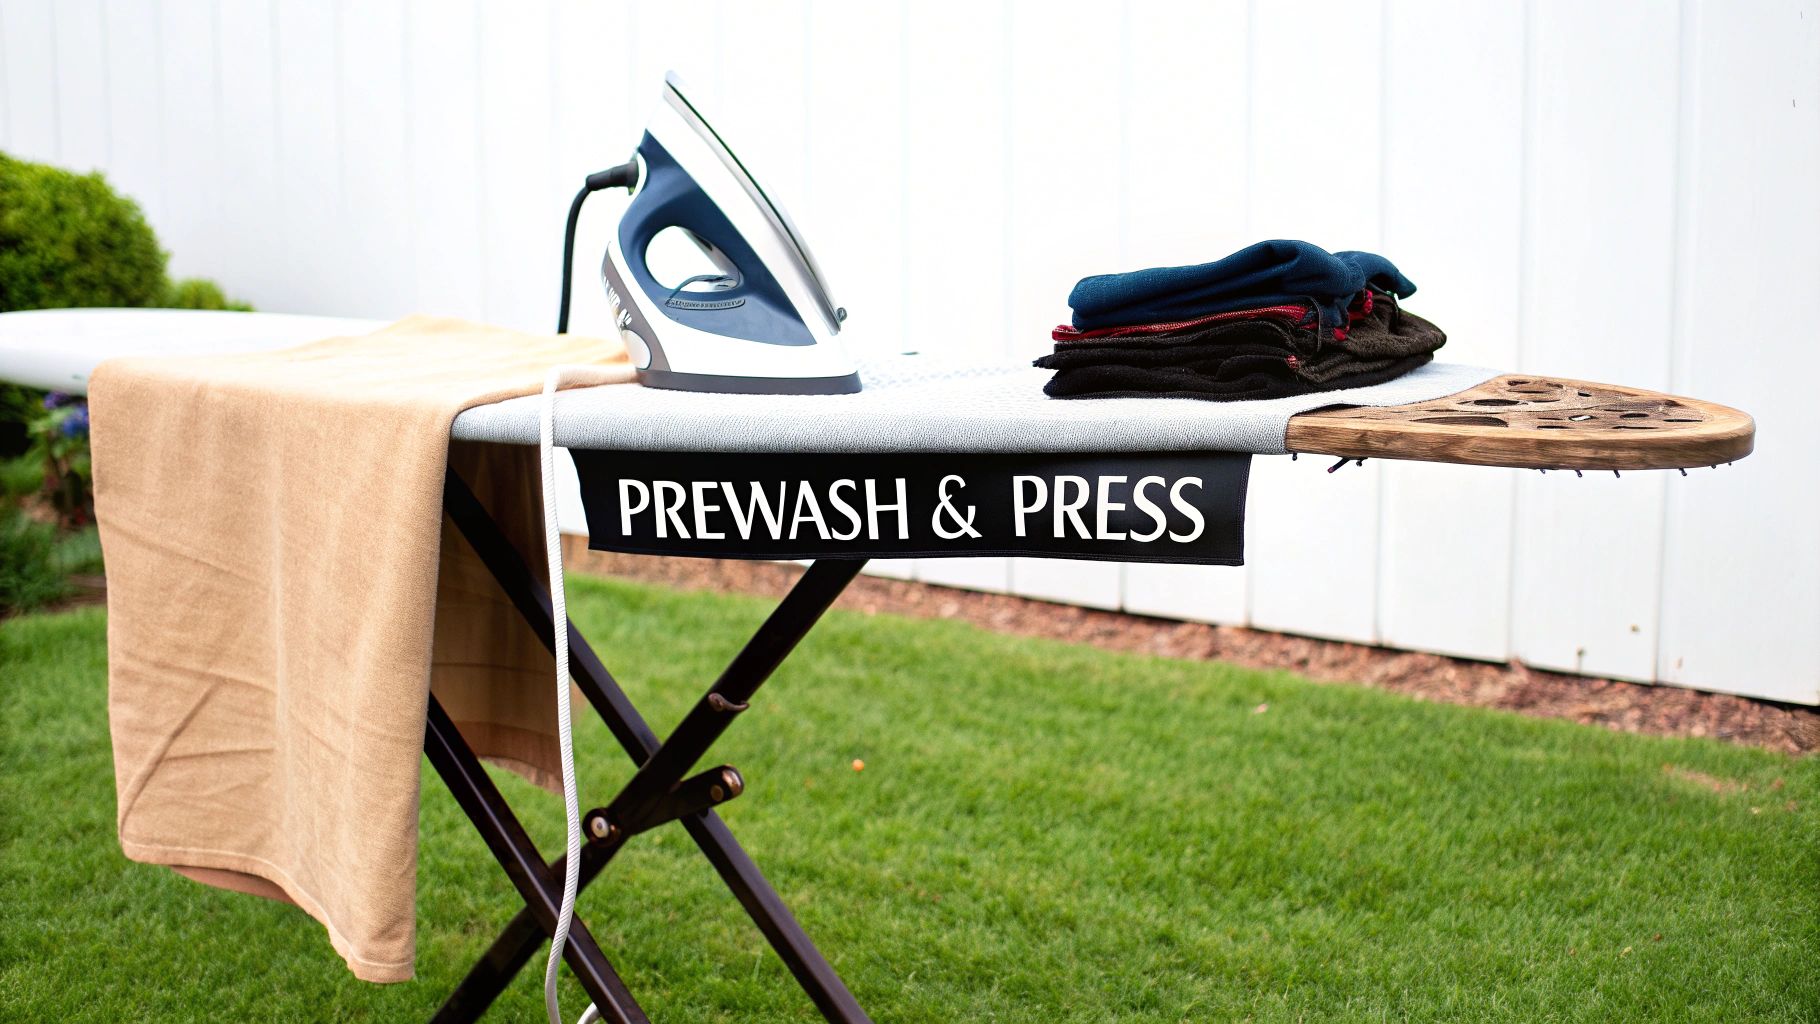
Once you've done the math for your quilt backing, it's time to prep the fabric. This part is just as important as the calculations. Taking care of a few small details now will save you from some major headaches down the road, making the actual quilting a whole lot smoother.
My best advice? Always round up your fabric purchase to the nearest 1/4 yard. Think of it as cheap insurance. This little bit of extra fabric gives you a safety net in case of a cutting mistake or if the material shrinks more than you anticipated.
First things first: wash your backing fabric. I know it's tempting to skip this, but trust me, it’s a non-negotiable step. Pre-washing shrinks the fabric to its true size and gets rid of any excess dyes that might otherwise bleed onto your gorgeous quilt top.
After a good wash and dry, give it a thorough press.
A perfectly flat, well-pressed backing is your secret weapon for smooth quilting. Taking the time to press seams open really cuts down on bulk. This makes it so much easier for the needle to glide through the layers, preventing those little bumps and tucks in your finished quilt.
If you’re piecing your backing together, make sure to trim off the selvage edges before you sew the pieces. Selvages are woven tighter than the rest of the fabric and can cause puckering along your seam line.
Once you’ve sewn your pieces, press those seams open. Using a great tool like the Oliso M3 Pro Mini Iron can make wrangling those large panels of fabric much more manageable.
Even after you've run the numbers, a few questions always seem to pop up when it comes to quilt backing. Let's walk through some of the most common ones I hear from other quilters. Getting these details right can make all the difference, giving you the confidence to finish your project beautifully.
Yes, you absolutely do. This isn't just a suggestion; it's a requirement for the machine to work its magic.
Longarm machines mount the quilt backing onto a frame using rollers and clamps. That extra fabric around the edges—usually 4 to 6 inches on every side—is what they grip to keep the whole quilt sandwich taut and smooth. Without it, the quilter can't load your project properly, and they won't be able to stitch all the way to the edge of your quilt top.
Before you buy a single inch of fabric, check with your longarmer about their specific overage requirements. It’s a non-negotiable part of their process.
A Little Friendly Advice: Most longarmers will turn away a quilt that doesn't have enough backing fabric. It's not them being difficult—it's a mechanical necessity for their equipment to give you that beautiful, pucker-free finish you're paying for.
Of course! Using something soft and cuddly like flannel or minky on the back can make a quilt extra special. But, you need to know what you’re getting into, as they behave very differently from standard quilting cotton.
These fabrics are known for their stretch, which can cause frustrating shifting and puckering as you quilt. To keep things under control, I'd recommend using a walking foot if you're quilting it yourself. You might also want to add extra pins or use a good spray baste to keep the layers from wiggling around.
The most important step? Pre-wash both your quilt top and your specialty backing fabric. Flannel, in particular, is notorious for shrinking, and you want to get that out of the way before you sew everything together.
This is a classic debate! Lots of quilters will tell you a horizontal seam is best because it runs parallel to the rollers on a longarm machine, which puts less stress on the stitches. That's a solid point.
However, running the seam vertically often saves you a good bit of fabric, and it's perfectly fine to do. Honestly, the best direction is usually whichever one makes the most efficient use of your yardage.
My biggest piece of advice here is to avoid putting a single seam right down the middle of the back. It can create a weak point. A much better approach is to use a large central panel with two smaller, equal-sized strips sewn to either side. It looks more balanced and gives you a much sturdier result.
At Famcut, we have all the high-quality fabrics and tools you need to bring your quilting projects to life. Explore our selection today at https://famcut.com
At High Country Quilts we care deeply about community. With our experiences in retail, we know that a store is not only a place to shop but also a place for the community to gather and share. During this busy...

Hi! We’re Adam and Renee Wheaton, the new owners of High Country Quilts! For more than 40 years, we’ve owned and operated vacuum and sewing businesses. Following in Renee’s father’s footsteps after he retired from All Discount Vacuum and Sewing in Colorado...


Leave a comment