


Free Fabric All Year: Our 2027 Fabric Punch Card
November 2–25 only: buy a $200 gift card in either store and get a free yard of fabric every month of 2027.

Quick Summary
To baste a quilt, stack the backing wrong side up, the batting, then the quilt top right side up, smoothing each layer, and hold them together with curved safety pins, spray, or another method. Pin about every 4 to 6 inches, working from the center outward, so the layers stay flat while you stitch.
Last Updated: November 10, 2026
Quilt basting is the step where you temporarily hold the three layers of a quilt together before stitching. Skip it, and the top, batting, and backing shift, bunch, and pucker as you quilt. Good basting is what keeps a quilt flat, even, and square at the finish.
Quilters at every skill level often ask why they can't just skip this step? The short answer is that the layers will move. Batting in particular stretches and slides, and a loose sandwich leads to wrinkles on the back that no amount of pressing fixes later.
Basting holds everything in place so you can focus on your stitching. Whether you hand quilt, machine quilt, or send the job out, a well-basted quilt is easier to work on and looks better when finished.
The quilt sandwich is the stack of three layers you baste together: the quilt top on the front, the batting in the middle, and the backing on the bottom. Each layer has a job. The top gives the design, the batting gives warmth and loft, and the backing finishes the back.
Batting choice matters more than many beginners expect. A natural cotton batting like the [PRODUCT: Warm 100 Ultra Clean Natural Cotton + 100% Cotton Scrim | hcquilts.com] is easy to quilt by hand or machine and does not need pre-washing. If you are unsure how much to buy, our guide on How Much Batting Do You Need for a Quilt? A Step-by-Step Guide walks through sizing. For a deeper comparison of batting types, see What Is the Best Batting for a Quilt?
Plan to make the backing and batting larger than the top, usually by 2 to 4 inches on each side. That extra margin gives you room to square up and trim later.
Assembling the sandwich is simple, but take your time. Lay the backing right side down on a clean, flat surface, then smooth the batting on top. Center the quilt top right side up over both layers.
Pressing the quilt top and backing before you start removes folds that would otherwise show up as ridges. Lay the layers on a surface large enough to hold the full quilt flat, such as a table or a clean floor.
Pin basting uses curved safety pins to hold the layers together. It is inexpensive, leaves no residue, and works well for small to medium quilts and for any quilt you plan to hand quilt or domestic-machine quilt.
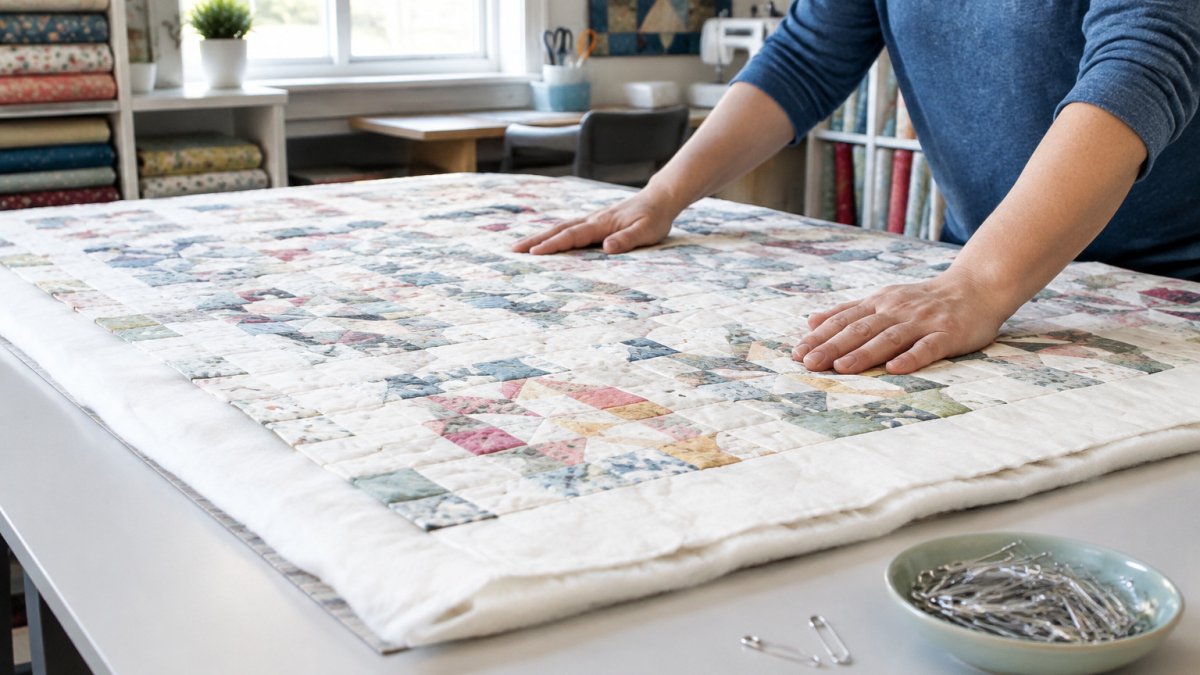
Start in the center and work outward in a grid. Insert each pin through all three layers, catching the backing fabric as you go, and close each pin fully so it does not snag thread or your machine foot. Pins that go through only two layers will not hold, and pins left open will catch on the quilt as you maneuver it. Once the layers are secure, choose a fine hand-quilting needle suited to delicate fabric so your stitches pass through without stressing the cloth, and keep Things Fabric in mind as you consider how needle choice affects the work.
Pin-basting takes longer than spray, but it gives you tight control over the layers and no residue to clean up. You can find the Lori Holt Pretty Pins Quilting pins recommended for this method on our site.

Place pins every 4 to 6 inches across the quilt, with more pins in areas you plan to quilt densely. Avoid placing pins right where your stitching lines will go, since you will need to remove them as you sew. A grid pattern works well for beginners and keeps the layers evenly held.
Spacing is not one-size-fits-all. A common pattern is to tighten spacing to about 3 to 4 inches for heavily quilted designs, high-loft batting, or quilts that will be rolled and handled a lot, and to relax toward 5 to 6 inches for light quilting on a stable, low-loft batting. If you are unsure, err toward more pins; extra pins cost time, but too few pins cost you a pucker you cannot fix after quilting.
Match the method to the quilt and the room you have. For a crib or lap quilt, a dining table and pin basting are usually enough. For a twin or larger quilt, a clean floor or a longarm frame gives you the flat surface the layers need; pool noodles can help you roll and manage the bulk. Spray basting is faster for large quilts but needs ventilation and a workspace you can protect from overspray. If you have neither floor space nor a large table, basting in sections on a table, smoothing and pinning one manageable area at a time, is a common workaround, though it demands extra care at the seams between sections.
Watch out: if you find a wrinkle on the backing after pinning, do not quilt over it hoping it will quilt out. Unpin the affected area, lift the layers, smooth from the center outward, and re-baste before you continue.
Pin basting holds the layers with curved safety pins, and the article's key spacing and method points are summarised below.
| Basting method | Best for | Key point |
|---|---|---|
| Pins | Small to medium quilts, hand or domestic-machine quilting | Inexpensive, no residue |
| Spray | Large quilts | Needs ventilation and workspace |
| Pool noodles | Rolling and managing large sandwiches | Roll and unroll section by section |
| Pin spacing, heavy quilting | Dense stitching or high-loft batting | Tighten to about 3-4 inches |
| Pin spacing, light quilting | Light quilting on low-loft batting | Relax to about 5-6 inches |
| Pin placement | Every basting pin | Avoid stitching lines |
Spray basting uses a temporary adhesive to bond the layers. It is fast and good for large quilts, but it needs ventilation and a clean workspace. Spray the backing lightly, then lay the batting over it, smooth it, and repeat with the top.
Work in a well-ventilated room and follow the product's safety directions. Spray in short, light passes, not heavy coats, so the adhesive stays tacky without soaking through. Browse Magic Premium Quilting Crafting Spray if you are looking for a basting spray to use.

Pool noodles give you a clever way to roll and hold a large quilt sandwich while you pin or spray. Roll the sandwich loosely around a noodle, then unroll section by section as you baste. This keeps the layers from folding over themselves.
Puckers usually come from loose backing or batting that was not smoothed out. If you see a pucker on the back, unpin that area, smooth the layers, and re-baste. Shifting often means too few basting points, so add pins or spray in the open areas.
Uneven tension happens when one layer is stretched more than another. Always smooth from the center outward and keep each layer flat before you pin or spray.
Once your quilt is basted, you are ready to stitch. High Country Quilts carries quilting supplies, including batting, to help you finish. Visit our Highlands Ranch store to find the right batting and tools for your next project.
For most beginners, pin basting on a table or clean floor is the easiest method because it needs no special products and gives you direct control over each layer. Spray basting is faster for larger quilts but requires ventilation and careful use. Pool noodle basting works well when you have limited table space. Choose the method that matches your quilt size and the space you have available.
Place basting pins about 4 to 6 inches apart across the quilt sandwich, working from the center outward. Keep pins out of the path of your planned quilting lines so you do not have to stop and remove them while stitching. Check that the top, batting, and backing stay flat and smooth as you go. Denser spacing helps prevent shifting on larger quilts.
Yes. You can baste on a clean floor, a carpeted area covered with a sheet, or by rolling the quilt and working one section at a time. Pool noodles can also support the quilt sandwich so you can baste in manageable sections without needing a full-size table. Work from the center outward and roll up the finished portions to keep the rest of the quilt clean.
Press the backing fabric before layering and lay it wrong side up, then smooth it outward from the center with your hands. Tape or clip the edges so the backing stays taut. Add the batting and top next, smoothing each layer as you go. Working slowly and checking for wrinkles before you pin or spray will prevent most puckers from forming.
November 2–25 only: buy a $200 gift card in either store and get a free yard of fabric every month of 2027.

Serger and BERNINA Mastery classes, longarm training, bag-of-the-month, Kids Sewing Club and a Highlands Ranch retreat. Here's what's on the calendar in November.

Free gifts, included packages and special pricing on the BERNINA 790 ULTRA, 990, Liberty Editions, L 890 serger and Q Series longarms, now through December 31.


Leave a comment