

We Love Our Quilting Community
At High Country Quilts we care deeply about community. With our experiences in retail, we know that a store is not only a place to shop but also a place for the community to gather and share. During this busy...


Before you can add those beautiful final quilting stitches, you need to baste your quilt. This is the crucial step where you temporarily secure the quilt top, batting, and backing together. It’s your single best defense against the layers shifting, which can cause frustrating puckers and wrinkles.
Think of it as creating your "quilt sandwich" and holding it all in place so the actual quilting part is a breeze.
I like to think of basting as the foundation of a house. You'd never build walls on shaky ground, right? The same logic applies here. You shouldn't start quilting on unstable layers of fabric.
Without taking the time to baste properly, all those hours you poured into piecing a gorgeous quilt top can be completely undone by fabric shifts and puckers during the quilting phase. It’s the one step that truly bridges the gap between a finished top and a beautifully quilted project you can be proud of.
When you secure these three layers—the quilt top, the fluffy batting, and the backing fabric—you create a stable canvas. This stability is what lets you quilt with confidence, whether you’re working by machine or stitching by hand.
The main reason we baste is to stop the layers from moving around on their own. When they do, a few all-too-common problems pop up:
Basting is your insurance policy against quilting frustration. A little time spent here saves a lot of time with a seam ripper later. It’s what ensures the quilt you envisioned is the quilt you actually create.
Basting has always been a technical necessity in quilting. For centuries, traditional hand-basting with long running stitches was the only way to do it, especially when quilting was an essential household skill. It’s fascinating to explore quilting's rich history and see how these methods have evolved. Thankfully, we modern quilters have a few more methods to choose from, each with its own pros and cons.
The three most popular techniques today are:
So, which one should you choose? It really depends on the size of your quilt, how much space you have to work in, and honestly, just your personal preference. At the end of the day, all three get you to the same goal: a perfectly secured quilt sandwich, ready for you to work your magic.
The secret to a beautifully basted quilt isn't some complex technique—it's all in the prep work. Honestly, taking the time to set up your space properly is the single best thing you can do to get a smooth, pucker-free finish. You don't need a huge, dedicated studio. I've basted many quilts on a clean living room floor or a large dining table.
What you're aiming for is a large, flat surface that can support your entire quilt sandwich without any of it hanging off the edges. This prevents gravity from pulling and distorting your layers while you work. If you're looking for clever ways to make your area more functional, check out your guide to the perfect sewing room setup for some great ideas.
Once you've picked your spot, it's time to get your materials in order. This is one of those moments where slowing down pays off big time. A few extra minutes here will save you hours of frustration later. Trust me.
First things first, give your quilt top and backing fabric a really good press with a hot iron. You want them perfectly flat. I mean every single crease needs to go. Any wrinkles you baste into the quilt sandwich have a funny way of becoming permanent.
Next, deal with your batting. If it's been crammed in a package, lay it out to relax for a bit. A neat trick is to toss it in the dryer on a low or no-heat setting for just a few minutes. This helps release all those stubborn folds.

As you can see, a simple floor setup works wonders. The key, which we'll get to next, is making sure that bottom layer is held completely taut before you add anything else on top.
Before you start taping and layering, a quick check of your supplies can save you from having to get up mid-process. Here’s a quick rundown of what you’ll need for the most common methods.
| Supply | Pin Basting | Spray Basting | Thread Basting |
|---|---|---|---|
| Safety Pins | Curved basting pins | ||
| Basting Spray | Quilt basting adhesive | ||
| Needle & Thread | Long needle and thread | ||
| Painter's Tape | Required | Required | Required |
| Scissors | Required | Required | Required |
| Iron | Required | Required | Required |
Having everything within arm's reach makes the whole experience much smoother.
Your absolute best friend for this job is a roll of standard blue painter's tape. It’s hands-down the most effective way to get your backing fabric perfectly smooth and tight, which is the foundation of a great baste.
Start by laying your backing fabric wrong side up on your clean floor or table. Find the center of one side and stick a piece of tape down. Now, walk over to the opposite side, gently pull the fabric taut—you want it firm but not stretched out of shape—and tape that center point.
Do the same for the other two sides. Then, just work your way out from the center on all four sides, adding tape every 6-8 inches until the entire quilt back is secured.
A backing that is taped down taut and smooth is the best defense against puckers on the back of your finished quilt. This non-negotiable step ensures your foundation is solid, stable, and ready for the next layers.
For generations, quilters have relied on pin basting, and for good reason. It’s a classic for a reason. Pin basting is affordable, straightforward, and creates an incredibly secure hold that keeps your layers exactly where you want them until the quilting is done. If you’re just starting out, this is a fantastic, reliable method to learn first.
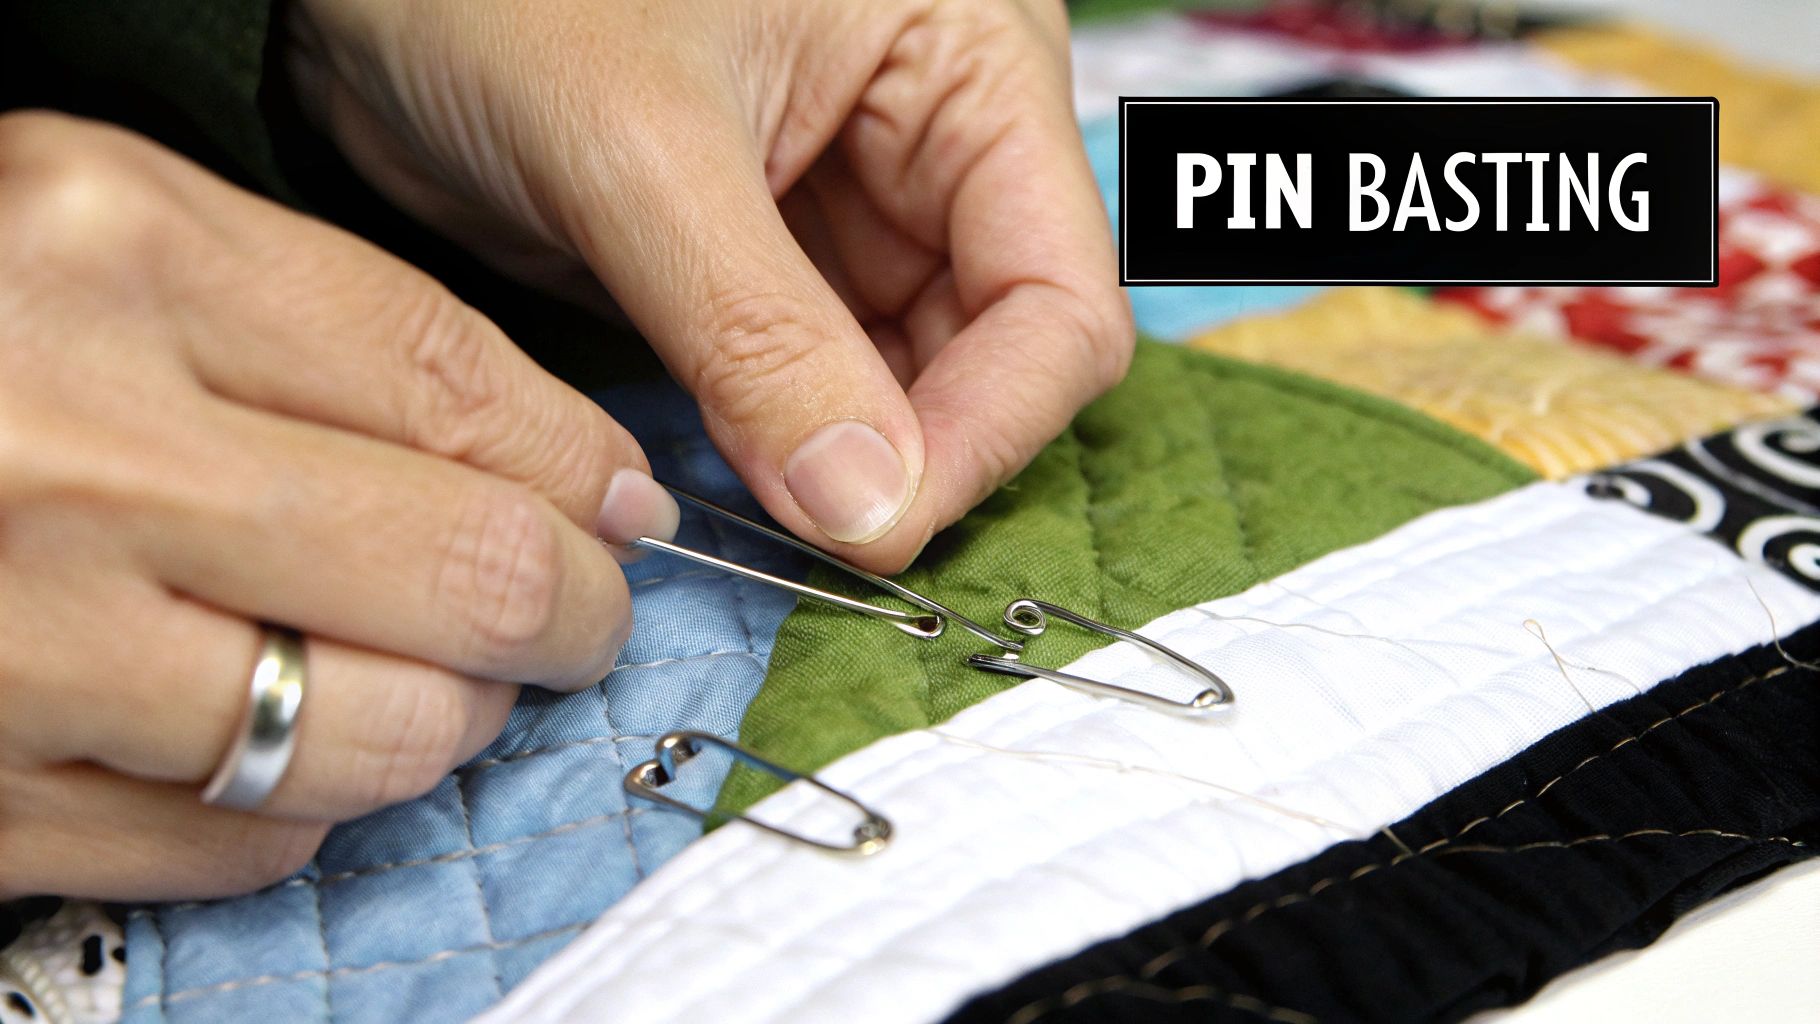
The whole idea is simple: you’re using special safety pins to tack your quilt sandwich together. The key is using curved basting pins. That little curve makes all the difference, allowing you to easily scoop through all three layers of fabric and batting without everything shifting around.
Let's assume you've already taped your backing fabric down, nice and smooth with the wrong side facing up. Now it's time for the batting.
Gently lay the batting over your backing. I always start in the middle and smooth my hands outwards, pushing out any wrinkles or trapped air bubbles. Don't pull or stretch it—you want the batting to be completely relaxed and flat.
Next comes the star of the show: your quilt top. After a good pressing, carefully place it right side up over the batting. I find it easiest to line up the top edge first, making sure it’s centered with about two inches of extra batting and backing peeking out on all sides. Once it’s in position, repeat the smoothing process, working from the center out.
With all your layers perfectly smooth, it's time to start pinning. Here’s the most important rule to remember: always work from the center of the quilt out to the edges. This technique systematically pushes any remaining fullness to the outside, which is the secret to avoiding those dreaded puckers on your quilt back.
A good rule of thumb is to place a pin every 4-6 inches, or roughly the width of your hand. This keeps things from shifting but isn't so dense that you're constantly stopping to remove pins while you're trying to quilt.
Let's be honest, pinning a large quilt can be a real workout for your hands. I learned pretty quickly that a few simple tricks can save your fingertips and make the whole process go much smoother.
One of my absolute must-have tools is a Kwik Klip. This little gadget is a lifesaver. You just slide its tip under the pin to provide support, and it gives you the leverage to close the safety pin without a struggle. It’s a total game-changer, especially on queen or king-sized quilts.
It also helps to occasionally stand up and look at your work from a different angle. This little break gives you a fresh perspective to spot any areas that might need an extra pin or a quick re-smoothing. After you think you’re done, give the whole quilt one final pat-down, feeling for any sneaky bumps or loose spots. Your finished quilt sandwich should feel like a single, secure unit, ready for you to add those beautiful quilting stitches.
If you're looking for a faster, pin-free way to baste, you've got to try spray basting. It's a fantastic option that uses a temporary spray adhesive to create a smooth, even hold across your entire quilt sandwich. I've found it often leads to fewer puckers than other methods, and it's definitely my go-to for medium-sized quilts. It's especially great for projects with dense quilting where stopping to pull out pins just kills your rhythm.
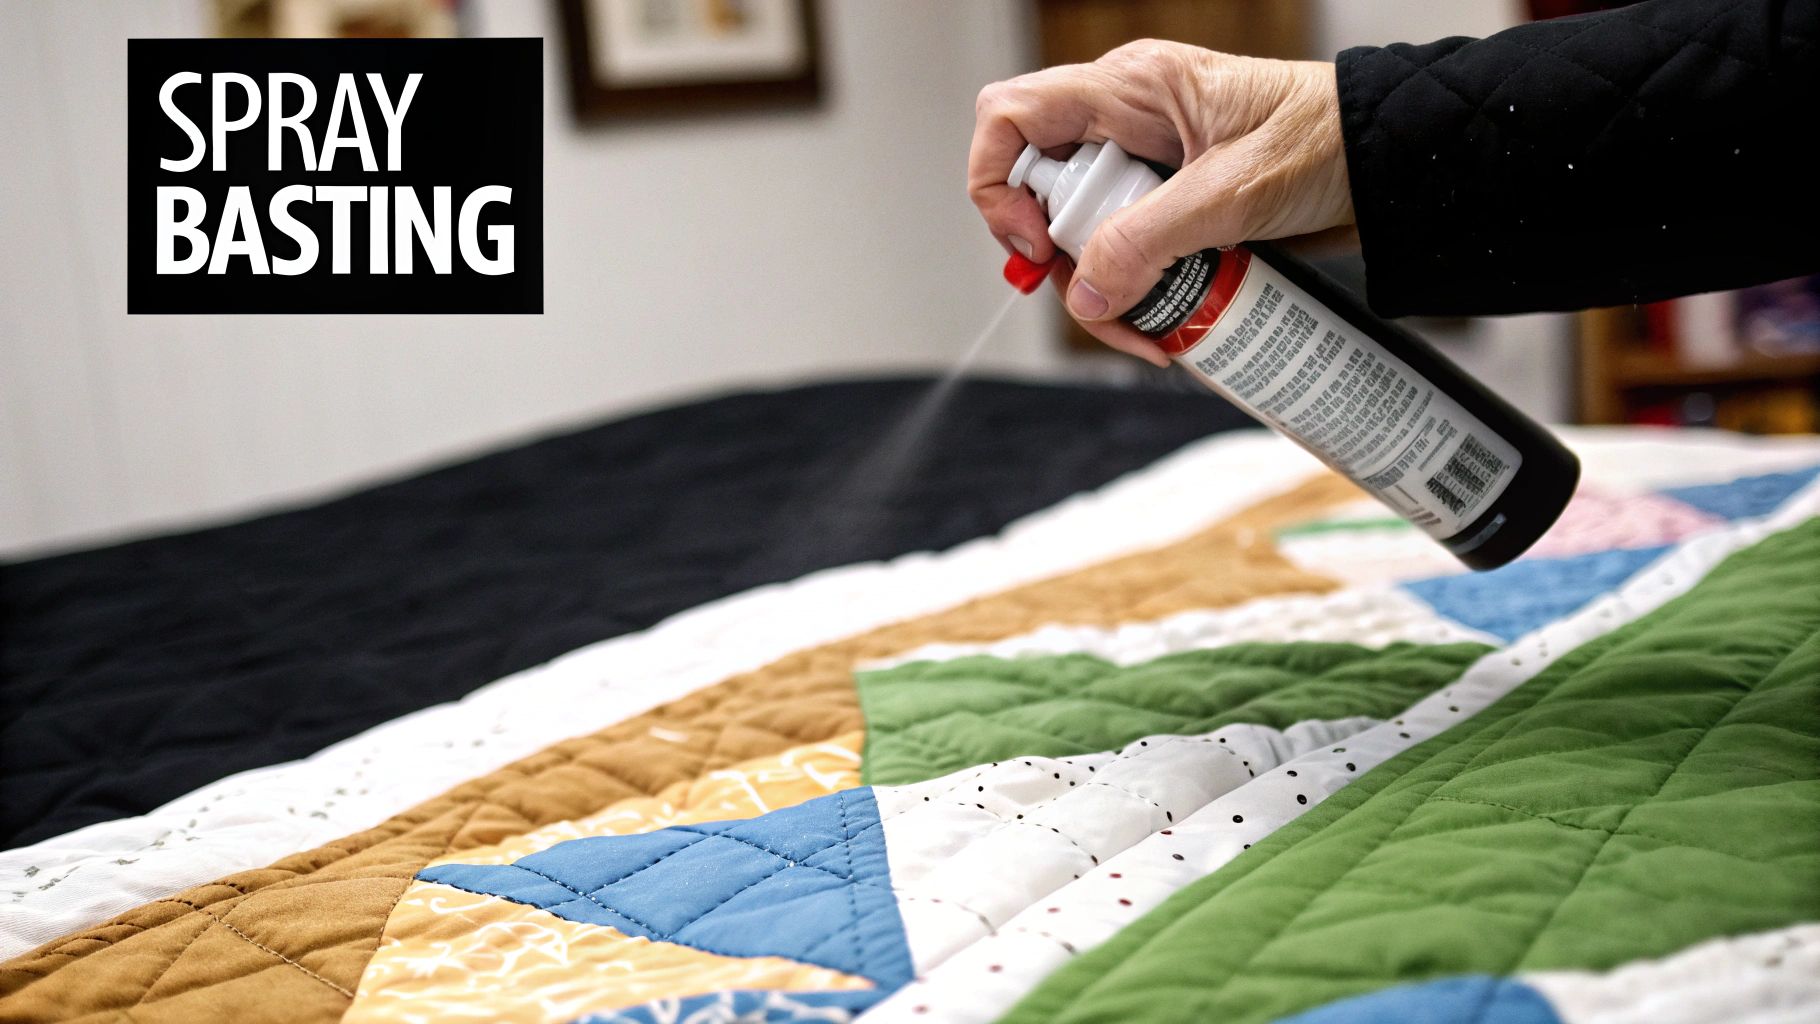
The trick is to use a quality adhesive made specifically for fabric. You want a spray that stays repositionable for a little while, won't gum up your needle, and washes out completely when you're done. Always give the can a quick read to make sure it checks all those boxes before you head to the checkout.
First thing's first: safety and ventilation are non-negotiable when you're working with spray adhesive. The fumes are no joke, so be sure to open a window or even get a fan going for some air circulation. You'll also want to protect your floor or table from overspray, because that stuff gets sticky.
Before you even think about spraying, lay down an old sheet, a cheap plastic tablecloth, or a few layers of newspaper around your taped-down quilt backing. Trust me, this small step will save you a ton of scrubbing later on.
Once your backing is taped down nice and smooth, lay your batting on top and flatten it out from the center. Here's the key part: instead of just plopping the quilt top on, you're going to work in halves. Fold one half of the batting back over itself, which will expose the backing fabric underneath.
Now, grab your spray. Hold the can about 10-12 inches away from the fabric and apply a light, even coat to the exposed backing. You're going for the same motion you'd use with spray paint—you want consistent coverage, not big, wet splotches.
The goal is a light, tacky surface, not a saturated one. Overspraying is the most common mistake and can lead to stiff patches in your quilt. Less is truly more.
Right after you spray, carefully unfold the batting and smooth it back into place. Work from that center fold outwards, using your hands or a long ruler to press it down and push out any air bubbles. Then, just repeat the whole process for the other half of the batting.
You'll do the exact same thing to attach the quilt top to the batting, working one half at a time. This method ensures everything stays perfectly aligned without any shifting.
Spray basting gives you a huge advantage in speed, bonding the layers together without the bulk or finger pricks from pins. Its popularity has been on the rise for years, with sales of quilting spray adhesives jumping by 20% annually since the 2010s.
This technique is a lifesaver for stabilizing layers when you're doing intricate free-motion quilting, which now accounts for over 50% of modern quilting styles. If you're curious, you can read more about the evolution of basting techniques and how they've shaped the craft.
The final result is a quilt sandwich that feels almost like a single piece of fabric—it's smooth, secure, and ready for you to quilt without a single pin getting in your way. Just remember to give your finished quilt a good wash to dissolve any leftover adhesive.
Long before adhesive sprays and fancy pins hit the scene, there was thread. Thread basting is the classic, time-honored technique quilters have trusted for generations, and it’s still a beloved method for good reason.
It gives you incredible control over your quilt layers, making it a go-to for hand quilters, heirloom projects, and anyone who wants their quilt sandwich to stay soft and flexible during quilting. Unlike pins, which can create stiff spots, thread keeps everything pliable. And unlike sprays, it’s completely chemical-free.
Yes, it takes a bit more time upfront, but the payoff is a level of precision and a gentle hold that’s hard to beat. For those truly special quilts, it’s often worth every minute.
You don’t need much to get started with thread basting. The whole idea is to make temporary stitches that hold everything together securely but are also easy to see and pull out later.
Once you have your quilt sandwich layered and perfectly smooth on a flat surface, you're ready to start stitching. The golden rule, no matter the basting method, is to start in the center and work your way out. This is non-negotiable! It pushes any wrinkles or fullness toward the edges instead of trapping them in the middle of your quilt.
First, knot your thread and bring your needle up from the back at the very center of the quilt. Then, create a simple, large running stitch—down through all three layers, then back up. Keep your stitches relaxed. If you pull them too tight, you’ll create puckers and tension, which is exactly what we’re trying to avoid. The goal is for the fabric to lie perfectly flat.
Stitch in a straight line from the center out to one edge. These aren't tiny, precise stitches; making them an inch or two long is perfectly fine. Once you reach the edge, just snip the thread. Then, go back to the center and start a new line of stitching toward another edge.
Your goal is to create a grid of basting lines spaced about a hand’s width (4-6 inches) apart. This network of stitches will cover the entire quilt top, making sure no section can shift or bunch up as you quilt.
What you're left with is a quilt sandwich that's securely held together but still wonderfully soft and easy to work with. When all your quilting is done, you can just snip these colorful stitches and pull them right out, and they’ll leave no trace behind.
Even when you follow the instructions to a 'T', quilt basting can sometimes throw you a curveball. It's totally normal for questions to pop up while you're in the middle of it. Let's tackle some of the most common challenges quilters run into, so you can troubleshoot with confidence.
Think of this as the kind of advice you'd get from a quilting friend over a cup of coffee—just practical solutions for real-world problems.
This is probably the number one question I hear, and thankfully, the answer is pretty straightforward. A great rule of thumb, whether you're using pins, spray, or thread, is to baste every 4 to 6 inches. An easy way to visualize this is to use the width of your own hand as a guide while you work your way across the quilt.
This spacing is your best defense against shifting layers, ensuring no large, unsecured pockets can form.
Now, if you're planning on some really dense quilting or you know the quilt sandwich will be handled a lot before quilting, you might want to tighten things up. In those cases, placing your pins or stitches a bit closer together, say every 3 to 4 inches, will give you that extra peace of mind.
Wrangling a king-sized quilt can feel a bit like wrestling an octopus, but the key is managing your space. If you don't have a huge, clean floor available, a large dining table can be your best friend. You'll just need to work in sections, carefully rolling up the basted areas as you move across the quilt.
Another fantastic trick for big quilts is what some people call the "pool noodle" method.
For truly massive projects, a lot of quilters find spray basting to be the fastest way to get it done. That said, pin basting a big quilt is a whole lot easier if you can recruit a friend to help you smooth and hold the layers taut.
Pro Tip: When you're basting a very large quilt, don't forget to take breaks! Step away, stretch your back, and come back with fresh eyes. It's amazing how a little break helps you spot a potential wrinkle you might have missed when you were focused on one small area.
Absolutely! In fact, creating a hybrid approach is a brilliant strategy that plays to the strengths of different techniques. You definitely don't have to choose just one.
Many seasoned quilters swear by this. For example, you could use a light coat of spray baste to get that perfectly smooth, even adhesion across the center of the quilt. Then, add a row of safety pins all around the outer edges for extra stability right where it’s needed most.
Another popular combination is using a light spray baste to hold things in place initially, followed by a few strategic, long stitches of thread basting. This is especially handy for large quilts that might sit for a bit before you get to the quilting machine, giving you a secure but flexible hold.
At High Country Quilts, we believe that a well-basted quilt is the foundation for beautiful quilting. For all the tools and fabrics you need to bring your next project to life, from the sharpest basting pins to the perfect bolt of backing, come see us online at https://hcquilts.com.
At High Country Quilts we care deeply about community. With our experiences in retail, we know that a store is not only a place to shop but also a place for the community to gather and share. During this busy...

Hi! We’re Adam and Renee Wheaton, the new owners of High Country Quilts! For more than 40 years, we’ve owned and operated vacuum and sewing businesses. Following in Renee’s father’s footsteps after he retired from All Discount Vacuum and Sewing in Colorado...


Leave a comment