

We Love Our Quilting Community
At High Country Quilts we care deeply about community. With our experiences in retail, we know that a store is not only a place to shop but also a place for the community to gather and share. During this busy...


Hand appliqué is one of those timeless skills, a way of sewing smaller fabric shapes onto a larger background with just a needle and thread. As you stitch, you carefully turn the raw edges of the shape under, which creates this beautiful, clean finish where the stitches are almost invisible. It’s my absolute favorite way to add that personal, detailed touch to quilts and other projects.
Welcome to the wonderfully rewarding world of hand appliqué. It's so much more than just a sewing technique; I've always found it to be a meditative craft that lets you turn simple pieces of cloth into something truly special.
Each stitch is a chance to slow down, to be present, and to create with real intention. It’s what transforms a quilt from just a blanket into a work of art. This guide is designed to walk you through that whole journey, from picking out the perfect needle to making that final, satisfying stitch.
What I love most about hand appliqué is its simplicity. You don't need a lot of fancy equipment, and it gives you incredible control, especially when you're working on tricky curves or sharp points that a machine might struggle with. It’s a skill that grows with patience, and you'll quickly find a peaceful rhythm in the gentle pull of the needle and thread.
Hand appliqué isn't just some passing trend; it's a cherished technique with a rich history stretching back centuries, a core part of textile arts all over the world. That legacy is alive and well today, supported by a vibrant community of makers.
This craft connects us to a long line of artisans who used their hands to create beauty and tell stories. When you learn to appliqué, you're not just learning a new skill—you're participating in a piece of living history.
The modern quilting world really shows how popular it remains. In the U.S. alone, the quilting industry is a massive $4.5 billion market, with an estimated 9-11 million active quilters. A huge number of those folks, like me, are drawn to handwork for the tactile satisfaction and artistic freedom it offers. You can dive deeper into these quilting industry insights and see for yourself how this traditional craft continues to flourish.
Here at the shop, we see this passion every single day. We truly believe that anyone can master this beautiful technique, and we’re here to give you all the inspiration and support you need to start your own creative journey.
Before you make your first stitch, gathering the right supplies is one of the best things you can do for yourself. Think of it less as a shopping list and more as assembling your creative partners. With the right tools at your fingertips, the entire process of hand appliqué becomes more intuitive and frankly, a lot more fun.
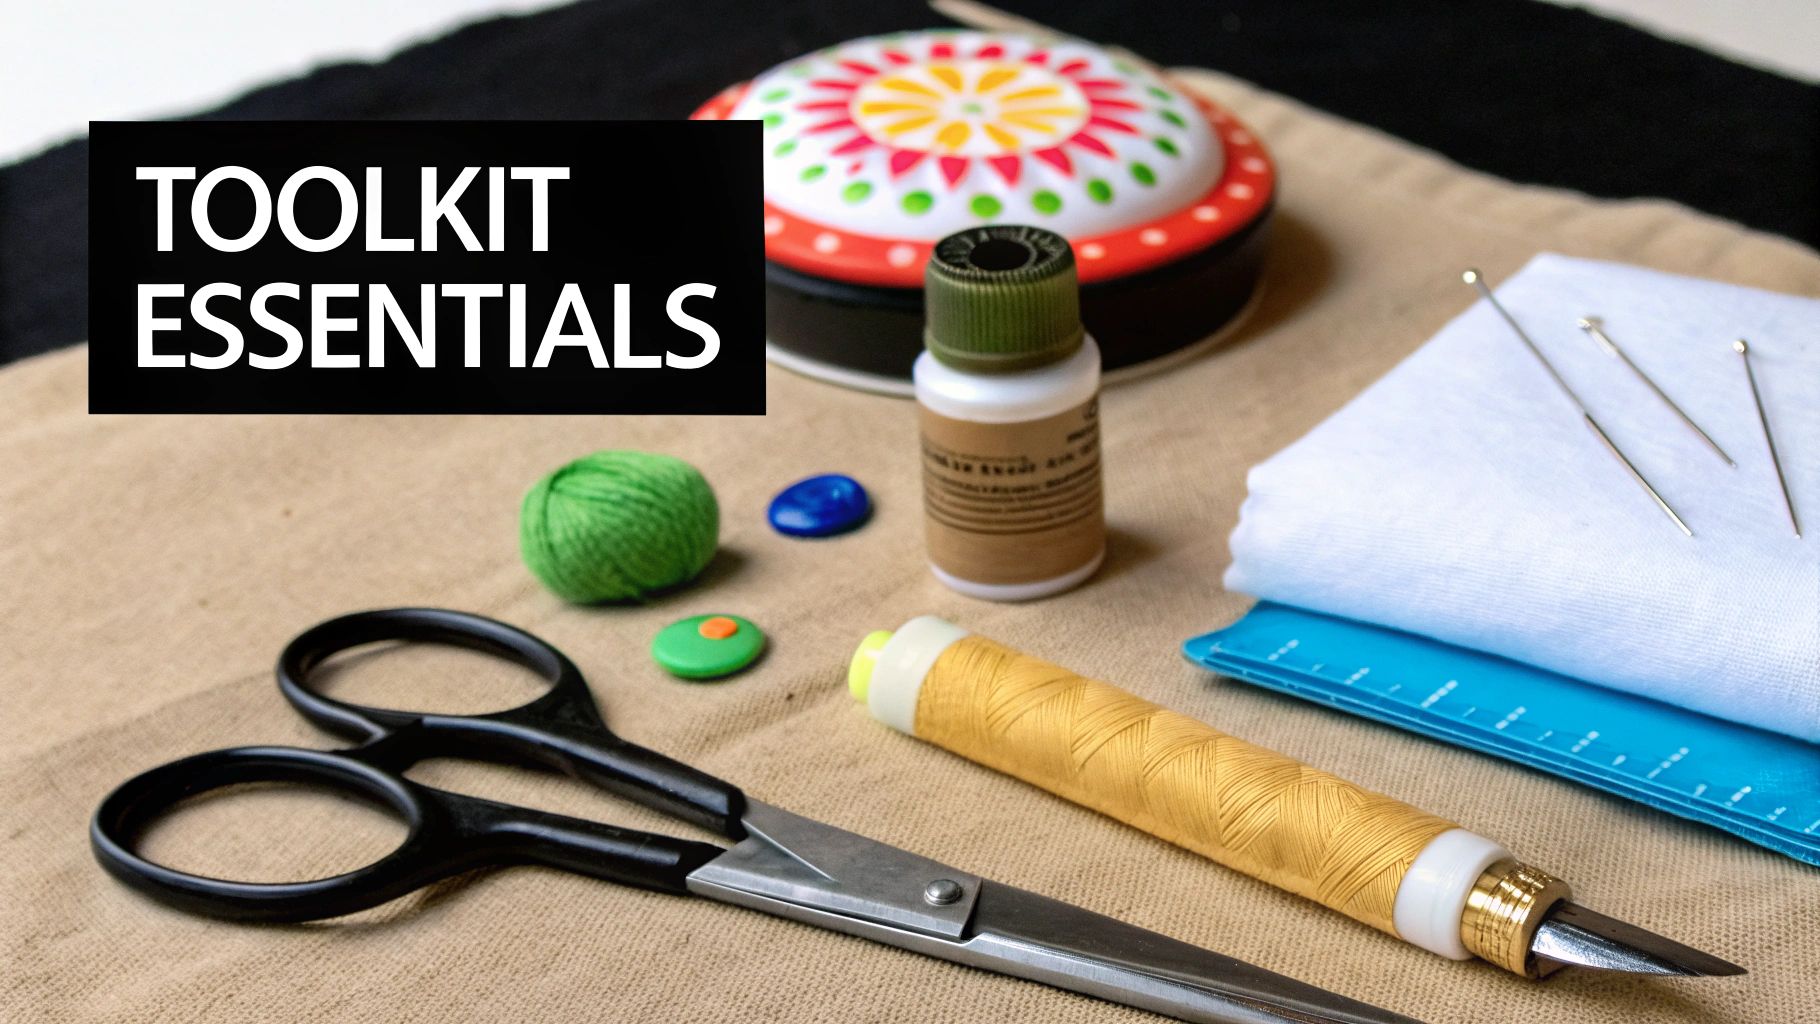
Let’s talk about the absolute essentials you'll want to have on hand.
Here's a quick rundown of the must-have items that will make your hand appliqué projects a success.
| Tool Category | Specific Recommendation | Why It's Important |
|---|---|---|
| Needles | Milliners needles, sizes 10 or 11 | Their long, fine shaft gives you excellent control for turning under fabric edges as you go. |
| Thread | Fine, 50-weight 100% cotton thread or silk thread | The goal is for stitches to disappear. Fine thread sinks into the fabric beautifully. |
| Scissors | Small, sharp-pointed appliqué scissors AND dedicated fabric shears | You need one pair for snipping tiny curves and corners and another for cutting clean fabric shapes. |
| Marking Tool | Water-soluble or air-erasable pen, or a sharp chalk pencil | Crucial for tracing your design accurately onto the fabric without leaving permanent marks. |
| Fabric Stabilizer | Freezer paper or lightweight fusible interfacing | Creates a crisp, stable edge to fold against, making perfect shapes much easier to achieve. |
| Basting Tool | Roxanne's Glue-Baste-It or fine appliqué pins | Temporary glue is a game-changer for holding pieces flat and secure without distortion from pins. |
Having these specific tools will truly set you up for success, allowing you to focus on your stitching technique rather than fighting with your supplies.
The single most important tool in your kit is your needle. Not just any needle will do. For appliqué, you want something fine and sharp that has just a bit of flex. I always recommend Milliners needles in sizes 10 or 11. Their longer shafts are a huge help, giving you the leverage to gently turn under those tiny seam allowances as you stitch.
Next up is thread. The whole point of hand appliqué is to make your stitches nearly invisible. A fine, 50-weight 100% cotton thread is the gold standard for a reason. Here’s a pro tip: always match your thread color to the appliqué piece itself, not the background fabric. This little trick makes a world of difference in helping your stitches blend in. Silk thread is another fantastic choice; it’s surprisingly strong and has a subtle sheen that melts right into the fabric.
And of course, you can't get far without sharp scissors. Precision is key here, so you’ll actually want two pairs:
While pins have been the go-to for generations, a few modern tools have completely changed how I approach appliqué prep. Pins are great, but they can sometimes cause tiny puckers or allow the fabric to shift just enough to throw off your placement.
A temporary basting glue is probably the best trick I've learned for flawless appliqué. It holds your pieces perfectly flat against the background, giving you a stable, secure edge to stitch against. Best of all? No pins to sew around!
Products like Roxanne's Glue-Baste-It are a dream for this. A few tiny dots on the back of your shape, press it in place, and it’s not going anywhere.
Another item I can't live without is freezer paper. By ironing a freezer paper template to the right side of your fabric, you can create an incredibly crisp edge to fold your seam allowance against. These simple tools take so much of the guesswork out of the prep, letting you relax and enjoy the rhythm of your stitching.
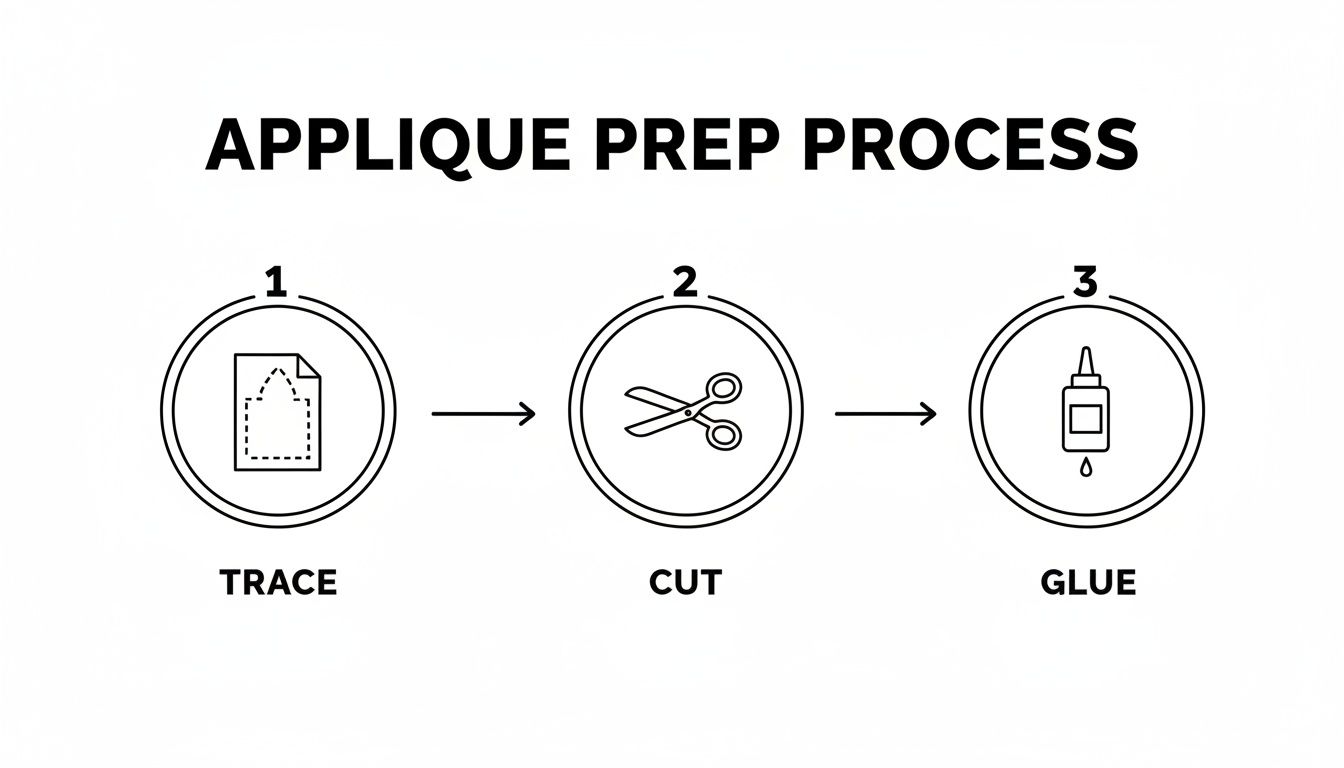
Great hand-appliqué starts long before you even pick up a needle. The secret to getting those smooth, professional-looking results really comes down to how you prep your fabric and your design pieces. It's the foundation for everything that follows.
When you're working on any project, considering different fabric types is always an important first step. Once you've got your fabrics picked out and pre-washed, we can get into the fun part: making the shapes.
I've tried a lot of methods over the years, but I always come back to two: the freezer paper technique and the starch-and-press method. Which one I choose just depends on what kind of shape I'm tackling.
For most shapes, the freezer paper technique is my absolute go-to. It's fantastic for getting incredibly crisp, clean edges because it gives you a firm guide to fold your seam allowance against. No more guessing games.
Here’s the rundown:
And that's it! You've got a perfect, stable guide for turning your edges as you stitch.
Now, when I'm dealing with trickier shapes—think tight curves or super sharp points—the starch-and-press method gives me way more control. Instead of ironing paper onto your fabric, you'll use a template made from something sturdy like cardstock or heat-resistant template plastic.
You’ll still cut your fabric with that 1/4-inch seam allowance. Then, you just lightly spray a bit of starch onto the allowance and use the very tip of your iron to press it over the template's edge. What you're left with is a pre-folded, almost-finished piece that's a dream to stitch down.
My Two Cents: Consistency is your best friend here. Keeping that 1/4-inch seam allowance uniform is the key to getting beautiful, smooth curves and avoiding ugly bulk, especially when your pieces are small.
Once all your appliqué shapes are prepped, the last step before sewing is getting them placed on your background fabric. You could use pins, of course, but I've found they can sometimes let the fabric shift or pucker just a little bit. This is where a modern solution can make a huge difference.
I strongly recommend using a temporary basting glue to hold your pieces in place. A lot of the modern hand-appliqué process involves tracing shapes on freezer paper, cutting that essential 1/4-inch seam allowance, and using a product like Roxanne's Glue Baste to position everything without pins.
This pin-free approach is becoming more and more common. In fact, it reflects a bigger trend where hand appliqué accounts for 45% of project preferences among quilters who love the hands-on process. You can read more about these quilting market trends if you're curious. Just a few tiny dots of glue will hold your piece perfectly flat, letting you concentrate completely on making your stitches beautiful.
Now that your pieces are all prepped and in place, we get to the best part: the stitching. This is where the real magic happens, where you transform separate bits of fabric into a single, beautiful image. The stitch you choose is your secret weapon for a professional finish, holding everything together while becoming part of the artwork itself.
The aim for most appliqué is to make your stitches practically disappear. This takes a gentle touch and, honestly, a bit of practice. Don't stress about getting it perfect on your first try. Just focus on finding a comfortable rhythm. As you get the hang of it, you’ll find that working on ways to improve hand-eye coordination really helps with those tiny, precise movements.
Your needle should feel like it's gliding through the fabric, not forcing its way. Think of each stitch as a quiet little moment that, one by one, builds into something wonderful.
There are a few core stitches in hand appliqué, each with its own personality and purpose. Some hide away, while others stand out as part of the design. Let's take a look at the three most common ones you'll encounter.
A quick comparison can help you decide which stitch is right for your project.
| Stitch Type | Final Appearance | Best For | Beginner Friendliness |
|---|---|---|---|
| Needle-Turn Stitch | Nearly invisible, creates a soft, rounded edge. | Organic shapes, curves, and achieving a high-end, traditional look. | Intermediate. Takes practice to master the "turn." |
| Blind Stitch | Completely invisible from the front. | Projects with pre-pressed edges (like freezer paper or starch methods). | Beginner-friendly. The rhythm is easy to learn. |
| Blanket Stitch | A visible, decorative border around the shape. | Folk art, wool appliqué, and adding a charming, handcrafted touch. | Beginner-friendly. A great first decorative stitch to learn. |
Ultimately, the "best" stitch is the one that you enjoy doing and that fits the style of your quilt or project. Don't be afraid to experiment!
If you only learn one hand appliqué stitch, make it this one. The needle-turn is famous for creating that nearly invisible finish that you see in professional and heirloom quilts. It's my personal favorite for its elegance and the beautifully smooth edges it produces, especially on curves.
The magic of this stitch happens right at the tip of your needle. Instead of preparing the entire seam allowance ahead of time, you use the needle itself to gently turn the raw edge of the fabric under just before making each stitch.
Here’s the basic rhythm:
The key is consistency. Keep your stitches small and evenly spaced, and you’ll be amazed at how they disappear into the fabric.
The blind stitch is another fantastic choice for an invisible finish. I find this stitch works especially well when you’ve already pre-pressed your seam allowances, like with the starch-and-press or freezer paper methods. It gives you a very secure, clean seam.
The movement is a bit different from the needle-turn. Instead of catching the top of the fold, your needle actually travels inside the fold for a short distance.
My Personal Tip: When I'm using the blind stitch, I always work with a shorter length of thread, maybe around 18 inches. Because the needle is weaving through the fabric fold, a longer thread has a frustrating tendency to twist and knot up on itself.
You'll bring your needle up from the back, take a tiny stitch in the background fabric, and then "tunnel" your needle through the folded edge of the appliqué for about 1/4 inch before it exits. Pull the thread taut (but not so tight that it puckers!), and the stitch vanishes.
Sometimes, you don't want your stitches to be invisible at all—you want them to be part of the design! The blanket stitch is perfect for this. It adds a charming, rustic border that outlines your appliqué shape, making it a go-to for folk art, wool projects, or anything you want to have a cozy, handcrafted feel.
Unlike the other two, the blanket stitch is worked entirely from the top of the fabric. You create a series of straight stitches along the edge of your appliqué, with a perpendicular "locking" stitch along the top fold. It’s a wonderful and simple way to add both texture and color to your work.
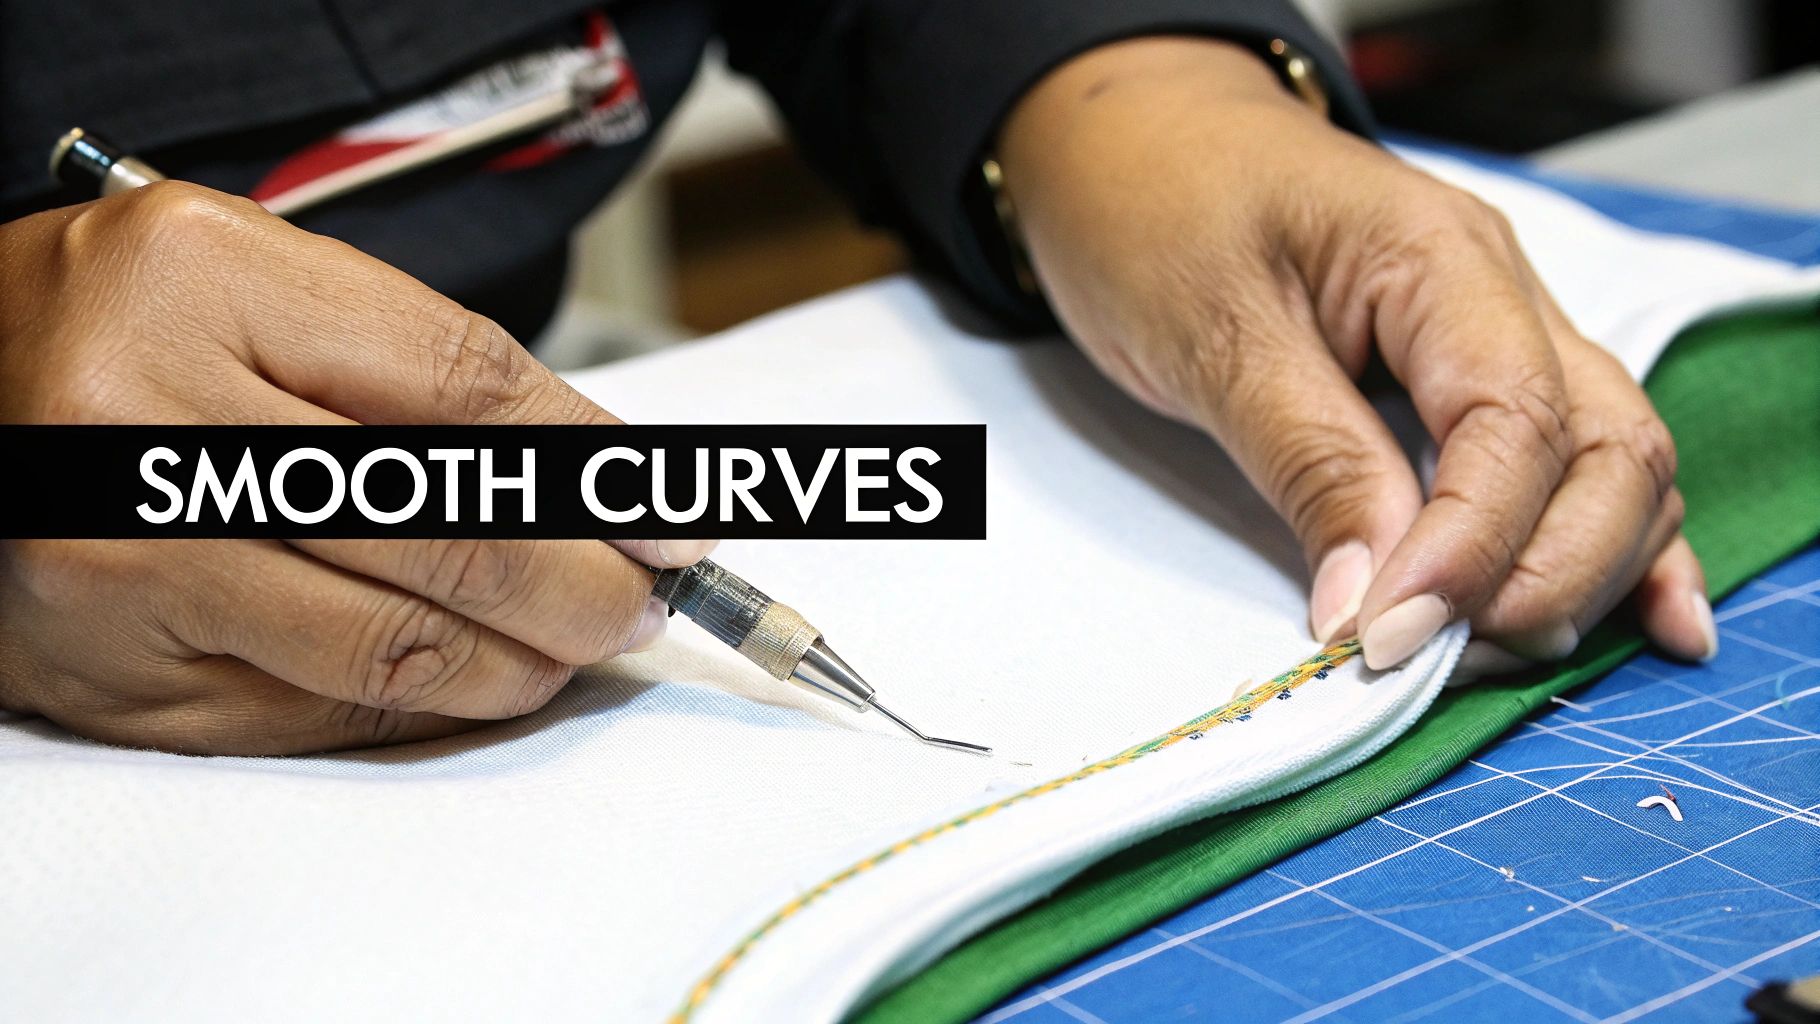
Intricate shapes like leaves and flower petals are often what draw us to appliqué in the first place, but they can seem a little intimidating. Don't worry—with a few specific techniques for curves and points, you’ll be able to tackle any design and get that smooth, professional finish.
The trick is to think of your needle as more than just a tool for stitching. It’s your primary shaper, helping you coax the fabric into place as you go.
This level of detail is exactly why so many of us fall in love with handwork. Mastering curves and points is what makes hand appliqué so special. In fact, according to recent surveys, 62% of quilters value hand appliqué specifically for its ability to handle delicate curves that are nearly impossible to replicate on a machine. It's a key reason why handcrafted appliqué quilts can fetch 40% premiums in certain markets. You can dig into the numbers yourself in the full quilt market research.
When you’re working on an outer curve, like the top of a heart or the gentle arch of a petal, the process is all about making small, gradual adjustments. Forget trying to turn under a long section of seam allowance all at once. The key is to work with just a tiny bit at a time.
Use the side of your needle to gently sweep and tuck the fabric under. You’ll notice the fabric wants to create little pleats or gathers. Your job is to ease those pleats in with your needle, distributing the fullness so it lays perfectly flat. Small, frequent stitches are your best friend here—they’ll secure that beautiful, smooth curve.
Inner curves, or "valleys," present the opposite challenge. Instead of dealing with excess fabric, you're fighting tension. To get a crisp inner curve without any puckering, you have to clip the seam allowance.
Carefully snip into the fabric almost to your stitching line, perpendicular to the edge. For a gentle curve, one or two clips might be enough. For a tighter one, you may need several clips spaced about 1/4-inch apart.
My Pro Tip: Be so careful not to clip past your seam line! It’s the most common mistake I see. Those little clips release the fabric's tension, which is what allows you to turn the edge under for a sharp, clean valley.
Sharp points give your appliqué such great definition, but they can turn bulky in a hurry if you're not careful. The secret is to reduce as much fabric at the tip as you can.
Here’s the method I swear by for crisp points:
For extra control, I often use a stiletto or even a simple bamboo skewer to hold those tiny folds down while I make that final securing stitch. This little trick prevents bulk and ensures your points are perfectly sharp, every single time.
That last stitch is always such a satisfying moment, isn't it? But before you set your project aside, taking a few extra minutes for the finishing touches is what really elevates your work from handmade to beautifully handcrafted.
A good press is the secret to a professional-looking finish. My number one rule is to always press from the back of your work first. This lets the heat and steam work their magic, setting the seams and stitches flat without crushing the beautiful texture you’ve created on the front.
I always recommend using a pressing cloth—even a scrap piece of cotton will do—to protect your fabric from getting that dreaded iron shine. And remember, press, don't iron. Just a light up-and-down motion is all it takes; dragging the iron can pull your appliqué shapes and stitches out of alignment.
Even after years of stitching, I still run into the occasional hiccup. The good news is that most common appliqué problems are simple to fix.
Puckering Fabric: This is almost always a tension issue. If your background fabric is bunching up around your appliqué, you're likely pulling your stitches just a little too tight. Try to relax your hold and aim for consistent, gentle tension. On your next project, consider adding a lightweight stabilizer to the background fabric; it works wonders to prevent stretching.
Visible Threads: Are your little stitches showing more than you'd like? First, double-check your thread. It should always match the appliqué fabric, not the background. The other culprit is the size of your stitch—practice taking the tiniest "bite" possible from the very edge of the appliqué piece.
Fraying Edges: There's nothing more frustrating than little threads poking through your beautifully turned edge. For fabrics that are prone to fraying, a little bit of a seam sealant like Fray Check applied to the seam allowance before you start stitching is a lifesaver.
A well-finished piece is a testament to the care you put into every step. Don't rush the ending; it's what frames all your hard work and prepares your creation for its final purpose.
Now that your stunning appliqué is complete, it's the perfect time to keep that creative momentum going. Simple projects like a decorative pillow cover, a set of tea towels, or even a single quilt block are fantastic ways to practice. They’re quick, satisfying, and will build your confidence for the next piece
Of course. Here is the rewritten section with a more natural, human-written tone.
As you start your hand appliqué journey, you'll naturally run into a few questions. Everyone does! Let's clear up a couple of the most common ones I hear from students in our workshops.
This is probably the number one question people ask. For most projects, you can't go wrong with a fine, 100% cotton thread in a 50 or 60 weight. The real trick is to pick a color that blends seamlessly with your appliqué piece, not the background fabric. This helps your stitches virtually disappear.
If you want a truly invisible finish, silk thread is an absolute dream to work with. It’s surprisingly strong for how fine it is, and it has a way of nestling right into the fabric fibers, making it incredibly hard to spot.
Ah, the dreaded pucker! It happens to all of us. More often than not, the culprit is pulling your stitches just a little too tight. Try to focus on keeping a gentle, even tension with each stitch you make—don't tug.
A lightweight stabilizer on your background fabric can also be a game-changer, giving it just enough body to prevent stretching while you work. And one last pro tip: always, always pre-wash and press your fabrics before you even think about cutting. It removes any sizing and pre-shrinks the material, which helps prevent a whole lot of frustration down the road.
At High Country Quilts we care deeply about community. With our experiences in retail, we know that a store is not only a place to shop but also a place for the community to gather and share. During this busy...

Hi! We’re Adam and Renee Wheaton, the new owners of High Country Quilts! For more than 40 years, we’ve owned and operated vacuum and sewing businesses. Following in Renee’s father’s footsteps after he retired from All Discount Vacuum and Sewing in Colorado...


Leave a comment