

We Love Our Quilting Community
At High Country Quilts we care deeply about community. With our experiences in retail, we know that a store is not only a place to shop but also a place for the community to gather and share. During this busy...


Printing photos onto fabric is one of those wonderfully satisfying crafts that turns your favorite digital images into something you can actually hold and use. With just a standard home inkjet printer, you can get fantastic results using either special iron-on transfer paper or printable fabric sheets. These methods are perfect for adding a personal touch to everything from memory quilts and custom clothing to unique home decor.
Bringing a personal photo to life on a piece of fabric is a game-changer for any crafter. Imagine creating a quilt filled with cherished family photos or adding a custom-designed pocket to a handmade tote bag. Printing your own images on fabric opens up a whole new world of creative possibilities.
The good news is, you don't need a lot of fancy equipment to get started. The process can be as straightforward as using the inkjet printer you already own, or you can explore more advanced techniques for projects that need a truly professional finish.
This guide will walk you through the most popular methods, from the easy DIY options to the more complex processes. We'll cover everything from choosing the right fabric to putting on the finishing touches, making sure your printed creations look beautiful and stand the test of time.
The best printing method for you really boils down to your budget, the equipment you have on hand, and the kind of finish you're hoping to achieve. For anyone just dipping their toes in, inkjet-based methods are by far the most accessible and wallet-friendly.
Deciding between a DIY approach and a professional service can be tricky. This decision tree can help you figure out which path makes the most sense for your project.
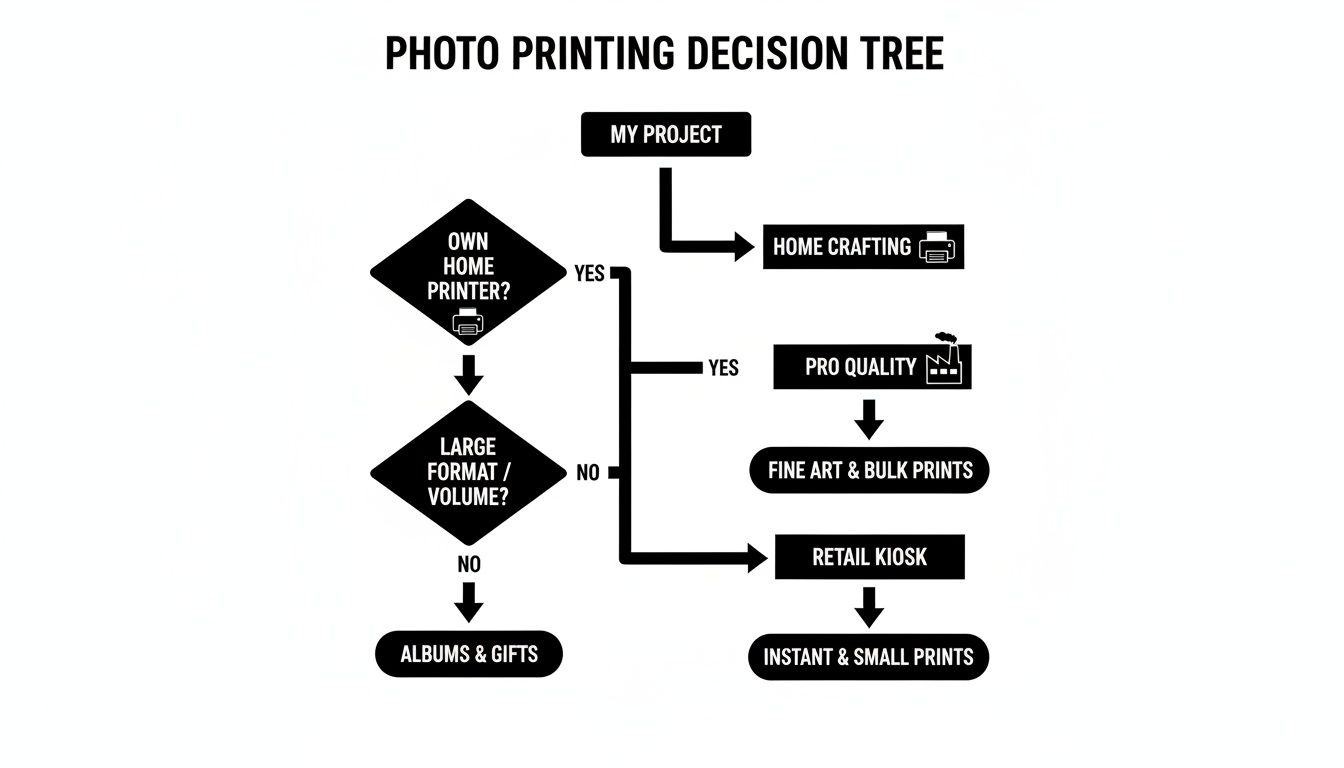
As the flowchart shows, at-home methods are perfect for one-off crafts and personal projects. But when you need bulk orders or items that will see heavy use and washing, a professional service is usually the better bet.
Here’s a quick look at the most common methods for printing photos on fabric, outlining their ideal uses, necessary gear, and difficulty to help you pick the right one.
| Printing Method | Best For | Key Equipment | Skill Level |
|---|---|---|---|
| Printable Fabric Sheets | Quilt blocks, soft apparel, detailed images where a soft feel is important. | Inkjet printer, fabric sheets. | Beginner |
| Iron-On Transfer Paper | T-shirts, tote bags, promotional items, projects on dark-colored fabrics. | Inkjet printer, transfer paper, iron or heat press. | Beginner |
| Dye-Sublimation | Sportswear, banners, home decor on polyester or poly-blend fabrics. | Sublimation printer, special ink, heat press. | Intermediate |
| Direct-to-Fabric | Custom yardage, high-end apparel, commercial production on natural fibers. | DTF printer, specialized inks. | Advanced/Pro |
| Heat-Transfer Vinyl (HTV) | Bold graphics, text, simple logos on clothing and accessories. | Vinyl cutter (e.g., Cricut), HTV sheets, heat press. | Intermediate |
Each method has its place, and choosing the right one sets your project up for success from the very beginning.
The desire for one-of-a-kind items has sparked a huge interest in custom printing. The global photo printing market, valued at USD 27.76 billion in 2026, is expected to climb to USD 34.34 billion by 2031. This surge is powered by everyday consumers and hobbyists who love creating their own unique, tangible goods.
For many of us, printing on fabric isn't just about making something. It's about embedding memories and personality directly into the fibers of a project, creating a piece that's truly one-of-a-kind.
If you're interested in taking this idea to a larger, cozier scale, you might want to check out this ultimate guide to printing pictures on blankets for more inspiration.
The secret to a stunning, long-lasting photo on fabric isn't in some complicated technique—it's all in the prep work. Before you even think about hitting the print button, two things will make or break your project: picking the right fabric and getting your image ready for the big transfer. Nail these two, and you’re on your way to a crisp, vibrant print instead of a blurry, faded mess.
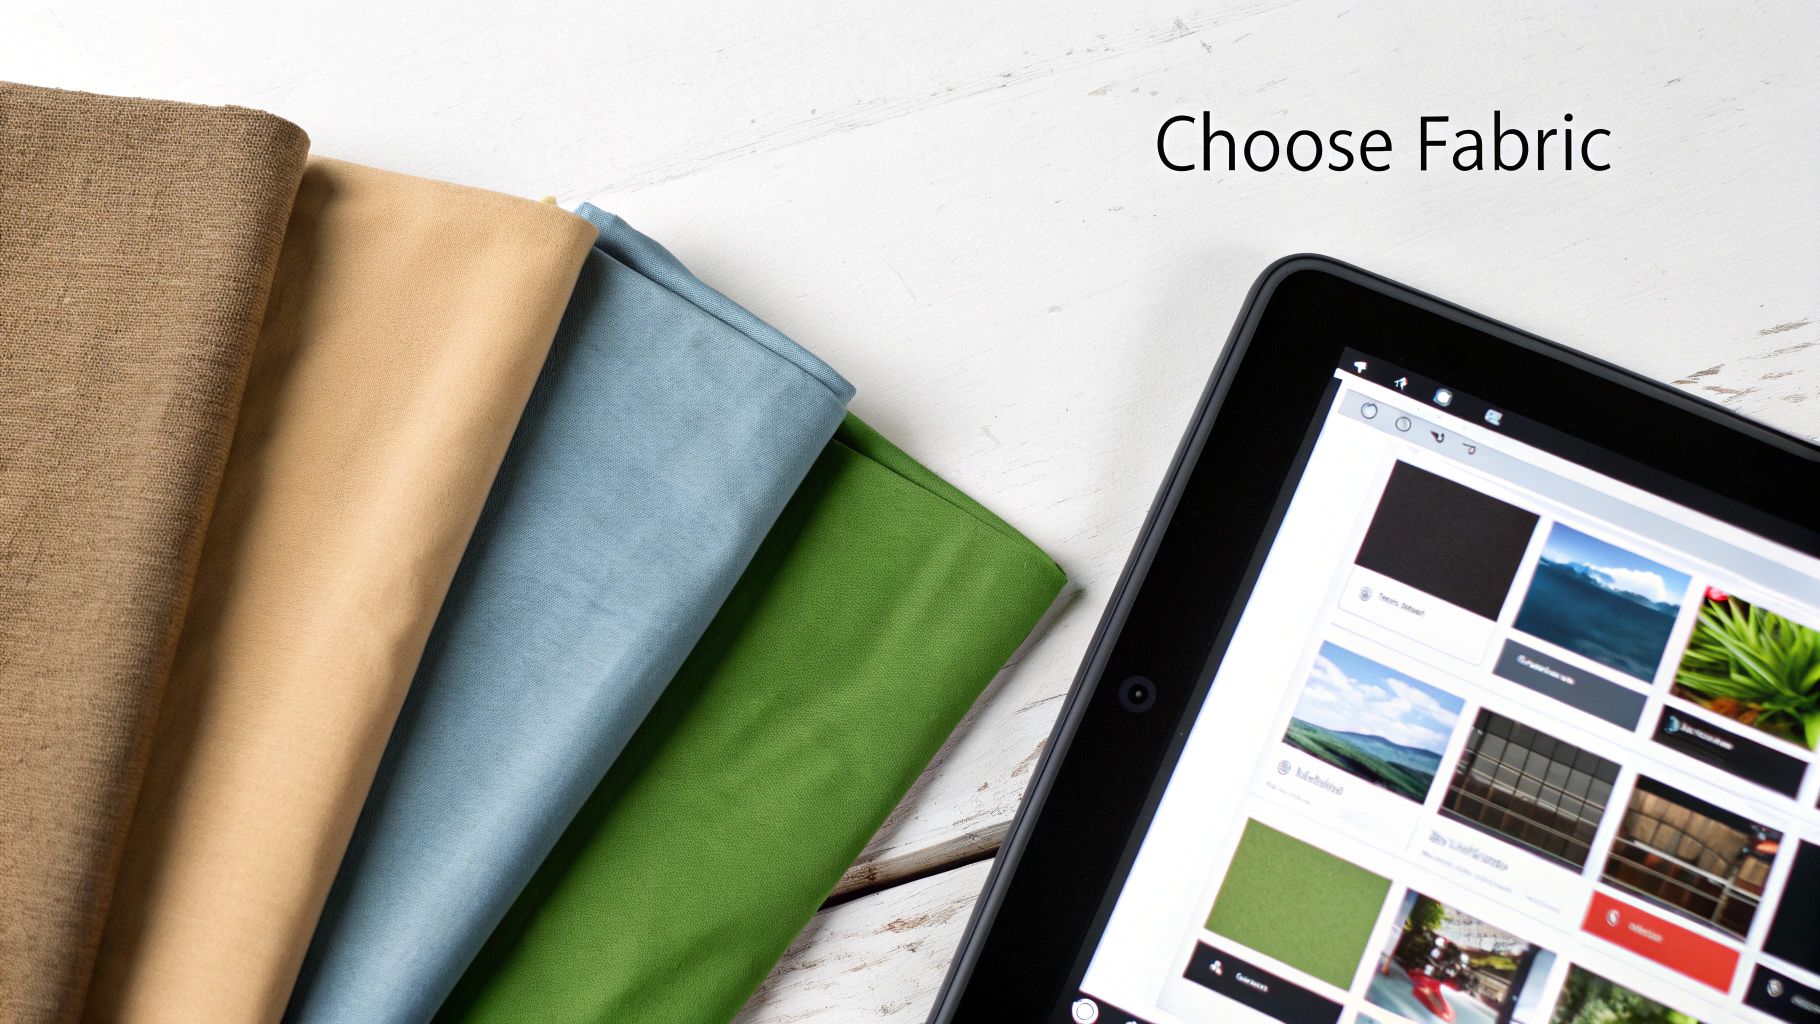
Your fabric is the canvas. Its texture, what it's made of, and how it's woven all have a huge say in how well it takes and holds onto the ink.
When it comes to printing photos on fabric, my number one rule is smoother is better. Think about it like drawing on smooth cardstock versus a rough piece of construction paper—the smoother surface gives you much cleaner, sharper lines. Fabrics with a high thread count and a tight, plain weave are your best bet for getting those fine details to show up.
For most of the at-home methods we'll talk about, natural fibers are the way to go.
Now, synthetic fabrics definitely have their place. If you're diving into dye-sublimation, 100% polyester is an absolute must. That process relies on a chemical bond between the ink and the synthetic fibers, which is what makes the final print so permanent and fade-proof.
On the flip side, try to avoid heavily textured fabrics like corduroy, terry cloth, or fuzzy fleece. Their bumpy surfaces just won't allow for a clean, even transfer of your image.
I can't stress this enough: pre-washing your fabric is non-negotiable. It's probably the most common mistake I see people make. A brand-new piece of cotton can shrink by as much as 5% in its first wash. Imagine printing a perfect portrait, then washing it, only to find the face has become distorted and puckered. It’s heartbreaking!
Always wash and dry your fabric exactly how you plan to care for the finished item. This simple step gets rid of any factory sizing or chemicals and, most importantly, gets all the shrinkage out of the way. Once it's dry, give it a good press with a hot iron to create a perfectly flat, smooth surface to print on.
My mantra for this is simple: Wash, dry, and iron before you even think about printing. It's the best insurance policy you have against a ruined project.
With your fabric all ready, it's time to turn your attention to the digital photo itself. The quality of your source image has a direct line to the quality of your finished print.
Always start with the highest resolution photo you can get your hands on. For printing, the gold standard is 300 DPI (dots per inch) at the size you want the final print to be. That low-res photo you pulled from Facebook might look okay on your phone, but I guarantee it will look pixelated and blurry once it's on fabric.
Before you print, pop the image into a photo editor. You don't need fancy software—the basic tools on your computer or phone are usually enough. I always recommend making a few small tweaks to the brightness and contrast. Photos tend to print a little darker on fabric than they look on a bright screen, so bumping up the brightness helps counteract that. A little extra contrast will make the details stand out, too.
Finally, think about your printing method. If you're using iron-on transfer paper for light-colored fabrics, you absolutely have to mirror or flip your image horizontally before printing. If you forget this, any words or logos in your picture will be backward. It's a simple click of a button that can save you from a major, irreversible "oops" moment.
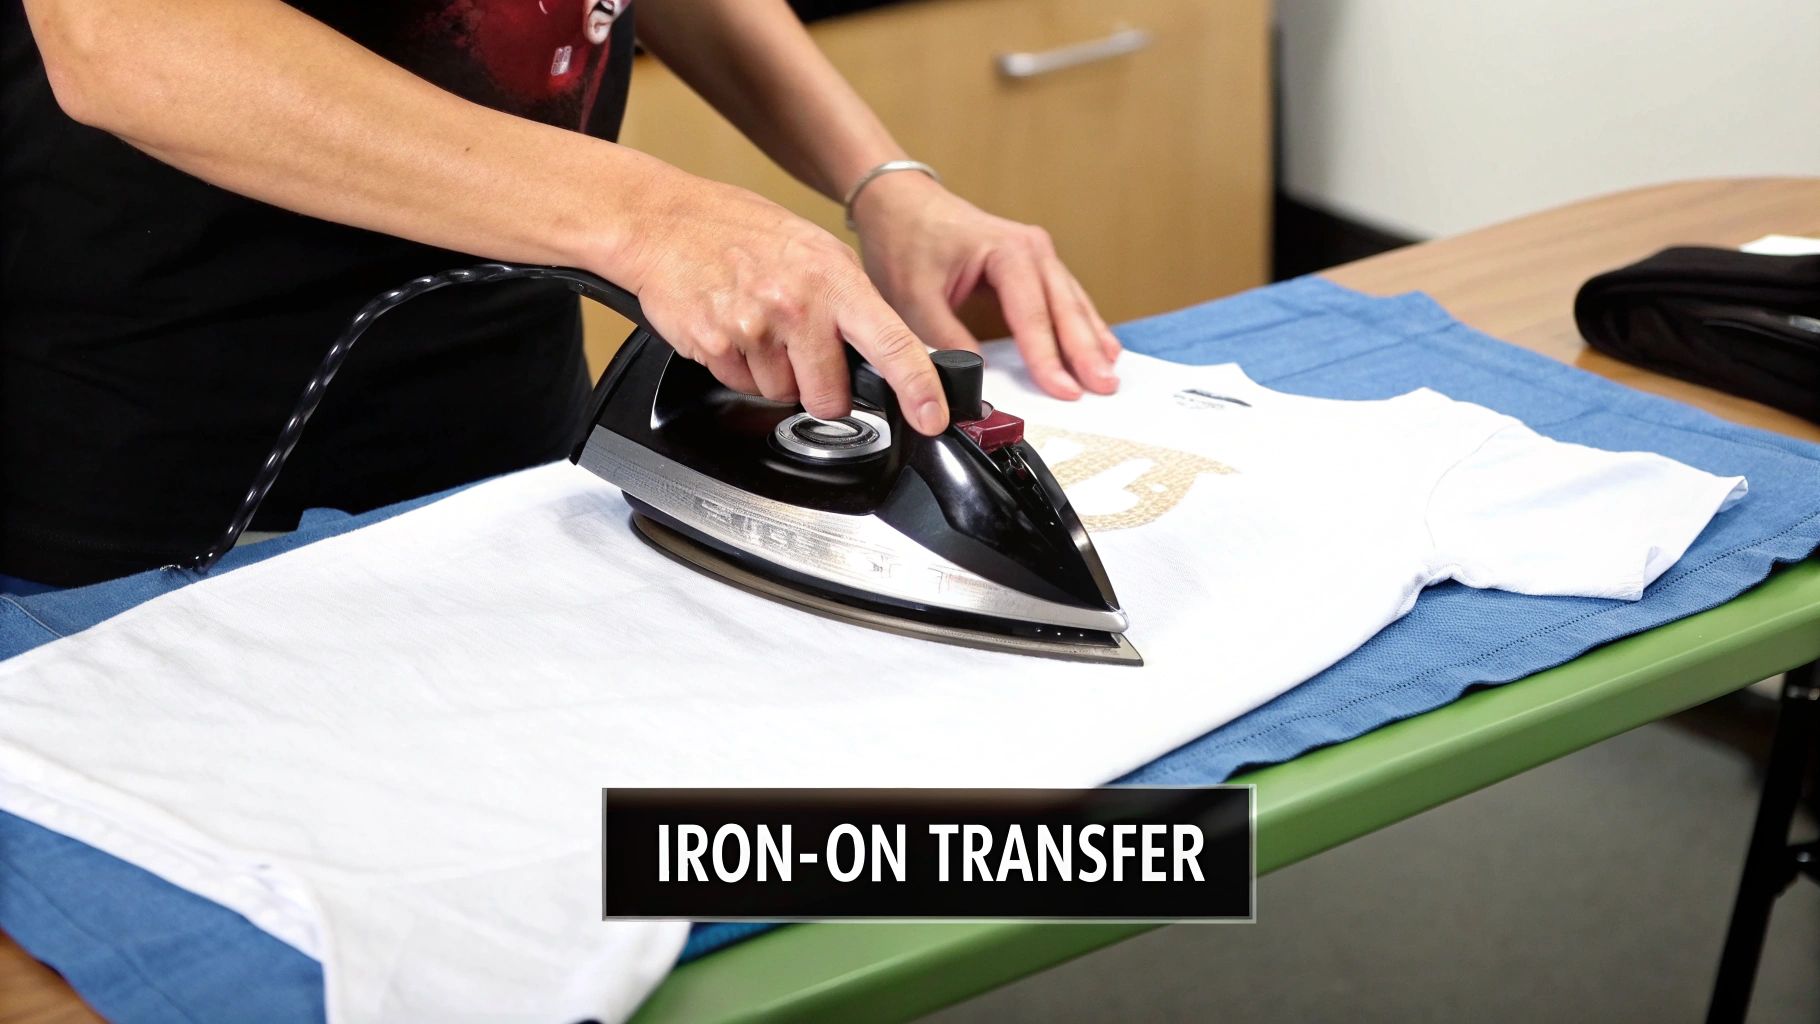
If you're just dipping your toes into printing photos on fabric, the iron-on transfer paper method is a fantastic place to start. It's one of the most accessible and affordable techniques out there. Best of all? You can use the standard inkjet printer you probably already own.
This method is perfect for all sorts of projects, from whipping up custom t-shirts and tote bags to adding a deeply personal photo block to a memory quilt. The process is straightforward: you print your image onto a special coated paper, then use a hot iron to transfer it onto the fabric. The result is a thin, film-like image that sits right on top of the fabric fibers, creating a surprisingly bold and vibrant picture. It’s an easy win for getting impressive results without buying a bunch of new gear.
Your first, and most critical, choice is the paper itself. There are two main types of transfer paper, and they are definitely not interchangeable. Picking the wrong one is a recipe for a failed project.
Seriously, don't mix these up. If you use a transparent transfer on a black t-shirt, your photo will be nearly invisible. Always check the packaging to make sure the paper is designed for your fabric color.
Got the right paper? Great. Now it's time to get your image ready. This next bit is where most beginners go wrong.
If you are using transfer paper for light-colored fabrics, you absolutely must mirror your image before printing. Just flip it horizontally in your photo editor. I can't stress this enough! If you forget, any text or logos in your photo will be backward on the finished shirt.
Transfer paper for dark fabrics usually doesn't need to be mirrored because you apply it face-up, but it's always a good idea to quickly scan the manufacturer's instructions to be sure.
Once the image is ready, don't just hit "print." You need to tell your printer what you're doing.
Making these two quick adjustments signals the printer to lay down more ink with greater precision, which is exactly what you need for a sharp, saturated transfer.
Okay, it's time for the main event. Your iron is the star of the show here, and how you use it makes all the difference. Preheat your iron to the temperature recommended on the paper’s packaging—usually the highest cotton setting. And here's a huge tip: turn the steam function OFF. Steam creates moisture, which is the enemy of transfer adhesive. It will ruin your project.
Also, ditch your regular ironing board. The padding and mesh surface just don't provide the solid, even pressure you need.
A much better option is a countertop or a sturdy table. Just protect the surface with a pillowcase or a piece of cotton fabric. You need something solid and heat-safe to press against for a good bond.
Lay your pre-washed, ironed garment on your solid surface. Give the spot where you're placing the transfer a quick press to chase away any stray wrinkles or moisture. Then, position your printed transfer face-down on the fabric (for light fabric paper) and get ready to press.
The final part of the process is all about firm pressure and a little bit of patience. With your hot iron, apply steady, even pressure and move it slowly across the entire transfer. Keep the iron moving constantly to prevent any scorch marks on the paper or your fabric. The goal here is to melt the adhesive film evenly so it fully bonds with the fabric fibers.
Give extra attention to the edges and corners. From experience, I can tell you these are the first spots to start peeling if they aren't adhered properly. The total time you'll need to iron can be anywhere from 30 seconds to a few minutes, depending on the size of your design and the specific brand of paper you're using.
Once you’re done ironing, let the transfer cool down completely. I know it's tempting to peek, but resist! Peeling the backing paper off while it's still warm can stretch, crack, or lift your beautiful image right off the fabric. When it's cool to the touch, gently and smoothly peel the paper away to reveal your custom-printed photo. This is how you get that crisp, professional finish that really lasts.
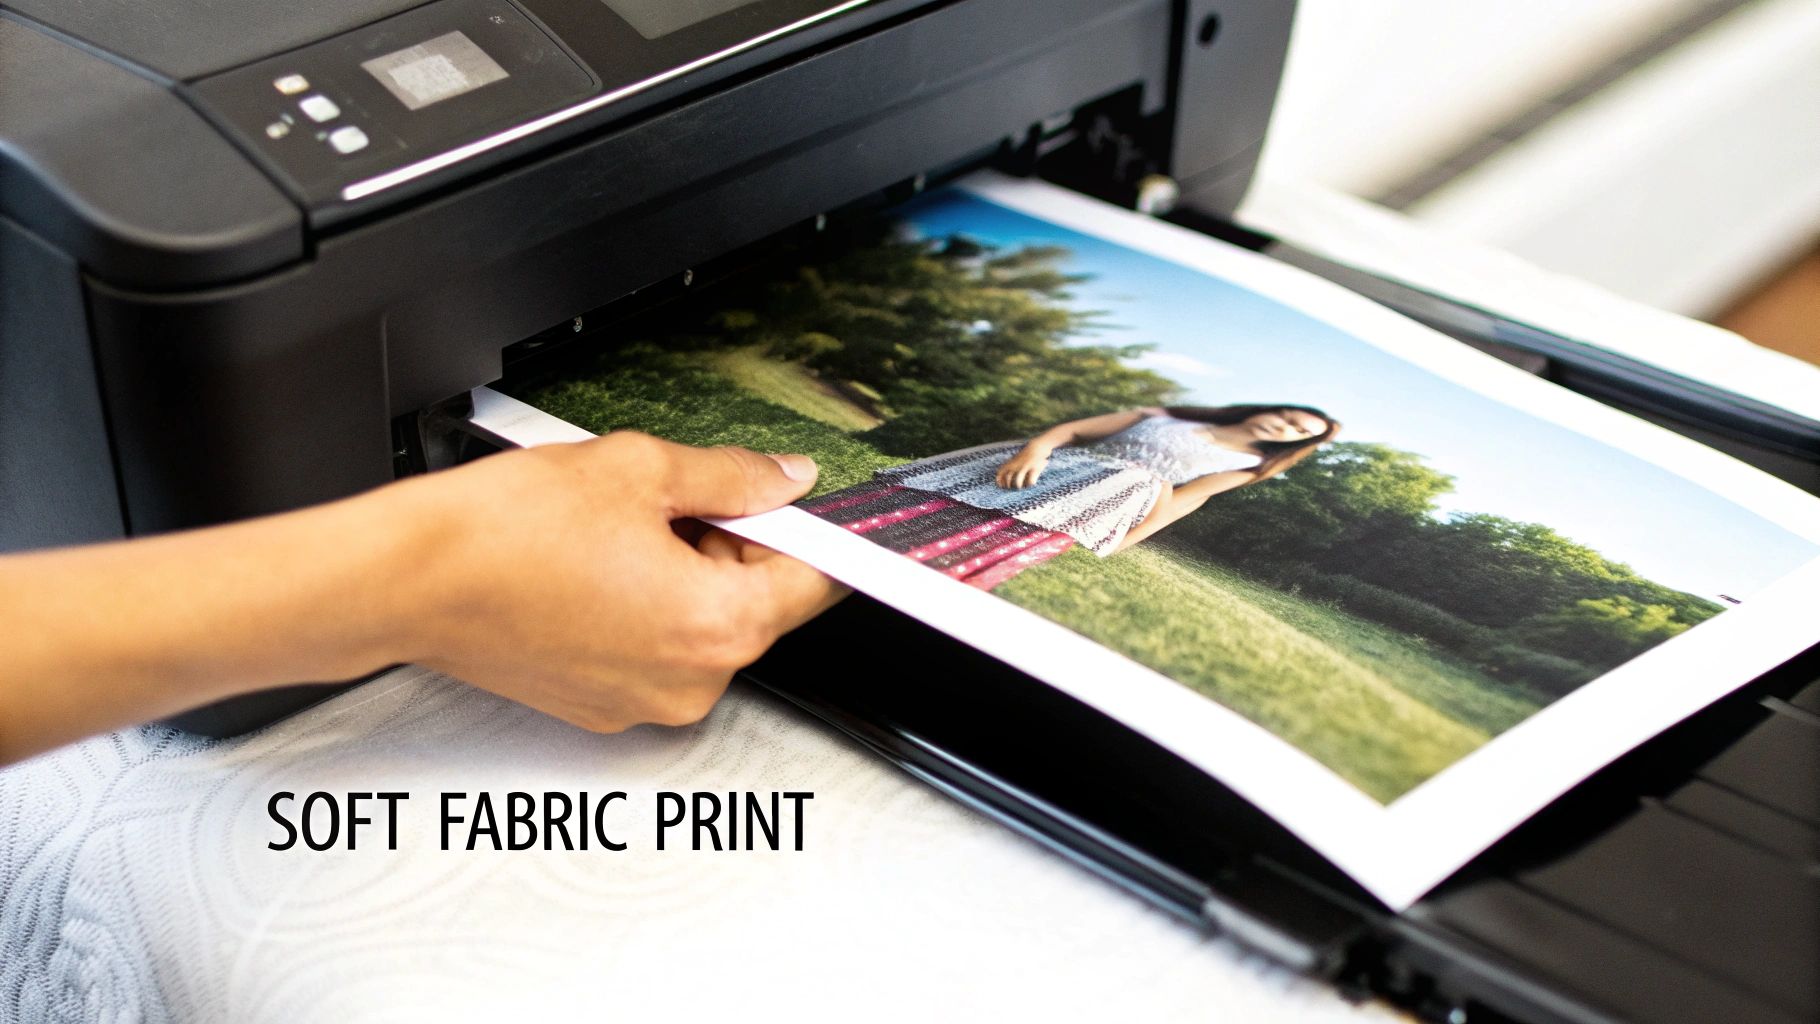
If you're after a printed photo that feels just like the fabric it’s on—soft, flexible, and with a natural drape—then printable fabric sheets are what you need. Think of them as the complete opposite of a traditional iron-on transfer, which can leave a stiff, film-like layer on the surface. These sheets let the ink sink right into the fibers, so there’s absolutely no stiffness. The print becomes part of the fabric.
So, what are they? Essentially, they’re high-quality pieces of cotton or silk temporarily bonded to a paper backing. This paper stabilizer is the secret sauce; it gives the fabric enough rigidity to glide through a standard inkjet printer just like a sheet of paper. It’s no wonder they’re a favorite among quilters making memory blocks and crafters who need detailed appliques that blend seamlessly into a larger project.
The specific sheet you pick makes a huge difference in how your photo turns out. Most are 100% cotton, but the weave and finish matter more than you might think.
This desire for personalized items isn't just a niche hobby. The global market for photo printing and merchandise, which includes all these custom fabric goods, was valued at USD 23 billion in 2023. This boom is fueled by people like us who want to turn our digital memories into something tangible. For the sewing and quilting world, this means more creative tools than ever. You can find more details about this trend in the photo merchandise market report on custommarketinsights.com.
You can’t just hit "print" and hope for the best. To get a brilliant, color-accurate image, you need to give your printer the right instructions.
First things first, load one fabric sheet at a time. If your printer has a manual feed tray, use it—it provides a straighter path and helps prevent jams. Double-check that you're loading it so the printer will print on the fabric side, not the paper backing.
Now, let's get into the printer settings on your computer.
A little tip from my own experience: always print a small test version on a scrap piece or a corner of the sheet first. This quick check saves you from wasting a whole expensive sheet only to find out the colors are off or the image is fuzzy.
Once your sheet slides out of the printer, the job isn't done. The next steps are what make your photo permanent and washable.
The first rule is patience. Let the ink dry completely. To avoid any tragic smudges, leave the printed sheet alone for at least a few hours. I find that waiting up to 24 hours is even better, as it gives the ink plenty of time to cure.
With the ink fully dry, it’s time to lock it in. Heat-setting is what makes the print durable enough to withstand washing. Grab a press cloth (a scrap piece of cotton works fine), place it over your image, and press with a hot, dry iron. Make sure the steam setting is off! Keep the iron moving for a couple of minutes to distribute the heat evenly.
Let the fabric cool down completely after you're done ironing. Then comes the satisfying part: gently peel the paper backing away from the fabric. It should come off easily, leaving you with a soft, beautifully printed piece of fabric, ready to be cut and sewn into your next masterpiece.
When you’ve mastered the basics and are ready for truly professional-looking results, it’s time to level up. The methods we’ve covered are fantastic for home crafters, but for unparalleled durability and eye-popping color, you'll want to explore the techniques the pros use. These are the secrets behind commercial-quality custom apparel, vibrant home decor, and high-end quilts that you see in galleries.
Two of the heavy hitters in the professional world are dye-sublimation and direct-to-fabric (DTF) printing. They serve different needs and work with specific fabrics, so knowing the difference is key to bringing your more ambitious projects to life.
Dye-sublimation is a bit like magic. Instead of ink sitting on top of the fabric, this process bonds the ink into the very fibers of the material. It creates a permanent image that feels like it was always part of the fabric itself.
Here’s how it works: you print your image with special sublimation ink onto transfer paper. Then, using a heat press, you apply high heat and pressure. This is where the magic happens—the solid ink turns directly into a gas, completely skipping the liquid stage. This gas permeates the fabric’s fibers, and as it cools, it solidifies and becomes one with the material.
The result? A photo print with absolutely zero texture that will never crack, peel, or fade, no matter how many times it goes through the wash.
The main catch is the fabric. Dye-sublimation only works its magic on synthetic materials, with 100% polyester being the absolute best choice. You can use it on poly-blends, but the image will only bond to the polyester fibers, so your colors might look a little more muted or vintage.
Getting started with this method requires some specific gear:
Many people have found great success in sublimation printing with an Epson printer, as some models can be converted for this specific purpose, offering a more accessible entry point into this durable printing method.
Direct-to-Fabric, or DTF printing, is another professional-grade option, and it's the go-to for natural fibers like cotton. Just like it sounds, this method uses a highly specialized printer to apply pigmented ink directly onto the fabric. Think of it as a much more sophisticated, industrial version of the printable fabric sheets you might use at home.
DTF printers are serious machines. They can handle entire bolts of fabric and produce breathtakingly detailed, high-resolution images with a massive color spectrum. Because the ink is applied directly, the fabric keeps its soft, natural hand-feel, making it perfect for premium clothing, custom quilting cotton, and fine art reproductions on canvas.
This technology is booming. The global market for digital textile printing was valued at around USD 5.8 billion in 2024 and is expected to hit USD 11.6 billion by 2030. That growth is all about the demand for high-quality, on-demand custom fabrics.
Here’s the big question: do you buy the equipment or pay someone else to print for you? It really boils down to your goals and how much you plan to print. If you're launching an Etsy shop or find yourself constantly needing custom fabric, investing in a sublimation setup might pay for itself over time.
For most hobbyists, though, the cost of the equipment can be a major hurdle.
Luckily, there’s a great middle ground. Dozens of online print-on-demand services offer both dye-sublimation and direct-to-fabric printing. You can simply upload your photo, pick your fabric, and have a professionally printed piece show up at your doorstep. It’s the perfect way to get that top-tier quality for a special quilt or gift without the massive upfront investment and learning curve.
Even with a great guide, diving into a new craft always brings up a few questions. Printing photos on fabric is no different! Let's walk through some of the most common hurdles I see people encounter so you can get back to your project with confidence.
Yes, you absolutely can. That’s the real beauty of the most common methods—they're designed for the printer you already have at home.
Both iron-on transfer paper and printable fabric sheets are made to work perfectly with standard inkjet printers. You don't need to run out and buy special equipment to get started.
Just be sure you’re using an inkjet printer, not a laser printer. Laser printers use intense heat to fuse toner onto paper, and that same heat will melt the transfer paper or fabric sheet backing. It can create a sticky, expensive mess and might even permanently damage your machine.
The standard dye-based inks that come with most home printers will get the job done. But if you want your project to last, pigment-based inks are a much better choice.
Think of it this way: pigment inks are made of tiny solid particles that sit right on top of the fabric fibers. Dye-based inks, on the other hand, soak into them. Once you heat-set pigment inks, they're far more resistant to fading and water, especially after a wash. If you find yourself printing on fabric often, investing in a printer that uses pigment inks is a worthwhile upgrade.
The secret to a print that survives the washing machine is heat-setting. This step is non-negotiable. It cures the ink and locks it into the fabric so it doesn't just wash away. For iron-on transfers, the ironing process is the heat-setting step.
For printable fabric sheets, you’ll need to set the ink after it's had a chance to dry completely. I always recommend waiting up to 24 hours to be safe. Once it's dry, grab a dry iron, set it to a high heat setting (whatever your fabric can handle), and press the image for a few minutes. Keep the iron moving to avoid scorching.
Pro Tip: Always place a press cloth, like a scrap piece of cotton, between your iron and the printed fabric. This little step prevents scorching and protects your beautiful image from the direct, harsh heat.
When it's finally time to wash your creation, a little care goes a long way:
Follow these simple rules, and your custom fabric will stay vibrant for years to come.
A blurry, disappointing print almost always comes down to one of three things. Let's troubleshoot.
First, look at your source image resolution. You can’t get a crisp print from a fuzzy photo. For printing, the gold standard is 300 DPI (dots per inch) at the final size you want to print. An image you grabbed from social media might look fine on your phone, but it will likely look pixelated and blurry when printed on a quilt block.
Second, double-check your printer settings. This is the step everyone skips! Before you hit "print," dive into the settings and make these changes:
These settings signal the printer to slow down and lay down more ink, which is exactly what you need for a sharp, saturated image on fabric.
Finally, think about your heat application. With iron-on transfers, not enough heat or uneven pressure is a classic reason for a faded look. Make sure your iron is fully preheated and that you're applying firm, consistent pressure over the entire design—especially the edges.
You sure can! You just need the right kind of paper. Standard transfer paper for light fabrics is transparent. This means any white areas in your photo will just be the color of the fabric showing through—perfect for a white t-shirt, but your image will disappear on a black one.
The solution is opaque transfer paper made for dark fabrics. This type has a solid white backing. When you iron it on, that white layer acts as a blank canvas, making your photo's colors pop against the dark material. It's a total game-changer for customizing hoodies, denim, and darker quilts.
At Famcut.com, we understand the passion that goes into every stitch and quilt block. Whether you're a seasoned quilter or just starting your sewing journey, we provide the high-quality materials, tools, and community support you need to bring your creative visions to life. Explore our collection and join a class today at https://famcut.com.
At High Country Quilts we care deeply about community. With our experiences in retail, we know that a store is not only a place to shop but also a place for the community to gather and share. During this busy...

Hi! We’re Adam and Renee Wheaton, the new owners of High Country Quilts! For more than 40 years, we’ve owned and operated vacuum and sewing businesses. Following in Renee’s father’s footsteps after he retired from All Discount Vacuum and Sewing in Colorado...


Leave a comment