

We Love Our Quilting Community
At High Country Quilts we care deeply about community. With our experiences in retail, we know that a store is not only a place to shop but also a place for the community to gather and share. During this busy...


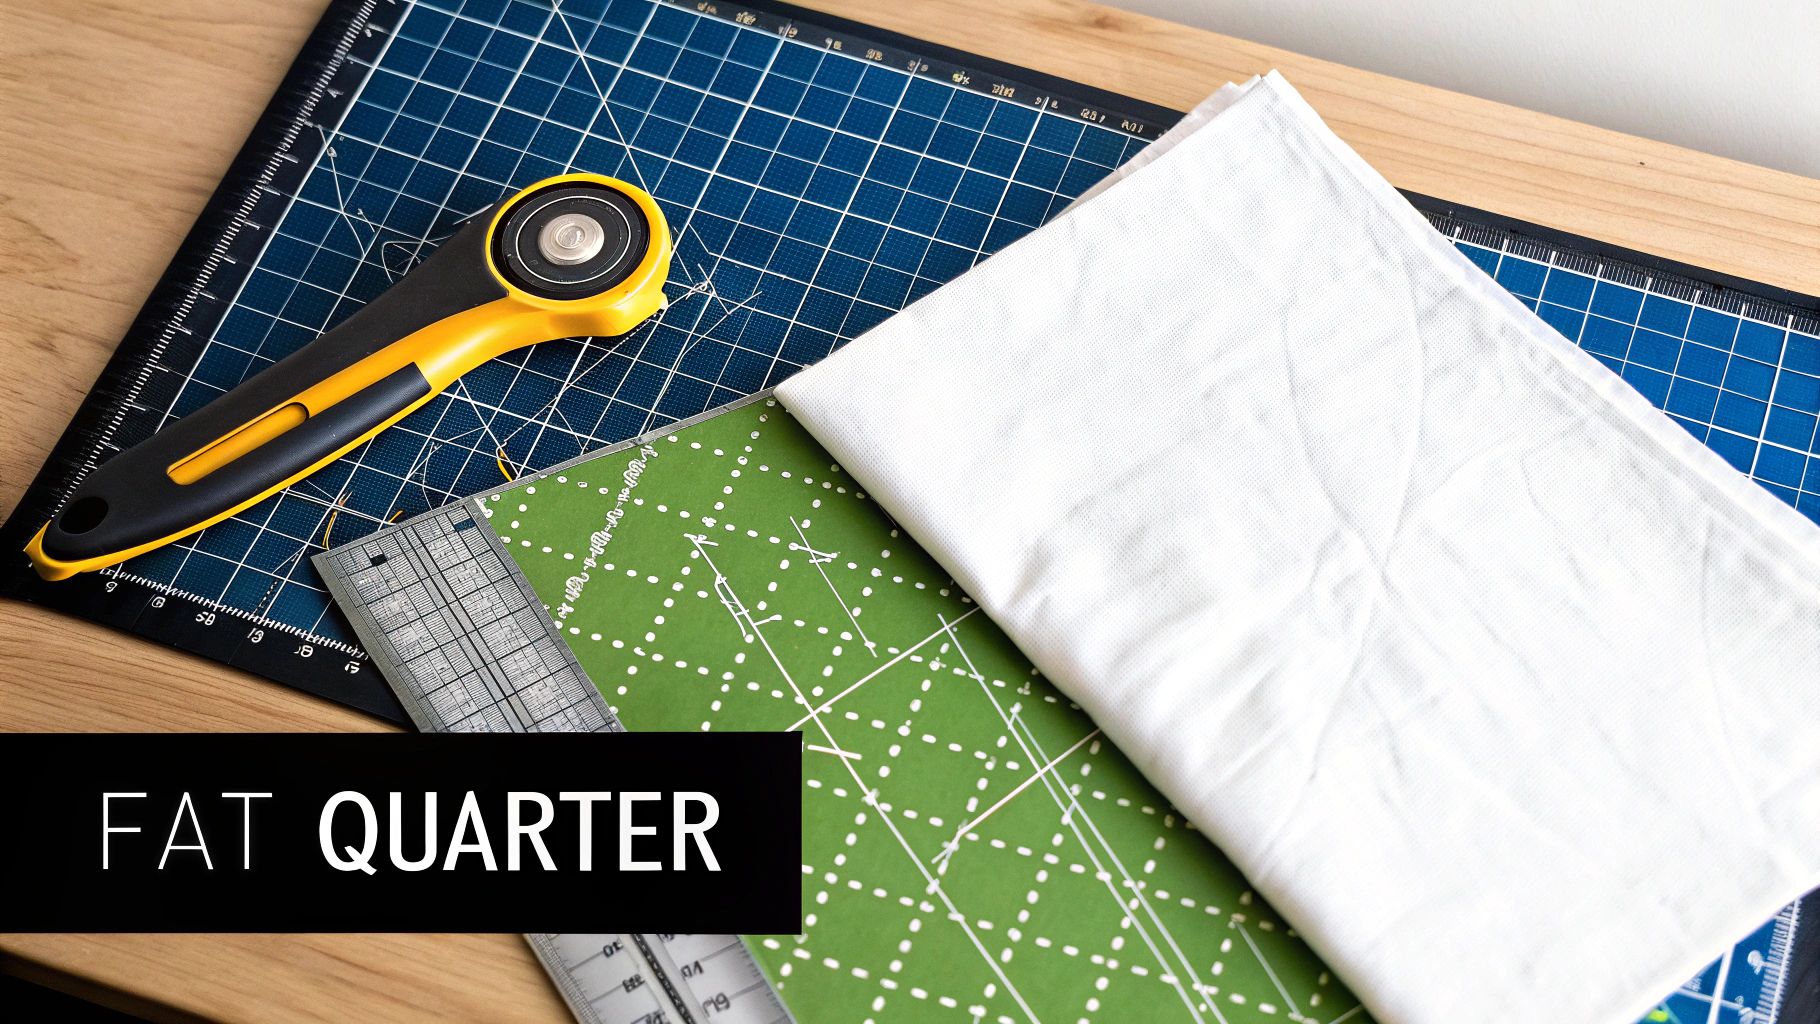
Walk into any quilt shop, and you'll find them—neatly folded, colorful stacks of fabric called fat quarters. They're a quilter's best friend for a reason. A standard fat quarter is a piece of fabric measuring 18 inches by 22 inches (that’s about 46cm x 56cm), giving you a wonderfully versatile, squarish cut to work with.
It’s a game-changer compared to the traditional quarter-yard cut, and its unique shape is precisely why it’s a staple in every quilter’s stash.
Think of it like this: if you buy a yard of fabric, you can ask for a "quarter yard." The shop will cut a long, skinny strip that’s 9 inches wide by the full width of the fabric (usually 42-44 inches). This is often called a "skinny quarter" or "long quarter."
But what if you need a bigger, blockier shape? That’s where the magic of the fat quarter comes in. To get one, you start with a half-yard of fabric. You then cut that piece in half vertically, right down the middle. This simple change in how you cut the fabric results in a piece that's "fatter" and much more user-friendly for a huge range of patterns.
The real love for the fat quarter size comes down to its incredible usability. A traditional skinny quarter is great for things like sashing, borders, or binding. But if you need to cut out a larger block piece or want to perfectly center a cute motif from a print (a technique called fussy cutting), that long, narrow strip just won't work.
A fat quarter unlocks design possibilities that a skinny quarter just can't offer. It provides enough width and height to accommodate a huge range of quilt block patterns, from simple squares to intricate star points, without having to piece smaller strips together.
Fat quarters are also the perfect way to build a beautiful, diverse fabric stash without breaking the bank. Instead of committing to a full yard of every print you fall in love with, you can grab a fat quarter bundle. These are curated collections of coordinating prints, often from a single designer line.
Buying a bundle gives you a little piece of an entire collection, guaranteeing a cohesive, professionally-designed look for your project right from the start.
This popularity is a big deal in the crafting world. The global quilting cotton industry hit $4.2 billion in 2023, and you can bet fat quarters played a huge role in that. These beginner-friendly precuts have brought a ton of new people into the craft, with one survey showing 18% of quilters are new to the hobby. If you're curious, you can dive deeper into the quilting cotton market trends to see how precuts are shaping the industry.
To make things super clear, here’s a quick reference for the standard fat quarter size and its most common variation (which happens when the fabric width is closer to 42 inches).
| Measurement Type | Imperial (Inches) | Metric (Centimeters) |
|---|---|---|
| Standard Size | 18" x 22" | 46cm x 56cm |
| Common Variation | 18" x 21" | 46cm x 53cm |
Keep this table handy! It's a great little cheat sheet for when you're planning projects or shopping for fabric.
Ask any quilter what a fat quarter is, and they'll likely tell you it's an 18" x 22" piece of fabric. And most of the time, they'd be right! But if you've been quilting for a while, you've probably also come across fat quarters that measure 18" x 21".
So what gives? It's not a mistake or a short-changed cut. The final size comes down to the original width of the fabric bolt, or what we call the Width of Fabric (WOF).
Quilting cottons typically come on bolts that are anywhere from 42 to 44 inches wide. To create a fat quarter, a shop cuts a half-yard (18 inches) off the bolt and then cuts that piece in half along the fold. If the fabric is a full 44 inches wide, you get two lovely 18" x 22" fat quarters. If the bolt is a little narrower at 42 inches, you’ll end up with two 18" x 21" pieces.
That one little inch might not sound like a big deal, but it can make all the difference if your pattern needs a specific 10-inch square cut out. My advice? Always give your fat quarters a quick measure before you start cutting. It’s a simple step that can save you a real headache later.
Just when you think you have it figured out, there's another little wrinkle to consider: where the fabric comes from. Here in the US, we work in yards and inches. But many beautiful fabrics, especially from European designers, are sold by the meter. This creates a slightly different—and slightly bigger—fat quarter.
It's a good thing to keep in mind, especially when you're ordering fabric online from an international shop. Getting a metric fat quarter can be a happy surprise, giving you a little extra fabric to play with!
Fat quarters are just one member of the wonderful world of precut fabrics. Knowing how they relate to other cuts helps you see the possibilities in your stash.
For example, a fat eighth is exactly what it sounds like—half of a fat quarter! It’s typically a 9" x 21" cut, perfect for smaller projects or adding more variety to a scrappy quilt.
Then you have the smaller precuts like charm packs (bundles of 5" x 5" squares) and mini charm packs (2.5" x 2.5" squares). Many of us will chop up a favorite fat quarter to create our own custom charm squares, which is a fantastic way to make sure not a single precious scrap goes to waste.
While grabbing a precut bundle is undeniably convenient, there's a unique satisfaction that comes from cutting your own fat quarters from a larger piece of fabric you adore. It's the perfect way to turn that gorgeous yard of cotton you've been saving into a set of perfectly coordinated pieces for your next quilt. Honestly, it's not just more cost-effective; it’s a fundamental skill that puts you in complete control of your fabric stash.
The process itself is simple, but as with all things quilting, precision is everything. Before you even think about making a cut, you have to square up your fabric. This just means making sure you have a perfectly straight edge and a true 90-degree corner to work from. Taking a minute to do this first saves you the headache of wonky, distorted fat quarters later and ensures your piecing will be spot-on.
This diagram breaks down the journey from a bolt of fabric to a perfectly usable fat quarter.
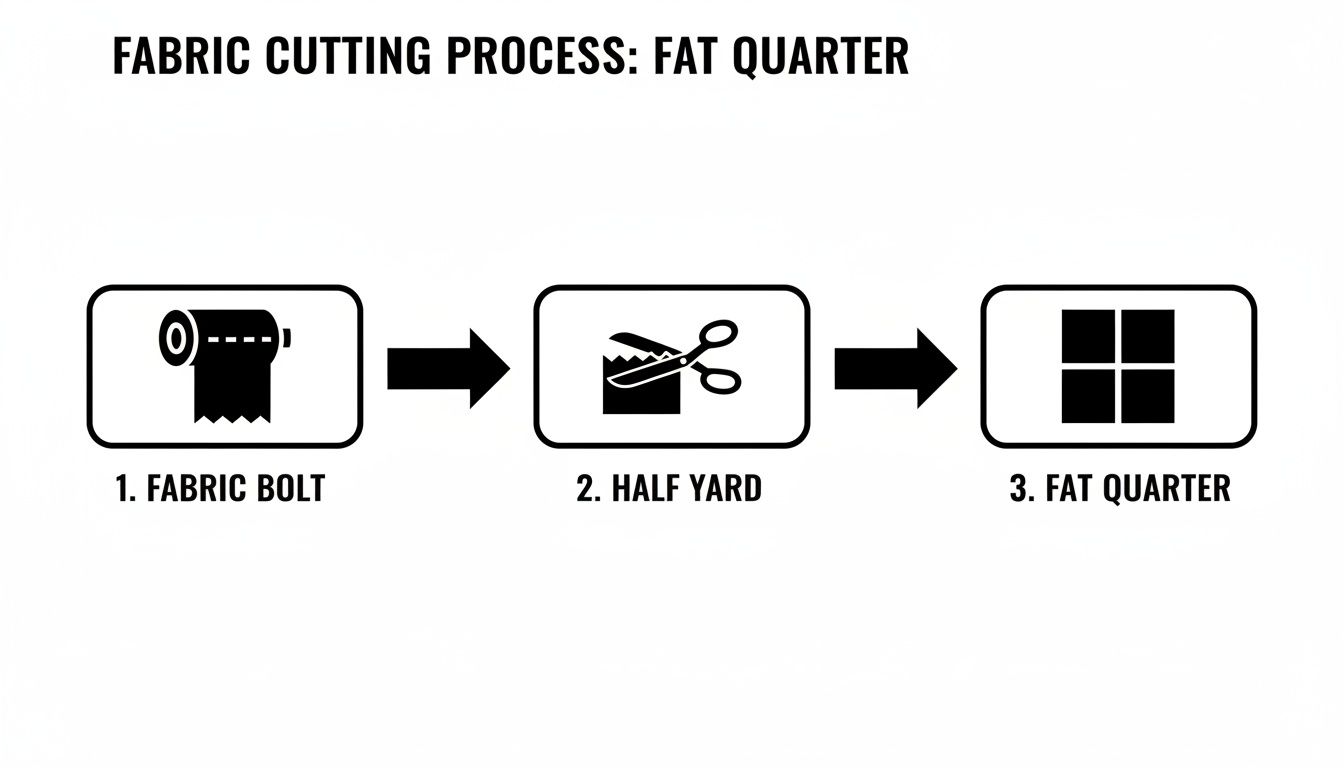
As you can see, it all starts with a half-yard piece, which is then divided in half to get that classic fat quarter shape.
To get those crisp, accurate cuts every single time, you'll want to have a few trusted tools by your side. These are the absolute cornerstones of precise quilting work.
Once you have your gear ready, you can get to cutting. The approach changes just slightly depending on whether you're starting with a half-yard or a full yard.
If you just need one or two fat quarters for a small project, starting with a half-yard of fabric is the most direct route.
This is one of those essential bits of "quilter's math" to remember: one half-yard of fabric always yields two fat quarters. Knowing this makes planning your projects so much easier.
When your project calls for a matching set of four fat quarters, working from a full yard is the most logical way to go.
Figuring out when to grab a fat quarter versus a standard quarter yard can feel a little confusing at first, but it's really all about the shape you need for your project. Think of it this way: both cuts give you the exact same amount of fabric, just in a different format.
One isn't inherently better than the other; they just have different jobs they excel at.
A traditional quarter yard is what you get when you ask a fabric store employee to cut a quarter yard straight off the bolt. It’s a long, skinny piece of fabric measuring 9 inches by the full width of the fabric (usually 42 to 44 inches).
This long, narrow shape makes it the absolute champion for anything that requires continuous length. If you're cutting sashing to go between your quilt blocks, long strips for a border, or the binding to finish your quilt, this is your go-to cut. You can’t beat it for efficiency when you need length.
A fat quarter, on the other hand, is a more block-like rectangle measuring roughly 18 inches by 21 inches. It’s this squarish shape that makes it a quilter’s best friend for so many different tasks that a skinny quarter just can't handle.
So, how do you decide? It all boils down to what your pattern asks you to cut. The fat quarter's generous width is a game-changer for cutting larger quilt blocks, chunky appliqué shapes, or pieces for bags and pouches without having to sew smaller strips together first.
Its real superpower, though, is how it enables fussy cutting. This is when you meticulously cut your fabric to center a specific motif—like a perfect rose or a whimsical character from a novelty print. You just can't do that with a 9-inch-wide strip if your design is wider than that.
The decision is purely strategic and based on your cutting list. If you see lots of long, thin pieces, a traditional quarter yard is the smart choice. If your list is full of squares, triangles, or other blocky shapes, the fat quarter wins every time.
To make it even simpler, let's put them side-by-side to see how they really stack up.
Here's a quick comparison to help you visualize the difference and choose the right cut for your next project.
| Attribute | Fat Quarter | Traditional Quarter Yard |
|---|---|---|
| Typical Dimensions | 18" x 21" (or 22") | 9" x 42" (or 44") |
| Shape | Square-ish, blocky | Long, narrow, rectangular |
| Best For Cutting | Larger squares, quilt blocks, appliqué pieces | Long strips, sashing, borders, binding |
| Key Advantage | Ideal for fussy cutting specific motifs | Maximum length for continuous strips |
| Common Projects | Patchwork quilts, tote bags, pillows, pouches | Log cabin blocks, quilt borders, strip piecing |
Getting this distinction down helps you buy fabric with a plan. Instead of just grabbing what's available, you can look at your pattern and confidently choose the cut that gives you exactly what you need with the least amount of waste. It’s all about making your fabric work smarter for you.
Alright, now for the fun part—turning that gorgeous stack of fabric into something you can actually use and love. The real beauty of a fat quarter bundle is that it lands in your sewing room ready to go, with a perfectly matched color palette that takes all the stress out of choosing fabrics.
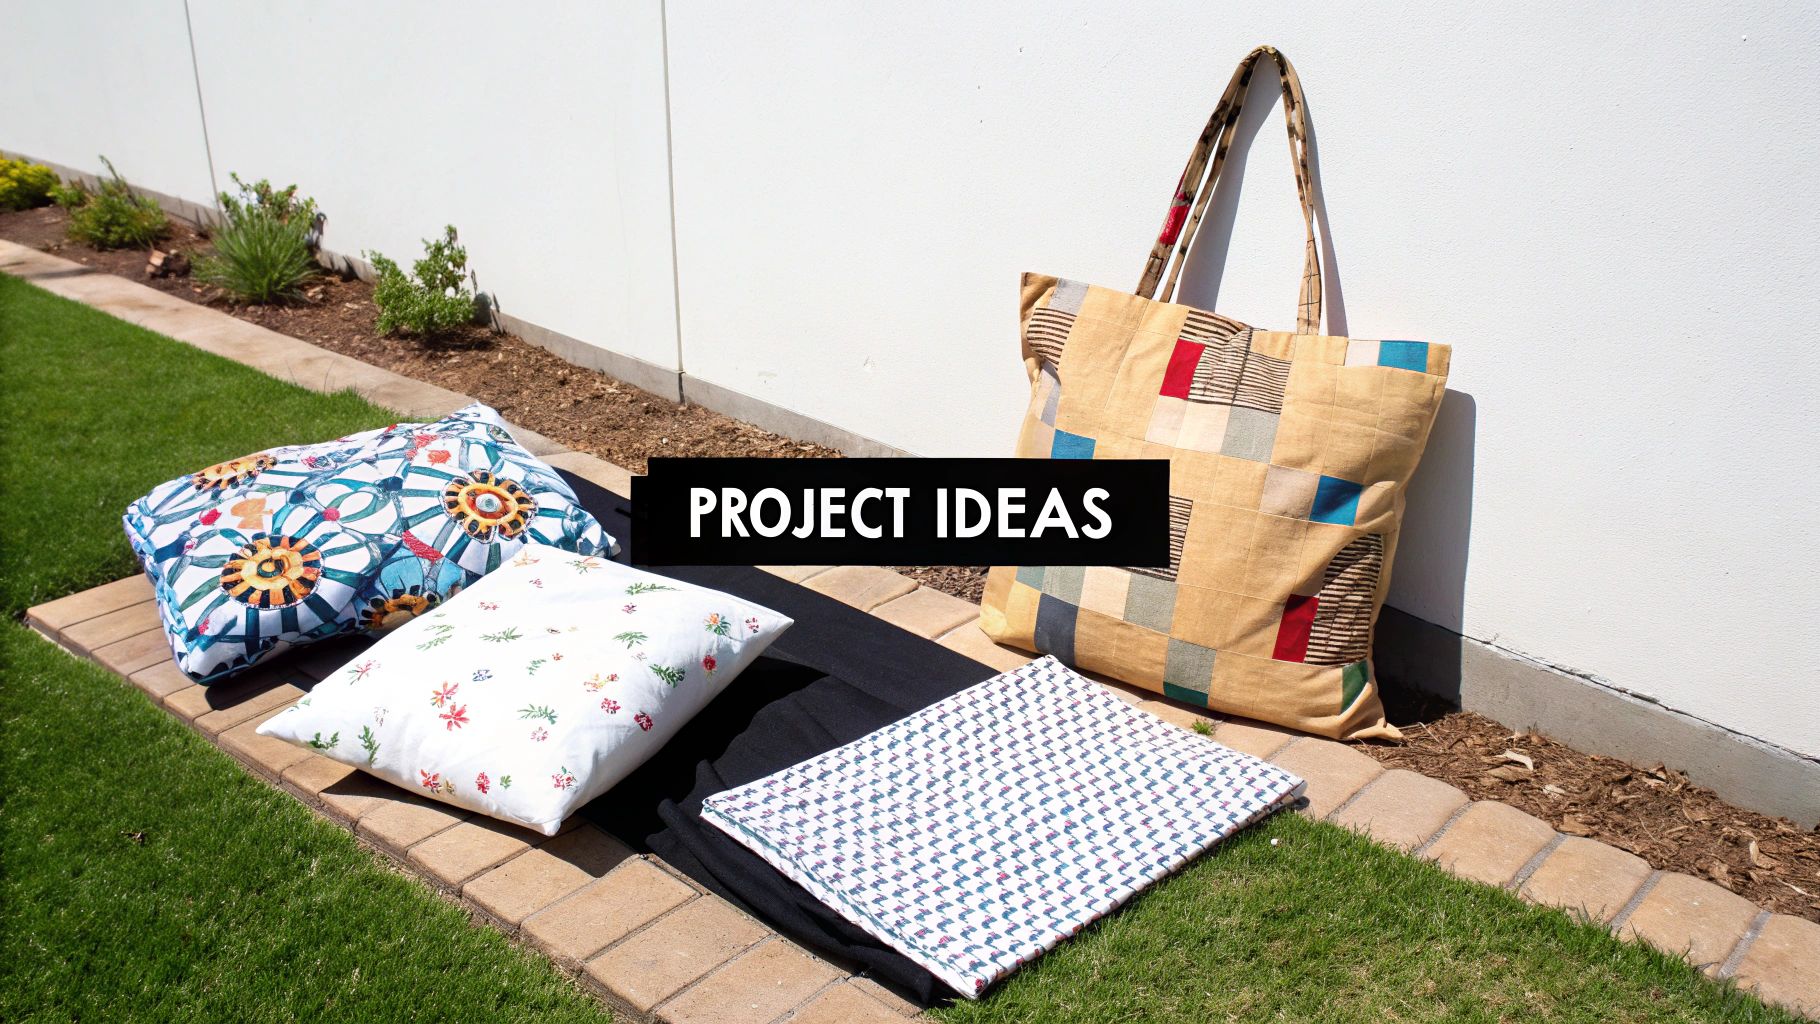
Whether you bought a bundle with a specific quilt in mind or just couldn't resist the collection, these precuts are your ticket to endless creativity. Their blocky shape is perfect for so much more than just traditional patchwork. Think charming home decor, practical accessories, and gifts that will make your friends swoon.
Naturally, the first thing many of us think of for a fat quarter bundle is a quilt. And for good reason! That generous size is ideal for cutting all the squares, triangles, and strips you need for beautiful quilt blocks without creating a mountain of waste. A little planning goes a long way here, as the number of fat quarters you'll need depends entirely on your quilt's size and the pattern's complexity.
To give you a rough idea, here are some common quilt estimates:
The versatile 18x22-inch cut has been a quilting game-changer since it blew up in the 1990s. In North America, which dominated 63.77% of the global quilting market in 2022, these precuts are an absolute staple. They are a huge reason why the industry hit a $4.73 billion valuation in 2023 and continues to grow. If you're curious, you can read the full research about trends in the dedicated quilting market to see just how much of an impact these handy cuts have made.
But don't let the quilts have all the fun! Fat quarters are brilliant for smaller projects that add a handmade touch to your home and life. Since the fabrics in a bundle are already coordinated, even the simplest items look thoughtfully designed and polished.
One of the greatest joys of working with fat quarters is seeing how quickly you can create something beautiful and functional. A single fat quarter can become a zippered pouch, a set of coasters, or the pocket on an apron.
Here are a few quick and satisfying projects to get you started:
Let’s be honest, a growing fat quarter collection is a quilter's pride and joy. But that beautiful stack can quickly turn into a chaotic fabric mountain without a good system. Getting your stash in order isn't just about being tidy; it's about being able to "shop your stash" and find that perfect print the moment inspiration hits.
The one thing most seasoned quilters do first? We press them. Take a few minutes to iron your fat quarters before you put them away. It gets rid of those stubborn bolt creases, so the fabric lies perfectly flat and is ready for an accurate cut whenever you need it.
Once your fabrics are pressed and smooth, it's time to find a storage method that works for you. There’s no single right way to do it—it all comes down to your space and what feels most intuitive for your creative process.
A well-organized stash is more than just tidy—it's an invitation to create. When you can easily see your colors and prints, you're more likely to feel inspired and start a new project with fabrics you already own.
If you’re on a mission to get your whole craft room in order, you can find some great broader tips on how to organize craft supplies like a pro.
Once you get a few projects under your belt, you start thinking about the nitty-gritty details. Let's tackle some of the most common questions quilters have about fat quarters so you can plan your next masterpiece with total confidence.
This is one of the most practical bits of quilting math you can know. Since we get two fat quarters from a half-yard, it stands to reason that a full yard of fabric will give you exactly four fat quarters.
Knowing this little conversion is a game-changer for planning projects. If a pattern calls for three yards of assorted fabrics, you can easily swap in a bundle of 12 fat quarters. You’ll get a similar amount of fabric but with way more variety!
Ah, the great quilting debate: to wash or not to wash. The honest answer? It really depends on your project and personal preference.
Many of today's high-quality quilting cottons have minimal shrinkage and are colorfast, which is why a lot of quilters feel comfortable skipping the pre-wash step for precuts. That said, if you're working with deeply saturated colors—think rich reds or dark blues—pre-washing is a smart move to prevent any potential color bleeding onto your lighter fabrics.
Here’s a quick rundown to help you decide:
At the end of the day, consistency is key. Just try to either wash all the fabric for a single project or none of it. It’s all about what gives you peace of mind.
Ready to build your own beautiful fabric stash? At High Country Quilts, we have a fantastic selection of precut fat quarter bundles and gorgeous yardage perfect for any project. Come explore our collection and find your next inspiration today
At High Country Quilts we care deeply about community. With our experiences in retail, we know that a store is not only a place to shop but also a place for the community to gather and share. During this busy...

Hi! We’re Adam and Renee Wheaton, the new owners of High Country Quilts! For more than 40 years, we’ve owned and operated vacuum and sewing businesses. Following in Renee’s father’s footsteps after he retired from All Discount Vacuum and Sewing in Colorado...


Leave a comment