

We Love Our Quilting Community
At High Country Quilts we care deeply about community. With our experiences in retail, we know that a store is not only a place to shop but also a place for the community to gather and share. During this busy...


If you're looking for the perfect first quilt block pattern, let me introduce you to an old friend: the classic Nine Patch. It’s a simple grid of nine squares, and in my experience, there’s no better project for mastering the essentials. It’s rewarding, not frustrating, and it’s the block that gets so many quilters hooked for life.
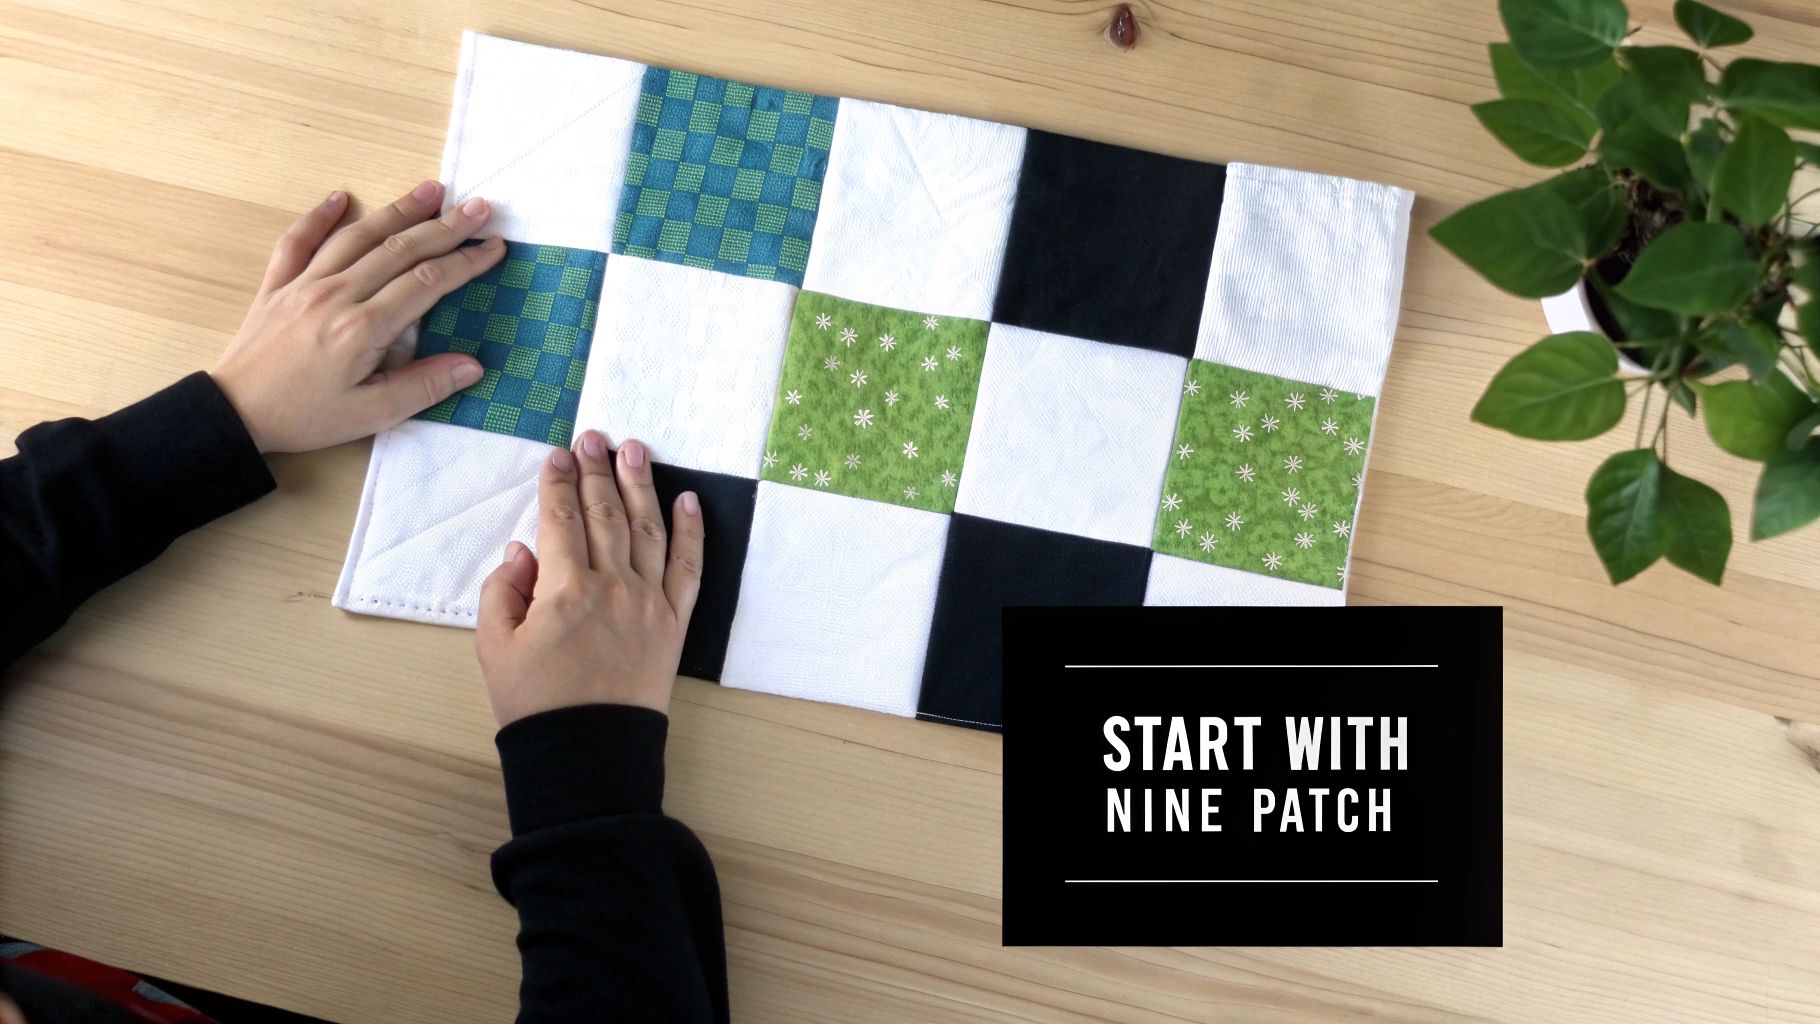
Jumping into your first quilt can feel a bit intimidating, but the secret is to start with a design that builds your confidence. That’s exactly what the Nine Patch block does. It’s a wonderfully forgiving pattern that comes together quickly, giving you that satisfying feeling of accomplishment right away.
This block is more than just easy; it’s a fantastic teacher. By sticking to a simple nine-square grid, you can really concentrate on nailing the basics that every quilter needs.
The real magic of a simple block is how it can turn a pile of small fabric scraps into something truly beautiful. Before we get into the pattern itself, it's worth understanding the craft of what is patchwork quilting, which is the heart and soul of blocks like this. It’s a tradition built on creativity and making the most of what you have.
The Nine Patch, specifically, has a fascinating history rooted in this very idea. While people have been sewing fabric together for centuries, pieced block quilts really took off in the mid-19th century when the Industrial Revolution made textiles more affordable. With cotton prices dropping by 70% by 1840, home quilters suddenly had access to an incredible variety of fabrics. They could play with color and pattern like never before, turning even tiny two-inch scraps into stunning designs.
My Two Cents: Choosing a simple pattern like the Nine Patch isn't a shortcut. It's a smart strategy. You're building your skills on a time-tested design that guarantees a beautiful quilt and, more importantly, keeps you excited about the craft.
This straightforward approach lets you enjoy the process and see a finished project take shape without getting bogged down. It’s truly the perfect starting point for a lifelong journey of creative quilting.
Any seasoned quilter will tell you that a beautiful quilt starts long before you sit down at your sewing machine. Think of this prep work as laying a strong foundation for your project. A little time spent getting your fabrics and tools organized now will save you headaches later and make the whole process much more enjoyable.
If you're just starting, the sheer variety of fabric can be a bit much. My best advice? Keep it simple and stick with 100% quilting cotton. It’s stable, presses beautifully, and generally behaves itself under the needle, which is exactly what you want for a first project.
To make life even easier, you might want to look at precuts. These are curated bundles of fabric that come already cut into standard quilt-friendly sizes. For a Nine Patch block, something like a "Charm Pack" (which is a stack of 5-inch squares) is a fantastic starting point and saves you a ton of time at the cutting mat.
As you get more into quilting, you’ll probably find all sorts of fun gadgets to add to your collection. But to begin, you only need a few workhorse tools. Don't feel like you need to buy out the entire store; these basics will get you through your first several quilts with no problem.
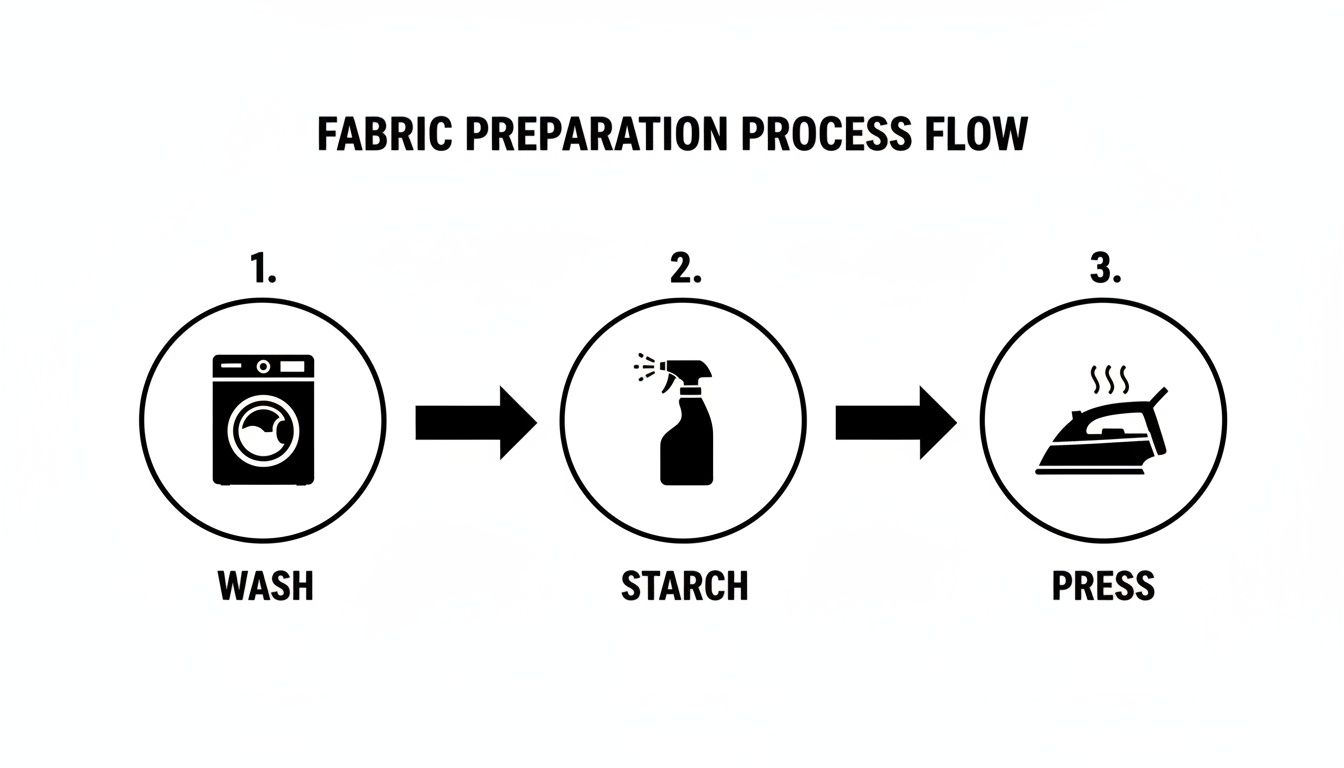
If I could give just one piece of advice for better accuracy, it would be this: prepare your fabric before you make a single cut. I know it's tempting to jump right in, but skipping this step can lead to wonky, shrunken blocks down the road.
First things first, pre-wash your fabrics. Toss them in the machine on a gentle cycle with a color catcher sheet to handle any potential dye bleeding. This step also pre-shrinks the cotton, ensuring your finished quilt doesn't get distorted and puckered after its first real wash.
My Go-To Tip: After washing and drying, give your fabric a really good press with a hot, steamy iron. For an extra boost of stability and crispness, I swear by using starch or a starch alternative. A well-starched fabric cuts like a dream and is far less likely to stretch or fray while you're sewing. It's a total game-changer.
Alright, you've got your fabric cut and your tools laid out—this is where the real fun begins. Putting together your very first block is a genuinely magical moment. You get to watch all those individual pieces of fabric start to become something beautiful and cohesive. We're going to build a classic Nine Patch block, and I'll walk you through the little tricks I've learned over the years to make sure your points match up and your block lies perfectly flat.
This is where that quarter-inch seam allowance you've heard so much about comes into play. Honestly, mastering it is the single most important skill for accurate piecing. If you're sewing on a BERNINA, the #37 Patchwork Foot is your absolute best friend. That little guide on the side makes sewing a perfect 1/4" seam practically foolproof.
Before you even touch your project fabric, take a quick moment to test your seam allowance. Just grab two little scrap squares, sew them together, and press the seam to one side. Now, measure what you just sewed. If your seam was spot-on, the width will be exactly what it should be. Taking a minute to get this right from the very start is a total game-changer, especially for an easy quilt block pattern where precision adds up quickly.
Remember, all that prep work you did earlier is what makes this step possible.
Washing, starching, and pressing aren't just fussy suggestions; they give your fabric the stability it needs for you to sew a truly precise seam.
For a Nine Patch block, you’re basically making three rows with three squares in each one. The most efficient way to tackle this is a wonderful technique called chain piecing. Instead of sewing two squares together, cutting the thread, and then starting the next pair, you just feed them through your machine one after another without stopping.
It works like this:
When you're done, you'll have a cute little "chain" of fabric pairs connected by threads. Just snip the threads between each pair. Now you're ready to add the third square to each row, chain piecing them in the same speedy way. This method saves a surprising amount of time and thread, and I find it makes my piecing much more consistent.
My Pro Tip: When I'm chain piecing, I always keep my rows laid out in order on a small design board (or even just a piece of felt) right next to my machine. It’s a simple habit that keeps me from accidentally sewing the wrong pieces together. Trust me, I’ve learned that lesson the hard way!
Now, listen up, because this part is just as important as the sewing itself: how you press your seams. The goal here is to reduce bulk where all your seams are going to meet in the middle.
For our Nine Patch, here’s the secret: press the seams of your top and bottom rows in one direction (say, to the left), and press the seams of your middle row in the opposite direction (to the right).
This one tiny step sets you up for the most satisfying part of making a block: nesting your seams.
When you place your top row on top of your middle row (with the right sides of the fabric together), you'll literally feel the seams from each row lock into place. They should butt up against each other snugly, like little puzzle pieces. Pop a pin right at these intersections to keep them from shifting. When you do the same for the bottom row, you’ll find that your corners line up almost perfectly on their own. This is what creates those crisp, professional-looking points that truly make a quilt block shine.
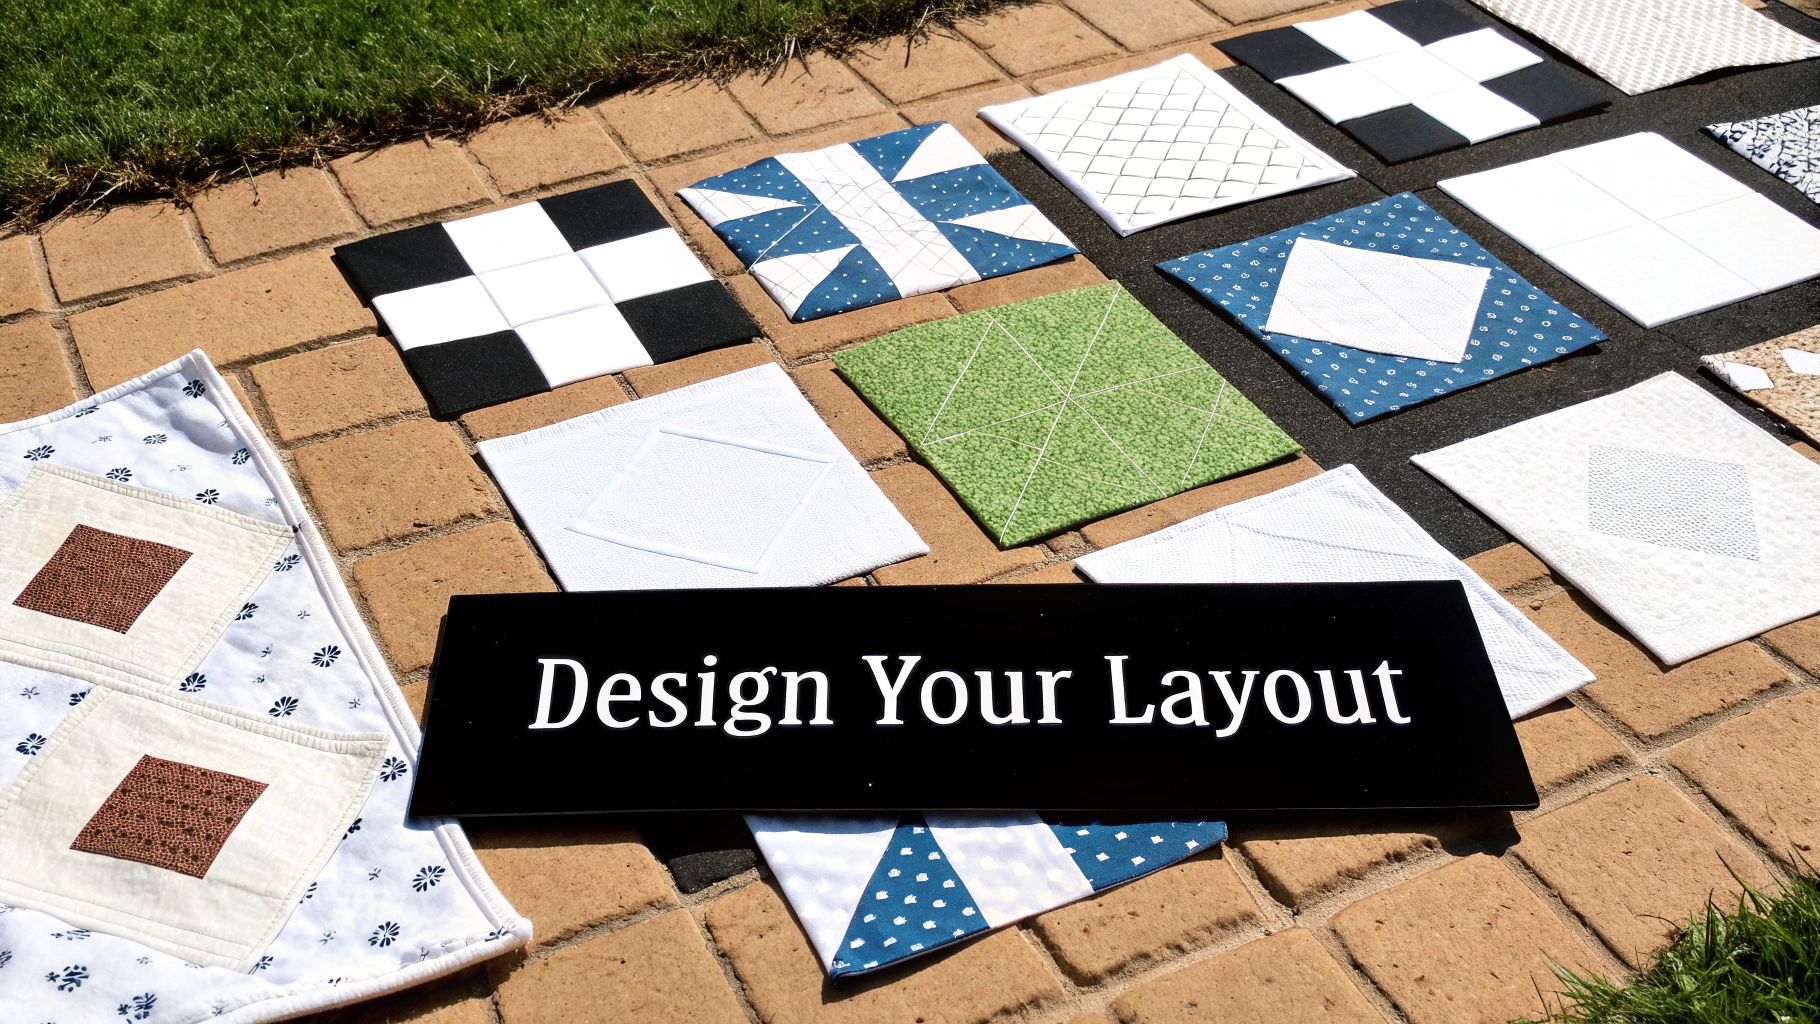
You’ve done the hard work, and all your blocks are finished! Now for the really fun part—playing designer. Arranging your blocks is where the quilt truly comes to life and develops its own personality. It’s so much more than just sewing squares together; it's about seeing how the colors and patterns play off each other to create something beautiful.
The most direct approach is a simple grid, sewing your blocks edge-to-edge. For a classic like the Nine Patch, this creates a timeless checkerboard effect that always looks fantastic. But don't just start sewing! The best thing you can do at this stage is to lay all your blocks out on the floor or a design wall. Move them around, swap a few, and step back to see how it changes the overall look. You’ll be surprised how a small shift can have a huge impact.
If your blocks feel a little crowded, or you just want to make each one a feature, sashing is the perfect solution. Sashing is simply strips of fabric sewn between your blocks and rows, creating a kind of frame that makes each block pop. I find this especially helpful when I've used busy prints; the sashing gives your eyes a place to rest.
To add sashing, you’ll cut strips of fabric to the same length as your finished block (so, 12.5 inches for a block that finishes at 12 inches). A standard sashing width is 2.5 inches, but feel free to play with that. You'll start by sewing a sashing strip between each block to form your rows, then you'll join the rows together with longer sashing strips.
The principles of arranging individual pieces to tell a story are universal. When you're planning your quilt top, thinking about how elements work together is key, much like the process involved in creating a cohesive layout for a visual project. Each block is a picture, and the sashing is the frame.
Want to add another layer of detail? Try adding cornerstones to your sashing. These are just little squares of fabric that sit at the intersection of the sashing strips. They're a fantastic way to pull in an accent color or even create a secondary "chain" pattern that travels across the quilt.
For a really dynamic look that feels a bit more advanced (but isn't!), you can set your blocks on point. This just means turning every block 45 degrees so they look like diamonds instead of squares. This layout adds instant movement and sophistication to even the simplest block pattern. It might look tricky, but all it involves is adding setting triangles to the sides of your blocks and rows to get the quilt back to a square or rectangle.
No matter which layout you go with, the final assembly is pretty much the same. Sew your blocks (and any sashing) into rows. Here’s a pro tip: press the seams in each row in alternating directions. When you go to sew the rows together, the seams will "nest" or lock into each other perfectly, giving you sharp points and a beautifully flat quilt top.
This is where the magic really happens—turning your flat, pieced top into a soft, cozy quilt. The finishing process can feel a little intimidating at first, but if you break it down into a few clear steps, it’s completely manageable, even on your very first project. The first thing on the agenda is to make what we call the "quilt sandwich."
It's just what it sounds like: the three layers that make up a quilt. You'll need a large, flat surface to lay out your backing fabric (wrong side up), then the batting, and finally, your beautiful quilt top centered right on top (right side up). The most important tip here is to make sure your backing and batting are at least 4 inches bigger than your quilt top on every side. This extra space gives you some wiggle room and makes the whole process much more forgiving.
Once you’ve smoothed out every last wrinkle, you need to hold those layers together for quilting. This step is called basting, and it’s what keeps everything from shifting around and creating frustrating puckers while you sew. There are a couple of great ways to do this.
The whole point of basting isn't just to stick the layers together—it's to set yourself up for a smooth, professional-looking finish. Taking your time here is one of the best things you can do for your final quilt. A well-basted quilt is an absolute joy to quilt; a poorly basted one can be a real struggle.
With your sandwich all basted and ready, it's time for the actual quilting! This is the stitching that goes through all three layers, giving your quilt that wonderful texture and making it durable enough to be loved for years. For an easy block quilt pattern like this one, you can't go wrong with simple straight lines. Using a walking foot on your machine is a game-changer here, as it helps feed all three layers through evenly and prevents puckers.
There's a reason simple patterns have such a timeless appeal. Blocks like the Economy Block, for example, became a staple during the Great Depression because they were so good at using up precious scraps. Fast forward to today, and the global quilting market, valued at $5.4 billion in 2023, sees simple blocks making up a whopping 40% of beginner patterns sold. It's a real testament to their enduring popularity. If you're a history buff, you can learn more about the history of classic blocks and how they came to be.
The very last step is to finish the raw edges with binding. This is simply a long strip of fabric that wraps around the edge of the quilt, giving it a clean, sturdy finish. You'll sew the binding strip to the front of the quilt first, then wrap it around to the back and stitch it down, either by hand for a traditional look or by machine for a quicker finish. It's the final frame for your beautiful work of art.
Even the most straightforward quilt block can throw you a curveball. It's totally normal for questions to pop up while you're sewing, especially when you're just starting out. Think of these little challenges as your first lessons in quilt troubleshooting, not as setbacks.
One of the first things beginners often run into is fabric that frays like crazy. If your neatly cut squares start getting fuzzy at the edges, a little spray starch before you even make the first cut can be a game-changer. It gives the fabric more body, making it much easier to handle.
Getting those seam intersections to line up perfectly is another classic hurdle. If your points just aren't meeting, the problem almost always comes down to two things: an accurate quarter-inch seam and nesting your seams. Seriously, take a moment to measure your seam allowance with a ruler. Even being a thread's width off can make a surprising difference across a whole block.
Finishing a set of blocks only to find they aren't all the same size is a moment every quilter has experienced. Don't panic! It's usually a sign that tiny little inaccuracies in cutting, sewing, or pressing have added up.
This is where a squaring-up ruler becomes your best friend. This simple tool allows you to trim each block to a precise, uniform size before you sew them together, making the final assembly a breeze.
This kind of practical problem-solving is woven into the very fabric of quilting history. During the Great Depression, easy block patterns sparked a massive quilting renaissance. Many of the 21 million quilters active today can trace their creative lineage back to this resourceful era. By 1935, magazines were serializing patterns for millions of home sewists. You can learn more about how quilting history shaped today's craft and see how far we've come.
Sometimes, the machine itself seems to have a mind of its own. If you're getting skipped stitches or your thread keeps snapping, always start with the simplest fix first: put in a new needle. A dull or bent needle is the most common culprit behind a cranky machine. It's also a good idea to use a quality, 50-weight cotton thread designed specifically for machine piecing.
And what about when you finish a long seam and realize it's crooked or you sewed the wrong pieces together? Welcome to the club! Get to know your seam ripper—it’s an essential tool, not a sign of failure. Every single quilter, no matter how experienced, spends quality time with their seam ripper. Unpicking a seam that isn't right is just part of the process.
At High Country Quilts, we believe there are no silly questions. Whether you're working through a tricky pattern or are ready to find the perfect BERNINA machine for your next project, our team is here to cheer you on. Come see us in Colorado Springs or browse our fabrics and classes online at https://hcquilts.com.
At High Country Quilts we care deeply about community. With our experiences in retail, we know that a store is not only a place to shop but also a place for the community to gather and share. During this busy...

Hi! We’re Adam and Renee Wheaton, the new owners of High Country Quilts! For more than 40 years, we’ve owned and operated vacuum and sewing businesses. Following in Renee’s father’s footsteps after he retired from All Discount Vacuum and Sewing in Colorado...


Leave a comment