

Free Fabric All Year: Our 2027 Fabric Punch Card
November 2–25 only: buy a $200 gift card in either store and get a free yard of fabric every month of 2027.

No, not for every quilt. A walking foot is strongly recommended for straight-line quilting through a full quilt sandwich, and optional for small or single-layer piecing.
The familiar advice to buy a walking foot before you start quilting skips an important question: what does your machine already do? An integrated dual-feed system may give you the feeding help you need without another attachment. And if you're assembling cotton blocks rather than quilting the finished layers, a regular piecing foot is often the better tool.
Spend according to your next project, not a universal beginner shopping list. The useful distinction is between guiding ordinary seams, feeding a layered quilt, and moving fabric freely by hand.
A walking foot isn't required for every quilt, but it's strongly recommended for straight-line quilting through a full sandwich. Treat the yes entries below as practical recommendations, not a claim that stitching is impossible without the attachment.
Walking foot verdict by quilting task
| Quilting task | Walking foot needed? | Better option | Why |
|---|---|---|---|
| Straight-line quilting through a full quilt sandwich | Yes, strongly recommended | Walking foot or built-in dual feed | Keeps three layers moving together over long seams |
| Stitch-in-the-ditch | Yes | Walking foot | Layers must stay aligned at the seam |
| Attaching binding | Yes | Walking foot | Helps prevent the edge from stretching or shifting |
| Sewing borders and matching stripes | Yes | Walking foot | Helps keep pattern lines matched |
| Free-motion meandering or feathers | No | Free-motion foot with feed dogs lowered | Your hands control stitch direction |
| Ruler work | No | Ruler foot | Fabric is moved by hand under the ruler foot |
| Piecing single layers of cotton | No | Standard quarter-inch foot | Ordinary cotton piecing usually doesn't need top feed |
| Small baby quilt, carefully basted | Optional | Standard foot with slow stitching | Basting helps control shifting on a manageable project |
| Machine with built-in dual feed | Usually no separate foot | Built-in dual feed | Check the manual before buying |
The distinction between controlled machine feeding and hand-guided quilting matters more than the word quilting on an accessory package. Straight-line work, binding, and gentle curves suit a walking foot; free-motion work and machines with integrated dual feed are different cases.
A beginner sewing a long quilting line may benefit more from a walking foot than an experienced maker piecing a small block. Skill doesn't change the transport problem. Layer thickness, seam length, and stitch direction determine whether upper feeding is useful.
Also separate piecing the top from quilting the sandwich. Piecing joins fabric patches along their edges. Quilting stitches the assembled top to the batting and backing. Those jobs don't automatically need the same presser foot.
The table's border recommendation needs the same practical interpretation. An ordinary cotton border can be attached with a standard foot, but top feeding becomes useful when a long edge creeps or a matched print starts drifting. It helps maintain alignment; it won't correct a border that was cut or measured inaccurately.
Buying rule: Choose the attachment for the seam you're about to sew, not for your identity as a beginner or advanced quilter.
Find your most common project in the table and note its verdict before making an accessory list. If your projects span several rows, plan to change feet rather than expecting a single attachment to handle everything.
A quilt sandwich behaves a little like a rug pushed across a floor. If you drag the underside while the top skids or bunches, the surfaces don't stay aligned. A walking foot acts like another hand on top, moving in step with the force underneath.
Under a standard presser foot, the machine's lower feed dogs contact the backing. The presser foot holds the top down, but it doesn't actively transport that top surface in the same way. Friction between the quilt top, batting, and backing determines how successfully the remaining layers follow.
A U.S. walking-foot patent describes the attachment's usefulness for feeding fabric layers surrounding cotton batting while reducing slippage. That mechanical purpose explains the benefit more clearly than calling it a must-have quilting accessory.
The comparison below shows where the extra feeding action occurs.
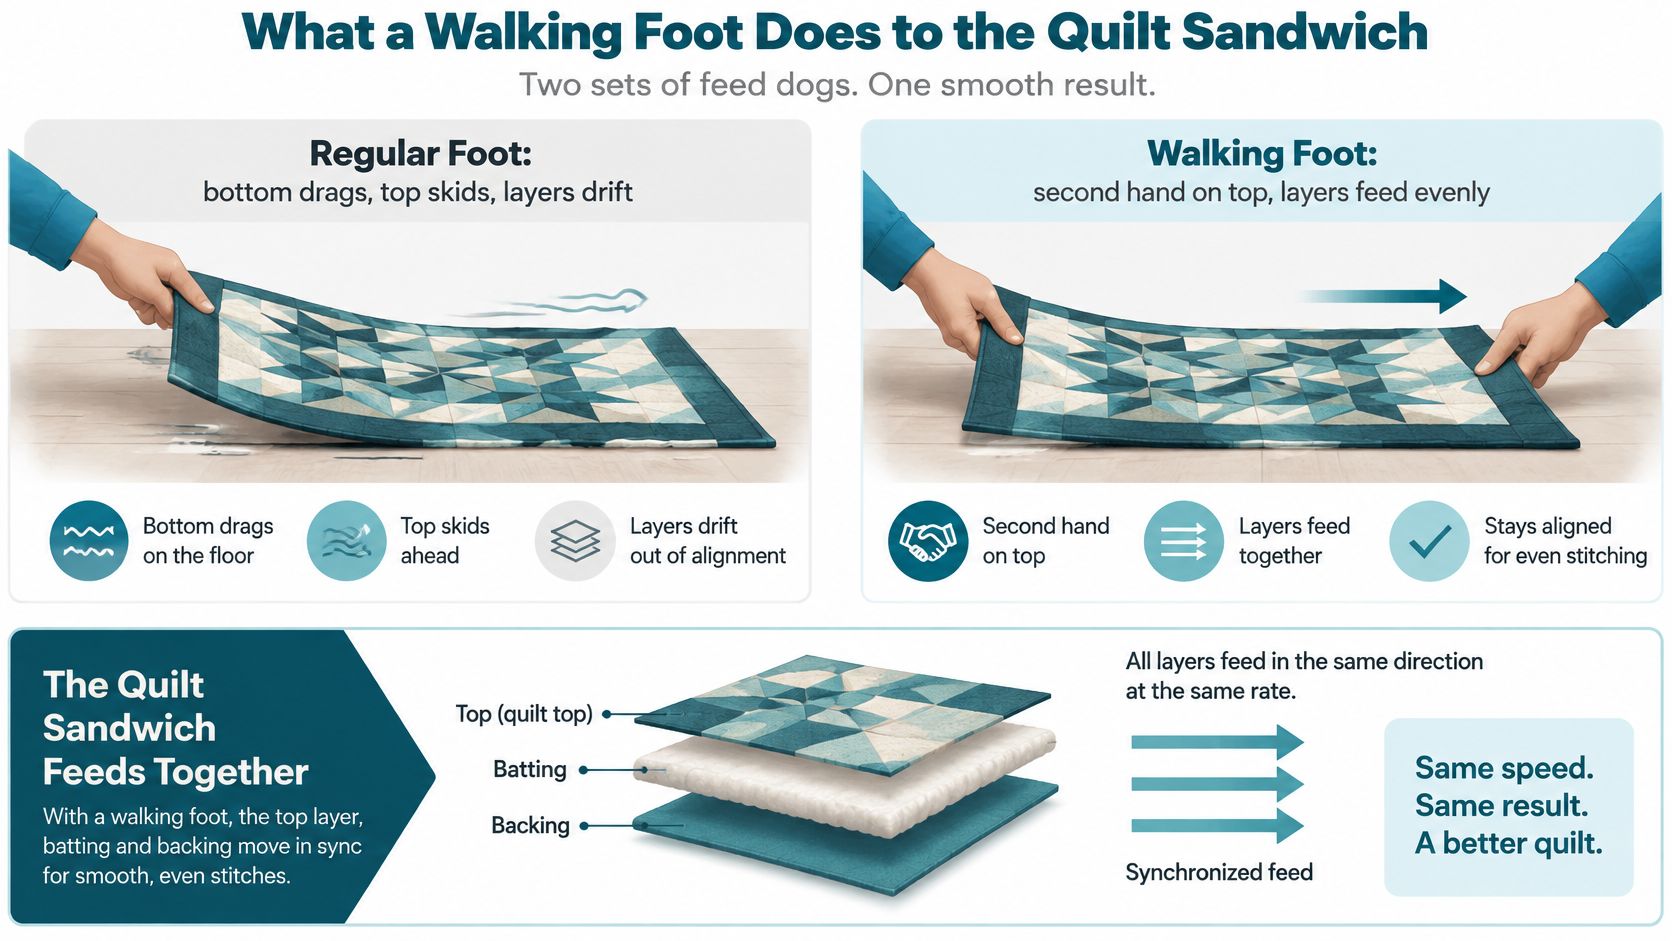
Say you're channel quilting across a pieced top. With a standard foot, you might notice a small ridge gathering ahead of the foot even though the backing appears to feed normally. Forcing that ridge underneath can stitch the excess into a tuck. Synchronized feeding helps prevent that mismatch from developing.
The advantage is greatest during sustained, layered stitching. An integrated dual-feed system addresses the same basic upper-and-lower feeding need, although its compatible foot and operating instructions are machine-specific.
Make a scrap sandwich from your project materials and baste it flat. Draw an alignment mark across the edges, stitch with your standard foot, then inspect the back and compare the edge positions.
Look for a tuck, a growing ridge, or an edge that no longer lines up. Don't judge only by how straight the top stitching looks. If the sandwich stays flat and aligned, your existing setup may be adequate for that project.
Before choosing a walking foot, compare its detailed fit specifications with your machine model and ask for a demonstration on a similar sandwich.
A standard foot, walking foot, even-feed foot, free-motion foot, and integrated dual feed aren't interchangeable solutions. Some control fabric transport; others give your hands room to move the quilt. Choose by how the fabric needs to travel.
Quilting feet compared by how they move the layers
| Attachment | How it moves the layers | Best for | Limitation |
|---|---|---|---|
| Standard presser foot | Presses the top; feed dogs move the bottom only | Piecing and single-layer seams | Layers can creep in multi-layer sandwiches |
| Walking foot | Upper feed teeth sync with the feed dogs | Straight-line quilting, stitch-in-the-ditch, binding | Forward feed only; no free-motion or buttonholes |
| Even-feed foot | Same synchronized upper and lower feed, under other brand names | Straight stitching on layered projects | Fit depends on shank and needle-clamp clearance |
| Free-motion foot | Feed dogs lowered; your hands move the fabric | Meandering, feathers, and free-form designs | No automatic feed; needs practice |
| Integrated dual feed | Upper feeding mechanism built into an equipped machine | Straight stitching without a separate walking-foot attachment | Requires the correct compatible foot and manual settings |
Even-feed foot commonly describes the same accessory principle as a walking foot. Don't assume that a different label means a different capability, or that a similar-looking attachment will fit your machine.
The SINGER Even Feed Walking Presser Foot product page is an example of why checking the named attachment matters. Review the compatible machines and intended applications before choosing a foot, rather than relying on a broad description such as universal.
Think of a walking foot as a controlled forward-feeding attachment. You can guide broad, gentle curves, but don't force the quilt sideways or treat the foot as a free-motion attachment. Buttonholes and stitches requiring side feeding need a different approved setup.
On BERNINA's Walking Foot #50/#50W, the fork fits over the needle clamp. Where the machine provides a walking-foot setting, select it. That physical engagement is what operates the feeding mechanism, not the fact that the foot is screwed onto the machine.
Very lightweight fabric presents a different problem. The University of Illinois IDEA Lab walking-foot guide warns that the upper mechanism can chew delicate material or push it beneath the needle plate, where it may catch and jam. Use a standard foot for thin, uncomplicated seams unless testing and the machine instructions support another choice.
A walking foot can improve feeding without correcting poor preparation. If the backing contains a fold before sewing, the attachment can stitch that fold permanently into place.
Check the likely causes in a useful order:
A walking foot can reduce layer creep. It can't make an unevenly prepared sandwich lie flat.
Maintain separate setups for machine-fed straight quilting and hand-guided free-motion quilting. Compare the walking-foot, even-feed, and free-motion-foot product specifications for your exact model before deciding which setup you need.
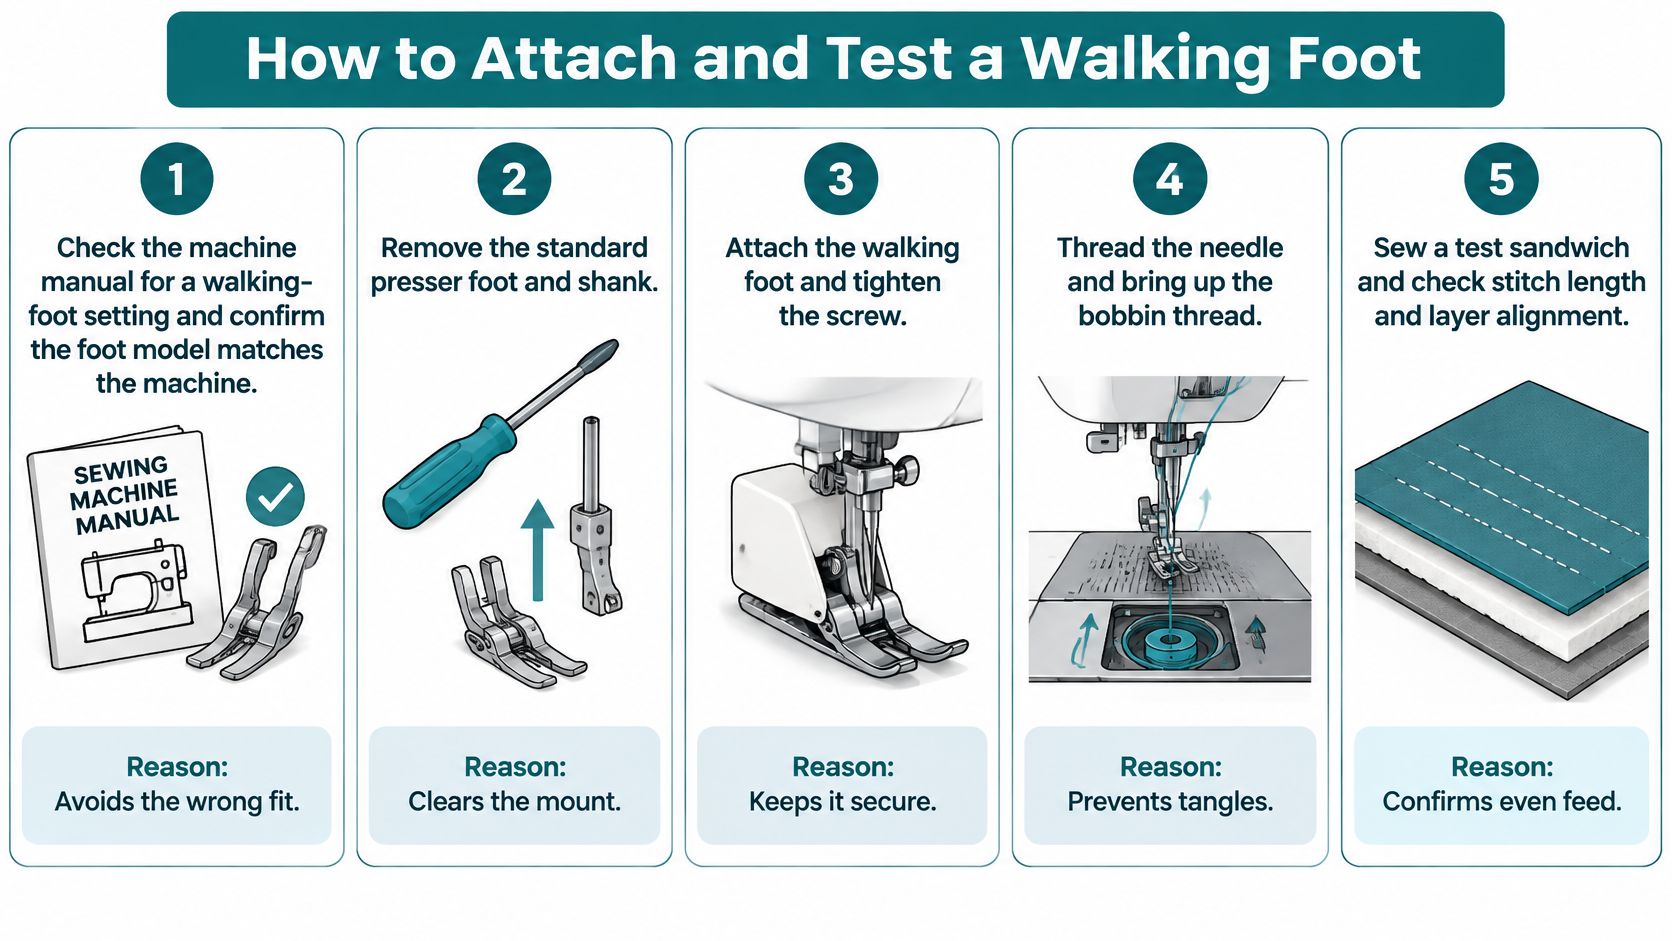
Correct installation comes before tension adjustments. A loose mount or misplaced operating fork won't improve when you change the stitch settings. Turn the machine off before changing the attachment, and use the installation method specified for that foot.
Use this visual checklist alongside your machine's instructions.
The BERNINA Walking Foot #50/#50W manual recommends approximately 3.0–3.5 mm for quilting and lists maximum stitch widths of 5.5 mm for #50 and 9 mm for #50W.
Walking foot stitch settings by model
| Foot model | Maximum stitch width | Recommended quilting length |
|---|---|---|
| BERNINA #50 | 5.5 mm | 3.0–3.5 mm |
| BERNINA #50W | 9 mm | 3.0–3.5 mm |
| Other brands or models | Use the attachment's stated width limit | Start with the manufacturer's quilting recommendation and sample-test |
For those BERNINA settings, begin toward the shorter end and test toward the longer end for heavier layers or a more visible stitch. Maximum width is a clearance limit, not a recommended quilting width.
Watch the attachment and testing process before handling your project.
Support the quilt on the table rather than letting its weight drag from the needle area. Guide it with relaxed hands, and stop to reposition when the bulk starts resisting movement.
The result to look for is a flat back, aligned seams, and even stitches, not a machine that runs without stopping. Request the compatible presser-foot specifications and installation guidance before purchasing if the mounting method is unfamiliar.
The most useful accessory decision starts with an actual quilt on the worktable. A small patchwork top, a densely seamed lap quilt, and a free-motion project place different demands on the machine.
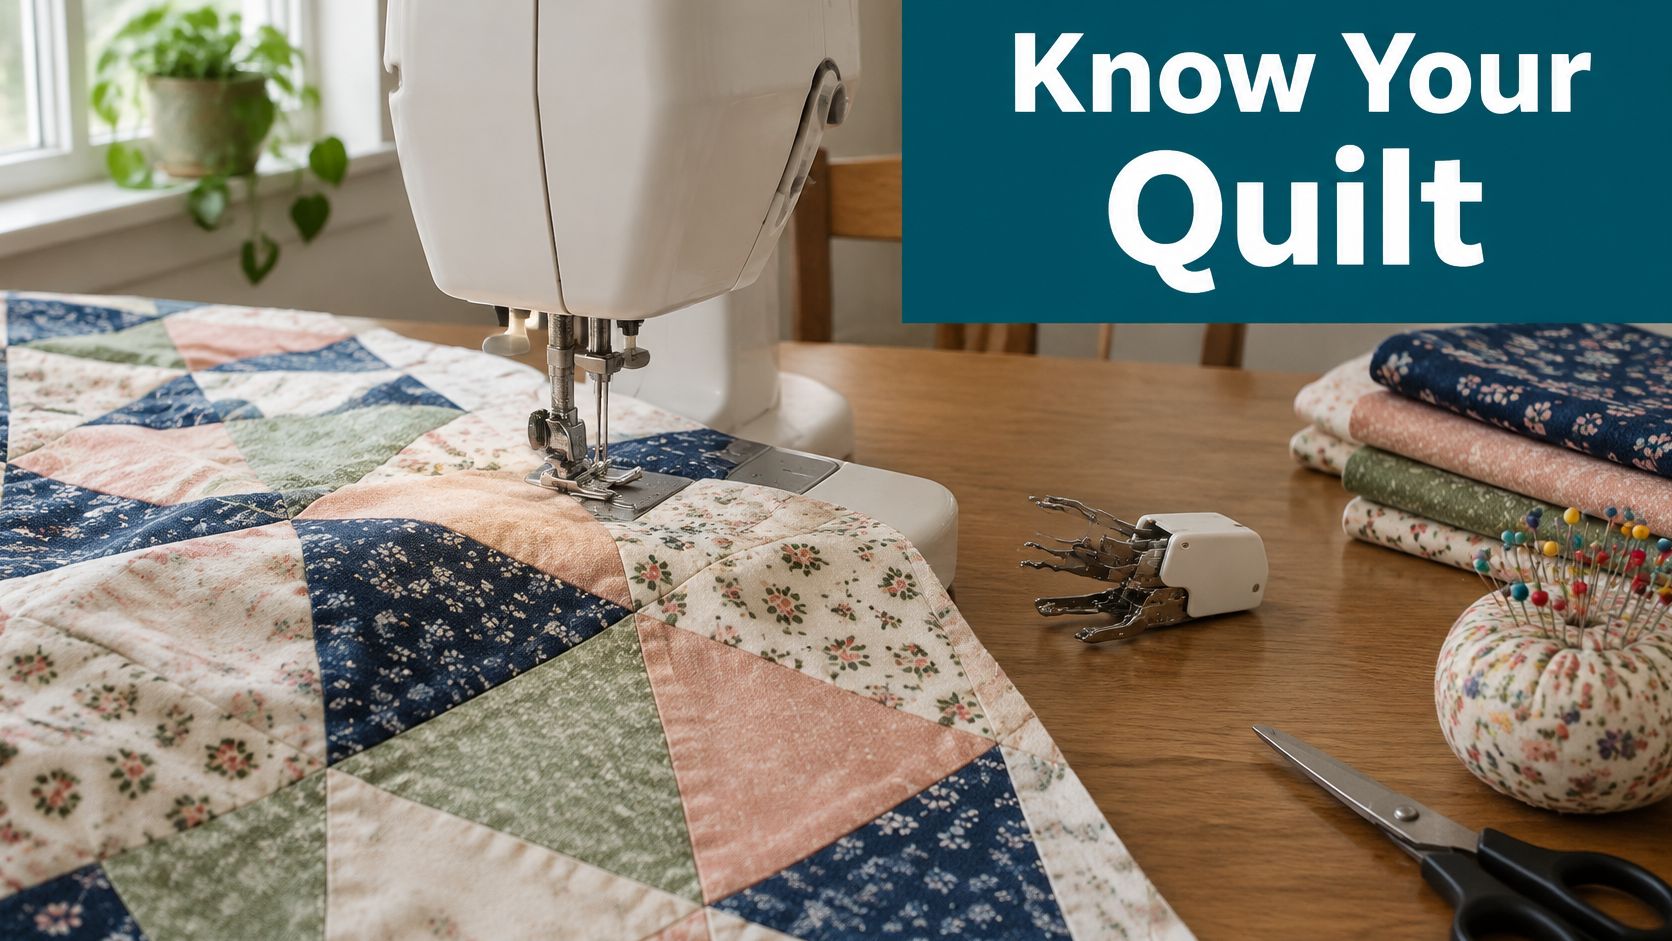
Your first cotton patchwork top. You're joining squares, pressing seams, and checking that the blocks finish consistently. A standard quarter-inch foot gives you a useful seam reference without the bulk of a walking attachment. Verdict: keep the regular piecing foot. Basting becomes important when you later assemble the quilt sandwich, not while joining individual patches.
Your first straight-line lap quilt. The top is finished, the backing is smooth, and you've chosen parallel quilting rows. Test the layered sample before beginning, then use a compatible walking foot or approved dual-feed setup. Verdict: this is a sensible project for investing in even feeding. It lets you concentrate on guiding the marked path instead of compensating for creeping fabric.
For an intermediate queen-size quilt with cotton batting, long rows create more opportunity for handling problems. Support the quilt's weight and arrange the bulk so it doesn't pull against the needle. A walking foot is the main straight-quilting tool here, but it won't enlarge the machine's throat space or carry the quilt for you.
A flannel quilt or a quilt with wool batting deserves a materials test before any confident recommendation. Try a sample containing a representative seam intersection, not just a smooth open area. Verdict: test the walking foot first, then judge whether the combination feeds cleanly without flattening or bunching the surface.
If you mostly quilt free-motion feathers or meanders, your main attachment remains the free-motion foot. A walking foot may still be useful for stabilizing selected borders or attaching binding. Keep both available and change the setup for the operation rather than trying to steer every design through the same attachment.
Project-first advice: Buy for the work you're about to do. An unused specialist foot isn't a better investment than a well-tested standard setup.
When your next quilt calls for long straight seams through a layered sandwich, the walking foot deserves a place on the shortlist. If you're only piecing a small cotton project, wait.
Ask to compare the detailed presser-foot options for your project type, bringing the machine model and a representative fabric sample so the recommendation is specific.
Before spending money, establish whether you need a new attachment at all. A machine with an unused dual-feed feature calls for a different answer than a machine that feeds only from below.
Use this confirmation list with the manual open beside the machine:
A brand name isn't enough to establish compatibility. Bring the model information and, if possible, the relevant manual page when asking for help. A photograph of the mounting area can also help explain what you're working with, but it shouldn't replace the model identification.
At High Country Quilts, we're an authorized BERNINA dealer in Colorado Springs. We sell BERNINA sewing machines, BERNINA Q Series longarm machines, BERNINA presser feet, and Bernette sewing machines. Ask us to confirm the appropriate attachment before buying rather than guessing from a product photograph.
When a customer buys a machine from us, we provide ongoing classes and guidance to help them feel confident using it. If your machine is new to you, ask about a class that helps you understand its feeding options and accessory setup before adding another foot.
Do you need a walking foot for quilting? The useful answer is conditional: choose according to the layers you're sewing, the length and direction of the quilting lines, and the machine the attachment must fit. Buy it to solve a feeding problem or support a planned technique, not because it appears on a beginner supply list.
High Country Quilts offers BERNINA presser feet and guidance to help you match the attachment to your machine and quilting plans. Visit High Country Quilts to explore presser-foot options, ask us to confirm compatibility, and book a class to build confidence with your setup.
November 2–25 only: buy a $200 gift card in either store and get a free yard of fabric every month of 2027.

Serger and BERNINA Mastery classes, longarm training, bag-of-the-month, Kids Sewing Club and a Highlands Ranch retreat. Here's what's on the calendar in November.

Free gifts, included packages and special pricing on the BERNINA 790 ULTRA, 990, Liberty Editions, L 890 serger and Q Series longarms, now through December 31.


Leave a comment