

We Love Our Quilting Community
At High Country Quilts we care deeply about community. With our experiences in retail, we know that a store is not only a place to shop but also a place for the community to gather and share. During this busy...


If you've ever admired a high-end garment and wondered how the hem seems to just... disappear, the secret is likely a perfectly executed blind hem stitch by hand. This technique is the key to creating a clean, nearly invisible finish that elevates your sewing projects from looking homemade to looking professionally tailored. Even with all the fancy sewing machines out there today, the control you get from sewing by hand is simply unbeatable, especially when working with tricky fabrics or detailed designs.
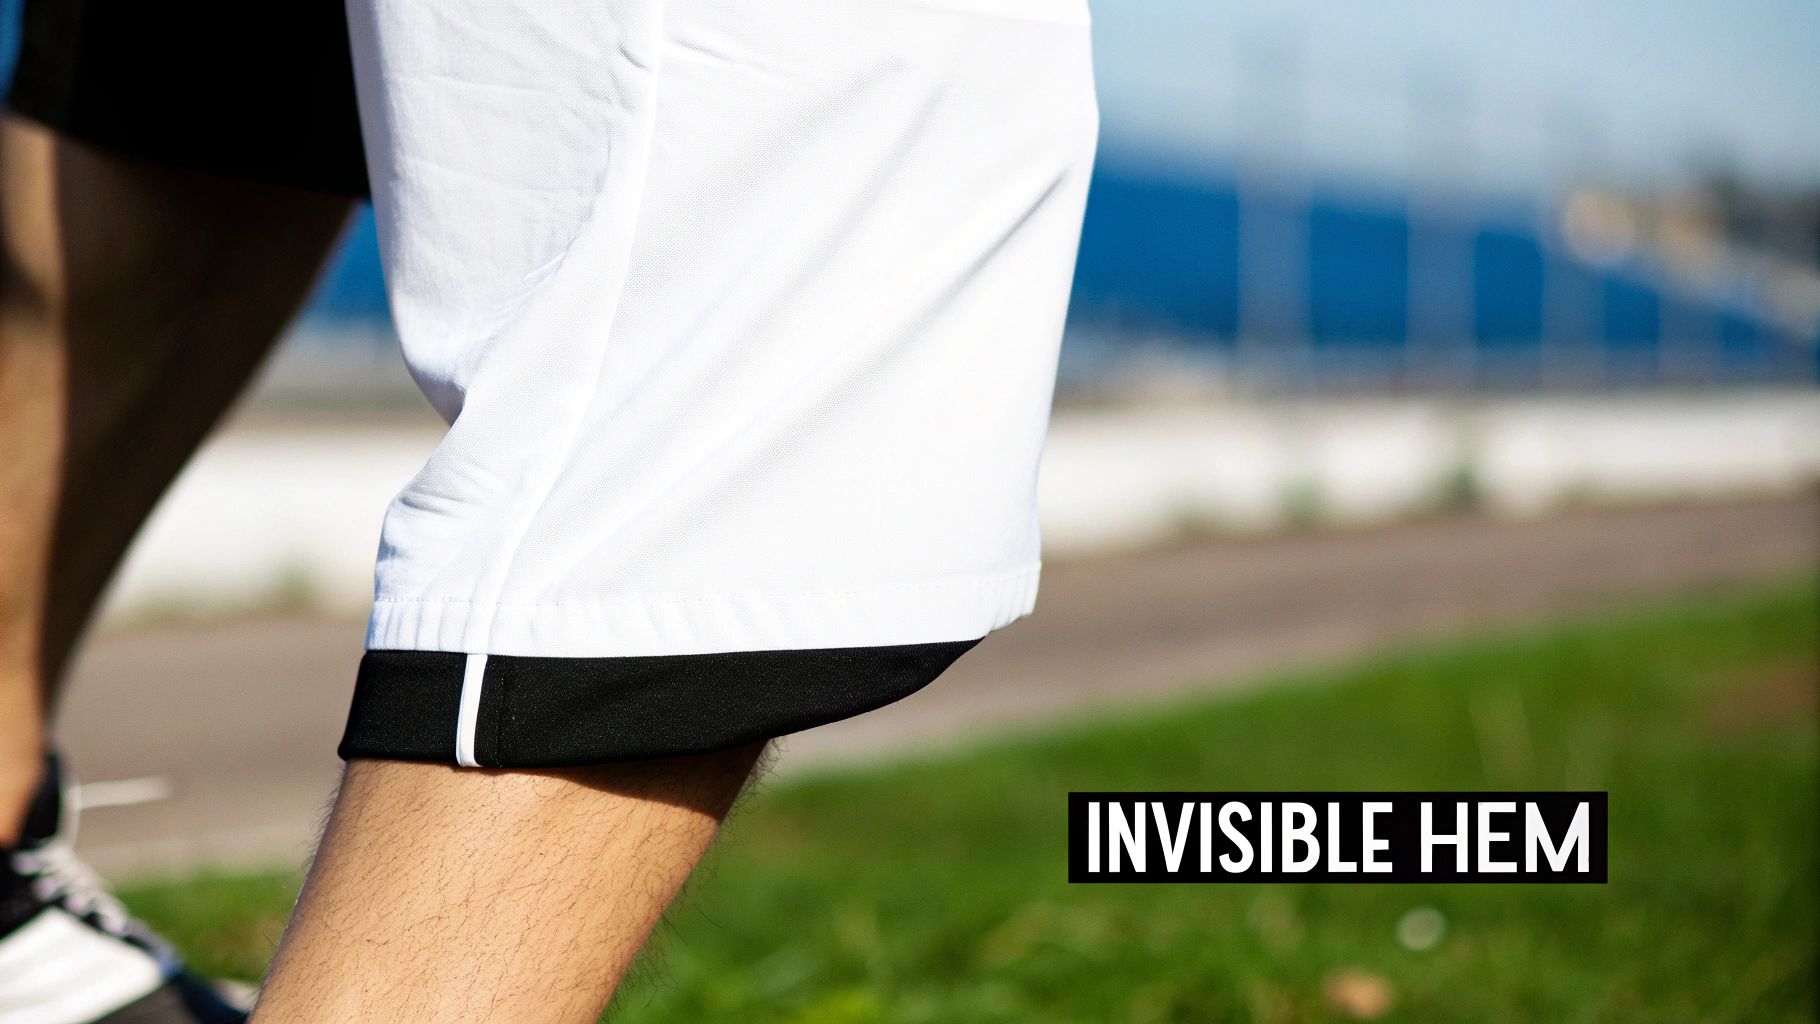
So, what really gives bespoke clothing that polished, flawless look? It almost always comes down to the finishing details. The blind hem stitch is one of those fundamental skills that truly separates good sewing from great sewing by creating a clean hemline with no visible stitching on the outside.
It’s an incredibly versatile method, making it my go-to for a huge range of projects. I use it for everything from hemming a pair of tailored wool trousers and finishing a flowing chiffon skirt to binding a precious quilt. The beauty of this stitch is its subtlety; the thread cleverly hides inside the hem's fold, catching just a single fiber of the main fabric at a time.
In an age where sewing machines can do just about anything, the hand-sewn blind hem still holds a special place in any serious sewer’s toolkit. Machines are fast, absolutely, but they can lack the delicate touch needed for certain materials. Trying to force sheer silks or bulky tweeds through a machine foot often leads to puckering, stretching, or even damage. Hand stitching puts you in the driver's seat.
Here’s why it’s a non-negotiable skill for anyone serious about their craft:
The control you get with a hand-sewn blind hem is what separates a good project from a masterpiece. It allows you to adapt your technique to the specific needs of the fabric, ensuring a perfect drape and finish that machines just can't replicate.
While the mechanization of sewing historically led to a massive 93.8% reduction in labor time for making clothes, the art of the hand-sewn hem endures because of its quality and finesse.
To really unlock the secret to that professional invisible hem, it's worth taking the time to master the blind hemming stitch by hand. Getting this foundational skill under your belt will give you the confidence to tackle more complex projects, knowing you can give them the perfect, almost magical, finishing touch.
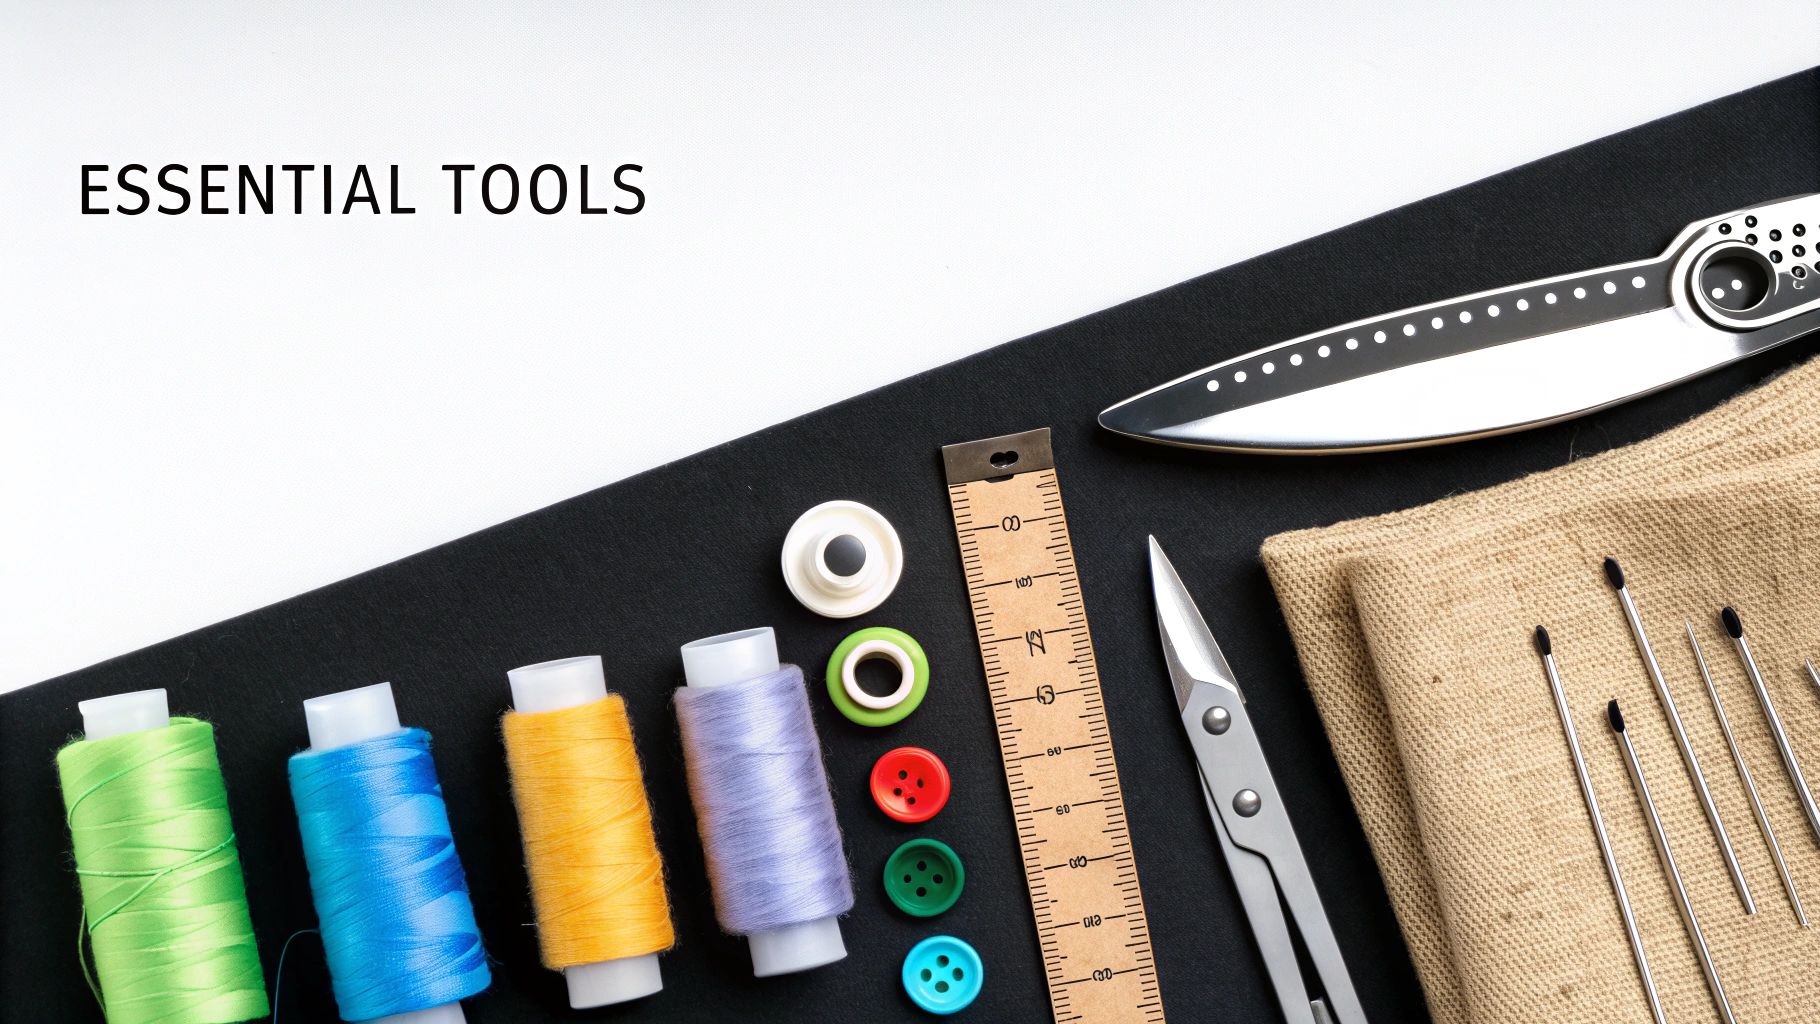
Pulling off a truly invisible blind hem stitch by hand doesn't require a fancy, high-tech sewing room. Honestly, it's about having the right, simple tools that do their job well. Think of this as your essential kit—each piece has a very specific role to play in creating that clean, professional edge you're after.
Taking a few minutes to gather these supplies beforehand can turn hemming from a dreaded task into a genuinely satisfying part of the process. With the right gear at your fingertips, you're set up for success, whether you’re finishing a drapey silk skirt or hemming a pair of sturdy wool trousers.
Getting your toolkit right is the first step toward a flawless finish. Here's a quick rundown of what I always have on hand before starting any hand hemming project.
| Tool | Recommended Type | Why It's Essential for Blind Hemming |
|---|---|---|
| Needle | Fine Sharps Needle (Sizes 9-12) | Its sharp point and small eye pierce fabric cleanly, grabbing only a single thread without leaving a visible hole. |
| Thread | All-Purpose Polyester or Silk Thread | It must match your fabric's color and weight to disappear. Silk thread is a fantastic choice for sheer or fine fabrics. |
| Marking Tool | Chalk Pencil, Disappearing Ink Pen | Accuracy is everything. A clear, crisp line ensures your hem is perfectly even all the way around. |
| Measuring Tool | Hem Gauge or Small Ruler | A hem gauge makes measuring and marking consistent hem depths incredibly fast and precise. No guesswork needed. |
| Iron & Press Cloth | A good steam iron and a simple cotton press cloth | Pressing creates sharp creases that act as your stitching guide. A press cloth protects delicate fabrics from heat and shine. |
With these few items, you have everything you need to create a hem that looks like it came straight from a high-end boutique.
Your needle is easily the most critical choice here. For this kind of delicate work, a fine sharps needle is your absolute best friend. These needles have a very sharp point that glides through the fabric weave instead of punching through it, which is key to keeping the stitch invisible. I keep a variety pack of sizes 9 through 12 in my kit. I’ll grab a tiny size 12 for something delicate like chiffon and go up to a size 9 for a more standard-weight cotton.
Next up is the thread. The golden rule is simple: match your fabric's color and weight. A thread that's even a shade off will stick out like a sore thumb. For most projects, a high-quality, all-purpose polyester thread is perfect.
But, if I'm working with something very fine or sheer, I'll reach for silk thread. It's surprisingly strong for how fine it is, and its natural luster helps it melt right into the fabric, making it virtually undetectable.
You can't sew a straight hem without a straight line to follow. Clear, accurate markings are the foundation of an even finish.
I tell every sewer I teach: a great blind hem is more about pressing than it is about stitching. A good steam iron creates sharp, crisp creases that guide your needle perfectly, making the whole job faster and more precise.
A reliable steam iron is non-negotiable. Steam sets the creases, giving you a razor-sharp edge to follow. I always press the hem at each stage—after the first fold, and again after the second. For anything delicate like velvet or satin, always use a press cloth. This simple scrap of cotton or organza protects the fabric from direct heat, preventing scorching or unwanted shine. It’s a tiny step that makes a world of difference.
The secret to a hem that truly disappears isn't in the stitching alone—it's all in the prep work. Getting your fabric measured, folded, and pressed just right is what lays the groundwork for a professional finish. Skip these steps, and you'll be fighting the fabric the whole time.
Think of it as creating a perfect roadmap for your needle. A little patience here makes the actual sewing process ten times easier and ensures your final hem is crisp, flat, and practically invisible.
This old saying is gospel in sewing for a reason. A wonky measurement is the fastest way to get an uneven hem, so taking a few extra moments here will save you a world of seam-ripping later.
Start with your garment on a flat surface. Better yet, have the wearer try it on, standing straight on a hard floor—carpeting can throw off your measurements.
This careful process guarantees your hem will hang parallel to the floor, avoiding that accidental "high-low" look.
It's tempting to just fold up the factory hem on a store-bought garment, but I'd advise against it. Hems can stretch out or get distorted with wear. Always establish a fresh, level hemline from scratch for the best results.
A double-folded hem is my go-to for a clean, durable finish that keeps the raw edge neatly tucked away and prevents fraying for good. It’s a simple technique that really elevates the look and longevity of your work.
You’re just folding the edge under twice. It's that easy.
Of course, there are exceptions. On really bulky fabrics like a heavy wool coat, a double fold can be too thick. In that case, I'd finish the edge with a serger or a zigzag stitch and just do a single fold. But for most woven fabrics—from crisp cottons to floaty linens—the double fold is the gold standard.
If you take only one piece of advice from me, let it be this: your iron is your best friend. Pressing your hem at each stage creates sharp, defined creases that act as a perfect guide for your needle. It makes the hand-stitching part faster, neater, and so much more accurate.
Get your steam iron ready. First, press that initial 1/4-inch fold flat. This "trains" the fabric, making the next fold much crisper and easier to manage. Once you’ve made the second fold, give the entire hem a final, thorough press.
This step is non-negotiable when I'm working with tricky fabrics like silk or rayon that love to shift and slide around. For those, I'll use a lower heat setting and always a press cloth to prevent any shine or damage. That perfectly pressed crease is the key to a pucker-free hem that looks like it was done by a pro.
Alright, this is where the magic happens. All that careful prep work is about to pay off as we turn that folded edge into a hem so clean it looks like it just floated into place. The stitch itself is a simple, rhythmic motion that will feel like second nature after just a few inches. Don't aim for perfection right out of the gate; just focus on getting a feel for the rhythm.
We're going to walk through anchoring your thread, the delicate touch needed to pick up just a single fabric fiber, and how to space your stitches so the seam is both strong and completely invisible. Think of it as a quiet conversation between the needle, thread, and fabric, where most of the action stays hidden inside the fold.
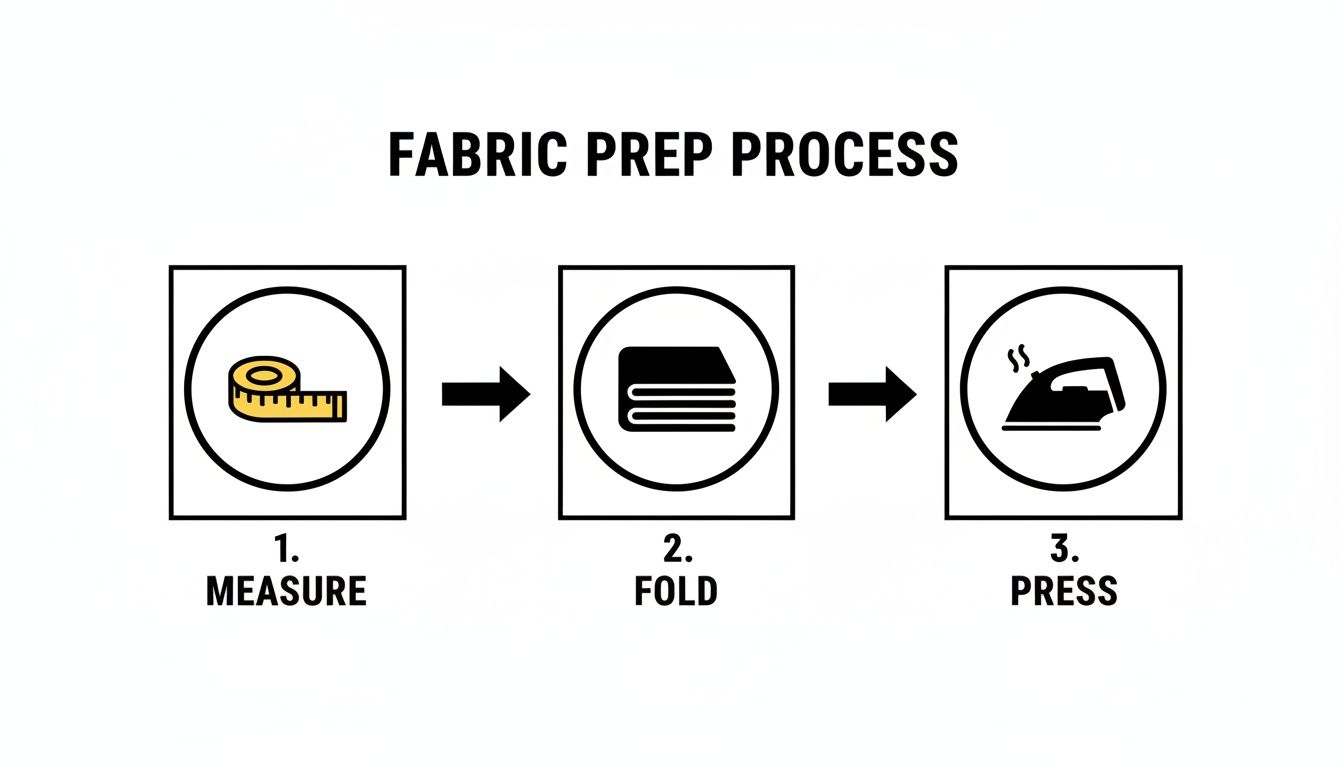
This little diagram is a great reminder of why we press everything so crisply. A sharp, stable edge is your best friend here, making the whole hand-stitching process smoother and far more accurate.
A truly professional-looking hem starts and ends without a trace. The trick is to anchor your thread securely inside the hem allowance, where no one will ever see it.
First, knot the end of a single strand of thread. Slide your needle up from underneath the folded hem allowance, coming out about a quarter of an inch from the top edge. Your knot is now nestled securely inside the fold, completely out of sight.
Right where your thread came out, make one or two tiny backstitches, making sure you’re only stitching through the folded hem fabric. This little step locks your thread in place, preventing it from pulling out as you start hemming.
This is the classic, go-to technique that works beautifully on most woven fabrics, from crisp cotton skirts to hefty wool trousers. The whole motion is a simple back-and-forth between a long stitch hidden inside the hem and a tiny "bite" into the main garment.
Assuming you're right-handed, you'll be working from right to left.
First, with your thread anchored, push your needle into the very top edge of the pressed fold. Tunnel the needle right through that fold for about 1/4 to 1/2 inch (0.6 to 1.3 cm) and bring the tip back out.
Now for the crucial part. Directly above where your needle just exited, pick up the tiniest bit of the main garment fabric—seriously, just one or two threads. The less you grab, the more invisible your stitch will be.
Immediately dive your needle back into the folded edge, right next to where you took that tiny bite. Tunnel through the fold for another 1/4 to 1/2 inch, and you're on your way. Just repeat that sequence. You'll see small, slanted stitches forming on the inside, but the outside should remain perfectly clean.
A rookie mistake is pulling the thread too tight after each stitch, which creates ugly little puckers on the outside. You want the thread to be snug, not strangled. Every few inches, I like to let the garment hang for a second to check that the fabric is still lying flat and natural.
For very fine or slippery fabrics like silk chiffon or even some tricky rayons, I often switch gears to a slip stitch (sometimes called a ladder stitch). It offers a slightly more secure hold on shifty materials and, believe it or not, can be even more invisible than the standard blind stitch.
The concept is similar, but the movements are parallel.
This technique is my absolute favorite for attaching quilt bindings or finishing the lining on a tailored jacket—anywhere you need total control and an impeccably clean finish.
How far apart should your stitches be? It's a trade-off between invisibility and strength. As a general guide, aim for stitches spaced about 1/4 to 1/2 inch apart.
If I'm hemming a flowing cosplay cape from a lightweight fabric, I’ll space them closer to a half-inch to preserve that beautiful drape. But for a pair of sturdy work pants that will see a lot of wear and tear, I'll keep the stitches closer to a quarter-inch for maximum durability.
In professional textile conservation, the specs are even tighter. Experts often recommend working the stitch 1/8 to 1/4 inch (3.2 to 6.4 mm) down from the hem's top edge to ensure it stays hidden. You can dig into the history and technical application of the blind stitch to see just how integral it is to high-end garment making.
Finally, consistent tension is what ties it all together. Think of it as gently guiding the thread into place, never forcing it. A relaxed hand creates a relaxed, pucker-free hem. If you notice your thread starting to twist up, just let the needle dangle for a moment to unwind. It's a simple habit that prevents knots and keeps your stitches beautifully even on your way to a flawless hand-sewn hem.
Even after years at the sewing table, every now and then, I run into a hem that just doesn't want to cooperate. Instead of getting frustrated and immediately reaching for the seam ripper, I try to see these moments for what they are: a chance to sharpen my skills.
Most of the time, the culprit behind a misbehaving blind hem stitch is something small. A little too much tension, an inconsistent stitch, or a pesky knot can throw everything off. Learning to spot these issues as they happen is what really builds confidence. Let's walk through the problems I see most often and how to fix them on the fly.
You’re stitching along, admiring your work, when you notice tiny, unsightly puckers forming on the outside of the garment. This is almost always a sign that your thread tension is too tight. You're pulling each stitch with just a bit too much force, causing the fabric to bunch up.
The fix is simple: relax your hand. There's no need to yank the thread taut after each stitch. You just want to pull it until it's snug and lies flat against the fabric.
This issue pops up most often with lightweight and slippery fabrics like silk or rayon, which show every last bit of tension.
So, what if your stitches are perfectly flat, but you can still see little dots of thread on the right side of your garment? This is a classic sign that your needle is grabbing too much fabric from the main garment layer. The goal is to catch just a single, almost microscopic, fiber.
This is all about refining your technique and muscle memory.
The secret to a truly invisible stitch is precision, not speed. Slow down and really focus on making that "bite" into the main fabric as shallow as humanly possible. It should feel like you're just skimming the surface.
To get better at this, try changing how you hold the fabric. I use the forefinger of my non-dominant hand to push up slightly from behind the fabric, right where I plan to take the stitch. This little move makes a single thread pop up, making it much easier to catch with the tip of your needle. A few minutes of practice on a scrap will help you get a feel for this delicate motion before you tackle your final project.
Few things are more aggravating than a thread that decides to tie itself into a knot mid-hem. This usually happens when your thread is too long—anything over 18 inches (about 45 cm) has a tendency to twist on itself.
If a knot does form, resist the urge to pull it tight. Instead, use the tip of your needle to gently tease it apart. If it’s a lost cause, try to guide the knot so it ends up hidden inside the hem fold.
Uneven stitches, both in their length and spacing, can also ruin the look of your hem and make it less durable.
Fixing an uneven hemline after it's sewn is a real pain, which is why taking your time with the initial measuring and pressing is so critical. If you notice your hem starting to dip or rise as you sew, it’s always better to stop, unpick that section, and re-press the fold before you continue. A little backtracking now will save you a lot of disappointment later.
Even with a great tutorial, you're bound to have questions when you're learning something new by hand. Getting the feel for a perfect blind hem stitch is all about muscle memory and a little finesse, so it’s totally normal to wonder about the details.
I've put together answers to the most common questions I hear from other sewers. We'll cover everything from choosing the right thread to wrangling tricky knit fabrics. These are the little tips that will help you go from just practicing the stitch to absolutely nailing it on your real-life projects.
The whole point of a blind hem is for the thread to disappear, right? Your best bet is always to pick a thread that’s a perfect color match to your fabric and, ideally, just a little finer than what was used to construct the rest of the garment.
For most of my sewing, a high-quality, all-purpose polyester thread does the trick. It's strong, doesn't really stretch, and you can find it in just about any color imaginable.
But when I’m working with something really delicate or sheer—think chiffon, organza, or a slinky silk charmeuse—I always reach for silk thread. It’s unbelievably fine but still has great strength, and it has a natural sheen that just melts into the fabric. The one thing you absolutely want to avoid is any kind of heavy-duty or topstitching thread. It’s just too thick and will leave obvious dots on the outside of your garment, not to mention cause puckering.
Getting the tension just right is more of an art than a science, and I promise it gets easier with practice. You're aiming for "snug," not "tight." As you pull each stitch, the thread should lay flat without putting any strain on the fabric.
A little check I do every few inches is to just let the fabric hang down from my hand. It’s a super simple way to spot tension problems right away:
Here’s a pro tip that really helps: try pulling the thread in the direction you're sewing—parallel to the hemline—instead of pulling it straight up and away from the fabric. It’s a subtle change, but it helps the stitch settle into place more naturally and keeps you from accidentally yanking it too tight. Using a thimble can also give you much better control, leading to more even stitches.
Yes, you absolutely can! In fact, it gives a gorgeous, high-end finish to things like jersey dresses or t-shirts. The problem is that the standard blind hem stitch is too rigid for fabric that needs to stretch. But with a small tweak, it works beautifully.
The trick is to build some "give" into the stitch itself. This is often called a stretch blind hem stitch. When you take that tiny bite of the main garment fabric, make sure you catch just a single thread of one of the knit loops.
Then, for the longer stitch that runs through the folded hem allowance, leave it just a tiny bit looser than you would for a woven material. This gives the hemline the flexibility it needs to expand and contract with the fabric, so your thread won't snap the first time you wear it.
A truly invisible finish needs an invisible start and an invisible end. You have to be able to lock your thread without leaving a bulky, obvious knot.
When you get to the very end of the hem, it’s time to tie it off securely. Take two or three tiny stitches right on top of each other. The key here is that these little stitches must only go through the folded hem allowance—don't let your needle poke through to the outside.
After that last tiny stitch, make a small loop with your thread. Pass the needle through that loop twice, then pull it taut. This creates a really strong, compact little knot. To finish it off, you’ll "bury the tail." Just run your needle through the inside of the folded hem for about an inch before pushing it out. Snip the thread flush with the fabric, and the end will pop back inside, completely hidden. This method makes sure all your beautiful work stays put.
At Famcut.com, we're passionate about helping you perfect every detail of your sewing and cosplay projects. Explore our resources and community for more tips to elevate your craft. Visit us at https://famcut.com to learn more.
At High Country Quilts we care deeply about community. With our experiences in retail, we know that a store is not only a place to shop but also a place for the community to gather and share. During this busy...

Hi! We’re Adam and Renee Wheaton, the new owners of High Country Quilts! For more than 40 years, we’ve owned and operated vacuum and sewing businesses. Following in Renee’s father’s footsteps after he retired from All Discount Vacuum and Sewing in Colorado...


Leave a comment