

We Love Our Quilting Community
At High Country Quilts we care deeply about community. With our experiences in retail, we know that a store is not only a place to shop but also a place for the community to gather and share. During this busy...


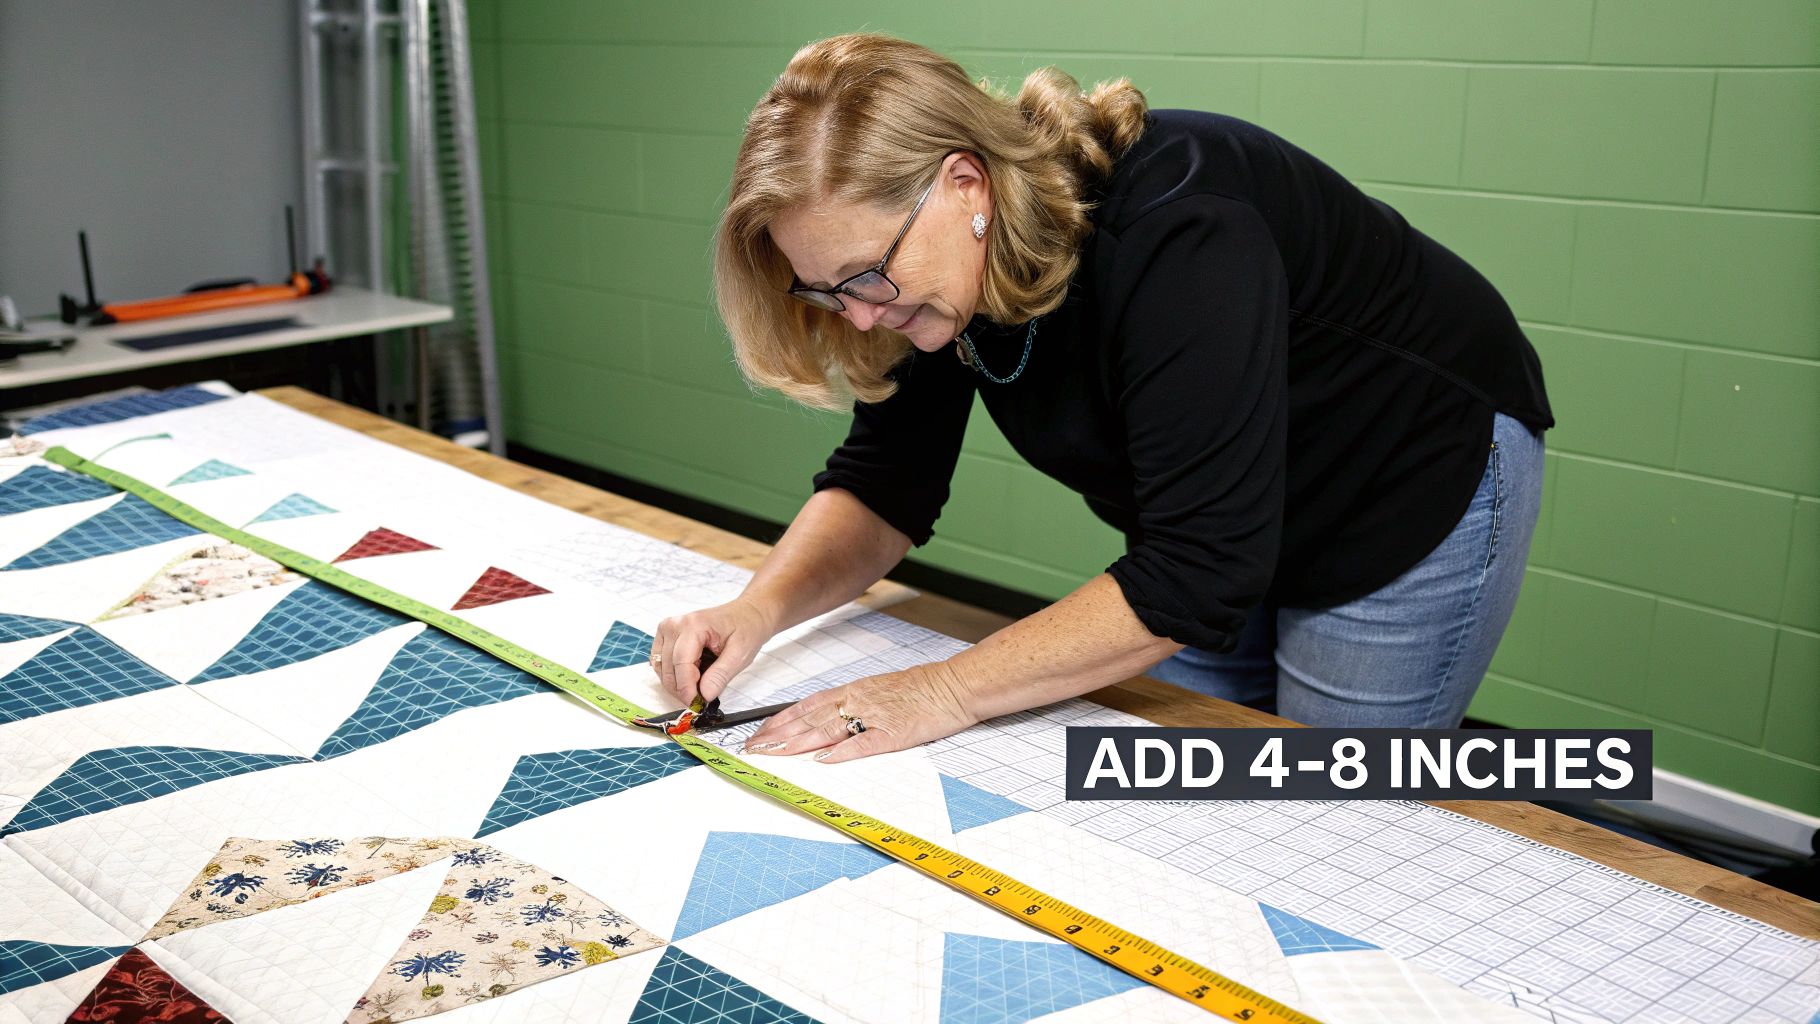
When it comes to picking the right batting for your quilt, there’s one golden rule that will save you a world of frustration: always go bigger than your quilt top.
Think of it as a quilter’s insurance policy. You need that extra material—what we call overage—to be at least 4 to 8 inches wider and longer than your finished quilt top. This little bit of extra fabric is the key to a smooth, pucker-free finish.
You've poured hours into piecing that beautiful top, so the last thing you want is a hiccup during the final quilting stage. That extra margin of batting is what allows a longarm quilter to securely load your project onto their machine, getting that perfect tension needed for beautiful, even stitches from one edge to the other.
Even if you’re quilting at home on your domestic machine, that overage is your best friend. As you stitch through the layers, things can shift and pull in slightly. It's just the nature of fabric. Having that buffer ensures your batting and backing will still extend past the edges of your quilt top when all is said and done.
Without it, you could end up with a dreaded situation where the backing fabric pulls in, leaving parts of your quilt top’s edge unquilted and unsecured.
Then there's the shrinkage factor. Many natural fiber battings, especially 100% cotton, are known for shrinking just a touch after that first wash. This is actually a good thing! It creates that wonderfully crinkly, lived-in texture that makes a quilt feel like home. The overage you build in from the start accounts for this, so your quilt settles into its final shape perfectly flat and square.
A quilter's worst nightmare is getting to the trimming stage and realizing the batting or backing is too short on one side. Always give yourself a generous 4-inch margin on all four sides—it’s a simple step that prevents a major headache.
Once you understand why the extra material is so crucial, shopping for batting becomes much less intimidating. You can walk into a great shop like High Country Quilts and confidently choose the right size, whether you're grabbing a precut package or having it cut from a bolt.
It's all about making an informed choice for your project. This dedication to quality is a huge reason why the quilting world continues to thrive. People cherish handmade, high-quality items. In fact, the global quilt market was valued at USD 5.61 billion in 2025 and is expected to grow to USD 9.67 billion by 2035. Getting the fundamentals right, like batting selection, is how we create quilts that are worth every penny. You can get more details on these market trends and growth.
For a handy reference, here’s a quick chart to help you figure out what size batting you'll need based on some common quilt sizes.
| Quilt Size | Finished Quilt Top Size (Approx.) | Recommended Batting Size (with 4" Overage) |
|---|---|---|
| Crib | 36" x 52" | 44" x 60" |
| Lap/Throw | 50" x 65" | 58" x 73" |
| Twin | 70" x 90" | 78" x 98" |
| Queen | 90" x 108" | 98" x 116" |
| King | 110" x 108" | 118" x 116" |
Remember, these are just common starting points. The most important measurement is always your own finished quilt top! Measure twice, buy once.
Okay, you've figured out the size. Now comes the fun part: picking the actual batting material. This choice is what gives your quilt its soul. It determines how it drapes, how warm it is, and even how it will look after years of love and washing. This isn't just stuffing; it's about defining the personality of your finished quilt.
Let's dive into the fibers, because this is where a good quilt becomes a great one. Each material brings something different to the table, and knowing what to use and when is a game-changer.
If you're chasing that classic, crinkly, lived-in vibe, you can't go wrong with 100% cotton batting. It's a natural, breathable fiber that feels a lot like a heavy flannel. The magic happens after its first trip through the wash—it shrinks just a little, usually around 3-5%, which creates that wonderful, puckered texture we all associate with heirloom quilts. It's my absolute favorite for traditional baby quilts or a timeless throw for the couch.
A hugely popular and incredibly reliable option is a cotton/polyester blend, typically an 80/20 mix. This stuff is the best of both worlds. You get the soft, natural feel of cotton, but the polyester adds a bit of strength and stability, making it easier to work with. These blends shrink less than pure cotton and are super forgiving, which is why I always recommend them for first-time quilters.
Looking for a quilt with a puffy, cloud-like loft? Polyester is what you need. Polyester batting is thicker, which makes your quilting stitches really pop and gives the whole project a more modern, comforter-like feel. It’s also lightweight, barely shrinks at all, and is usually easier on the wallet. This makes it a fantastic choice for kids' quilts that you know will be washed a million times, or for a wall hanging where you want the quilting design to be the star of the show.
A simple way I think about it is matching the batting to the quilt's destiny. A lightweight, breathable cotton is perfect for a summer baby quilt. That lofty, insulating wool? It’s destined for a mountain cabin throw meant for snowy nights by the fire.
For the ultimate in warmth and luxury, nothing beats wool batting. It’s incredibly insulating without being heavy, and it breathes beautifully. Wool also has a natural springiness that resists creases, so your quilt will always look smooth and drape perfectly. That beautiful loft gives quilting stitches gorgeous definition, making it a top choice for competition quilts or that extra-special project you want to feel incredibly cozy. If you're making a bed quilt for a cold climate or a truly special gift, wool is pure, functional elegance.
Alright, let's get down to the practical side of things. All the theory in the world doesn't help when you're standing in the quilt shop, staring at a wall of batting packages. The good news is that precut batting is designed to make your life easier, perfectly matching standard quilt sizes from crib to king. Knowing which one to grab saves time, frustration, and a whole lot of math.
Think of it this way: a typical crib quilt top might finish at around 36" x 52". The corresponding precut crib batting comes in at 45" x 60". That gives you the perfect amount of overage for quilting and trimming without a bunch of wasteful scraps. It’s a simple grab-and-go solution that helps you get to the fun part—the actual quilting—much faster.
Of course, the size is just one piece of the puzzle. The fiber you choose will completely change the look and feel of your finished quilt.
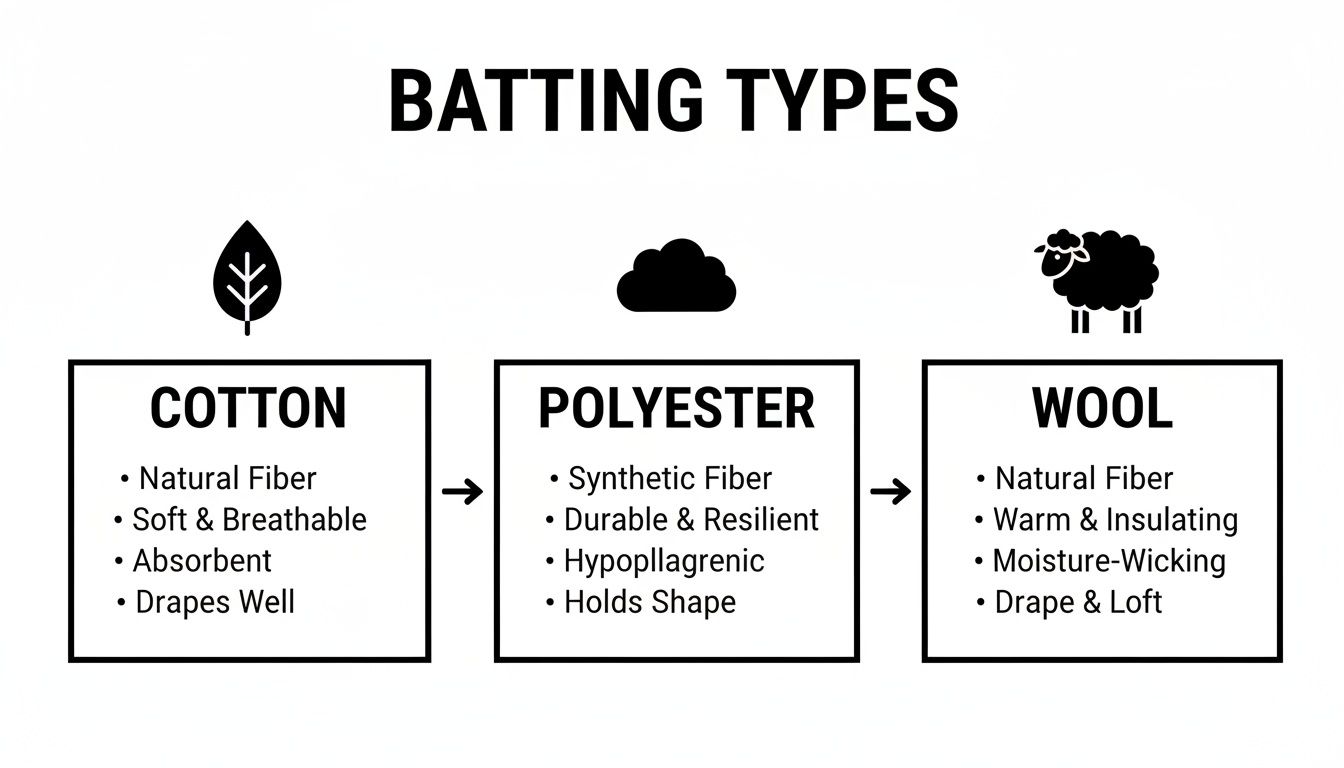
Each fiber has its own personality—cotton gives you that classic, crinkly heirloom feel, polyester offers modern puffiness and loft, and wool provides incredible warmth without the weight.
So, what about that cozy throw quilt you’ve been planning? A common throw measures about 50" x 65". While you could get your batting cut from a roll, it's often more economical to just buy a precut twin-size package, which is typically around 72" x 90". This not only gives you plenty of extra room to work with but also guarantees you have one single, seamless piece of batting.
This "size up" strategy is a handy trick I use all the time for different projects:
My Two Cents: If you’re planning on doing some really dense, intricate quilting on a queen-sized quilt, do yourself a favor and buy king-size batting. All that stitching can really cause the quilt to draw inward, and having those extra few inches of batting can be an absolute project-saver. Trust me on this one.
Once you start making queen and king-sized quilts, buying your batting by the yard from a wide roll is often the smartest move. These rolls usually come in 96-inch or even 120-inch widths, which means you can get one continuous, seamless piece for even the most massive bed quilts. This is a game-changer for avoiding the bulky, annoying seams that can happen when you have to piece smaller batting sections together.
The love for quilting isn't slowing down, with the global quilt market hitting USD 231.26 billion in 2023 and continuing to grow. This passion is visible in local shops like High Country Quilts, where quilters rely on standard batting sizes—like 96" x 108" for queen quilts or 45" x 60" for baby quilts—to keep up with popular projects. If you're interested in the market trends, you can discover more insights about the four seasons quilt market report.
By matching your project to these standard sizes, you take the guesswork out of the process and set yourself up for a beautiful, professional finish every time.
To make it even easier, here’s a quick-reference chart to help you at the fabric store.
This chart breaks down the most common quilt sizes and the batting you’ll need, whether you’re buying a precut package or having it cut from a roll.
| Quilt Type | Typical Finished Size (Inches) | Recommended Precut Batting Size (Inches) | Notes & Tips |
|---|---|---|---|
| Crib | 36" x 52" | 45" x 60" | Perfect for baby quilts and playmats. The standard precut size provides the ideal 4-5 inch overage on all sides. |
| Lap/Throw | 50" x 65" | 72" x 90" (Twin Size) | It's usually best to buy a twin-size package for a seamless piece with generous overage for quilting. |
| Twin | 70" x 90" | 72" x 90" | The precut size is a near-perfect match, but measure your quilt top first! Some modern twins are wider. |
| Queen | 90" x 108" | 96" x 108" | This is the standard. If you plan heavy quilting, consider a king-size batting (120" x 120") for extra security. |
| King | 110" x 108" | 120" x 120" | King-size batting provides ample room. You can also buy from a 120-inch wide roll for custom dimensions. |
Having this info handy before you start a project can save you a lot of headaches and ensure your quilt sandwich comes together perfectly.
Sooner or later, every quilter ends up with a pile of batting scraps or a project that's just a few inches wider than the batting on hand. Learning to piece batting together is a fantastic skill that not only saves money but also cuts down on waste. It might sound tricky, but getting a seamless, invisible join is surprisingly straightforward once you know the secret.
First, you need a perfectly straight edge. No fudging this part! Grab your rotary cutter (with a fresh blade, always), a long quilting ruler, and a self-healing mat. Lay your batting out, line up the ruler, and make one clean, confident slice. Do this for both pieces you intend to join.
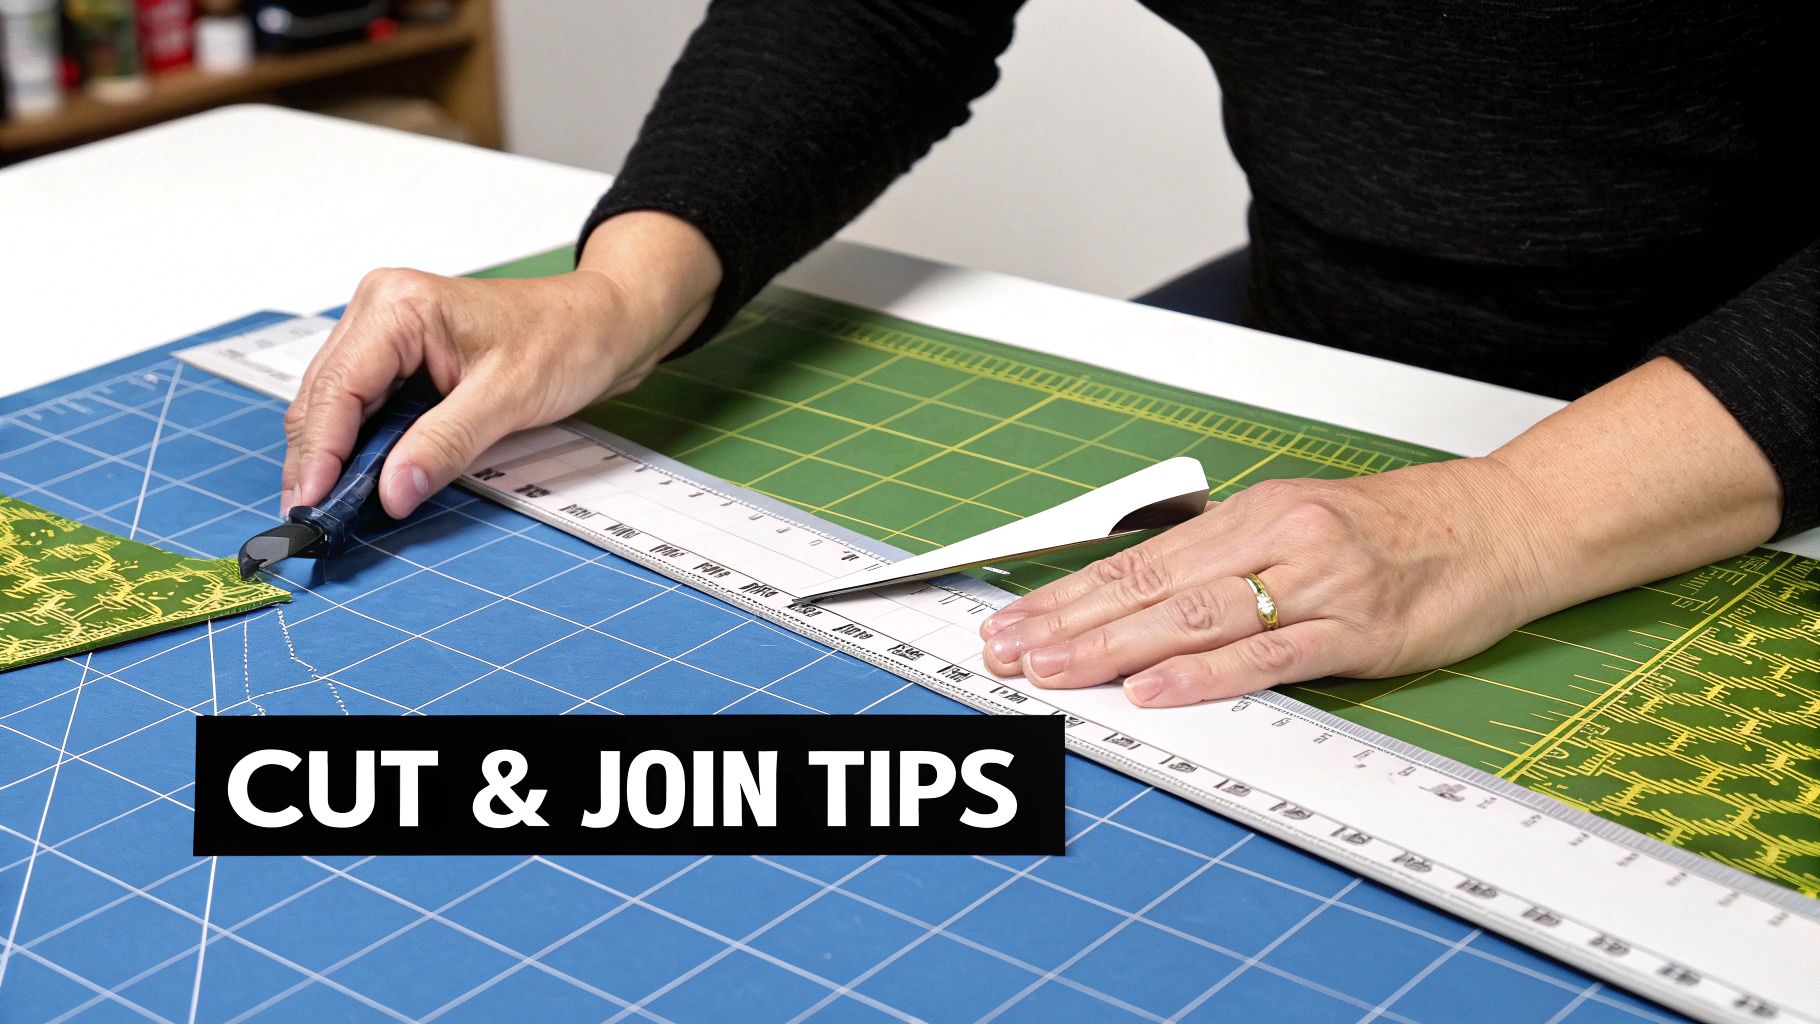
With two perfectly straight edges ready, it's time to connect them. The golden rule here is to butt the edges up against each other—never, ever overlap them. An overlap creates a thick, lumpy ridge that will absolutely show through your finished quilt top.
You've got a couple of great options for making the join:
Fusible Batting Tape: This is my go-to for a quick, no-fuss solution. You just lay the tape over the seam where the two pieces meet and press it with a hot, dry iron. The adhesive fuses the batting together into a single, flat piece. It’s incredibly effective and fast.
Machine Zigzag Stitch: If you want an ultra-secure join, your sewing machine is the answer. Set it to a wide zigzag stitch—I usually go for about a 4.0 mm width and 2.0 mm length. Carefully guide the seam under the needle, making sure the stitch catches both sides as it goes. This method creates a really strong bond that's perfect for larger quilts that will get a lot of love and washing.
Getting the right batting for quilts sizes is a huge part of modern quilting. The craft is bigger than ever, with the quilt market valued at USD 695.84 million in 2024 and expected to reach USD 1.15 billion by 2030. With that growth comes a real focus on smarter techniques. At High Country Quilts, we teach that precision cutting and joining can slash fabric waste by 20-25%. For a deeper dive into how sizing and industry trends connect, check out this detailed quilt market report.
A few extra tricks can take your pieced batting from good to completely undetectable. These are the little things that make a big difference in the final look and feel of your quilt.
My number one rule is to always use scraps from the same type of batting. Joining cotton to polyester might seem fine, but they behave differently when washed. One might shrink while the other doesn't, leading to puckering along your invisible seam.
If you can find it, try to align the "grainline" of the batting pieces. Just like fabric, most batting has a direction with less stretch. Keeping this consistent helps prevent any weird warping or pulling after you start quilting.
And finally, check the loft. Make sure the two pieces you're joining are equally fluffy. If one is a high-loft piece and the other is thin, you’ll end up with an uneven texture that shows right through your quilt top. Stick to these tips, and you’ll be able to turn any collection of scraps into a custom-sized piece of batting for your next masterpiece.
Sooner or later, every quilter runs into a batting problem. It's almost a rite of passage! You can plan everything perfectly, but sometimes things just don't line up. Don't panic—these frustrating moments are actually how you learn the clever little tricks that will save your quilts for years to come.
What if your batting is just a little too small? We've all been there. Instead of running out to buy a whole new piece, you can simply add a "border" of batting to what you already have. Just cut a straight-edged strip from the same type of batting, lay it next to the main piece, and stitch them together. A wide zigzag stitch on your machine or some fusible batting tape works beautifully for this.
Ah, shrinkage. This is a big one, especially with 100% cotton batting. You can expect it to shrink by 3-5% after its first wash, which is what gives a quilt that wonderful, crinkly, vintage look that so many of us love.
But what if you're going for a flat, modern aesthetic? In that case, you’ll want to pre-wash your batting. Just let it soak in cool water for about 20 minutes, gently squeeze out the extra water (never wring it out!), and then lay it flat to air dry or toss it in the dryer on a low-heat setting. This simple step gives you total control over the final texture of your quilt.
An unexpected pucker or a bit of shrinkage can feel like a disaster in the moment. But trust me, it’s just part of the process. Most of these "mistakes" are invisible to everyone but you and simply add to the handmade charm.
Ever see tiny little wisps of batting fiber poking through your quilt top or backing? That's called bearding, and it's incredibly annoying. It happens when the batting fibers work their way through the weave of your fabric. While any batting can technically do this, it's a much bigger problem with lower-quality polyester battings where the fibers aren't well-bonded.
The best defense against bearding is a good offense. Always start with a high-quality batting and a fresh, sharp needle. The right needle for your fabric makes a clean puncture, which is less likely to drag fibers through with it. If you find bearding is a constant battle, look for a batting with a scrim—it's a very thin stabilizer that locks the fibers in place and practically eliminates the problem, giving your quilt that clean, professional finish.
No matter how carefully you plan, a few questions always seem to pop up right when you're about to cut your batting. Let's tackle some of the most common ones I hear from fellow quilters, so you can move forward with confidence.
Oh, absolutely. Think of that extra 4 inches on each side as your project's insurance policy. It might seem like a lot, but there are solid reasons for it.
When your quilt goes on a longarm machine, the quilter needs that extra material to attach the batting and backing securely to the frame's leaders. This overage is what allows them to get a nice, taut quilting surface and ensures the needle can stitch right to the very edge of your quilt top without a problem.
It also gives you a critical buffer for any little shifts that happen during quilting and makes squaring up the quilt a breeze before you bind it. Trust me, cutting your batting too close to the size of your top is one of the most common (and heartbreaking) mistakes you can make.
Technically, yes. But should you? For any quilt you really care about, I'd strongly advise against it. Every type of batting behaves differently—they have unique lofts, drapes, and, most critically, they shrink at different rates.
Imagine sewing a piece of 100% cotton batting to a scrap of polyester. When you wash the finished quilt, the cotton will shrink more than the polyester, which can lead to some funky, uneven texture or even puckering. It just won't look right.
For a smooth, professional finish, your best bet is always to join scraps of the exact same type of batting. If you're just making a practice piece or a simple charity quilt, mixing might be fine. But for that special project? Stick to one kind.
If you're new to quilting, I almost always recommend starting with a high-quality cotton/polyester blend, like a good 80/20 mix. This stuff is wonderfully forgiving and gives you the best of both worlds.
You get the soft, natural feel of cotton, but the polyester adds strength, which means less shrinkage and a lower chance of it stretching or tearing while you work with it. It drapes beautifully and is a dream to quilt, whether you're working by hand or on your machine. It’s just a fantastic all-around choice.
The loft—that's the thickness or puffiness of your batting—won't change the actual measurements you need, but it's definitely something to keep in mind. High-loft battings, like wool or certain polyesters, give your quilt that puffy, cloud-like definition.
All that puffiness can sometimes cause the quilt top to "draw up" a bit more during quilting than a flat, low-loft cotton would. The standard 4 to 8-inch overage rule still holds true, but if you're planning on doing some really dense quilting on a high-loft batting, I’d suggest leaning toward the more generous side of that recommendation. A little extra is always better than not enough!
Here at High Country Quilts, we love helping quilters navigate every part of the process, from picking the perfect fabric to finding the right batting. Come see us in Colorado Springs or check out our online shop at https://hcquilts.com for everything you need on your quilting adventure.
At High Country Quilts we care deeply about community. With our experiences in retail, we know that a store is not only a place to shop but also a place for the community to gather and share. During this busy...

Hi! We’re Adam and Renee Wheaton, the new owners of High Country Quilts! For more than 40 years, we’ve owned and operated vacuum and sewing businesses. Following in Renee’s father’s footsteps after he retired from All Discount Vacuum and Sewing in Colorado...


Leave a comment