


We Love Our Quilting Community
At High Country Quilts we care deeply about community. With our experiences in retail, we know that a store is not only a place to shop but also a place for the community to gather and share. During this busy...


You've basted the quilt sandwich, aligned the first seam, and started stitching. A few inches later, the backing has rippled, the top fabric has crept forward, and small tucks are appearing behind the needle. That frustrating result doesn't mean you're bad at quilting. It usually means the layers need help moving together.
A walking foot for machine quilting, also called an even-feed foot, adds that help. It works with your machine's lower feed dogs to guide the top fabric at the same pace as the batting and backing. With the right setup, straight-line quilting becomes more controlled, binding lies more smoothly, and thick layers feel less like a wrestling match.
A standard presser foot presses the quilt top against the machine's feed dogs. Those lower teeth move the fabric from underneath, but they don't directly grip the upper surface of the quilt sandwich. As a result, the top fabric can travel differently from the backing, especially across bulky seams or thick batting.
A walking foot adds a second feeding action above the quilt. Its upper feed dogs grip the top fabric while the machine's lower feed dogs move the underside. Think of two people carrying a table, one on each end. If both people walk together, the table stays level. If one moves faster, the table twists. The walking foot helps your quilt layers behave like that coordinated team.
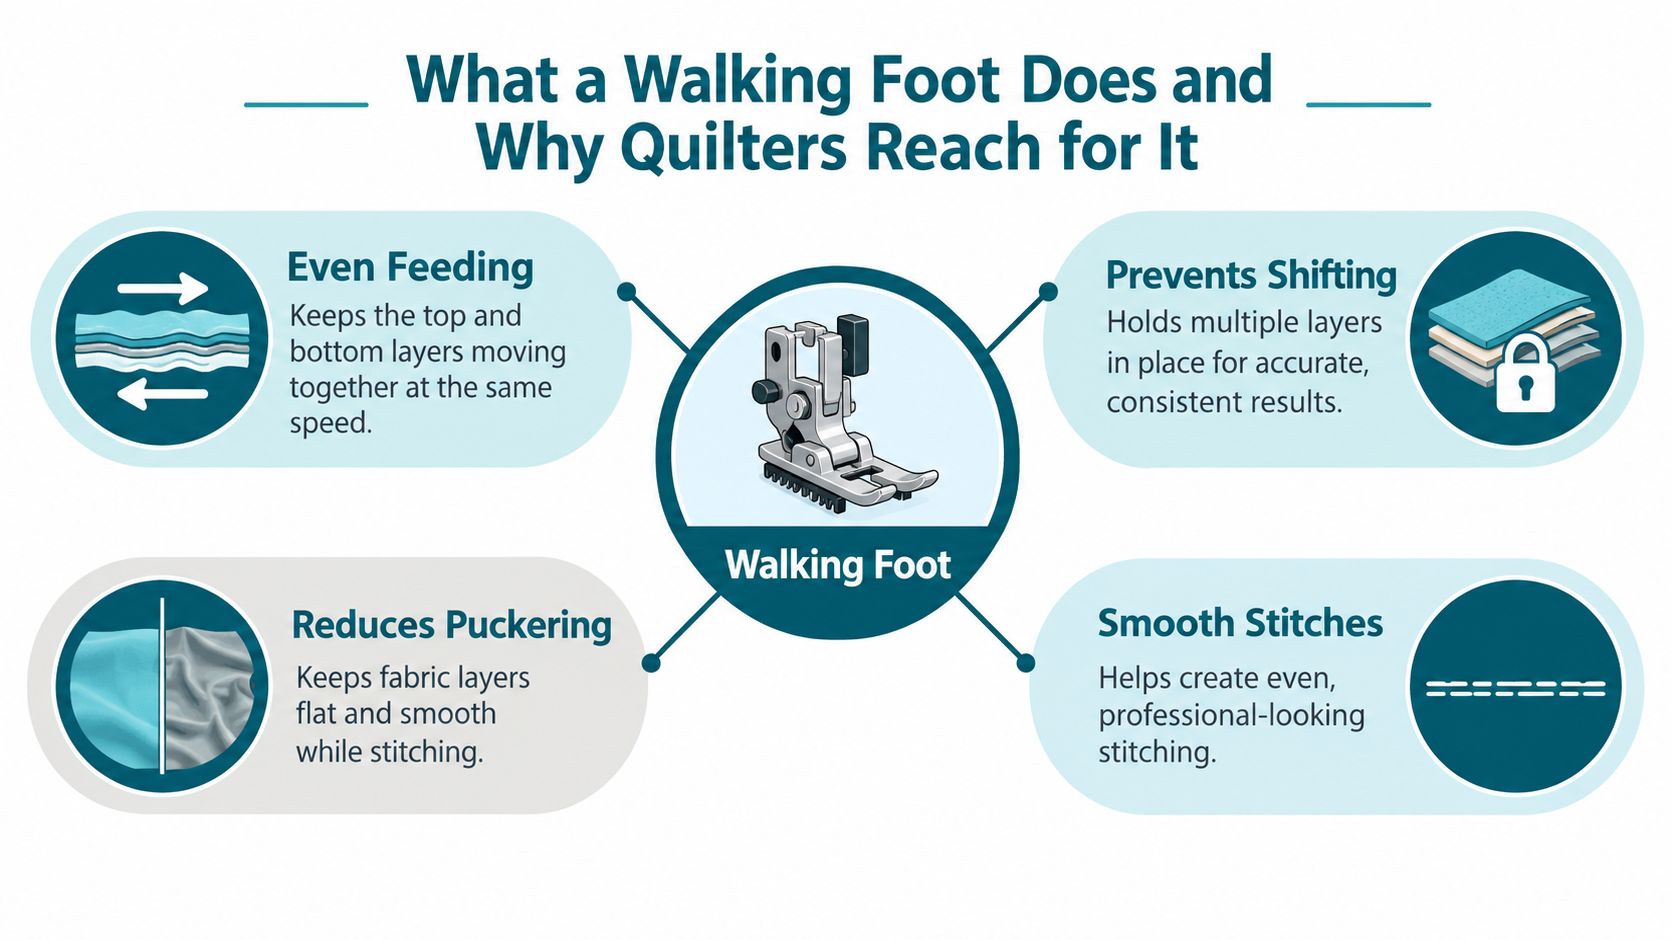
When the layers advance together, you're less likely to see:
That makes the foot useful for straight-line quilting, quilting in the ditch, gentle curves, borders, and grids. It's also practical when you're matching stripes or plaids in garment sewing, topstitching a bag, or attaching binding to a finished quilt. The same controlled feeding helps whenever several layers need to stay aligned.
A walking foot isn't designed for tight stippling or highly detailed freehand motifs. Its top-feed action follows the machine's forward and reverse movement, so it doesn't steer freely in every direction. For complex designs, you'll need to stop, use needle-down pivoting, and rotate the quilt, or change to a free-motion foot.
Practical rule: Reach for the walking foot when your priority is keeping layers aligned, not drawing unrestricted shapes with the needle.
For beginners, that distinction matters. A walking foot won't replace basting or careful handling, but it removes one major source of trouble. If the quilt sandwich feels as though the top is dragging against the bottom, even feeding is the mechanical solution.
A quilt sandwich can behave like three people trying to walk through one doorway at different speeds. If the machine moves fabric from below alone, the layers may resist one another. Early sewing-machine designers responded by exploring ways to add movement from above, creating steadier passage through the needle area.
In 1858, Charles Raymond's patent included a hinged presser foot that acted as a top feed. In 1861, J. L. Hyde patented a glass presser foot, helping stitchers see the needle area and stitching more clearly. Neither design was the modern quilting accessory, yet both addressed frustrations familiar to beginners today, especially shifting layers and poor visibility. This historical overview of presser feet follows that development.
Upper-feed ideas became useful wherever dense or layered materials resisted smooth feeding. The principle is straightforward: fabric travels more predictably when feeding from above works with feeding from below. For a quilter at High Country Quilts working on a bulky quilt, that cooperation can mean fewer surprises as the needle crosses seams or thicker areas.
A major domestic milestone arrived in 1954, when BERNINA introduced the first sewing machine with a patented clip-on presser foot. Changing feet became faster and easier with one hand, making specialized functions more approachable for home sewists. That clip-on approach still influences how many modern machines accept accessories.
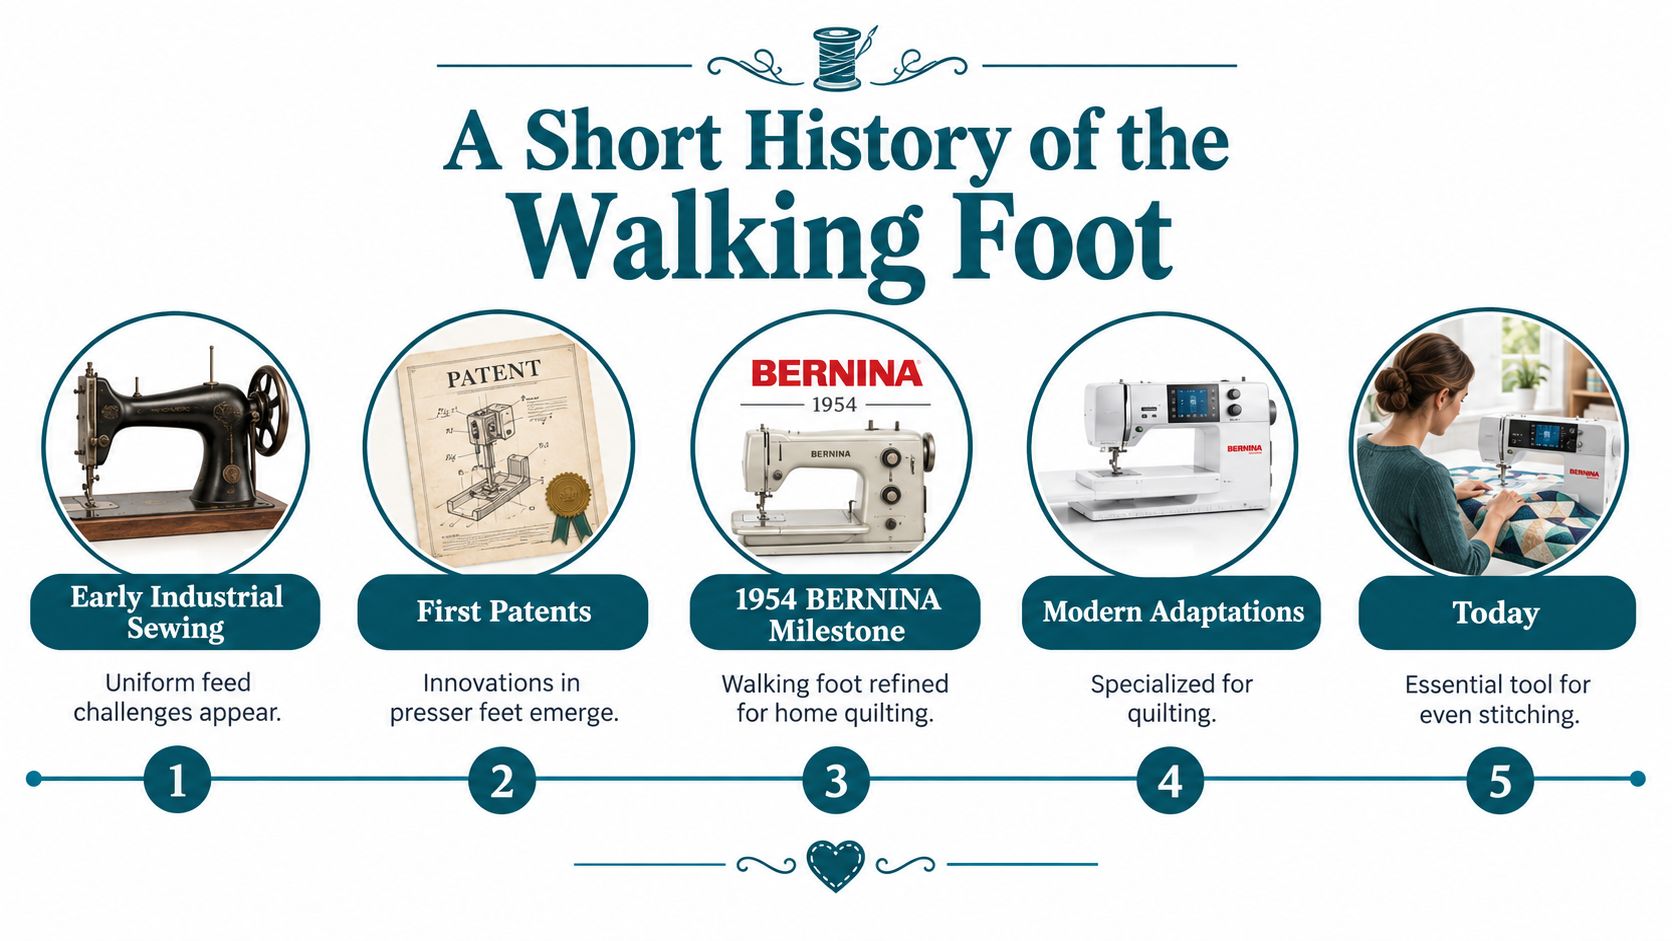
The history also explains why a walking foot feels different from a regular presser foot. Its wider shape is only part of the story. The mechanism reflects a long effort to guide fabric from both sides of the sewing bed, which is why it can help a beginner manage puckering and layer movement.
Modern machines may use a traditional attachable walking foot or an integrated dual-feed system. BERNINA's presser-foot recognition and dual-feed features continue the same idea in a machine-specific form. Names and attachment methods vary, but the purpose remains consistent: coordinate the layers before uneven feeding creates visible trouble. That makes the design useful for High Country Quilts customers choosing accessories for their particular domestic machine.
The easiest way to choose a foot is to ask one question: Who should control fabric movement?
With a standard presser foot, the machine controls the feed from below. That's perfectly suitable for ordinary piecing, seams, and many single-layer projects. It can become less predictable when a quilt sandwich contains a top, batting, and backing that don't slide at exactly the same rate.
A walking foot adds upper feeding, so it's the practical choice for straight-line quilting, gentle curves, borders, matching plaids, topstitching, and binding. A free-motion or darning foot takes the opposite approach. You lower the feed dogs and move the fabric yourself, controlling direction and speed to create stippling, pebbles, loops, or custom motifs.
| Foot Type | Best For | Skill Level | Feed Mechanism |
|---|---|---|---|
| Standard presser foot | Piecing, seams, and single-layer work | Beginner-friendly | Lower feed dogs only |
| Walking or even-feed foot | Straight lines, gentle curves, thick quilt sandwiches, binding, and matching layers | Beginner to intermediate | Upper feed action works with lower feed dogs |
| Free-motion or darning foot | Stippling, pebbles, and freehand motifs | Requires practice and fabric-control skills | The quilter controls movement, usually with feed dogs lowered |
A traditional walking foot attaches to the machine and uses a fork or bar connected near the needle clamp screw. A BERNINA Integrated Dual Feed system uses the machine's built-in mechanism on supported models. Compatible BERNINA even-feed feet and integrated dual-feed options are close cousins in function, though the attachment and machine settings differ.
Use this quick decision guide:
The distinction also helps bag makers and garment sewists. If you're stitching several layers of canvas or aligning a plaid, upper feeding can provide the same kind of control that it offers on a quilt.
Your quilt sandwich is basted, but the backing starts to creep as soon as you sew. Begin by powering off the machine and raising the needle to its highest position. Remove the standard presser foot according to the machine manual, then attach the compatible walking foot. On a traditional model, its fork or bar fits around the needle-clamp screw. Turn the handwheel slowly to confirm that the mechanism moves with the needle.
Make a scrap sandwich from the same top fabric, batting, and backing used in your project. Sew slowly along a short line, then inspect both sides. The bobbin and top threads should lock neatly, while the layers move together without one edge racing ahead.
If the backing puckers or the top shifts, this test gives you a safe place to adjust the setup before risking a finished quilt. Sewists preparing sturdy bags or layered home projects at High Country Quilts can use the same check for canvas and other thick materials.
Turn the handwheel through a full movement. The needle and walking foot should rise and fall smoothly, without resistance. This beginner tutorial recommends testing the foot's synchronization on scrap fabric. If the foot does not move with the needle, stop and recheck its attachment.
Before the quilt: Turn the handwheel through a complete movement and confirm that the foot, needle, and fabric-feeding action cooperate without resistance.
A quilt can look tidy on top while the backing gathers underneath. You may also see skipped stitches, uneven stitch lengths, or a small tuck where sewing begins. Each symptom points to a different part of the setup. Treat the fabric like a quiet conversation partner: its surface shows whether the needle, thread, tension, foot, or basting needs attention.
Ripples often begin with the quilt sandwich or thread path. Check that the backing lies flat and that the layers are basted securely. A dull needle can push through fabric instead of piercing it cleanly, while high top tension can draw the layers together too tightly. Fit a fresh 90/14 Microtex needle, reduce the top tension by half a number, and sew another test.
Change one setting at a time. If you replace the needle, alter tension, lengthen the stitch, and change thread together, the cause stays hidden. A scrap sandwich made from the project's fabrics gives High Country Quilts beginners a safe way to compare the back before risking a finished quilt. Quilters working with thicker layered bags or home projects can use the same check.
Skipped stitches may result from a loose walking-foot fork, a needle that does not suit the layered thickness, or thread caught around a tension disc. Raise the presser foot, re-thread the upper path, and confirm that the thread has passed through every guide and tension point.
Look again at the fork around the needle-clamp screw. The walking foot should rise and fall with the needle mechanism, not trail behind it. On a BERNINA machine, re-enter the correct foot code after a firmware update if the machine no longer recognizes the selected foot profile.
A tuck at the first stitches usually means the sandwich needs firmer basting or a slower start. Use quilting spray or basting pins suited to the project, smooth the layers under the foot, and begin gently. A very small starter stitch can hold the edge before you move to the longer quilting stitch, following the approach in this sewing tutorial.
Use this diagnostic order:
This sequence keeps a threading or attachment fault from being disguised by a tension change. Keep your hands in front of the foot and let the feed dogs move the quilt. Pulling from behind can shift the layers and recreate the puckering you are trying to remove.
A full quilt can feel like too much fabric to control when you are still learning the walking foot. Start with small projects instead. Each one uses a cotton top, batting, and backing, so your hands can learn how the layers move together and where puckering or shifting begins.
Begin with a potholder made from two charm squares, one layer of cotton batting, and a backing piece. Mark diagonal lines about an inch apart, then sew slowly across the sandwich. The compact size lets you watch the fabric advance, check the backing, and notice whether the layers stay flat.
Practice starting, stopping, backstitching, and guiding a steady line without tugging. For beginners who visit High Country Quilts for approachable project ideas, this small sample also makes a useful test piece before committing to a larger quilt.
A table runner adds length without the bulk of a bed-sized quilt. Make one with a strip-pieced top and fusible fleece batting, then sew gentle echoing lines one-quarter inch inside selected seams. The extended shape gives you more time to observe how the walking foot handles seam changes and how shifting layers can affect the line.
At each corner, stop with the needle down. Lift the foot, rotate the runner, and lower the foot before sewing again. This keeps the pivot point in place and gives quilters preparing for High Country Quilts classes a repeatable way to manage direction changes.
Finish with a small wall hanging made from a fabric panel. Try straight-line quilting or matchstick-style rows, then practise changing thread, pivoting, and attaching binding to the quilted piece. Use low-loft cotton, or another batting that suits the project's thickness, and test dense rows on scraps before sewing the panel.
For pattern inspiration, 99 Machine Quilting Designs Ideas for Walking Foot & Free Motion Quilting offers line ideas to review before marking the fabric. Keep the first wall hanging uncomplicated. Repetition teaches how much support the quilt needs, which helps beginners choose suitable practice materials and project guidance at High Country Quilts.
When straight lines leave puckers or the quilt layers shift under the needle, the walking foot addresses the movement causing the trouble. Its upper feed action works with the machine's lower feed dogs, helping the quilt top, batting, and backing advance together. The foot supports more even stitching, while basting, the right needle, and a test seam still prepare the quilt for success.
Seeing that movement in person can make setup easier to understand. High Country Quilts in Colorado Springs helps quilters connect written instructions with hands-on sewing. As an authorized BERNINA dealer, the shop can help you choose an accessory for your machine and review the settings for your model.
A beginner might start with an introductory walking-foot sampler. Small sections let you compare line spacing, sewing direction, and stitch length without managing a full quilt. A quilting-the-quilt workshop on domestic BERNINA machines then gives you practice guiding a basted project beneath the needle, which helps address the shifting layers that often cause frustration.
Open sew sessions provide support while your own project is set up. Bring the quilt, sew a few lines, and ask staff to examine tension, uneven feeding, or movement while the issue is visible. Test stations include BERNINA walking feet and practice sandwich kits, so you can watch an attachment demonstration and compare results with a diagram.
Staff can demonstrate:
Small classes give each quilter time at the machine and direct feedback. Call ahead about the next session, reserve a machine, or ask about a free fifteen-minute walking-foot consult before bringing your quilt.
High Country Quilts offers walking-foot classes, BERNINA machine support, practice materials, and compatible quilting accessories. Visit High Country Quilts to review current classes and products, then plan a Colorado Springs visit for hands-on help with your walking-foot setup.
At High Country Quilts we care deeply about community. With our experiences in retail, we know that a store is not only a place to shop but also a place for the community to gather and share. During this busy...

Hi! We’re Adam and Renee Wheaton, the new owners of High Country Quilts! For more than 40 years, we’ve owned and operated vacuum and sewing businesses. Following in Renee’s father’s footsteps after he retired from All Discount Vacuum and Sewing in Colorado...


Leave a comment