


We Love Our Quilting Community
At High Country Quilts we care deeply about community. With our experiences in retail, we know that a store is not only a place to shop but also a place for the community to gather and share. During this busy...


You've got a quilt top on the table, frayed edges at the side, a stack of strip sets waiting to be joined, and a sewing machine that's already doing the accurate work. The question is whether a serger can make the rest of the job faster without turning a careful quilt into a bulky one. Used well, it can. Used loosely, it can trim away the accuracy you spent all afternoon building.
A serger earns its place when you're tired of stopping to trim, overcast, and press every little edge by hand. It trims fabric and finishes the edge in one pass, which is exactly why it feels so efficient on quick-pieced quilts, borders, bindings, and strip-based projects. That speed is part of what makes it useful, but it also explains why it's not the first choice for every quilt.
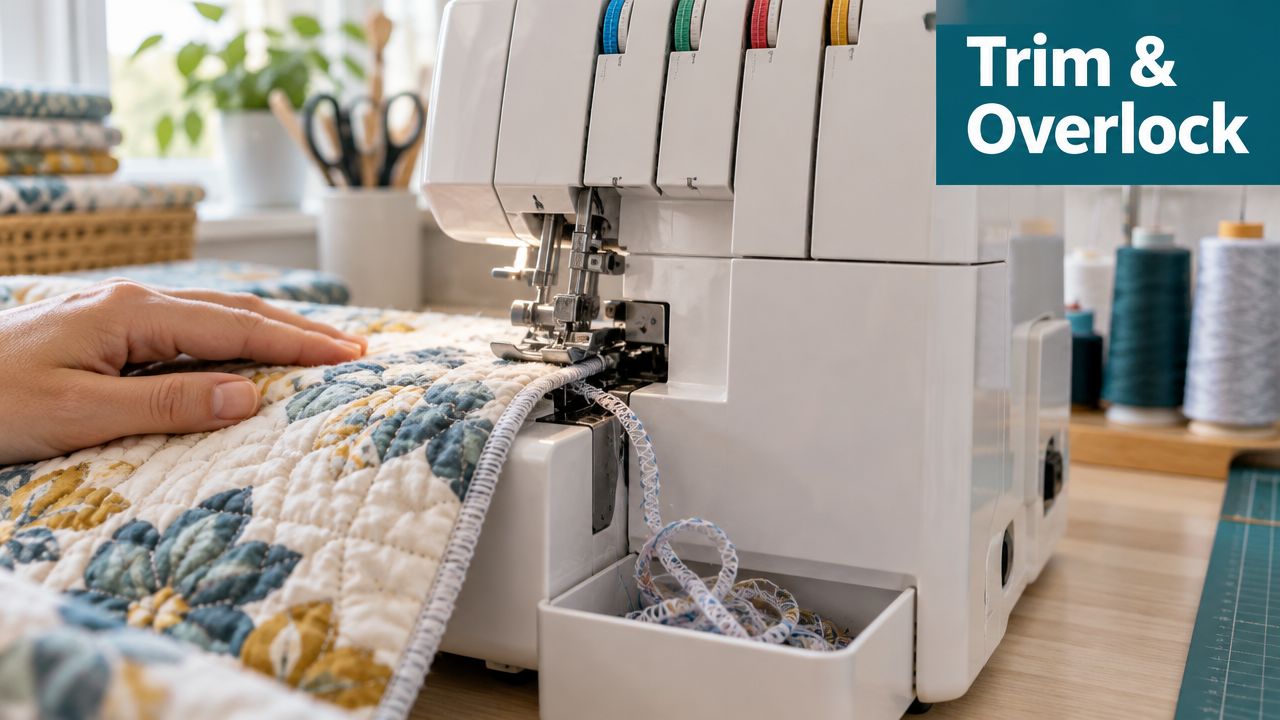
Traditional quilting methods go back centuries, long before sergers existed, and that history matters because the serger is a much newer specialty tool than the sewing machine or hand piecing methods used in classic quilts (Britannica quilting timeline). In a modern shop setting, I think of the serger as a bulk-management machine. It helps when you want flatter seams, less fraying, and cleaner edges that hold up through frequent handling.
That's why it shines on quilt-as-you-go, rag quilts, and edge finishing before binding. It's also why it can be a smart choice for teaching beginner-friendly strip projects, where visible progress matters and students want a finish that looks tidy right away. For one project, though, it can be the wrong tool if you need exact 1/4 inch piecing and lots of room to correct a wandering seam.
Practical rule: if the quilt depends on precision block matching, keep the sewing machine in charge of piecing and let the serger handle the edges.
The serger complements the sewing machine, it doesn't replace it. That mindset keeps your quilt square, keeps your corners honest, and saves the serger for the places where it does its best work. Explore serger machines before you commit to one for quilt finishing.
When I'm helping someone choose between machines, I start with the job, not the brand. A sewing machine is still the default for traditional 1/4 inch piecing, because it gives you the control most quilters expect on blocks, points, and sashing. A serger can piece simple quilts, but its real strength is speed, trimming, and edge finishing.
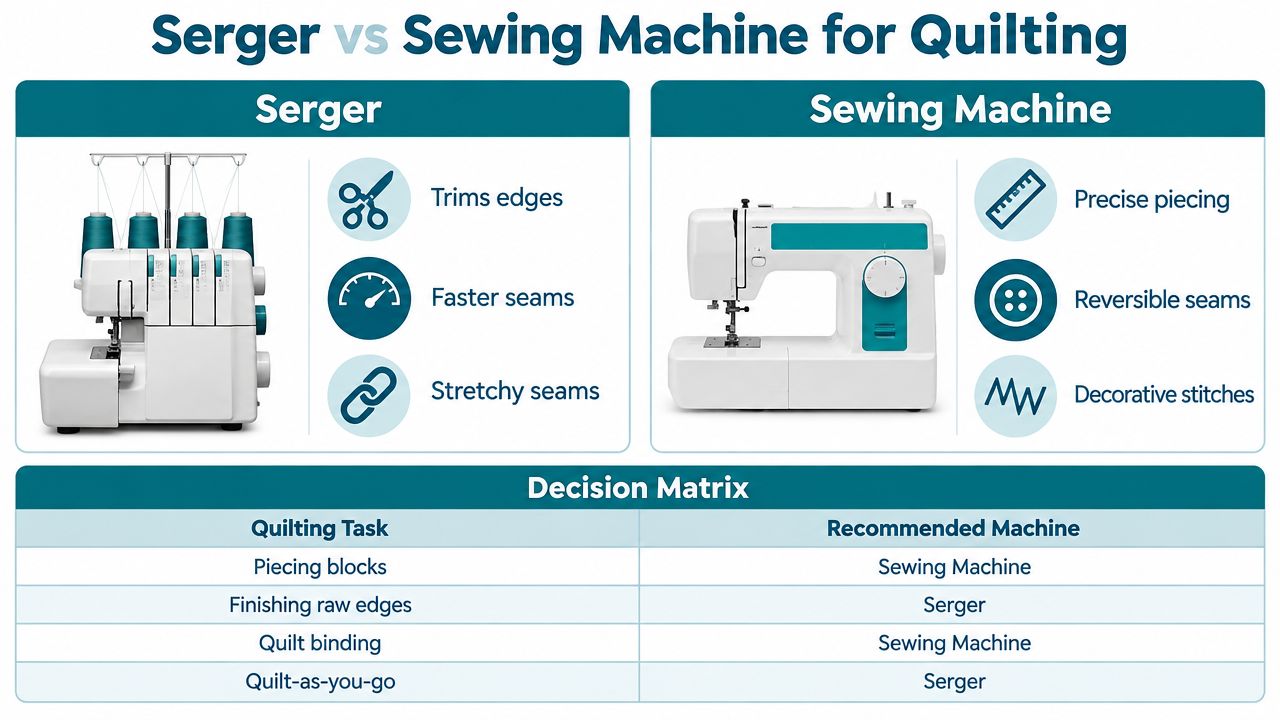
A helpful way to think about it is this. If the seam has to match an exact block measurement, the sewing machine usually wins. If the seam needs to be fast, neat, and resistant to fraying, the serger can be the better fit.
| Quilting Task | Best Tool | Why |
|---|---|---|
| Piecing blocks | Sewing Machine | Better control for a true 1/4 inch seam |
| Strip quilts | Serger or Sewing Machine | Serger speeds joins and reduces bulk, machine gives more precision |
| Quilt-as-you-go | Serger | Fast joining and tidy edges between sections |
| Rag quilts | Serger | Trims and finishes edges in one pass |
| Quilt binding | Sewing Machine | More control for neat fold placement |
| Edge finishing before binding | Serger | Helps reduce fraying on frequently handled quilts |
That table matches what many quilters already discover by trial and error. Guides on the topic note that sergers can make tidy seams and piece simple tops, but most quilters still prefer the sewing machine for conventional piecing, especially when exact sizing matters (Quilting Daily on serger quilting). The seam allowance issue is the big trade-off, because sergers usually sew wider than a standard quilt piecing seam unless you deliberately tune the machine.
A serger also adds thread to the seam, so it can create useful strength and structure, but it can add bulk where a thin seam is better. That's why it's strongest in modern, utility-driven quilting rather than in tightly matched sampler blocks. See serger accessories and quilting books if you want to build a setup around edge finishing and strip work.
Before you cut into good fabric, set the machine up for a 4-thread overlock and test on scraps. That setup matters because the knife, loopers, and needles all need to behave like a quilting tool, not a garment-factory shortcut. If you skip the testing step, the machine can trim too aggressively and change the size of your strip before you notice.
Use quilting cotton, fresh needles, quality serger thread, scissors, and a pile of test scraps. The scraps are not optional. They're the safest place to confirm that your seam allowance measures correctly before you touch the quilt fabric.
I also like to pre-sort strips in the order they'll be joined, especially on jelly-roll style projects. That keeps the chain piecing rhythm smooth and stops you from feeding the machine one erratic strip at a time. A clean workspace helps too, because serging works best when the fabric can move without snags or accidental twists.
A serger is happiest when the fabric plan is simple. The more you ask it to compensate for bad preparation, the more likely it is to give you a seam you don't want.
For quilt piecing, a reliable starting point is to tune the machine so the left needle sits exactly 1/4 inch from the knife and then sew a test seam before cutting real fabric (Sew Feet serger piecing guide). That's the calibration point that tells you whether your quilt-scale tolerance is there. If the seam doesn't measure true, adjust before you move on.
The other habit that saves fabric is checking stitch geometry on the test seam, not on the quilt. You want the upper looper thread on top, the lower looper on the underside, and the needle threads kept out of sight on both surfaces. If the machine can't do that on scraps, it won't do it better on your quilt. Shop quilting notions for serger prep if you're gathering needles, snips, and thread before a new project.
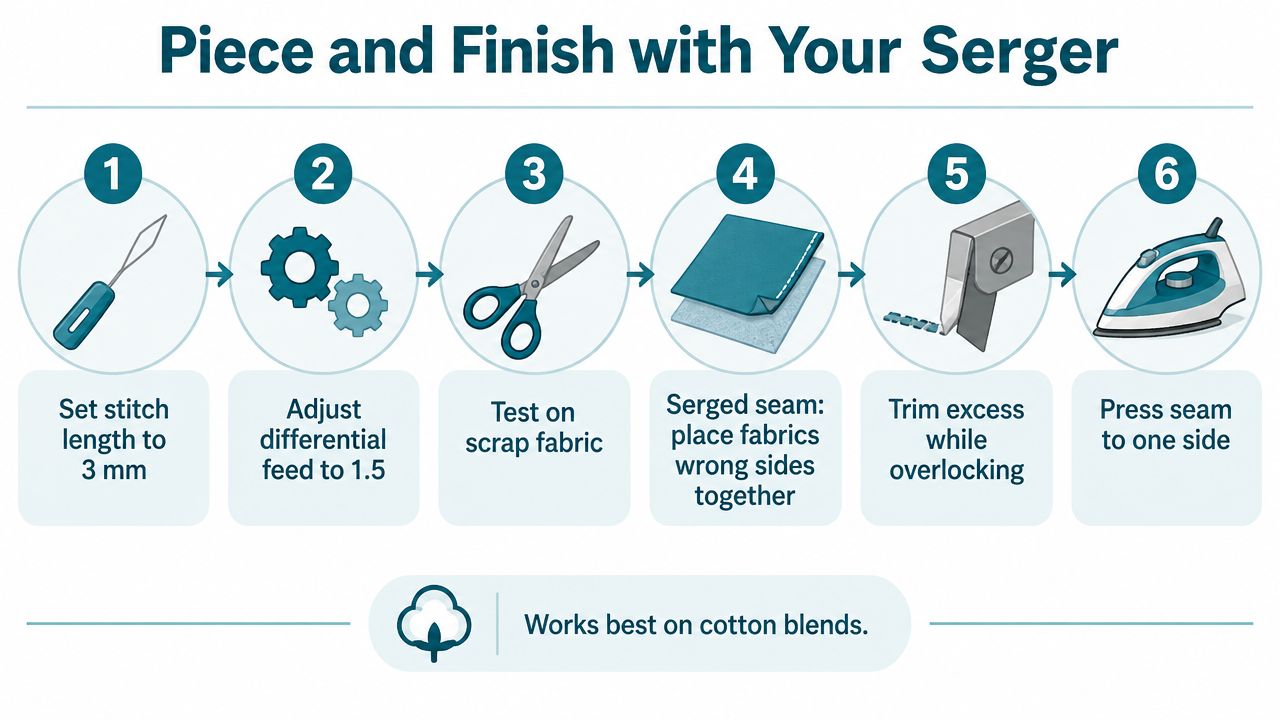
The easiest way to use a serger for quilting is to treat it like a precision tool, not like a faster version of a sewing machine. Start with the machine tuned to your test seam, then keep the fabric choice simple. Cotton and cotton blends are the least fussy place to begin.
For strip quilts, feed two strips evenly and let the serger join them while it trims the edge at the same time. The knife should skim away the excess, not chew into the seam allowance. If the left needle is set to that 1/4 inch reference point, the strip join can stay true enough for quilt work.
A serger feels efficient. An independent comparison of a jelly-roll quilt workflow reported that serger strip joining cut pressing time by up to 60%, reduced seam thickness from 0.82 mm to 0.47 mm, and shortened time per strip join from 42 seconds to 19 seconds (HowStuffWorks comparison). The same report estimated that serging uses about 2.3 times more thread per inch than straight stitching, which is why I never sell it as a universal replacement for a sewing machine.
If a quilt will be handled a lot, serging the raw edge before binding can slow fraying and keep the edge cleaner while you work. That's a common move on quilts that get washed often or passed around at classes. It's also useful when you're dealing with a top that has already been squared and you want the perimeter stabilized before the final finish.
For quilt-as-you-go, the serger can join sections quickly and keep the interior seam flatter than many people expect. For borders and bindings, it's best used as a helper, not as a substitute for careful measuring. That distinction matters, because the serger is excellent at fast finishing and much less forgiving when the layout is slightly off.
Workflow rule: calibrate first, test second, cut real quilt fabric last.
A published comparison of a jelly-roll quilt workflow also reported binding attachment time dropping from 28 minutes to 19 minutes, a 32% improvement, with the same caveat that the machine needs careful tension and feed setup (HandmadeLytics jelly-roll quilt comparison). If you want to see how those settings translate in a shop setting, High Country Quilts also carries serger-related products and education resources for practical machine use. If you're building a quilt-specific serger kit, start with serger notions and quilting books so the machine, thread, and project type line up.
Most serger frustration comes from setup, not from the quilt itself. When a seam tunnels, waves, or starts looking loose on one side, the first thing I check is threading, then tension, then the needle. That order matters because the machine can't form a clean stitch if one thread path is off.
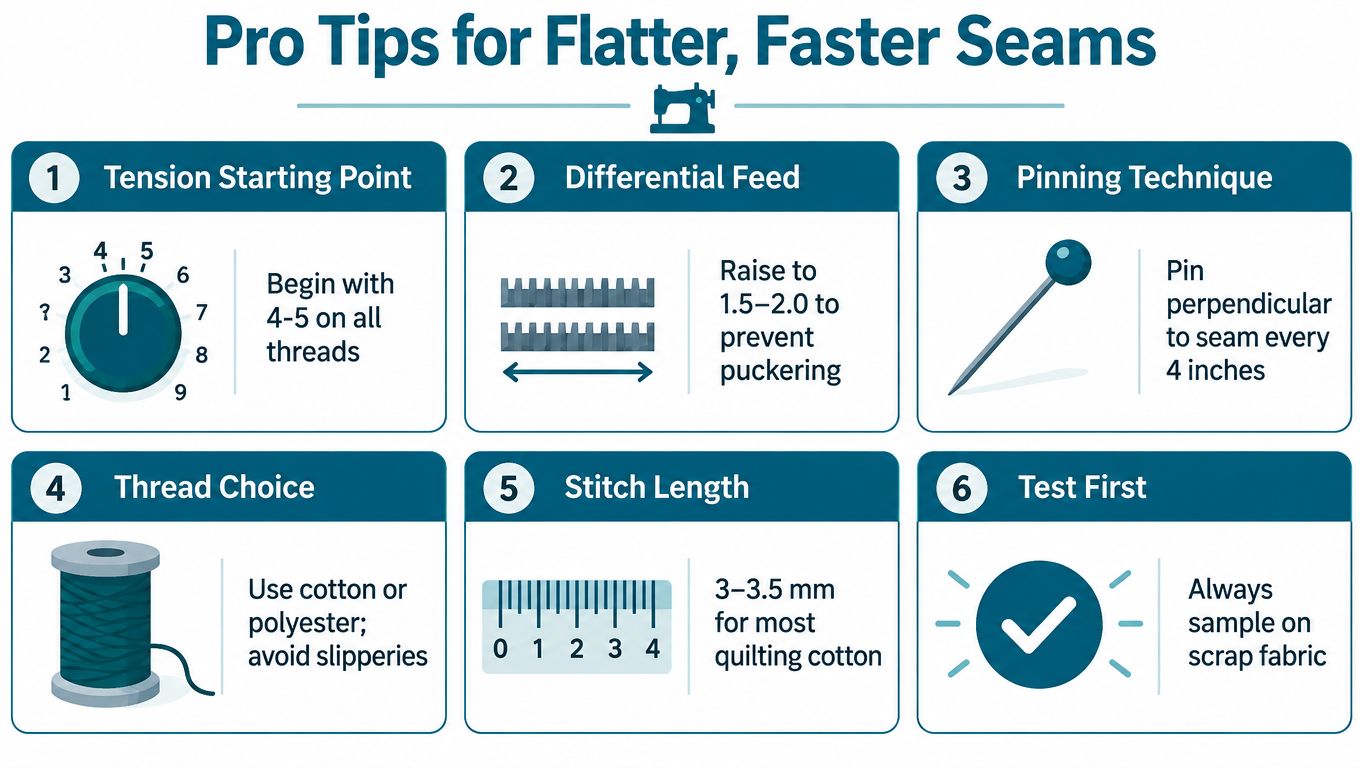
A useful troubleshooting habit is to full-rethread before changing too many settings. Expert guides estimate that roughly 70 to 80 percent of serger problems come from threading mistakes, incorrect tension, or a wrong or dull needle (Sew Feet serger piecing guide). That's why a quick rethread solves more problems than people expect.
Common starting tension on many sergers sits in the middle of the dial, then gets adjusted in small increments after a test seam. If the seam is puckering or the fabric waves, look at differential feed next. Differential feed uses two feed dogs, with the rear dog staying at the same speed while the front dog can be adjusted, which helps reduce puckering and shifting on tricky fabrics (Bernina overlocker manual).
Once the thread path is correct, examine where the loopers land. The upper looper should sit on top, the lower looper on the underside, and the needle threads should stay out of sight on both faces. If the thread migration looks wrong, don't keep sewing and hope it fixes itself.
A neutral quilting tutorial recommends serging quilt edges before binding to secure layers and reduce fraying, especially on projects that will be handled often or washed often (Sew Feet serger piecing guide). That's the kind of detail that pays off on utility quilts, table runners, and child-sized projects, where the edge gets more use than a show quilt would.
Test on scraps until the seam lies flat, then keep the machine settings unchanged for the quilt.
The payoff is real when the setup is right. One published quilting comparison reported lower seam thickness, faster strip joins, and faster binding attachment, which explains why sergers stay popular for modern finishes even though they consume more thread. If you want a reliable shop-side starting point, BERNINA serger support and classes can help you match machine settings to the project instead of guessing at the dial.
The best serger quilts usually come from a simple rule. Use the serger where speed, edge control, and bulk reduction matter most, and keep the sewing machine for the seams that need exact block accuracy. That gives you cleaner finishes without giving up the precision that makes a quilt fit together.
If you're new to this, start with a small strip project or a test binding sample before you cut into a larger top. You'll learn faster from one well-calibrated sample than from fighting a full quilt that's already out of square. High Country Quilts in Colorado Springs carries sergers, quilting fabrics, notions, and classes, so you can get the tools and the guidance in one place.
A shop that supports both sewing machines and sergers can make the learning curve a lot less steep, especially if you want hands-on help with thread paths, tension, or a machine-specific seam allowance. That's the point where a local class or a fresh supply run can save a lot of unpicked stitches.
If you're ready to try using a serger for quilting with real guidance, visit High Country Quilts for machines, fabric, notions, and classes that fit the project you're making. Bring your next strip set, ask questions about serger setup, and leave with a clearer plan for piecing and finishing your quilt faster.
At High Country Quilts we care deeply about community. With our experiences in retail, we know that a store is not only a place to shop but also a place for the community to gather and share. During this busy...

Hi! We’re Adam and Renee Wheaton, the new owners of High Country Quilts! For more than 40 years, we’ve owned and operated vacuum and sewing businesses. Following in Renee’s father’s footsteps after he retired from All Discount Vacuum and Sewing in Colorado...


Leave a comment