

Free Fabric All Year: Our 2027 Fabric Punch Card
November 2–25 only: buy a $200 gift card in either store and get a free yard of fabric every month of 2027.

The fabric is under the presser foot, the pedal is down, and three stitches in the thread wads into a knot on the underside of the cloth. Nothing is broken. Almost every time this happens, one small step in the setup was skipped, and the machine is telling you which one.
That's the frustration this guide is built to prevent. The sewing machine basics for beginners that matter fit on a short list: the parts that form a stitch, one correct threading path, two starting settings, a first straight seam, and a diagnostic order for when the stitch goes wrong. Learn them in that sequence and the machine stops being a mystery with a bad attitude.
A domestic sewing machine looks complicated from the outside. Look closer and a beginner model runs on a handful of working systems, and every seam you sew in your first year uses the same few parts in the same order. Once you can name them, an alarming problem becomes a short check.
Trace one length of thread from the spool. It leaves the spool pin, passes through a thread guide, slips between the tension discs, travels down to the take-up lever, and drops through the needle eye. The needle carries it through the cloth, a hook underneath catches it, and the bobbin supplies the second thread that locks the loop. The presser foot holds the fabric steady while the feed dogs advance it one stitch at a time.
Think of the needle and the bobbin as two partners who have to meet inside the fabric. Neither one makes a stitch alone, and neither one cares how fast you sew. The presser foot and feed dogs are the hands in that partnership: one holds, the other moves.
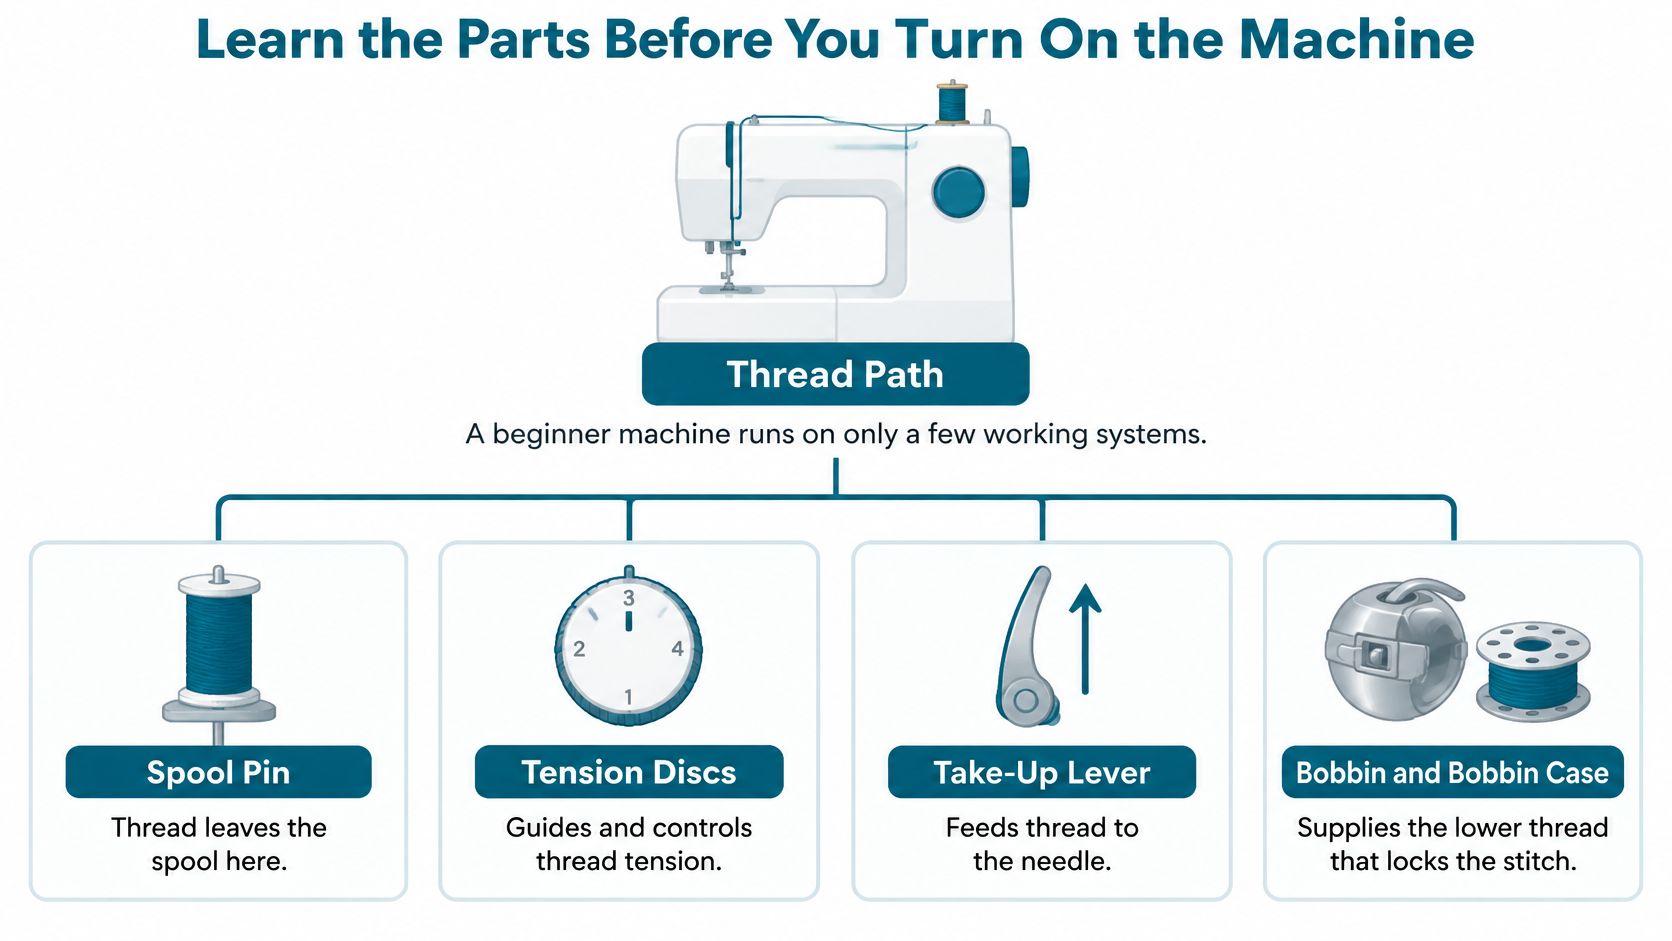
The Oregon State University Extension 4-H guide describes stitching as coordinated movement among the needle, bobbin, presser foot, feed mechanism, take-up lever and tension regulator. Its beginner advice is short: lower the presser foot before you sew, and stop with the take-up lever at its highest point so the thread doesn't pull free of the needle when you start the next seam.
| Part | Job | What to Check |
|---|---|---|
| Spool pin | Holds the upper thread spool | Spool turns freely and thread unwinds smoothly |
| Thread guides and take-up lever | Route thread along the correct path and pull slack after each stitch | Take-up lever is at its highest point before you start |
| Tension dial | Sets the tightness of the upper thread | A mid-range setting to begin with, adjusted only after a test seam |
| Presser foot and presser foot lever | Holds fabric against the feed system | Foot is lowered before every seam |
| Feed dogs | Move fabric under the needle | Teeth are clear of lint and you guide rather than push the fabric |
| Needle and needle clamp | Carries the upper thread through the fabric | Needle is fully inserted as the manual shows |
| Bobbin and bobbin case | Holds the lower thread | Thread runs in the direction the manual shows |
| Stitch length and width dials | Control stitch spacing and zigzag width | Straight stitch is selected before the first practice |
| Foot pedal and start-stop control | Controls sewing speed | Start slowly on scrap fabric |
The rule that saves the most grief: the presser foot goes down before the needle goes down. Sew with it raised and the tension discs stay open, the upper thread runs unregulated, and you get a nest for your trouble.
Controls sit in different places on different machines, even within one brand, so use the owner's manual for exact locations rather than assuming. Spend ten minutes finding each part on your own machine today, and mark the three you'll touch constantly: the needle and clamp, the presser foot lever, and the tension dial. Write the manual page number for threading on a sticky note and park it on the machine.
If you're still choosing a machine, the beginner models in our sewing machine collection are arranged so you can compare controls and stitch options side by side before you commit.
Threading is where most first-day frustration begins, and it's also the first place to look when a stitch misbehaves months later. The order below keeps the thread seated in every guide, which is the difference between a smooth seam and a knot that has to be cut out.
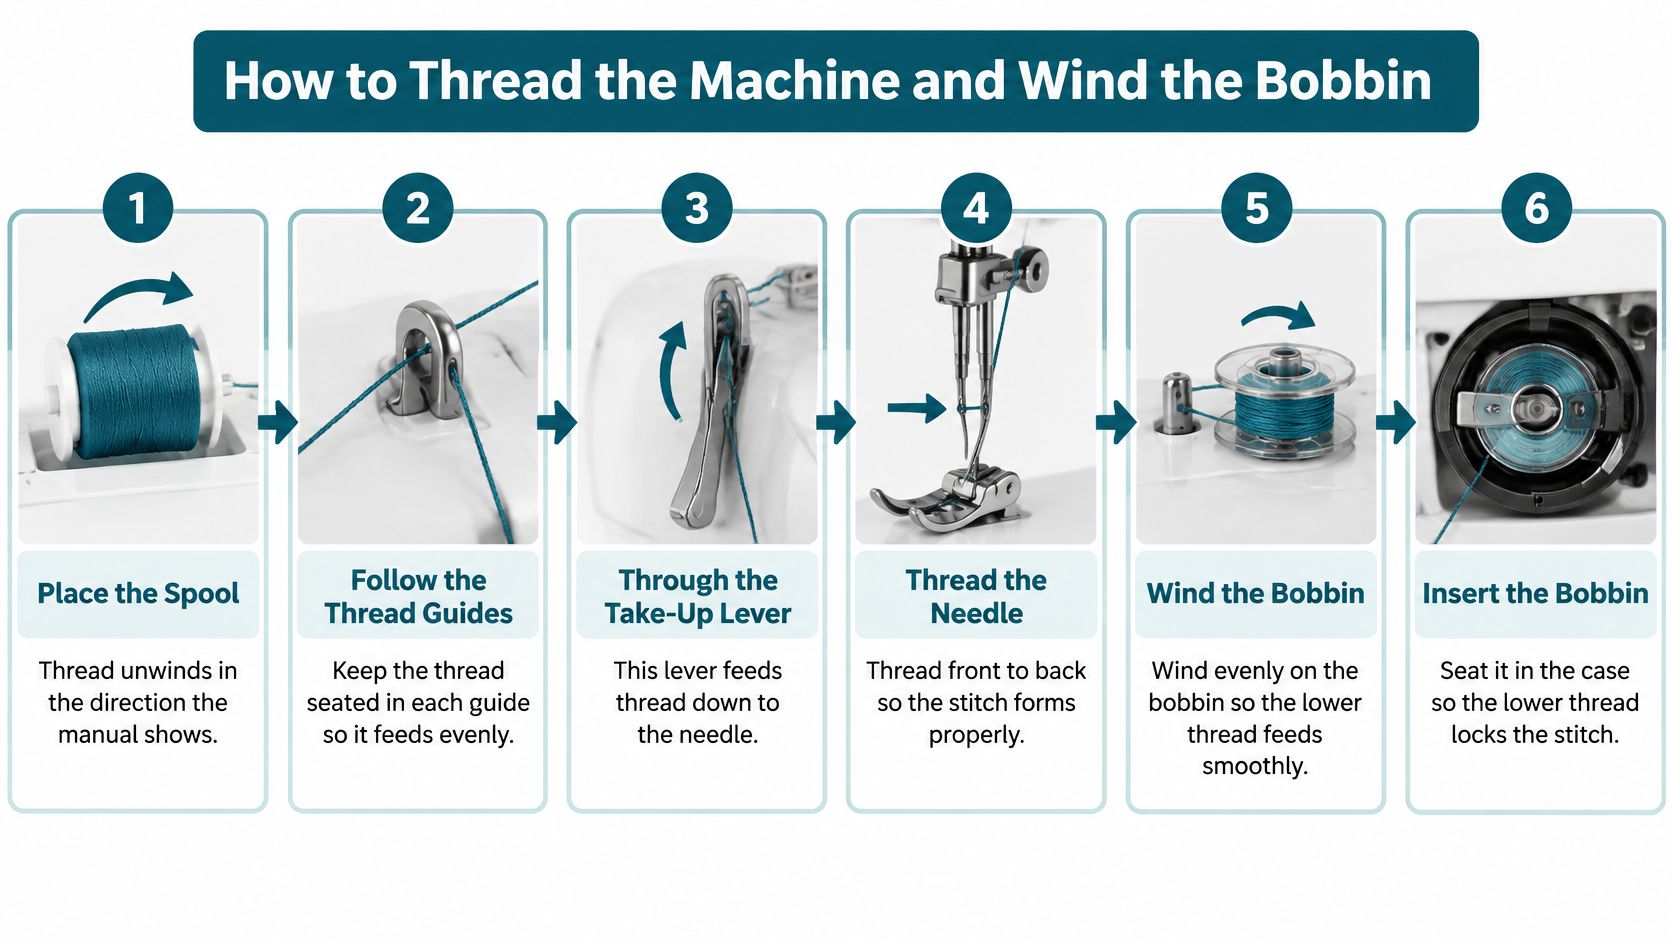
A skipped guide leaves the thread unregulated, and a bobbin wound or seated the wrong way throws nests onto the underside. Neither one is a tension problem, which is why the dial shouldn't be the first thing you touch.
If you'd rather watch the path than read it, this walkthrough runs the same sequence in real time, including the handwheel turn that lifts the bobbin thread.
Success looks like one loop of bobbin thread sitting above the needle plate and both tails resting to the left of the presser foot. If you don't see that, rethread from the spool before you sew a single stitch. Threading is always the first check, ahead of any tension change.
The machines we stock come with setup walkthroughs from our staff, so you can compare beginner machines and get the threading demonstrated on the model you're buying rather than guessing from a diagram.
Stitch length and thread tension are separate controls, and beginners get into trouble by changing both at once. Set a baseline, sew a test seam, and change one variable at a time.
A University of Nebraska–Lincoln extension guide treats approximately 12 to 16 stitches per inch as a suitable starting range for ordinary lockstitch sewing. The same reference sets 4 as a basic upper-thread tension on the machine it documents and notes that a higher number increases tension. For the everyday default, the Northeastern makerspace sewing guide names 2.5 mm, which works out to about 10 to 12 stitches per inch, and recommends testing on a layered scrap cut from the same fabric and batting as your project.
| Setting | Starting Point | Change It When |
|---|---|---|
| Straight stitch length | 2.5 mm, about 10 to 12 stitches per inch | Curves, bar tacks or fine fabric call for shorter stitches; basting and heavy fabric call for longer ones |
| Upper thread tension | A mid-range setting, with 4 as a common starting point | Only after rethreading, a fresh needle and a test seam show a balance problem |
| Needle | The type and size your manual specifies for the fabric | Replace when stitches skip, after a break, or after several projects |
| Presser foot | Standard all-purpose foot | Swap for zipper, buttonhole or specialty work |
| Bobbin | Inserted in the direction the manual shows | Check first whenever the stitch misbehaves |
Stitch length changes how the seam behaves, not just how it looks. Shorter stitches put more needle penetrations into every inch, which gives tighter control on curves and holds bar tacks firmly. Longer stitches reduce those penetrations and suit basting or heavy fabric, where dense stitching would stiffen the seam.
Leave the tension where the machine came set and the length at 2.5 mm. Sew a test seam on the layered scrap and look at it under good light. A balanced straight stitch shows only a small amount of upper thread on the underside, both threads interlocked inside the fabric, and a seam that lies flat without puckering. Loops on the top surface usually mean the upper tension is too loose; loops underneath usually mean it's too tight or the machine is threaded incorrectly.
Write it down before you turn the dial. A phone photo of the dial takes two seconds, and it's the only way back to your baseline once you've made four small adjustments and lost track.
That baseline turns troubleshooting into cause and effect. Once you know what a 2.5 mm stitch at a mid tension looks like on your fabric, any change is measurable instead of guesswork, and you can restore the setting that worked.
A sewing machine's first job was a straight line, and it's still the right first skill. Elias Howe's 1846 lockstitch machine could sew only straight seams, and that single stitch remains the foundation everything else builds on. Speed comes later. Control is what you're building now.
Feeling unsure at the first session is normal, not a sign you're doing it wrong. Every confident sewer started the same way: hands tense, eyes locked on the needle, scrap fabric moving too fast. A short routine done in a fixed order is what turns that nervousness into muscle memory.
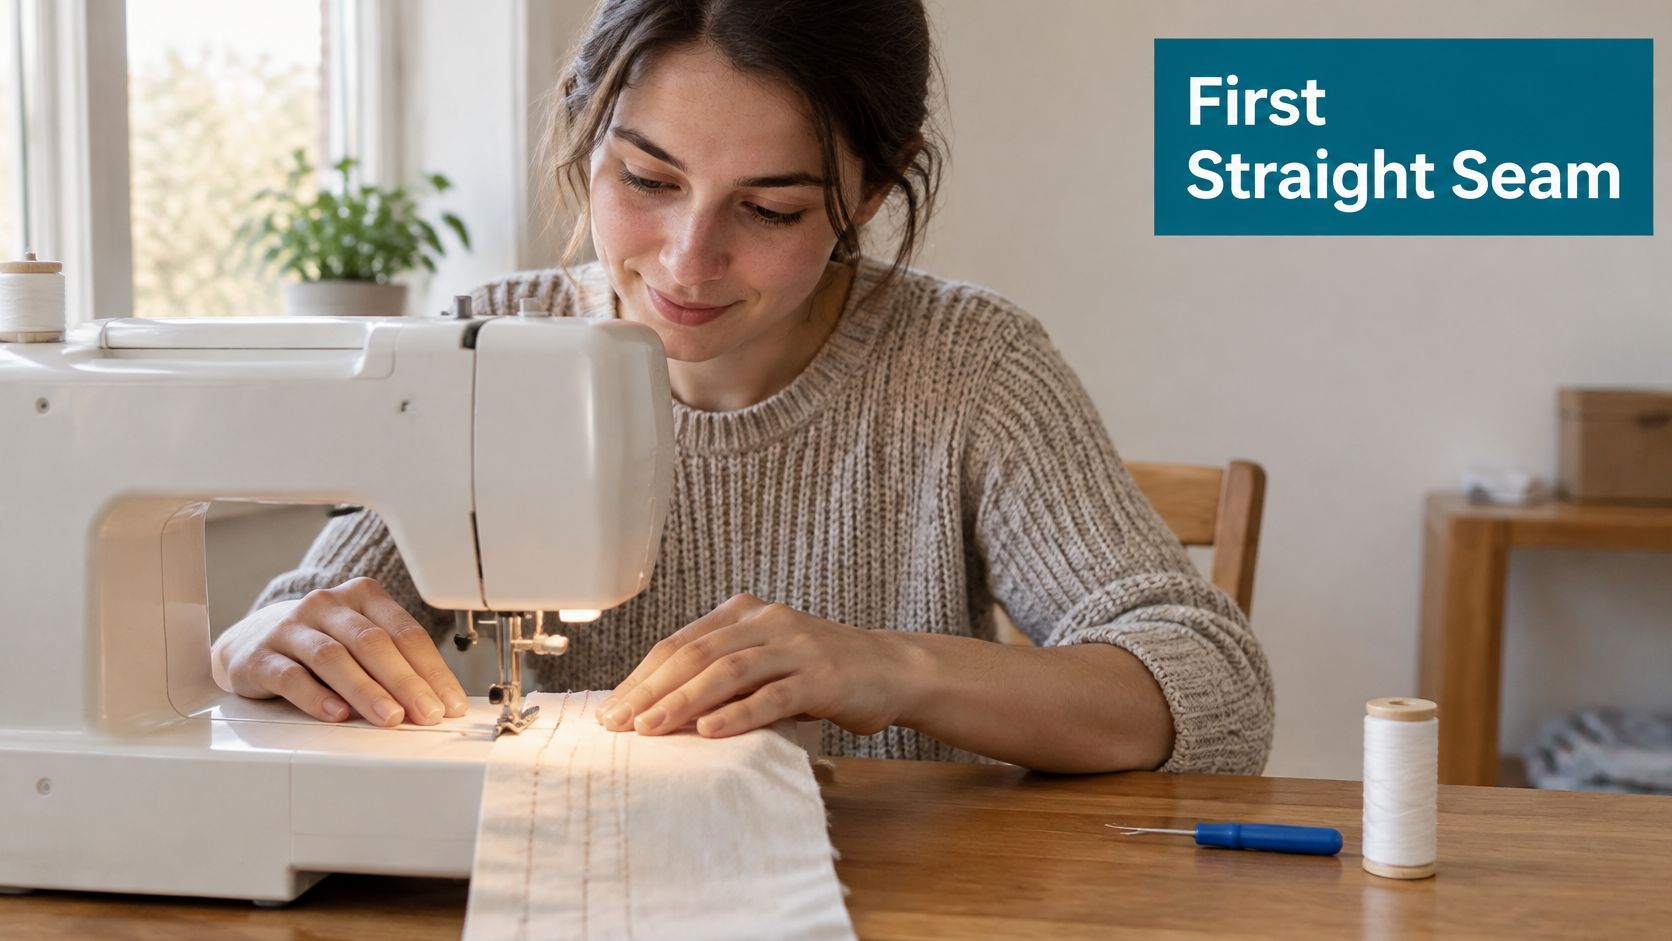
The habits that prevent injury are simple, and they work best when you drill them before the first stitch rather than after the first scare. Keep your fingers beside the presser foot, never directly in front of the needle. Use good lighting, clear the work surface of pins and cords, keep pets off the table, and switch the machine off whenever you walk away. The needle is the hazard, and it doesn't care whether you're watching.
Safety rule: the needle only moves when the machine is powered, so the safest habit you can build is turning it off for every pause, including the one where you lean over to read the manual.
Work through these four drills in order. Each one teaches a single skill, and skipping ahead is how crooked seams become a habit instead of a phase.
Adapt the setup to your body rather than forcing your body to the setup. Left-handed sewers can move the foot pedal to the left side of the machine and guide fabric from the left. Reduced vision improves with a task lamp aimed at the needle plate and a contrasting thread on light fabric. Hand pain or tremor responds to slower speed settings, a needle-down stop, and shorter sessions. Shared spaces such as libraries need a clear table edge and a plan for where the cord runs.
You're ready to move on when three things hold true at once: the seam lies flat, the stitches look even, and you can start and stop without the thread escaping the needle. Check them in that order after each session. If any one is still shaky, stay on scrap for one more session and work the drills again. Hands-on classes at High Country Quilts can give you guidance and support as you practice these steps.
Loops on the underside of the fabric are the complaint beginners bring most often, and they're rarely a tension fault. Work through four checks in a fixed order, and most problems resolve before you touch the dial.
The order is: threading and bobbin seating first, then the needle, then tension in small increments, and only after all three, a call to a service technician. Skipping straight to the tension dial is how a small threading slip turns into a machine that "never worked right."
| Symptom | Likely Cause | First Fix |
|---|---|---|
| Loops on the underside | Upper thread incorrectly routed, or the bobbin isn't seated right | Rethread the upper path with the presser foot raised, then test on scrap |
| Loops on the top surface | Upper tension too loose | Raise the tension one small step and test again |
| Puckered seam | Excessive upper tension, or a stitch length too short for the fabric | Lengthen the stitch and reduce tension in small steps |
| Skipped stitches | Wrong, dull or incorrectly inserted needle | Replace the needle with the correct type and insert it fully |
| Thread breaking | Incorrect threading, bobbin not seated, or tension too high | Rethread completely and check bobbin direction |
Balance is a relationship, not a number. The Utah State University sewing machine instructions note that many straight-stitch projects fall between tension settings 3 and 5, while stressing that no single setting works for every fabric, thread or stitch function. Correct balance means the upper and bobbin threads interlock inside the fabric instead of looping on one side, which is why the same dial position can behave differently on lightweight cotton and on a quilt sandwich.
Rethread the entire upper path with the presser foot raised so the thread seats between the discs. Then lift the bobbin cover, confirm the bobbin turns the direction the manual shows, and check the thread is under the tension spring rather than lying loose. Sew a test seam on a scrap of the same fabric before you move the dial one notch. If the loops persist after a fresh needle, then adjust.
Puckering has two common sources, and they feel identical from the outside. Too much upper tension pulls the bobbin thread upward and draws the seam tight; a stitch length too short for the fabric crowds the fibers and ripples the cloth. Try the longer stitch first, since it's a single dial move and easy to reverse.
Change one thing, then sew a test seam. Two changes at once and you learn nothing about your machine.
Grinding noises, a burning smell, or thread that keeps breaking after a rethread and a fresh needle are service signals, not practice problems. Stop sewing, unplug the machine, and let a technician look at the timing and hook. Owner maintenance covers threading, needles, bobbins, lint and lubrication the manual calls for; anything inside the case belongs to someone with the tools and the training.
Routine care prevents most mid-project failures, and the needle is the part you'll replace most often. Five minutes of attention between projects is cheaper than unpicking a seam that skipped six times.
| Task | How Often | Watch For |
|---|---|---|
| Brush lint from the bobbin area and feed dogs | After each project | Lint build-up causing uneven feed or thread trouble |
| Replace the needle | After a break, after several projects, or when stitches skip | A bent or dull tip and skipped stitches |
| Lubricate the machine | As the owner's manual specifies | Don't oil unless the manual calls for it |
| Clean the feed dogs thoroughly | Periodically, more often if you sew heavily | Trapped fibers or thread scraps |
| Cover the machine | Whenever it's stored | Dust reaching the mechanism |
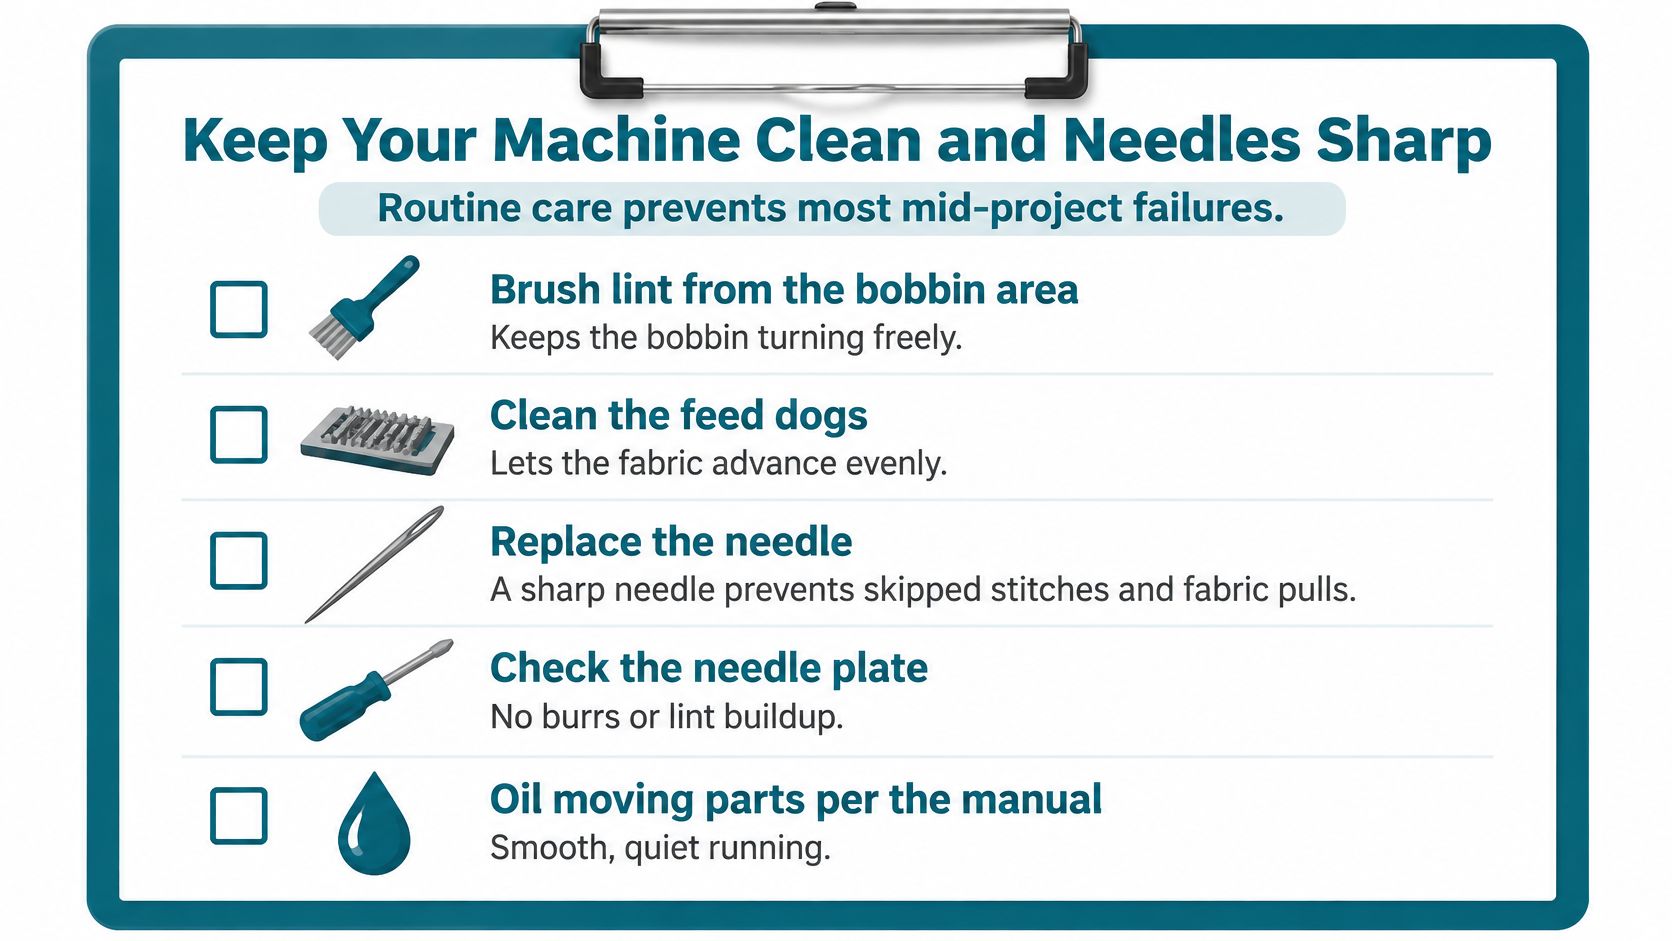
Use the small brush that came with the machine, and brush lint out of the bobbin area rather than blowing it deeper with compressed air. Air pushes fibers into the oiled mechanism where they collect and gum up the works.
Needle choice is a mechanical safety issue, not a matter of preference. New Mexico State University's sewing machine guide warns that a needle of the wrong length can contact the bobbin case and break, so use the type and size specified for your fabric and machine, and seat it fully in the clamp. The same guidance points to the owner's manual for bobbin insertion, because a bobbin seated the wrong way causes stitching problems that mimic tension faults.
Keep a small card beside the machine listing the five tasks above, and date the last needle change. A needle that has sewn through a quilt sandwich all weekend is finished, even if it still looks straight to the eye.
Needles, brush kits and the small maintenance supplies that keep a machine running are stocked in our sewing notions section, including the sizes that match common quilting fabrics.
Three criteria decide a first machine. You want controls you can see and turn by hand, a straight stitch plus a simple bobbin system rather than a screen full of menus, and a mechanical build, which is often enough to learn every basic on.
The Bernette B33 fits all three. It's a mechanical machine with Swiss design, described as the perfect model for beginners, and it's listed at $299.00 on our site. When you buy a machine from High Country Quilts, we provide ongoing classes and guidance so you can feel confident using it, which matters more than an extra decorative stitch you won't touch for a year.
Here's a seven-day plan that mirrors how the sessions run in our Colorado Springs shop.
Once straight seams feel routine, garment work becomes reachable, and adjusting oversized blouse and dress patterns is a practical next read for anyone who wants clothes to fit rather than just fabric to behave.
The beginner machines we carry and the class list sit in the same place, so you can pick a model and book the session that teaches it on the same visit.
High Country Quilts keeps a floor full of beginner machines and a calendar of hands-on classes in Colorado Springs, so you can learn the parts, thread the bobbin, and sew that first straight seam with someone beside you. If your machine is already at home and misbehaving, bring it in and we'll walk the threading and tension checks with you. Visit High Country Quilts to see the machines and classes and pick your starting point.
November 2–25 only: buy a $200 gift card in either store and get a free yard of fabric every month of 2027.

Serger and BERNINA Mastery classes, longarm training, bag-of-the-month, Kids Sewing Club and a Highlands Ranch retreat. Here's what's on the calendar in November.

Free gifts, included packages and special pricing on the BERNINA 790 ULTRA, 990, Liberty Editions, L 890 serger and Q Series longarms, now through December 31.


Leave a comment