


We Love Our Quilting Community
At High Country Quilts we care deeply about community. With our experiences in retail, we know that a store is not only a place to shop but also a place for the community to gather and share. During this busy...


You're standing in front of a wall of sewing pins with a half-finished project in your basket. One box says glass head, another says ball point, and a third promises extra-long quilting pins. You know you need pins, but you don't know whether the wrong choice could leave holes in your fabric, bend while you sew, or make your first quilt block harder than it needs to be.
The good news is that choosing pins for sewing becomes much easier once you stop sorting them by colorful packaging and start matching them to fabric behavior. A few details matter most: shaft diameter, length, head type, and point style. Learn what each feature does, test your choice on a scrap, and the notions wall becomes a helpful map instead of a wall of guesses.
A first-time sewist often reaches for the prettiest box or the pin described as “all purpose.” That's understandable, but “all purpose” doesn't tell you whether the pin will glide through lawn, hold a quilt sandwich, or move between the loops of jersey. A quilting cotton block and a silk lining may both need temporary support, yet they need very different kinds of support.
Think of a pin as a small tool with a particular job. A fine, sharp pin can pass through delicate cloth with less visible disturbance. A thicker, longer pin gives you more support when several layers are stacked together. A ball-point pin has a rounded tip that's designed for knitted structures rather than tightly woven fabric.
A useful first question: What fabric are you pinning, and how many layers must the pin hold?
Your next question is whether you'll press over the pinned area. Glass heads are useful when heat is part of the process because they tolerate an iron better than many plastic heads. If you're preparing clothing with labels, careful pin placement also helps you keep the fabric flat and aligned. A practical companion resource is this guide to sewing clothing tags like a pro, especially when you're working near small edges and finished seams.
For a first cotton quilt block, choose a medium, sharp pin and test it on a hidden scrap. For a knit top, reach for a ball-point option instead. For wool or several quilt layers, look for additional length and rigidity. You don't need every specialty pin on your first shopping trip. You need one pin that suits the project in front of you.
The history of pins explains why so many options exist. Sewing pins have been used for more than 4,000 years, with early examples made from materials including bone and iron. Brass became important during the Bronze Age, while steel later offered greater strength, although untreated steel could rust in humid conditions. By the medieval and Renaissance periods, makers used iron, brass, and copper wire, and pin production had become an established industry in Europe. (Historical overview of sewing pins)
The modern beginner benefits from that long development without needing to memorize it. Different materials and shapes exist because sewists need different combinations of sharpness, strength, flexibility, corrosion resistance, and cost.
At the notions wall, two pins can look nearly identical while behaving very differently in fabric. Check four features before choosing: length, diameter, head, and point. Together, they tell you whether a pin will reach through your layers, stay steady, remain visible, and pass through without leaving unnecessary holes.
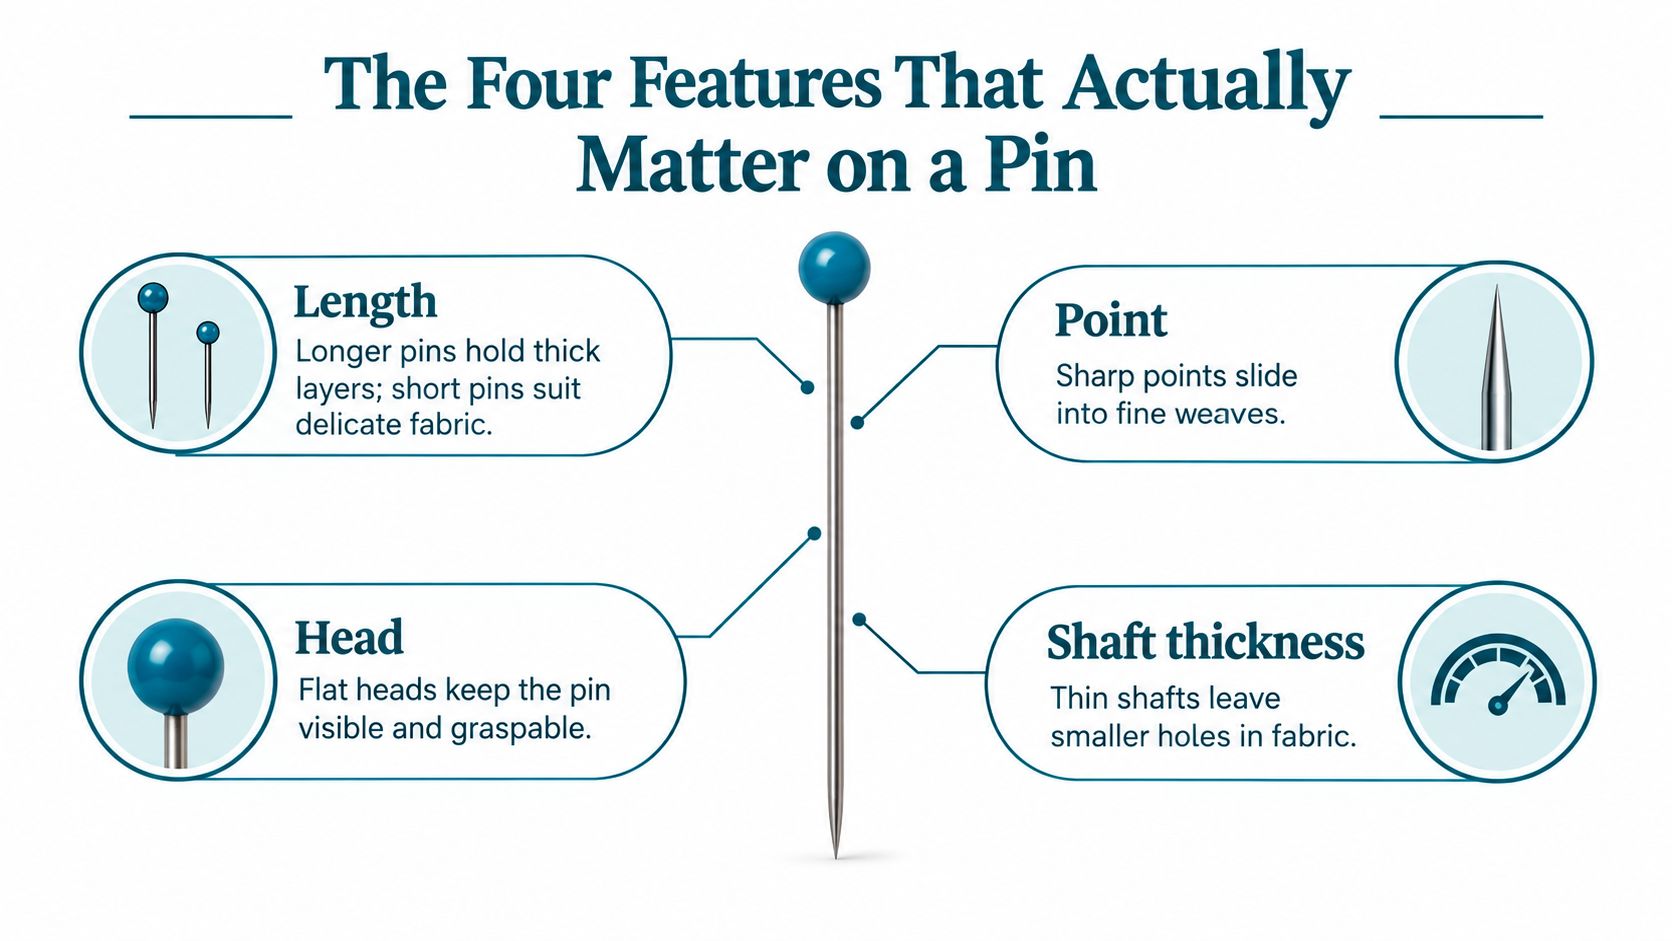
A short pin works like a toothpick. It is easy to control near the edge of a small appliqué shape or along a tight curve. A long pin works more like chopsticks, reaching through a quilt top, batting, and backing. That reach helps with several layers, although the pin may feel awkward inside a narrow seam.
Appliqué pins are typically about 1/2 to 3/4 inch long. All-purpose pins are approximately 1 1/16 to 1 1/2 inches, while quilting pins commonly measure about 1 1/2 to 2 inches. (Pin length guide)
For ordinary sewing and quilt-block construction, a pin around 1 to 1.5 inches, or 25 to 38 mm, is a useful starting point. (Beginner pin guidance) Choose more length when the layers are thick, and less when you need precise control near an edge.
Diameter means the thickness of the shaft. A fine shaft leaves a smaller opening, which suits lightweight cloth. A thicker shaft bends less when it passes through denim, heavy wool, or several quilt layers.
A shaft around 0.5 mm suits fine fabrics and sheers. Around 0.6 mm works for many medium-weight projects, while 0.7 to 0.8 mm gives more support for heavy fabrics and quilted layers. (Sewing pin diameter guide)
Practical rule: Use the thinnest pin that passes cleanly through the actual layers without bending or allowing them to shift.
A large, colorful plastic head is easy to spot on a busy cutting table. A flat glass head is also easy to grasp and handles pressing better because glass tolerates iron heat better than heat-sensitive plastic. The head helps you see and remove the pin, but it does not determine whether the shaft suits the fabric.
Sharp points suit woven cotton, lawn, silk, and other fabrics with stable threads. Ball-point tips suit knits. Their rounded ends move between knit loops instead of cutting across them, helping reduce snags and runs.
Material affects storage and working life. Stainless steel, brass, and nickel-plated brass are described as rustproof, while nickel-plated steel is rust-resistant and can work with a magnetic pincushion. (Pin material and condition guide) A clean, straight, sharp pin should pass through the fabric smoothly. If it catches, bends, or shows rust, replace it.
A pin that glides through quilting cotton may snag jersey or leave a hole in silk. Match the pin to the fabric's behavior first, then check thickness, stretch, and how many layers you will join.
| Fabric | Recommended Pin | Why It Works |
|---|---|---|
| Quilting cotton | Sharp, medium-length pin with a fine or medium shaft | It passes cleanly through stable woven fabric and holds quilt-block seams |
| Lawn | Fine, sharp pin with a glass head | The slimmer shaft reduces unnecessary punctures in lightweight cloth |
| Jersey and other knits | Medium-length ball-point pin | The rounded point moves between knit loops rather than catching them |
| Denim and canvas | Longer, thicker sharp pin | The stronger shaft supports dense fabric and multiple layers |
| Wool coating | Longer sharp pin with a sturdy shaft | Extra reach and rigidity help control thick cloth |
| Silk, satin, and chiffon | Extra-fine sharp silk pin | A fine shaft helps reduce visible holes in delicate fabric |
For quilting cotton, a pin around 0.6 mm in diameter and approximately 1.5 inches long suits many general projects. (American Sewing Guild pin guidance) Test it on a scrap first. A tightly woven batik may resist the point more than a softer cotton with a similar weight.
Fine fabrics need a lighter touch. A comparison discussed in beginner sewing coverage reported visible pinholes in 75% of silk samples with a thicker size 17 pin, compared with 10% when a finer size 20 pin was used. The available coverage does not independently verify the comparison, so use it as a reminder to test rather than as a prediction for every silk, satin, or chiffon fabric. (Discussion of fabric-specific pin choices)
A knit needs a different point. A sharp pin can catch a loop, much like a thorn catching a sweater. Begin with a ball-point pin, then test it on the garment fabric or a matching scrap. If the pin drags or leaves a visible opening, try a finer option or a different method.
Dense stacks also need testing. Put the actual top, batting, and backing together, then compare a fine patchwork pin around 0.5 to 0.6 mm with a heavier pin around 0.7 to 0.8 mm. Keep the thinnest pin that passes through all layers without bending, shifting the fabric, or leaving open holes. (Textile penetration research)
Lace, vinyl, and faux fur require separate choices. Their structure may call for specialty tools or methods that avoid puncturing the material.
Good pinning is less about filling every inch of fabric and more about controlling movement where it matters. Before inserting a pin, align the layers, smooth the fabric, and decide which side will face the presser foot.
For a straight seam, place pins inside the seam allowance and perpendicular to the seam line. This orientation keeps the pin available for removal and lets the machine foot pass across the shaft more predictably. Remove every pin before the needle reaches it. Don't rely on the machine to tolerate a pin.
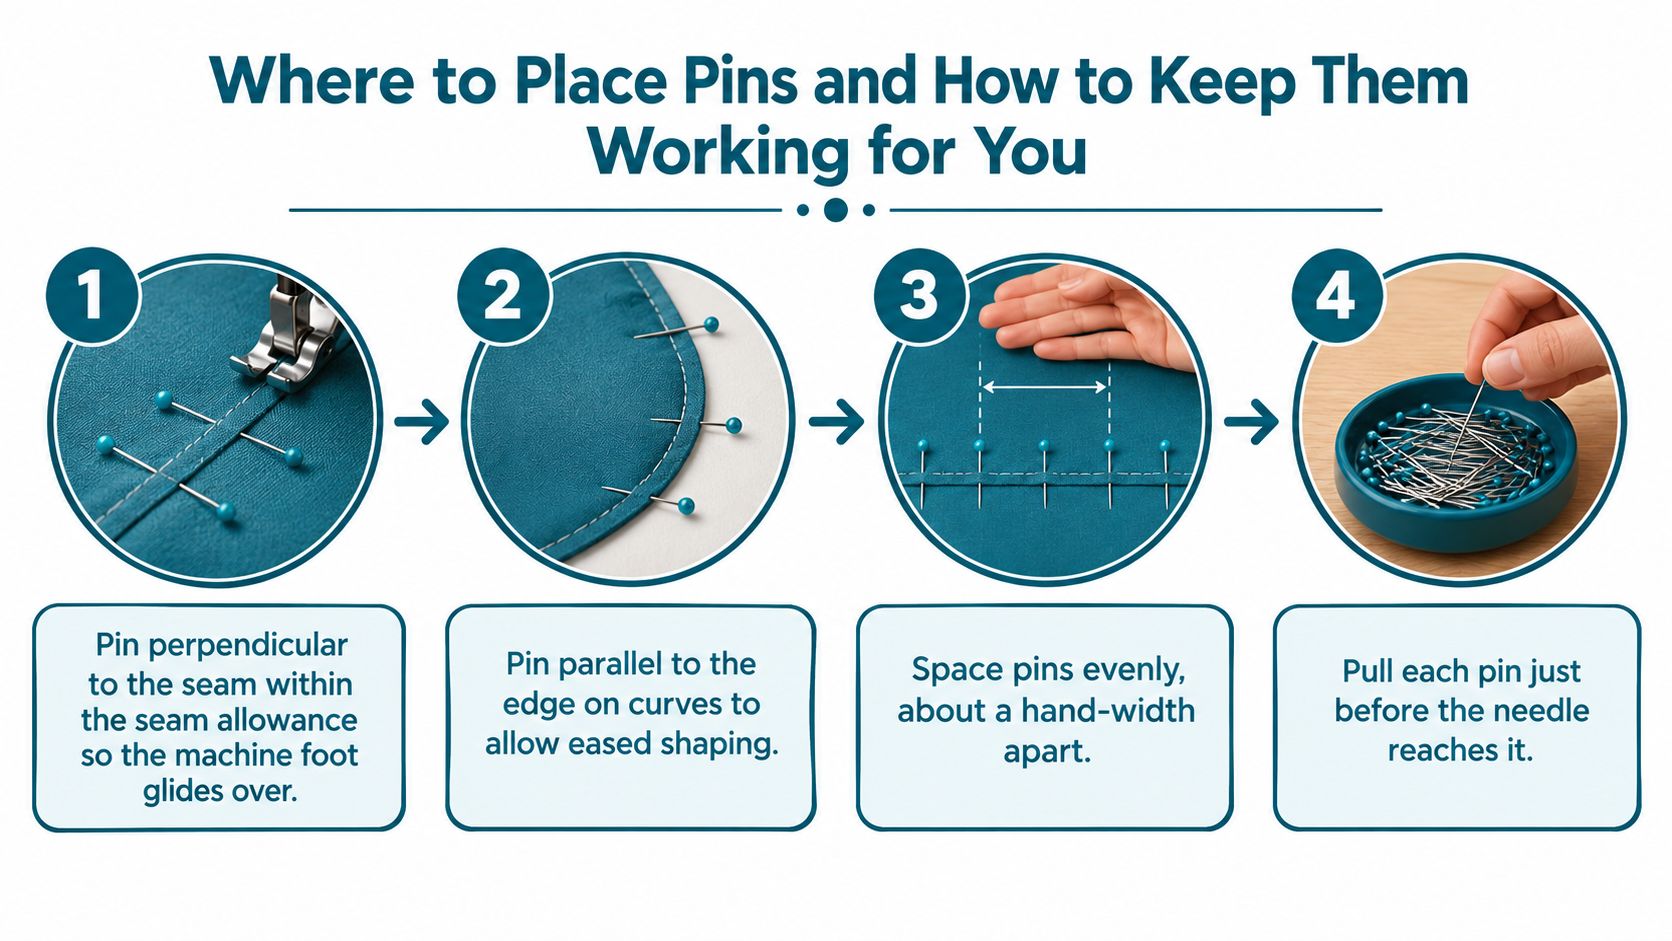
Curves need a different touch. Place pins parallel to the edge so the fabric can ease around the curve without creating a stiff obstacle. On a bias edge, use enough support to prevent stretching, but avoid pulling the fabric into shape with the pins.
At corners, don't place a pin exactly where the needle must pivot. Instead, secure the approach to the corner and the exit after it. Add support at notch points, dart ends, and zipper stops, where layers can slide or change direction.
For quilt blocks, keep pins flat through the layers and check that the backing hasn't folded underneath. A pin that catches only the top layer gives a false sense of control. It may hold the visible fabric while the lower layer drifts.
Before stitching: Pin, check both layers, smooth the seam, and remove the pin before the presser foot arrives.
A small dish beside the machine gives removed pins a destination. If you're learning from a garment project, a visual reference such as this kilt pin placement guide can also reinforce the larger principle: placement should support the fabric and the purpose of the pin, not follow a familiar habit.
Here's a short visual demonstration to watch before your next seam.
For dense quilt sandwiches, inspect the seam after removing the pins. Angled light can reveal open holes, displaced yarns, or a seam that has shifted. If the fabric moves or the pin bends, slow the machine, shorten the pinned section, or switch to clips or hand basting.
A pin isn't harmless just because it's small. The risks usually appear during ordinary moments, such as carrying a project bag, adjusting fabric beside the needle, or reaching under a cutting table for a dropped tool.
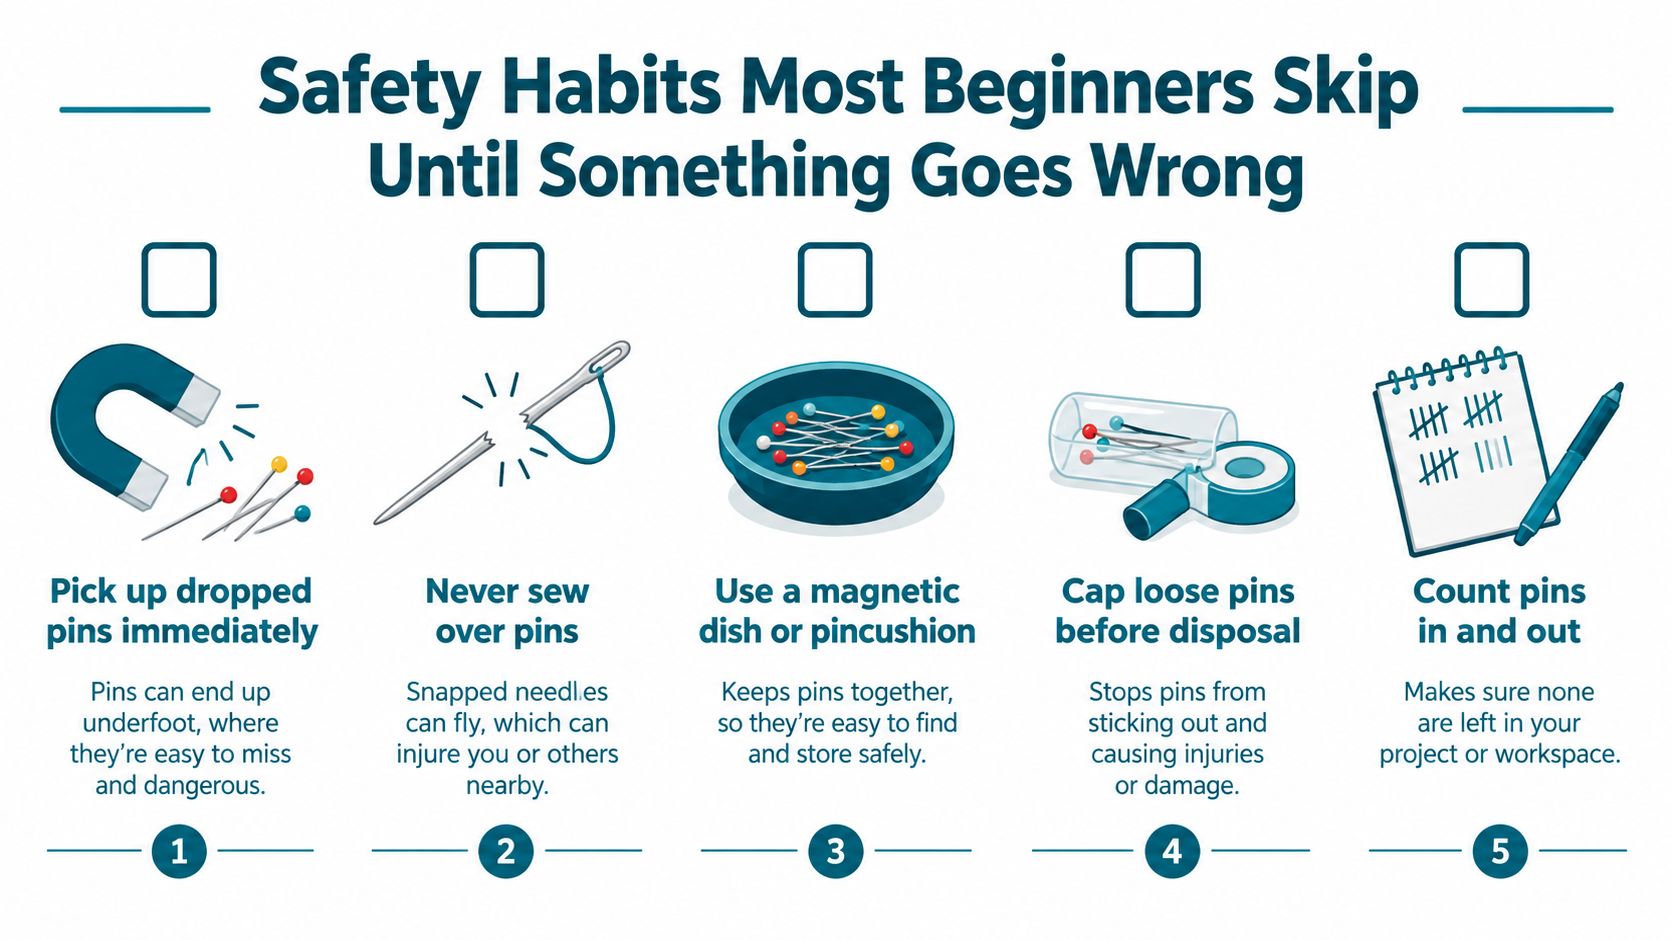
Pick up dropped pins immediately. A magnetic pickup tool or tongs is safer than searching with your fingers, particularly in a home with children or pets. Store loose pins in a pincushion, magnetic dish, or pin cup rather than leaving them in the folds of a project bag.
Never hold a pin in your mouth while you reposition fabric. It's easy to turn a quick adjustment into a puncture, and a pin can be difficult to see if it falls into a scrap pile.
Never sew over pins. A needle can strike the shaft, bend, break, or send metal toward your face. A damaged pin can also harm the machine, distort the fabric, or injure your hand. The Association of Sewing & Design Professionals recommends replacing damaged pins and warns against sewing over them. (Pin safety guidance)
Remove pins with bent shafts, rough points, loose heads, or visible corrosion. Don't push a damaged pin back into the pincushion where you might grab it later.
Disposal needs care too. Put bent, broken, or unwanted pins into a puncture-resistant container and follow local waste guidance. The FDA's general sharps guidance emphasizes immediate placement in a suitable container and notes that disposal programs vary by community. Sewing pins aren't medical sharps, but the same basic principle applies: don't leave sharp metal loose in household waste. (FDA sharps disposal guidance)
Keep a small first-aid kit or at least basic first-aid supplies near your sewing table. A calm, prepared workspace makes it easier to stop, clean a minor injury, and return to the project safely.
A useful starter kit doesn't need every specialty shape. Start with a small range that suits the fabric you already sew, then add new styles when a project gives you a reason.
| Pin Type | Best For | Suggested Quantity |
|---|---|---|
| Fine silk pins | Lightweight wovens, silk, satin, and delicate knits | A small working set |
| Medium-length sharp pins | Quilting cotton, lawn, and general woven sewing | The main everyday supply |
| Longer sturdy pins | Basting, wool, denim, canvas, and thick quilt layers | Enough for larger layered projects |
| Magnetic holder or pincushion | Safe storage during sewing | One reliable holder |
| Small labeled tin | Transporting pins to classes or sewing groups | One travel container |
The ideal quantity depends on the size and type of projects you make. A beginner making quilt blocks can start with a practical working supply and add more when pins become difficult to find in the pincushion. Keep one set for delicate fabric and another for heavier work so you don't reach for a thick shaft when sewing silk.
Nickel-plated steel is a useful everyday option because it resists rust and can work with a magnetic holder. Run your fingers carefully along the shaft before use. A smooth pin should glide without catching, while a rough shaft or damaged point belongs in the disposal container.
Remember the three habits that prevent most frustration: match pin weight to fabric, keep pins within the seam allowance, and replace damaged pins promptly. If you're unsure, test insertion and removal on a concealed scrap before the project.
High Country Quilts offers sewing pins, including MAGIC PINS Extra Long Pins/Fine and longarm quilting pins, along with pin cushions, pin cups, and wrist magnetic pin cushions. Visit High Country Quilts to choose tools that fit your next quilting or sewing project and explore the shop's fabrics, notions, classes, and sewing support.
At High Country Quilts we care deeply about community. With our experiences in retail, we know that a store is not only a place to shop but also a place for the community to gather and share. During this busy...

Hi! We’re Adam and Renee Wheaton, the new owners of High Country Quilts! For more than 40 years, we’ve owned and operated vacuum and sewing businesses. Following in Renee’s father’s footsteps after he retired from All Discount Vacuum and Sewing in Colorado...


Leave a comment