

We Love Our Quilting Community
At High Country Quilts we care deeply about community. With our experiences in retail, we know that a store is not only a place to shop but also a place for the community to gather and share. During this busy...


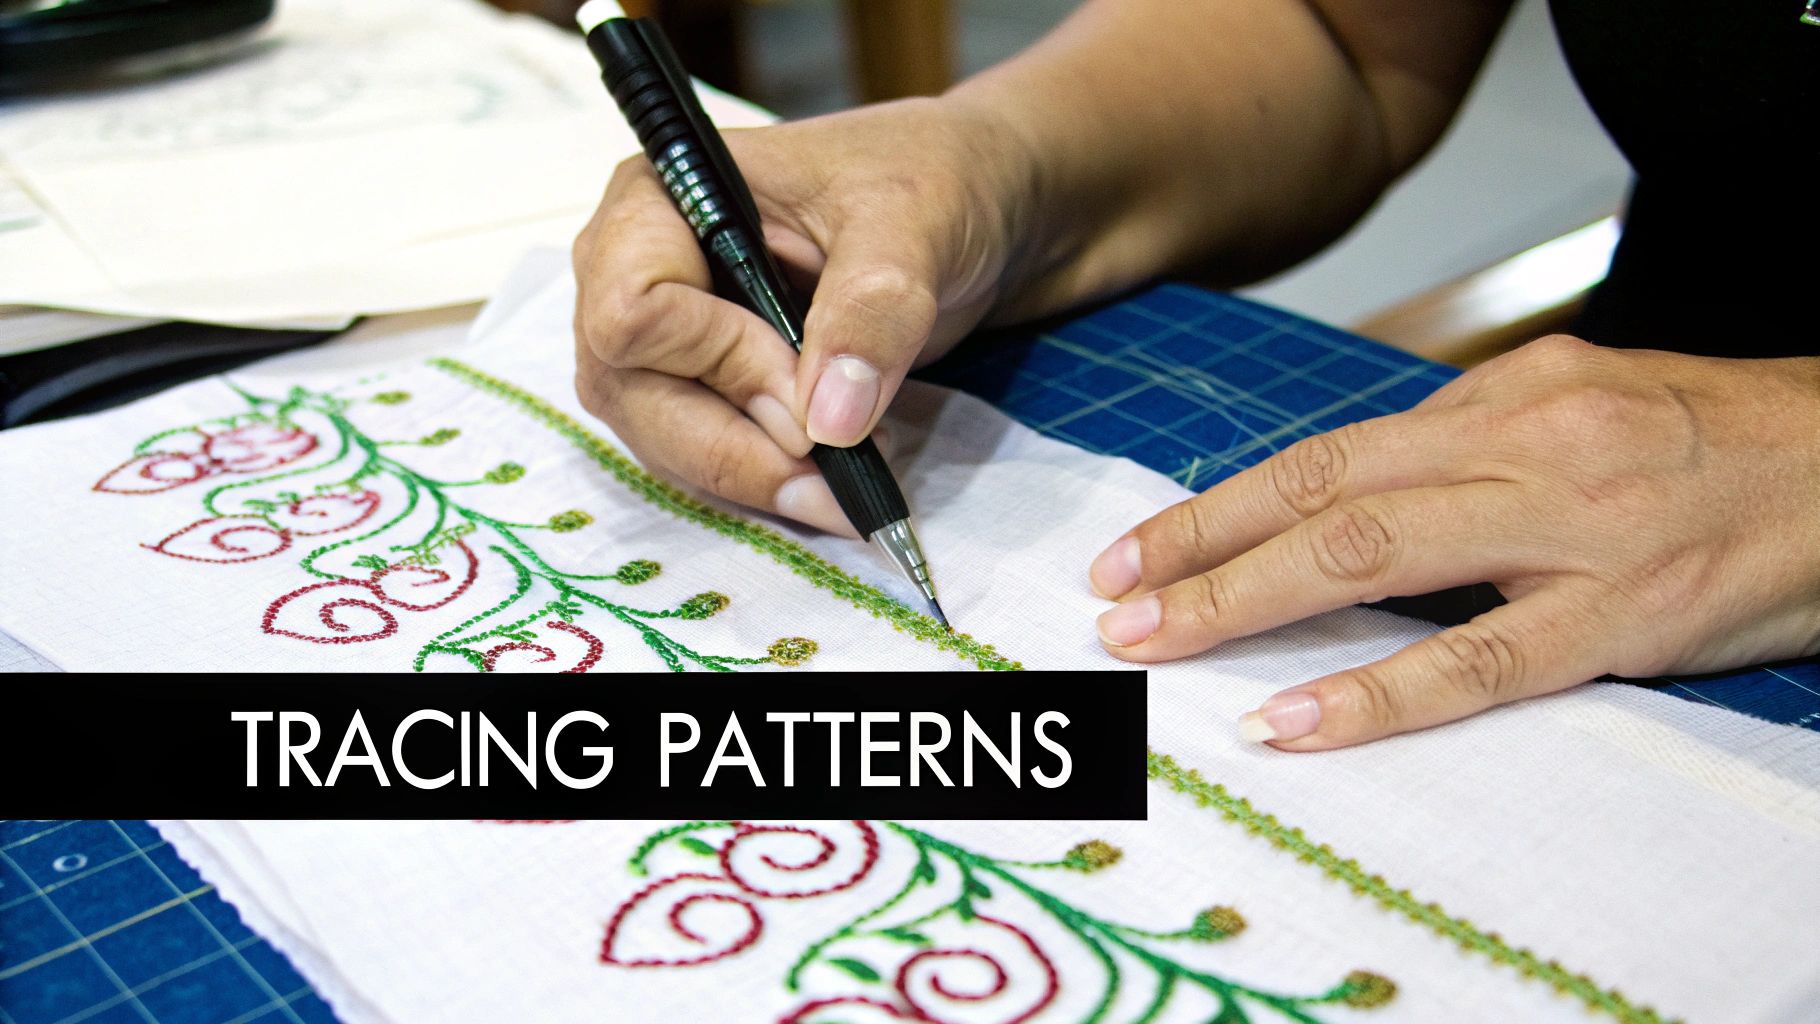
So, you have the perfect embroidery design picked out. Now comes the crucial step: getting that pattern from the paper onto your fabric. This is where your project really begins, and a clean, crisp transfer sets the stage for a beautiful finished piece. It’s like creating a perfect roadmap for your needle and thread.
The good news is you have options! The best method really just depends on what you're working with.
A few key things will guide your choice:
Let's break down the most common and reliable ways to get your pattern ready for stitching.
For any fabric that's light in color and not too thick, tracing is your best friend. It’s a classic for a reason. All you need is a good light source.
You can go low-tech and simply tape your pattern to a sunny window, then tape your fabric over it. The sunlight will illuminate the design, allowing you to trace it directly onto the material with a fabric pen or pencil. If you plan on doing a lot of embroidery, investing in a lightbox (or a simple light pad) is a game-changer. It gives you a perfectly illuminated, flat surface to work on anytime, day or night.
What happens when you can’t see through your fabric? This is where transfer aids come in. When light won't work, you need a method that adds the design to the surface of the material.
Dressmaker's carbon paper is a fantastic tool for this. You just sandwich it between your pattern and your fabric (colored side down!) and trace over the design with a stylus or a dull pencil. The pressure transfers a fine, chalky line onto your project. It's especially useful for felt, denim, and dark-colored canvas.
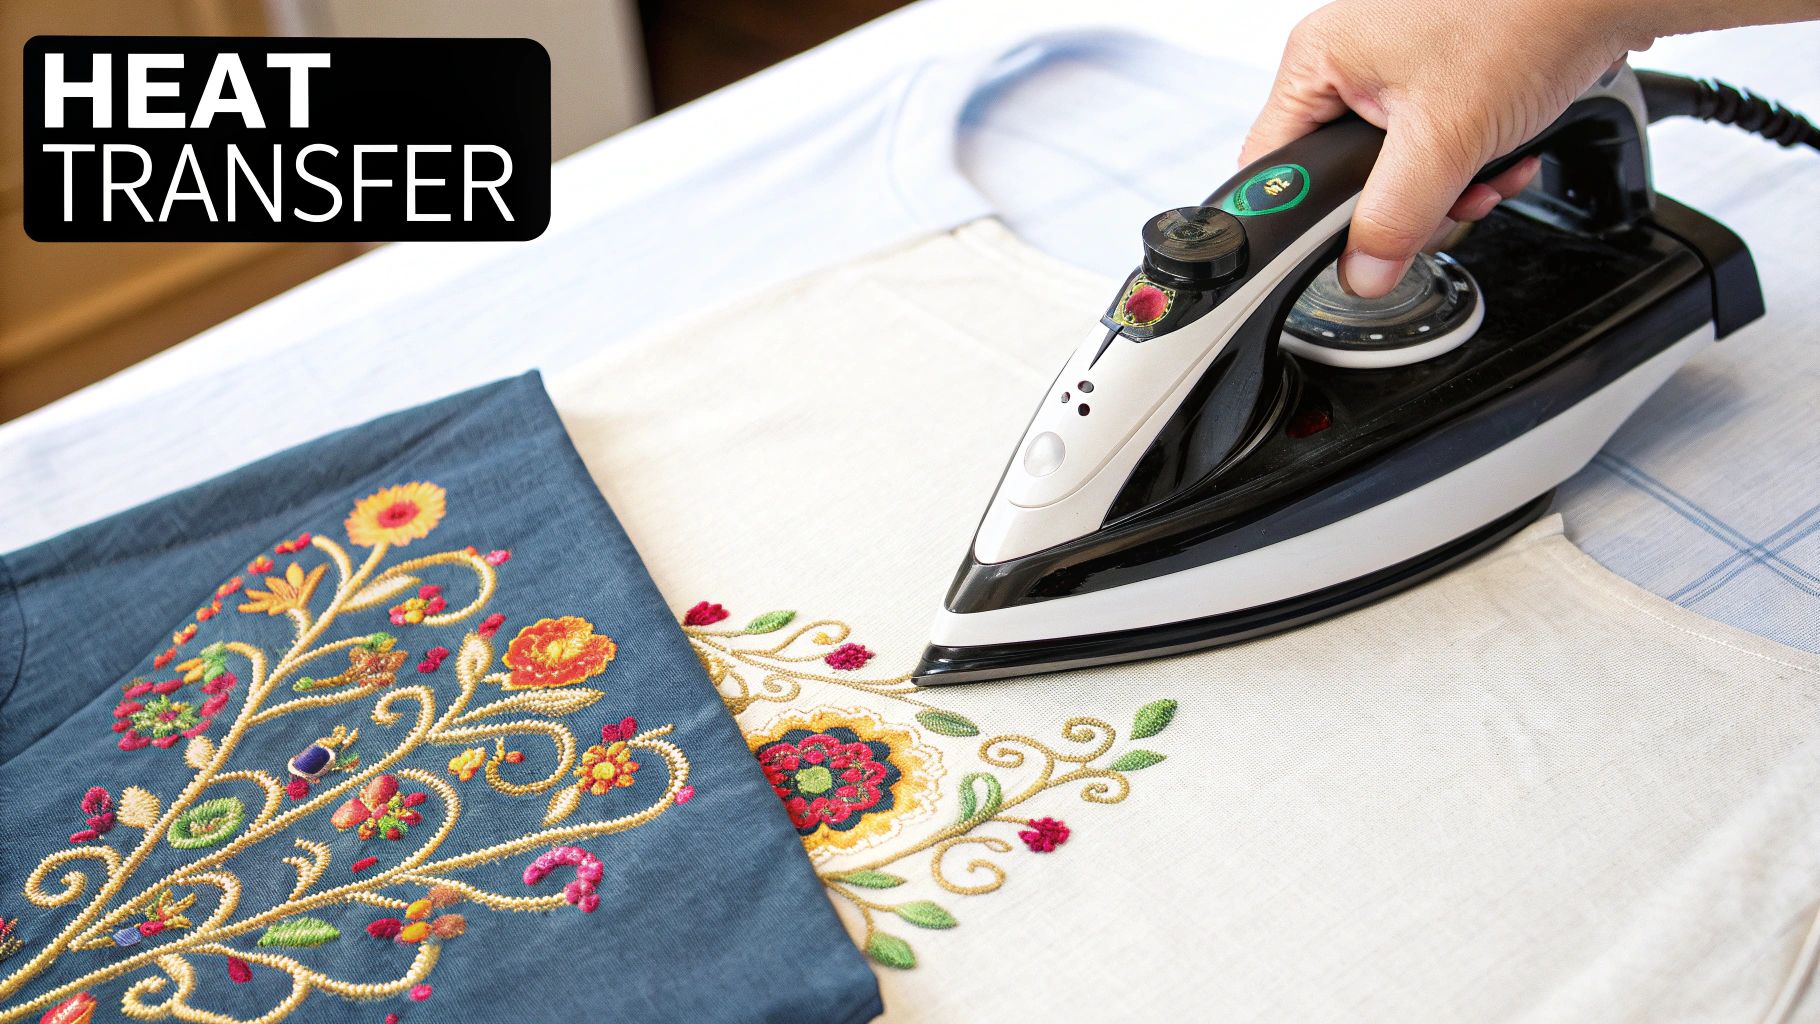
Another great option is using iron-on transfer pens or pencils. With these, you trace your design onto tracing paper, then place the paper face-down on your fabric and press it with a hot iron. The heat transfers the ink, leaving you with a clear guide. Just be aware that these marks are often permanent, so they need to be completely covered by your stitches.
Did you know the practice of transferring embroidery patterns is centuries old? The very first printed pattern book was published in Germany back in the early 1520s. Before that, stitchers in the 18th century would often draw designs freehand with chalk or ink directly onto the fabric.
For ultimate precision, especially on tricky fabrics like knits or dark materials where you can't see other marks, the water-soluble stabilizer is a modern marvel.
This stuff is pure magic. It comes in sheets that feel a bit like paper, and you can run them right through your printer. Simply print your design onto the stabilizer, peel off the backing, and stick it onto your fabric like a sticker. You then stitch directly through both the stabilizer and the fabric. When you’re finished, a quick rinse under warm water dissolves the stabilizer completely, leaving behind only your flawless stitches.
Before you commit to a method, take a look at this quick comparison to see what might work best for your current project.
| Method | Best For | Permanence | Ease of Use |
|---|---|---|---|
| Light Tracing | Light-colored, thin-to-medium weight fabrics like cotton or linen. | Temporary (with disappearing ink/pencils). | Beginner-friendly and fast. |
| Carbon Paper | Dark, thick, or non-transparent fabrics like denim, felt, or dark canvas. | Semi-permanent; can be brushed off but may leave a faint residue. | Moderate; requires firm, even pressure. |
| Iron-On Pen/Pencil | Most fabrics that can handle heat. Great for complex designs. | Permanent; marks must be fully covered by stitching. | Easy, but requires a steady hand for initial tracing. |
| Water-Soluble Stabilizer | Any fabric, especially dark, textured, or stretchy materials. | Dissolves completely, leaving no trace. | Easy, especially for printed patterns. |
Ultimately, mastering pattern transfer is all about knowing your options and matching the right technique to your fabric. Once you get a feel for these core methods, you'll be able to start any embroidery project with total confidence.
Building these foundational skills is key to growing as a crafter. For more tips on getting started, check out our guide offering free sewing lessons to help round out your stitching knowledge.
If you're working with a lighter-colored or slightly sheer fabric, like a nice cotton lawn or a classic linen, using light to transfer your embroidery pattern is one of the easiest and most accurate methods out there. It’s basically tracing, but for fabric.
This technique is my go-to for so many projects because it requires very few special supplies. The core idea is simple: shine a bright light through your paper pattern and then through your fabric, making the lines visible enough to trace directly onto the material. The two most popular ways to do this are with a lightbox or just a sunny window.
The absolute key to getting a clean transfer is starting with smooth, wrinkle-free fabric. Take a minute to press it first! Wrinkles and creases will absolutely distort your design, and you’ll end up with wonky lines. Once it's flat, tape your paper pattern to your light source, then carefully position your fabric over it. You want the fabric to be taut, but don't stretch it out of shape.
You don't need to get fancy. The most straightforward light source is simply a bright window on a sunny day. Just tape your pattern right onto the glass, layer your fabric on top, and you're ready to trace. It costs nothing and works surprisingly well, though you are at the mercy of daylight hours.
If you plan on doing a lot of embroidery or just want more flexibility, investing in a slim embroidery lightbox or a light pad is a game-changer. These give you a perfectly flat, stable surface with consistent, even lighting. This means you can stitch whenever you want, and I find it’s much more comfortable than standing hunched over a window.
My Favorite Hack: No lightbox? No problem. In a pinch, I've flipped a clear plastic storage bin upside down and stuck my phone's flashlight underneath. For smaller patterns, a tablet set to a blank white screen at full brightness also works wonders.
Here’s a look at a standard artist's lightbox. The even glow from edge to edge is what makes it so perfect for this kind of work.
That uniform light is what lets you see even the faintest pattern lines, which is critical for getting an accurate trace.
What you use to draw the lines is just as important as the light itself. It might be tempting to grab a regular graphite pencil, but I strongly advise against it. Graphite has a nasty habit of smudging and can leave a permanent gray stain on your fabric that won’t wash out, muddying the colors of your beautiful floss.
Instead, you’ll want a tool made specifically for fabric. I always have a few of these in my kit:
Light tracing is a dream for thin, light-colored fabrics, but what about when you’re facing down a piece of dark denim, thick wool felt, or even a lush velvet? When you can’t see through the material, you have to switch gears. The goal is no longer to trace through the fabric, but to apply the design directly onto its surface.
For this job, my go-to tool is embroidery transfer paper, which you might also see called dressmaker’s carbon paper. Forget the inky, messy stuff from old offices—this is a special paper coated with a chalky, waxy pigment that comes off cleanly when you apply pressure. It’s a classic for a reason.
Using it is all about creating a simple little sandwich. Start by laying your fabric on a hard, flat surface. Next, place the transfer paper on top, making sure the colorful, waxy side is facing down onto the fabric. Finally, put your paper pattern on the very top. Before you do anything else, tape or pin all the layers together so nothing can budge.
With everything secured, it’s time to trace. The real trick here is applying firm, consistent pressure. A stylus is perfect for this because its smooth, rounded metal tip glides over the paper without tearing it. If you don't have one, no worries—an empty ballpoint pen works just as well. Just try to avoid sharp pencils, as they can easily rip through your pattern.
Think of it like you’re drawing a single, confident line. You want it to be solid and easy to see.
I’ve learned this the hard way: if you press too lightly, you’ll get a faint, broken line that’s a nightmare to follow with your needle. But if you go too hard, you’ll end up with a thick, waxy line that can be tough to cover with your stitches. Always, always do a quick test on a scrap of your project fabric to find that sweet spot.
Transfer paper isn't a one-size-fits-all product; it comes in several colors, and picking the right one makes all the difference.
You want a line that you can see clearly while you stitch, but one that won’t peek out from under your beautiful finished work. This is the same kind of strategic thinking you'd use for more complex projects, like marking patterns on foam or fabric for costumes. In fact, our guide on making cosplay armor touches on similar challenges with unconventional materials.
If you're working with something incredibly delicate like velvet, where pressing down could crush the fabric's pile, you might want to try a more traditional technique: prick and pounce. This old-school method is brilliant. You start by pricking tiny, closely-spaced holes all along the lines of your paper pattern with a needle.
Then, you lay this perforated pattern over your fabric and gently tap—or "pounce"—a small fabric pouch filled with fine chalk powder over the holes. The chalk dust falls through the perforations, leaving a perfect dotted outline of your design on the fabric. It’s a wonderfully gentle approach.
It's fascinating to think that while this technique has been around for centuries, it wasn't always so easy. Historical records from the Lady's Magazine between 1770 and 1819 mention that the paper patterns of the era were often so fragile that pricking them would cause them to fall apart! This forced many stitchers to simply copy the designs freehand. It really makes you appreciate the durable tools we have today.
When your project demands really crisp lines and you can't afford any mistakes, it's time to bring out the modern tools. I find these are especially useful for tricky fabrics or designs that have a ton of detail. Two of my go-to solutions are iron-on transfer pens and water-soluble stabilizers.
These techniques go way beyond simple tracing. They give you a much more reliable guide for your stitches—clear, semi-permanent lines that won’t smudge or disappear halfway through. This is the secret to getting that polished, professional look on your finished piece.
Think of an iron-on transfer pen as a way to create your very own custom iron-on pattern. This method is a lifesaver for designs with lots of fine details or when you need to repeat the same motif multiple times, like adding a small flower to a set of cloth napkins.
The process itself is pretty simple:
It’s really important to use an iron that gives you consistent heat. A specialized tool like the Oliso M3Pro Mini Iron is fantastic for this because its small size gives you precise control without scorching the surrounding fabric. Just be aware that these ink marks are usually permanent, so your stitches will need to cover them completely.
For absolute, top-tier precision, nothing beats a water-soluble stabilizer. This is especially true when you're working on challenging fabrics. Think dark colors, highly textured materials, or anything stretchy like a t-shirt or a knit sweater. You'll often see it sold under brand names like Sulky Stick 'n Stitch.
This method is my personal favorite for complex projects. You can print your design directly from your computer onto the stabilizer sheet, which has an adhesive backing. It’s like turning your digital design into a perfect, temporary sticker for your fabric.
You just print your pattern, cut it out, peel away the backing paper, and press it firmly onto your fabric. The stabilizer creates a smooth, sturdy surface to stitch on, which stops the fabric from puckering or stretching while you work.
And the best part? Once you’ve finished stitching, you just soak the piece in warm water. The stabilizer dissolves like magic, leaving behind only your beautiful, flawless embroidery.
If you want to create your own unique patterns for this method, digital tools are a huge help. You can even learn to master block print illustrations using Procreate to design your own patterns to print directly onto a stabilizer. It’s a wonderful way to blend digital art with handmade craft, opening up a whole new world of creative possibilities.
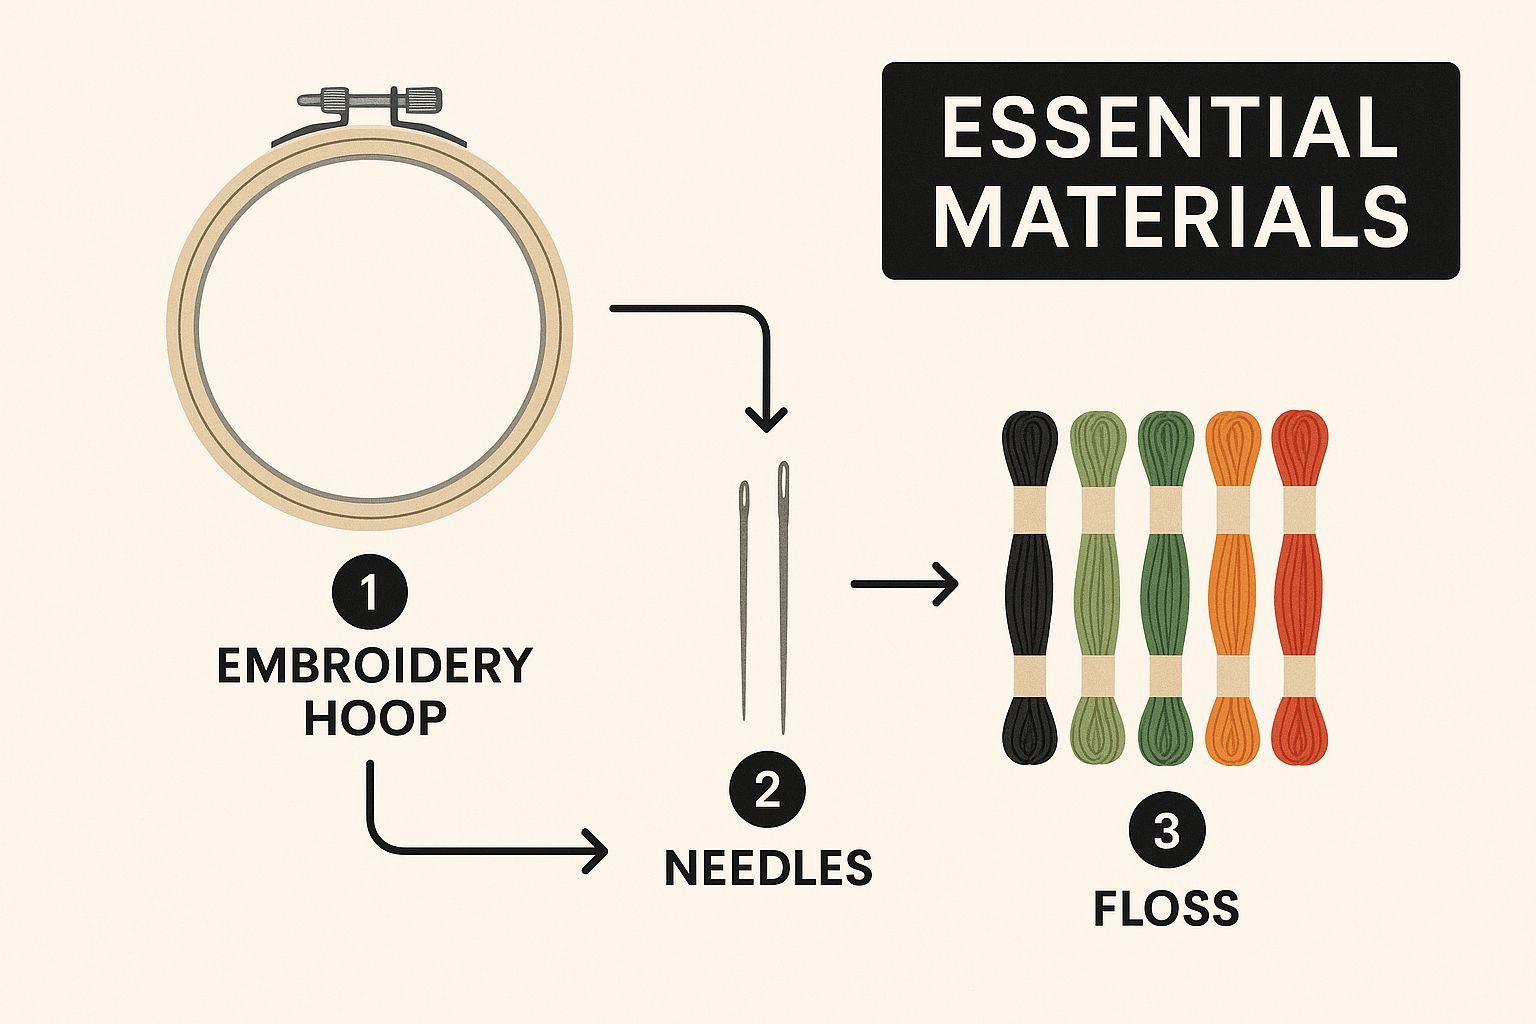
Getting your pattern onto the fabric shouldn't be a chore. In fact, with the right tools, it can be a really satisfying part of the process. Building a versatile kit means you’ll be ready for anything, whether you’re tackling a delicate design on silk or a bold graphic on a sturdy piece of denim. Think of these tools as the foundation for clean, accurate stitches.
The most important players here are your marking tools. These aren't just any old pens or pencils; they're made specifically to leave temporary guides on your fabric. Getting to know the differences is the secret to avoiding stubborn smudges or, worse, permanent marks on your beautiful finished piece.
The world of fabric markers is surprisingly deep, with each type serving a unique purpose. You’ll mainly come across three kinds: water-erasable, air-erasable, and heat-erasable.
When you're working on dark fabrics where ink just won't show up, a good white mechanical chalk pencil is a lifesaver. It creates a crisp, visible line that simply brushes or washes away when you're done.
Having the right tools is one thing, but keeping them organized can make your crafting time so much more enjoyable. For some great ideas on this, check out a comprehensive guide to organizing craft supplies.
While pens and pencils handle the drawing, a few other items can make the whole transfer process go much more smoothly. These tools are all about helping you see your pattern clearly and apply it with precision.
For light-colored fabrics, a simple lightbox—or even just a bright tablet screen in a pinch—makes tracing a breeze. But what about dark or thick materials? That’s where the classic duo of dressmaker's carbon paper and a stylus comes in. The stylus gives you just the right amount of pressure to transfer the carbon lines without accidentally ripping your paper pattern.
To help you decide which tool is best for your next project, here’s a quick comparison of the most common options.
| Marking Tool | Removal Method | Best For | Pro Tip |
|---|---|---|---|
| Water-Erasable Pen | Dab with a damp cloth or spritz with water. | Light to medium-colored cotton, linen, and blends. | Test on a scrap first! Some inks can be stubborn on certain fabric finishes. |
| Air-Erasable Pen | Evaporates naturally within 24-48 hours. | Quick projects on any fabric that won't be washed immediately. | Keep the cap on tight! They dry out much faster than other pens. |
| Heat-Erasable Pen | Apply heat from an iron (no steam). | Fabrics that can be safely ironed. Great for quilting and appliqué. | The ink can reappear in freezing temperatures, so avoid for items going in the cold. |
| Chalk Pencil/Wheel | Brushes off or washes out with water. | Dark fabrics, felt, and materials with texture. | Sharpen the pencil for fine lines or use the wheel for long, straight guides. |
| Carbon Paper | Marks are semi-permanent but fade with washing. | Dark or thick fabrics where tracing is difficult. | Choose a carbon color that is just visible enough to see but won't show through stitches. |
Ultimately, the best tool is the one that works for your specific fabric and project. Don't be afraid to keep a few different types on hand so you're always prepared.
https://www.youtube.com/embed/4Sw-_9B0qqI
Even with a solid plan, you're bound to run into some tricky situations. When you're figuring out how to transfer embroidery patterns, a few common challenges pop up again and again. Let's tackle those frequent sticking points so you can get back to stitching with confidence.
If you're brand new to this, your best bet is to keep it simple. Tracing with a water-soluble fabric pen is the most straightforward and forgiving approach out there. All you need is a bright window or a basic lightbox.
It’s incredibly intuitive, requires very little specialized gear, and the best part? Any mistakes you make can be wiped away with a little bit of water.
For those starting with dark fabrics where tracing is off the table, the easiest choice is a stick-and-stitch water-soluble stabilizer. You just print or draw your design onto the adhesive sheet, stick it right on your fabric, stitch through it, and then rinse the stabilizer away when you're done.
When you're just starting, pick the method with the easiest cleanup. Using a water-soluble pen or stabilizer takes away the fear of making permanent marks, so you can focus on your stitching instead of stressing about every line.
I get it—stretchy fabrics like t-shirt jersey can be a real headache. They love to warp and distort your design while you're trying to work. The hands-down best solution here is a water-soluble stabilizer, which you'll often see called "stick-and-stitch." Think of it as a temporary, non-stretchy second skin for your fabric.
The stabilizer sticks firmly to the material, which stops it from stretching or puckering as you stitch. You hoop both layers together, keeping your pattern perfectly stable and accurate from start to finish. Once you’re done stitching, the stabilizer dissolves completely in water, leaving just your beautiful work behind.
For more helpful guides on a range of sewing topics, be sure to explore the other tips and tricks on our blog.
You can, but I really wouldn't recommend it. Graphite has a nasty habit of working its way deep into fabric fibers, and it often leaves a permanent gray shadow around your stitches. This can easily dull the vibrant colors of your floss and leave your finished piece looking smudged.
You’re much better off using a tool actually designed for fabric, like a water-soluble pencil or a special mechanical pencil with ceramic lead. If you find yourself in a real pinch and a regular pencil is all you have, go for one with a very hard lead (like a 4H) and use the lightest pressure possible. You want to make a line so faint that your thread will completely cover it.
At Famcut, we're passionate about providing the tools and knowledge you need to bring your creative visions to life. Explore our full range of high-quality sewing and cosplay supplies at https://famcut.com.
At High Country Quilts we care deeply about community. With our experiences in retail, we know that a store is not only a place to shop but also a place for the community to gather and share. During this busy...

Hi! We’re Adam and Renee Wheaton, the new owners of High Country Quilts! For more than 40 years, we’ve owned and operated vacuum and sewing businesses. Following in Renee’s father’s footsteps after he retired from All Discount Vacuum and Sewing in Colorado...


Leave a comment