

Free Fabric All Year: Our 2027 Fabric Punch Card
November 2–25 only: buy a $200 gift card in either store and get a free yard of fabric every month of 2027.

Your fabric is folded on the table, the machine is threaded, and the pattern you bought is still sealed in its plastic sleeve. Somewhere between squaring the first cut and folding the binding to the back, most beginners stall, and it's rarely because they can't sew a straight line. It's because nobody told them which two measurements decide whether the quilt lies flat, or what to buy first so the project doesn't cost a fortune before the first seam.
Learning how to sew quilts is mostly a sequencing problem. Set the machine's seam allowance before the rotary cutter comes out, cut on grain, and sew one test block before committing the whole quilt. Every step below follows that order, because fixing a seam on a test block takes five minutes and fixing it across twelve rows takes a weekend.
Here's the walkthrough, start to finish, for a lap quilt you can finish.
Every quilt is three layers joined by stitching. The top is the surface you design. The middle is batting, which adds warmth and loft. The bottom is the backing, usually one continuous piece of fabric or a few wide ones seamed together.
The Smithsonian's National Museum of American History describes quilting as joining two or more fabric layers by sewing through them, and its quilt records show makers working in separate stages: piecing or appliquéing the top, adding batting and backing, then quilting through all three. That order hasn't changed, and it separates two skills beginners tend to blur. Piecing builds the patterned surface. Quilting holds the layers together and adds texture.
So four stages: piece the top, layer and baste, quilt, bind. A lap quilt spreads comfortably across a few weekend sessions. The average quilter spent 6 hours per week on quilts in 2025, according to Quilter's Survey results reported by Craft Industry Alliance and summarized by Quilt Gear HQ, which is a realistic pace if you're fitting this around a job.
| Item | Quantity or Size | Purpose |
|---|---|---|
| Quilting cotton for the top | 2 to 3 yards across 4 to 6 prints | Creates the pieced surface |
| Backing fabric | About 3 yards of 60-inch-wide cotton | Forms the bottom layer |
| Batting | Cut 4 inches larger than the top on each side | Adds warmth and loft in the middle |
| All-purpose cotton thread | One spool matching the top | Sews every seam and quilting line |
| Rotary cutter | 45 mm blade | Cuts strips and squares accurately |
| Self-healing cutting mat | At least 18 by 24 inches | Protects the table and supports cutting |
| Acrylic ruler | 6 by 24 inches | Guides straight cuts across strips |
| Universal sewing needle | Size 80/12 for cotton | Sews cotton cleanly with consistent stitches |
Buy in stages. Fabric, cutter, ruler and mat come first, because nothing else works until you can cut a straight 2.5-inch strip. Batting, binding fabric and a second spool get added when the top is done and you know its real dimensions.
Practical rule: If a tool won't touch fabric in your first two sessions, it can wait.
New quilters are a growing share of the market. 18% of respondents in the 2025 Quilter's Trends Survey identified as new to quilting, up from 11% a year earlier, and rising costs are pushing many of them to sew from fabric already in the house. Rummage the stash before you shop. Fat quarters, leftover jelly roll strips and yardage from an abandoned project all work if they're 100% cotton and similar in weight.
Match fabric in daylight, not on a screen: bolts of 42 to 44 inch quilting cotton look completely different online, so lay your candidates side by side at High Country Quilts and let staff tell you when two prints fight.
Now check your stash, write the kit list, and pick one pattern. Just one.
Two patterns carry most first quilts, and both start from 2.5-inch cuts. Neither demands more than a straight stitch and a seam allowance you've already tested.
Set the machine up before the fabric comes out of the bag. This is the stitch the rest of the guide assumes.
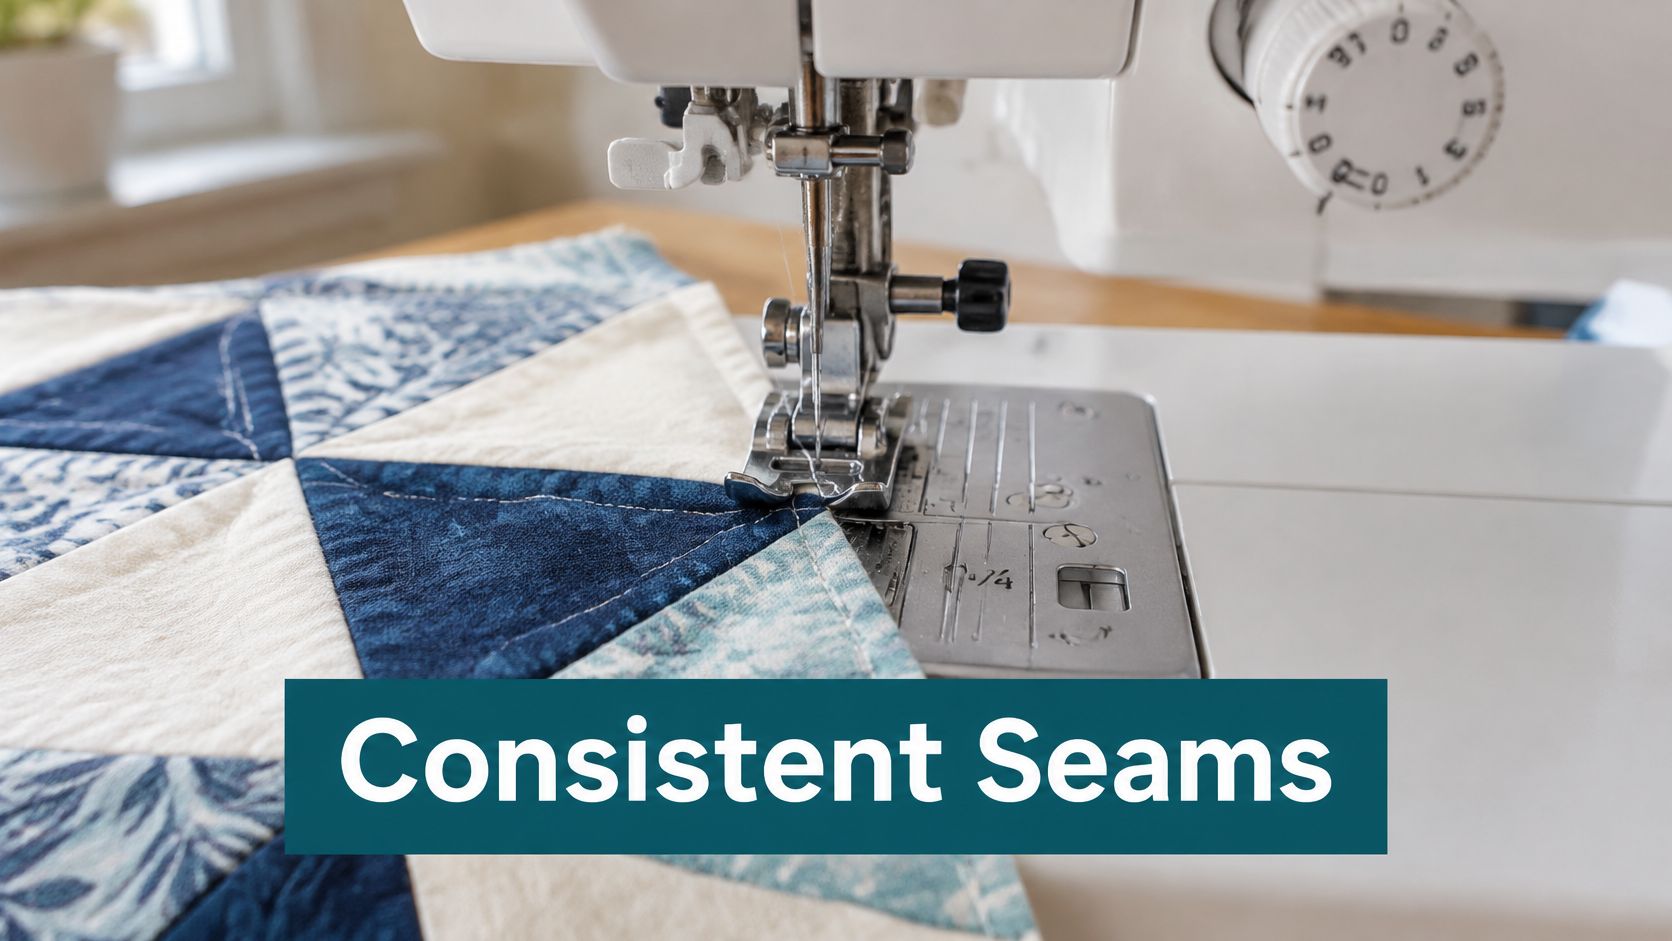
Cut 2.5-inch squares in two contrasting prints and sew them into pairs, then join pairs into four-patch blocks. Each block finishes at 4 inches square, which makes the math easy to hold in your head. A 6 by 8 grid produces a 24 by 32 inch crib quilt; a lap quilt near 48 by 60 inches needs a 12 by 15 grid, or 180 blocks.
Fabric for the smaller grid: 192 squares, which is about 12 strips cut across the width of the fabric, a little under a yard total spread across two prints. This is the pattern to choose when accuracy is the goal, because a bad seam shows up in the block itself rather than hiding in a busy row.
Sew 2.5-inch strips lengthwise in sets of three or four, press the set, then crosscut it into segments and join segments into rows. Fewer individual cuts, far more fabric variety per yard, and a precut strip pack or a pile of fat quarters drops straight in with almost no waste.
Strip piecing rewards planning over precision. You still need a quarter-inch seam, but a segment that finishes an eighth of an inch narrow gets absorbed into the row.
Count before you cut: strip packs, jelly rolls and fat quarter bundles are stocked at High Country Quilts, and one precut pack usually covers a crib-size strip quilt with strips to spare.
Pick your pattern, count your fabric, and cut a single test block before the full quilt.
Before you cut a single strip, set the seam allowance on the machine. A quarter-inch that drifts to three eighths changes every block in the top by the same fraction, and no amount of careful pressing rescues a row sewn at two different widths. Seam accuracy works like a ruler hidden inside the quilt. If that ruler is wrong, every measurement after it inherits the mistake.
The setup photo shows the target: a straight stitch, a quarter-inch reference point, and a needle sized for cotton.
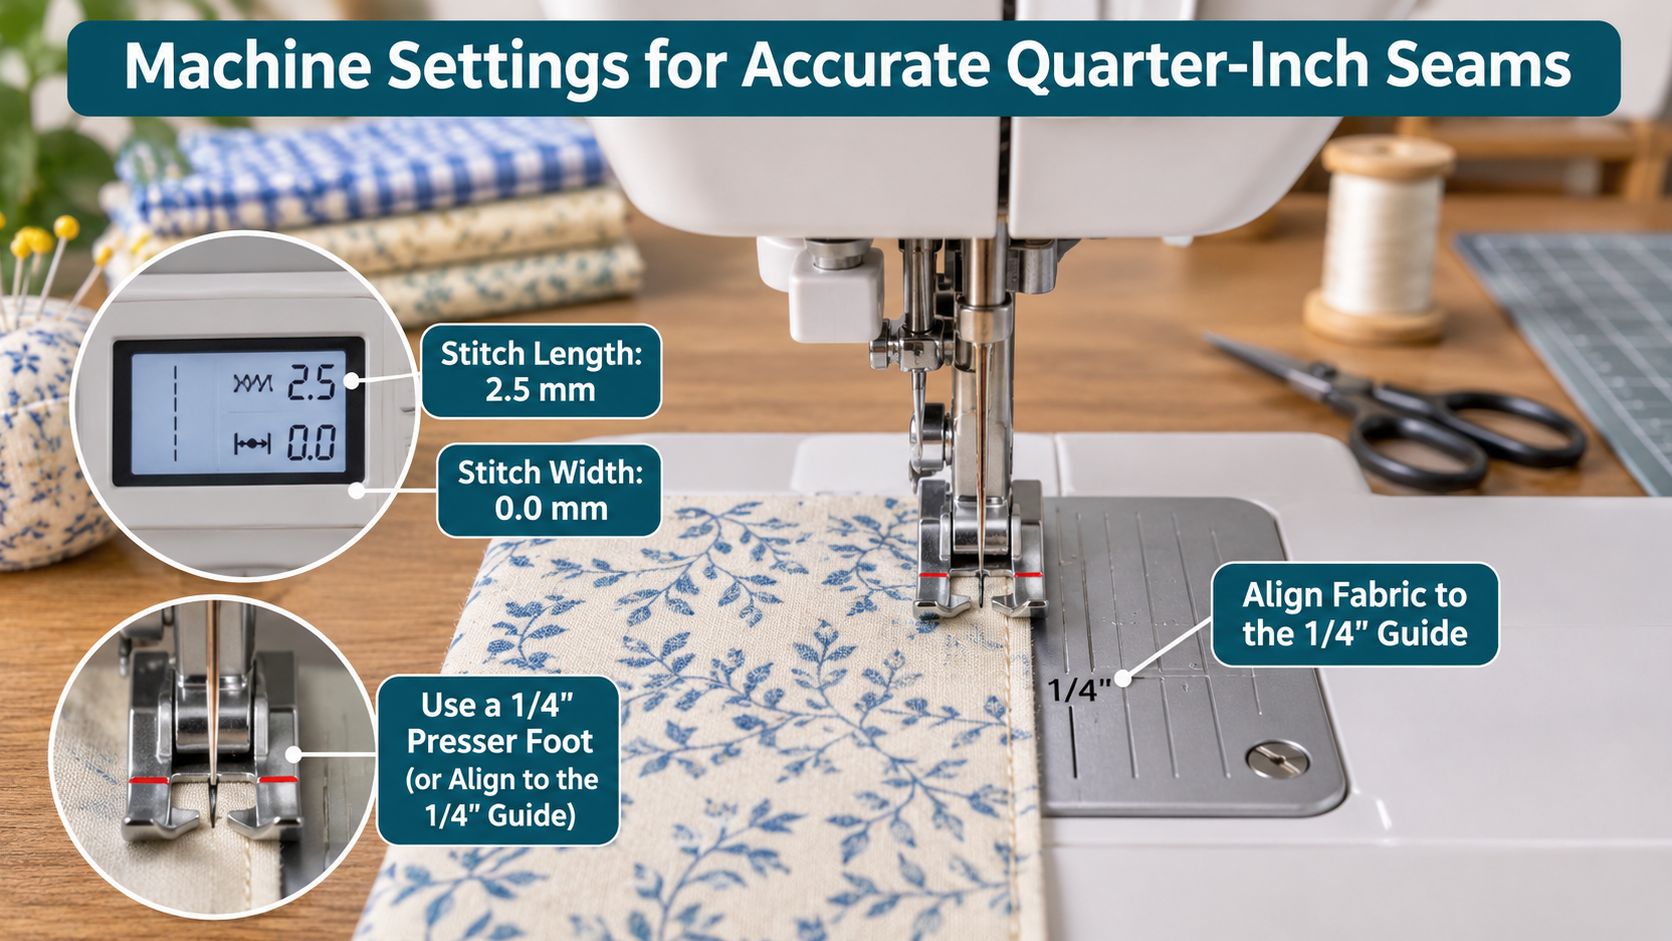
| Setting | Recommended Starting Point | Why It Matters |
|---|---|---|
| Stitch length | 2.0 to 2.5 mm, about 12 stitches per inch | Keeps seams secure without puckering |
| Seam allowance | Quarter-inch foot or a tape guide on the bed | Block sizes stay consistent across rows |
| Needle | Size 80/12 universal for quilting cotton | Avoids skipped stitches on cotton |
| Thread tension | Balanced, with top and bobbin threads meeting in the middle | Prevents loops and thread showing on the back |
| Presser foot pressure | Standard setting, lightened only for thick layers | Stops the fabric from stretching as it feeds |
| Presser foot for quilting | Walking foot for straight lines | Feeds all three layers evenly |
Treat this table as a starting point, then test it on scraps from the same fabrics you plan to piece. Cotton behaves differently from a loose weave, and a walking foot changes how layers feed when you quilt rather than piece. Keep one notebook entry for the machine setup that produced accurate blocks, so the next quilt begins with a known reference instead of guesswork.
Sew two scrap strips right sides together with a straight stitch, press the seam, and measure the finished unit. If it is off, move the guide, fit a quarter-inch foot, or lay a strip of masking tape on the machine bed at the quarter-inch mark. That small strip is a calibration tool. It tells you whether the machine is sewing the seam you think it is sewing.
The Iowa State University Extension quilting guide recommends using a marked machine guide or tape and gives 2.0 to 2.5 mm as a starting stitch length, about 12 stitches per inch. Sew a short sample with those settings, then measure before committing the whole quilt top.
Adjoining seams nest when you alternate directions, and nesting is what keeps a four-patch meeting point flat instead of lumpy. Pressing is part of the measurement system. A seam that is sewn accurately but shoved sideways with the iron can still make a block finish the wrong size.
Three failures account for most ruined rows. Changing the seam allowance mid-quilt shifts every block after that point. Pressing back and forth stretches the grain and bows the strip. Skipping the press between additions compounds distortion across an entire row, and once that row is joined, the error is built in.
Sew one row, press it, measure it, then sew the next. One row costs three minutes to check and an evening to unpick.
Fit the right foot once: quarter-inch feet, walking feet, and fresh 80/12 needles are on the shelf at High Country Quilts. Choose the tool that matches the job, then confirm the seam with a test strip before the fabric for the quilt goes under the needle.
Cutting decides more than sewing does. Press each fabric before it goes near the mat, align the selvages, and keep the outside edges of every block parallel or perpendicular to the grain.
The reason is thread count. A 45-degree diagonal cut crosses far fewer stabilizing threads than a straight one, so a bias edge stretches under the needle. That's where wavy borders, rippled bindings and joins that don't match come from. The University of Tennessee Extension quilt camp guide flags bias edges as especially vulnerable to stretching and recommends grain-aware cutting throughout, and it notes that prewashing reduces uneven shrinkage and dye bleeding if you plan to wash the finished quilt.
The whole path from cut to bound quilt looks like this. Keep it in view before you cut.
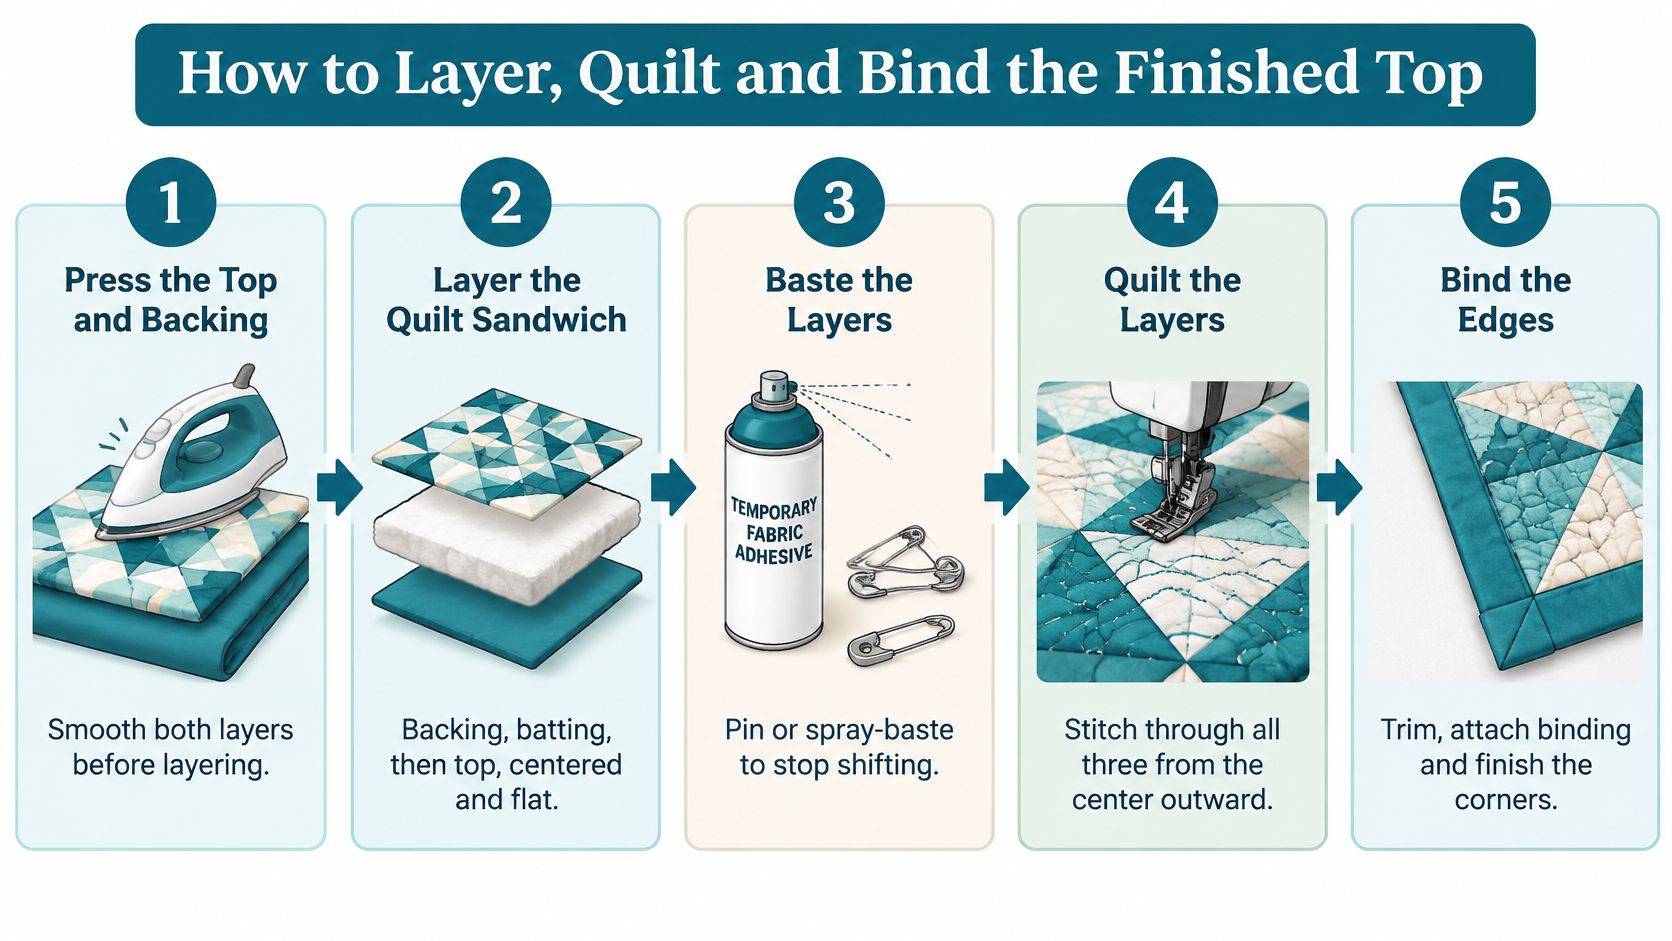
That test block is the cheapest insurance in quilting. It costs four squares and catches a drifted seam guide, a dull blade and a wrong ruler line before they spread across 180 blocks.
Three slips account for most cutting waste: cutting without checking the ruler against the square edge, using a dull rotary blade that drags and skips threads, and stretching strips while feeding them. Change the blade the moment it needs two passes.
Cut on a surface that doesn't rock: 6 by 24 inch acrylic rulers from Creative Grids, Tula Pink and AccuQuilt, plus 45 mm blades and self-healing mats, are stocked at High Country Quilts.
Finish one test block before you cut any more fabric.
A finished top becomes a quilt only when the layers behave as one. Think of the backing, batting and top as a sandwich: each layer must lie flat before the first stitch, or the finished piece will hold that wrinkle forever.
The common slip at each step is rushing the smoothing. A wrinkle basted in at step three becomes a tuck quilted permanently into the middle of the quilt, and there is no fix short of unpicking. Work slowly at the table, and the machine work goes faster because the layers do not fight you.
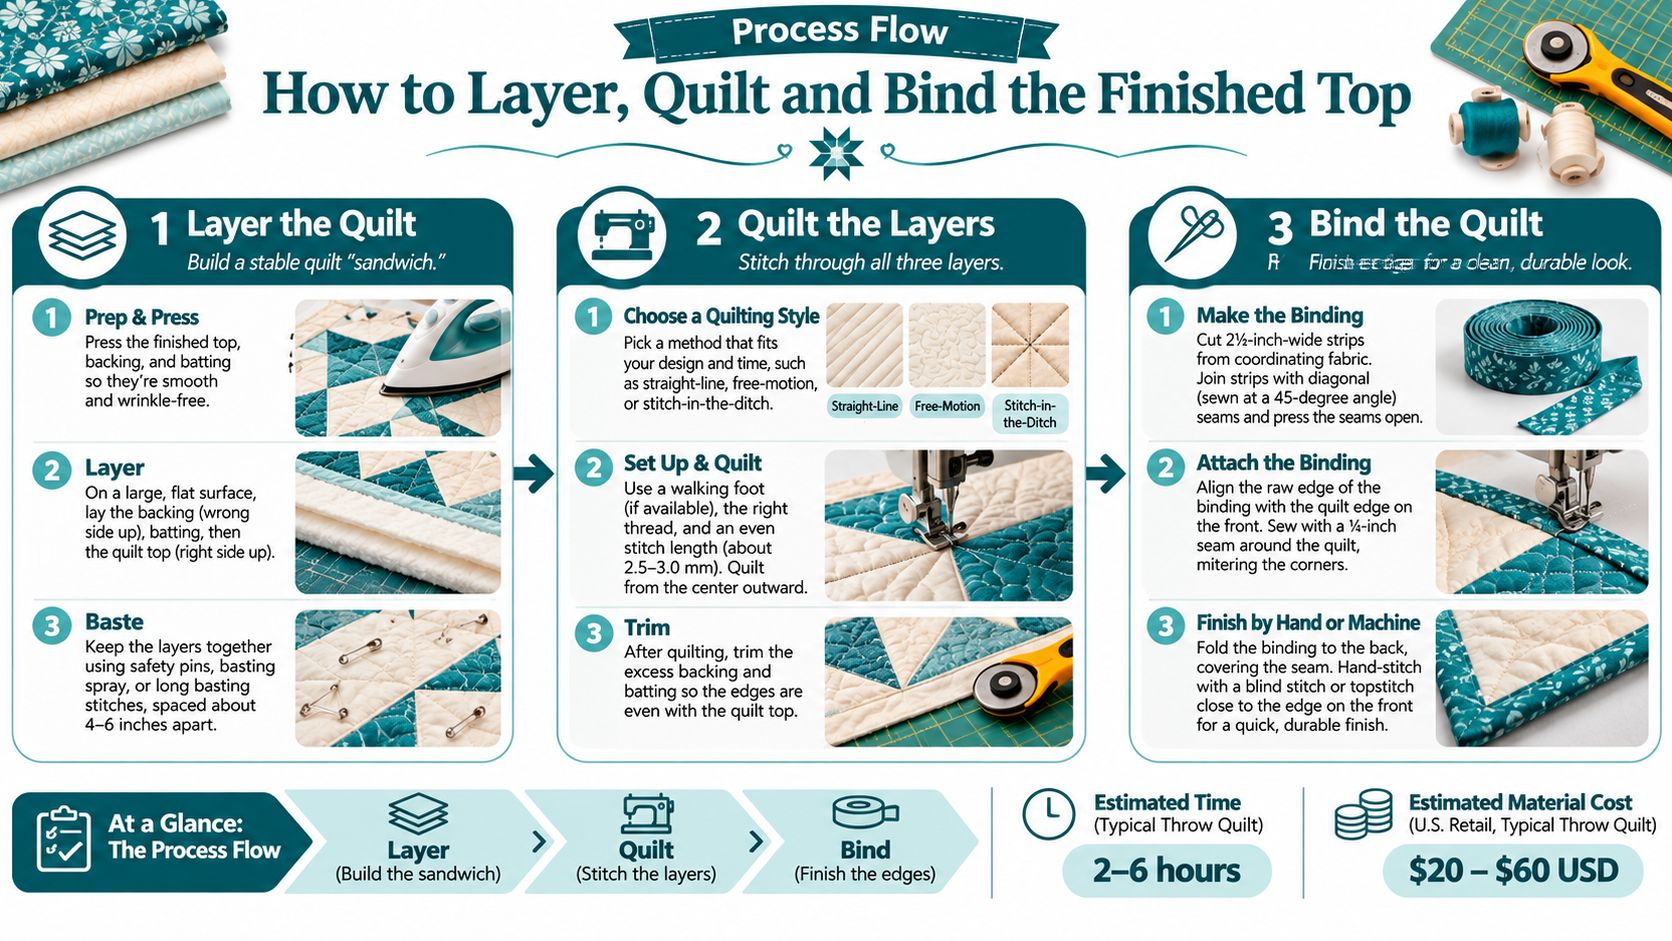
Match the batting to how the quilt will be used, not to what is on sale. A cotton or cotton-blend batting suits a lap quilt that will be washed often; a higher loft looks cosier and is harder to quilt on a domestic machine.
Before you plan the quilting grid, read the package for the maximum distance allowed between quilting lines. Quilt further apart than that and the batting will shift and pill inside the finished quilt. Pick loft before you cut it: compare the loft and fiber content printed on each batting package before you buy, and match it to how the quilt will be used.
Trend reporting on the quilting market points to sustainability and upcycled textiles as growing interests, alongside scrappy quilts, in Accio's quilting industry trends summary. If you have pieced from old clothing or mixed fibers, write the fiber content and washing instructions on a label and stitch it to the back corner. That tag helps keep the quilt from being washed at the wrong temperature later.
Lay the trimmed quilt on a flat floor and look along each edge. If it bows, the distortion came from bias at the cutting stage or from quilting that pulled. Fix the flatness before the binding goes on, because binding locks in whatever shape you have.
Binding is the frame, so treat it as a finishing tool rather than a cover-up. If the edges are straight, the binding will sit smoothly. If an edge waves, the stitch line will follow the wave, and the quilt will look wavy even when the center is sound. Check both the top and the back before stitching the binding down.
At High Country Quilts, customers can finish a project with help from experts through on-site quilting services, where Valerie is the in-house quilting artisan. That kind of support is useful when a first quilt has a layer issue you cannot smooth out alone, because an extra pair of hands can keep the layers straight while you guide the quilt through the machine.
A first quilt usually gives warning signs before it gives bad measurements. A border waves, a seam puckers, or the layer sandwich starts creeping under the needle. Treat each symptom like a label on a toolbox drawer. The label tells you which tool to reach for first, and the fix stays small when you catch it early.
| Symptom | Likely Cause | Fix |
|---|---|---|
| Wavy or bowed borders | Cutting or pressing on the bias | Recut on the grain and press without dragging the iron |
| Blocks finish smaller than the pattern | Seam allowance wider or narrower than 1/4 inch | Recheck the guide with a test strip and resew the seams |
| Puckered seams on the front | Tension too tight or pressing back and forth | Balance the tension and press each seam in one direction |
| Thread bird nest under the fabric | Top threading missed or bobbin inserted wrong | Rethread with the presser foot up, seat the thread in the tension discs, and clean out lint |
| Skipped stitches | Dull, bent, or wrong needle | Fit a fresh size 80/12 universal needle and match it to the fabric weight |
| Layers shifting during quilting | Basting too sparse | Baste every 4 to 6 inches and quilt from the center outward |
Two of these you can settle at the table in five minutes: rethreading and a fresh needle. Skipped stitches point to a needle that is dull, bent, too fine, or wrong for the fabric. Bird nests point to missed top threading, a wrongly inserted bobbin, or thread that missed the tension discs because the foot was down while you threaded it. That difference matters. A new needle will not solve a nest if the top thread never entered the tension path.
The quiet mistake is the allowance. A wrong seam can disappear under quilting or a binding. A wrong seam allowance in the top changes every block that follows.
Catch allowance errors at the test block stage, while four squares are still a cheap loss. Set the seam before you cut the whole fat quarter. Sew a scrap strip, measure the finished width, then adjust the guide or needle position until the strip matches the pattern. That little strip works like a thermostat. You are not guessing the heat, you are checking the setting before the whole quilt goes in.
Fabric grain deserves the same attention. A square cut slightly off grain behaves like a door wedge, each piece pushes the row in a new direction. Press without dragging the iron, because a sideways shove stretches the edge you just sewed. If a border bows even after pressing, recut it on grain instead of trying to ease the wave away.
If a fault persists after you have rethreaded with the foot up, seated the thread in the tension discs, cleaned the bobbin area, and fitted a new needle, stop adjusting tension dials at random. Tension and timing problems need a technician, and a machine that is out of time will keep producing nests no matter what the dial says.
High Country Quilts offers full service on Bernina sewing machines and sergers through a local authorized Bernina repair service, and machines can be dropped off during regular shop hours.
Mistakes belong to the process. The quilters who improve fastest are the ones who test, measure, and fix at the smallest possible scale.
A guide can set the seam allowance and the pressing order. A person standing next to your machine can see the problem in ten seconds, and that's the difference a class makes.
High Country Quilts runs classes year-round covering sewing, quilting, machine maintenance and machine software, so there's a steady place to learn rather than a one-off session you have to remember six months later. When a customer buys a machine from the shop, the ongoing classes and guidance continue so the machine gets used with confidence rather than sitting under a cover. If you want a class that isn't on the calendar, let the shop know. A class gets scheduled when at least three people are interested, or when at least two friends want to take one together.
Before you walk in, finish four things:
Check the schedule and get in touch: the class calendar and contact details are on the High Country Quilts website, and staff can tell you which upcoming session fits a true beginner.
Your first quilt doesn't need a longarm, a full supply list, or perfect points. It needs a seam allowance you've measured, fabric cut on grain, and one test block before you start cutting. High Country Quilts is a full-service sewing and quilting center in Colorado Springs with quilting cotton from names like Moda, Robert Kaufman and Riley Blake, precuts, rulers, batting, and year-round classes in sewing, quilting, machine maintenance and machine software, plus expert help from Valerie and the team if you'd rather have your project finished on site. Bring your test block and your questions to High Country Quilts, and we'll help you pick the fabrics and the class that gets your first quilt bound and on a bed.
November 2–25 only: buy a $200 gift card in either store and get a free yard of fabric every month of 2027.

Serger and BERNINA Mastery classes, longarm training, bag-of-the-month, Kids Sewing Club and a Highlands Ranch retreat. Here's what's on the calendar in November.

Free gifts, included packages and special pricing on the BERNINA 790 ULTRA, 990, Liberty Editions, L 890 serger and Q Series longarms, now through December 31.


Leave a comment