

Free Fabric All Year: Our 2027 Fabric Punch Card
November 2–25 only: buy a $200 gift card in either store and get a free yard of fabric every month of 2027.

You're standing at the quilt shop counter with a tightly rolled bundle of fabric in your hand. The label says jelly roll, the colors look lovely together, and you're wondering whether it's enough for a quilt or just an appealing collection of scraps.
Precut fabric strips can make getting started easier, but the label doesn't tell you everything about what you can sew. The useful question isn't how much fabric is in the bundle. It's whether you can cut every piece your pattern needs after removing selvages, straightening ends, and allowing for seams.
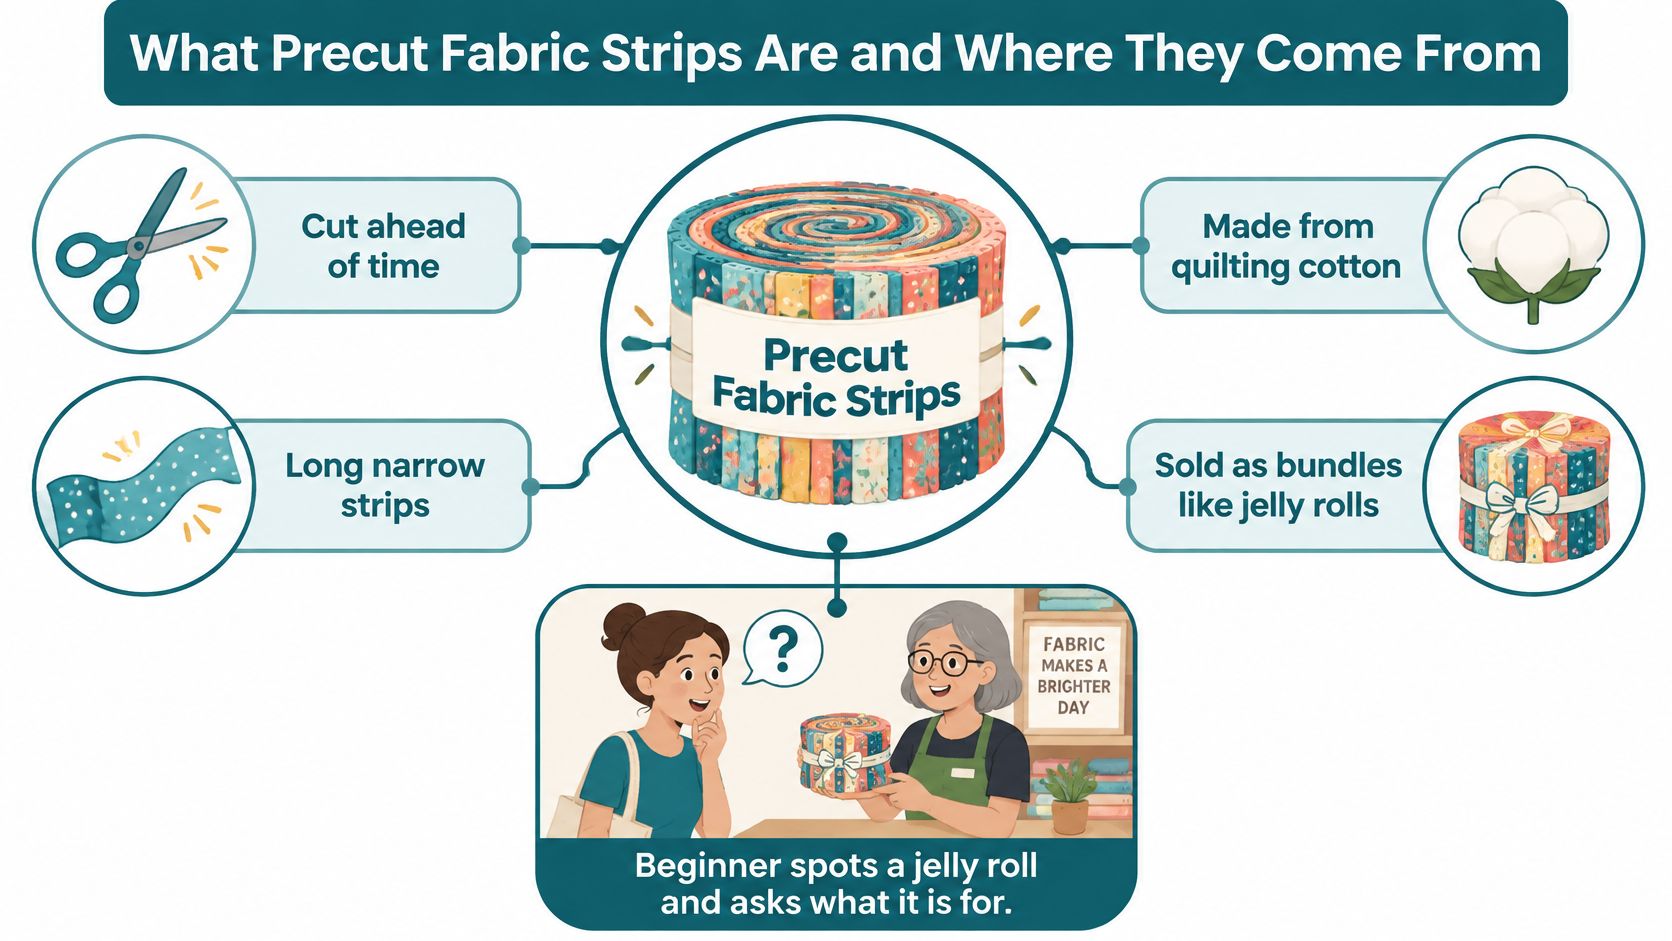
Precut fabric strips are long, uniform pieces of quilting cotton cut ahead of time and packaged together. Instead of choosing fabric from several bolts, measuring repeated widths, and cutting each strip yourself, you start with the strips prepared.
Think of a bundle as a pre-portioned meal kit. Someone has selected coordinating ingredients and measured the portions, but you still choose how to assemble them. A fabric bundle simplifies preparation without replacing the pattern or the sewing skills.
According to Fat Quarter Shop's jelly roll guide and collection, a standard jelly roll generally contains 40 strips measuring 2.5 inches wide by approximately 42 inches long, totaling roughly 2.75 yards of fabric. Browse the collection to compare how coordinated strip bundles are presented before choosing a pattern.
The strip's width is its narrow measurement, running from one long cut edge to the other. Its length follows the fabric across the bolt, usually including a selvage at each end. Selvages are the tightly woven factory edges, sometimes printed with a manufacturer's name or color dots.
A roll may look compact, but unrolling it reveals long ribbons of different prints. The coordinated fabrics help you build a consistent palette without selecting every fabric separately.
The infographic shows how those prepared strips become a ready-to-use bundle.
Days of Observance's history of National Sew a Jelly Roll Day credits Moda Fabrics with introducing the jelly roll format in 2006. The format turned repeated measuring and rotary cutting into a coordinated, ready-to-sew purchase.
Jelly roll is the familiar name, but shops and manufacturers also use terms such as strip roll, strip pack, or precut strips. Don't assume that similar packaging means identical contents.
At the counter, check these label details:
A coordinated bundle also isn't necessarily a complete quilt kit. Unless the package explicitly includes them, you'll still need to plan for backing, batting, and any supporting fabrics.
Common precut formats and piece sizes
| Format | Pieces per pack | Piece size | Typical use |
|---|---|---|---|
| Jelly roll | 40 | 2.5 in x 42–44 in | Strip sets, log cabin, rail fence, binding |
| Honey bun | 40 | 1.5 in x 42–44 in | Narrow strip sets, small blocks, mini quilts |
| Charm pack | 42 | 5 in squares | Scrappy blocks, four-patch and nine-patch units |
| Layer cake | 42 | 10 in squares | Larger blocks, quick quilt tops |
| Fat quarter | 1 | 18 in x 22 in | Appliqué, small pieces, fabric sampling |
Treat these as common format descriptions, not a guarantee for every package. For jelly rolls specifically, Missouri Star's strip collection describes the familiar 40-strip format with strips measuring 2.5 inches by approximately 42–44 inches and notes that package counts can differ. Compare the listed dimensions with your pattern before selecting a bundle.
The most important difference isn't the dessert-inspired name. It's what you'll do with the fabric.
With strips, you can sew long edges together and cut across the resulting panel. With squares, you can arrange individual pieces into rows or cut them into smaller shapes. A fat quarter gives you a broader rectangle, which is useful when a piece won't fit within a narrow strip.
For example, a rail-fence pattern depends on parallel bands of fabric. A simple square-patch quilt depends on separate squares. Both can look scrappy and colorful, but their cutting instructions aren't interchangeable.
A bundle can contain plenty of fabric overall and still have the wrong shape for your pattern. You can cut a narrow rectangle from a square, but you can't cut a wider, unpieced rectangle from a narrow strip.
That's why substituting formats requires checking the cutting diagram, not merely comparing yardage. You may need extra fabric to account for offcuts or a different arrangement of pieces.
Buying rule: Match the shape of the precut to the way the pattern is assembled, then check the package label against the cutting list.
When looking through current stock, read the product description rather than relying on the photograph. A small roll and a full roll can look surprisingly similar when displayed without a size reference.
Strip piecing means sewing long strips together before cutting them into repeated units. Instead of handling a pile of separate rectangles, you make a larger striped panel, called a strip set, and cut the smaller components from it.
Missouri Star's precut fabric collection describes this approach and identifies 2.5-inch strips as suitable for compatible rail-fence, log-cabin, table-runner, and patchwork patterns. Compare precut options only after checking the starting width your chosen design requires.
Precut strips compared with cutting from yardage
| Criterion | Precut strips | Cutting from yardage |
|---|---|---|
| Prep time before sewing | Minimal, strips are ready | Measure and cut every strip |
| Color coordination | Pre-selected and coordinated | You choose and pair each fabric |
| Cost per yard | Often higher per equivalent yard | Usually lower per yard |
| Length flexibility | Fixed at about 42–44 in | Any length the bolt allows |
| Waste | Trimmed ends and unused strips | Lower if cuts are planned carefully |
| Best fit | Beginners and strip-based patterns | Custom widths, long borders, large quilts |
The length advantage of yardage needs a little explanation. Strips cut across yardage still follow the bolt's width. To make longer uninterrupted strips, you need enough yardage to cut along its length, and your layout must allow for that direction.
Precuts suit a first quilt when you want to concentrate on sewing rather than repeated cutting. They're also helpful when you like a collection's coordinated look but don't want to buy separate cuts of every print.
Yardage is the stronger choice when you need custom widths, carefully positioned motifs, or uninterrupted borders. It also gives you more room to recut a piece after a mistake, provided you buy an allowance.
Say you're making a rail-fence throw. You could spend an afternoon beginning the strip sets from a compatible bundle rather than preparing strips from several fabrics. If the same quilt needs long, unpieced borders, you'd add yardage rather than force the bundle to do both jobs.
Don't judge value by the bundle price alone. Count the supporting fabrics you'll need, identify strips you can't use in the design, and consider whether a particular print needs careful placement.
A precut saves preparation and color-selection work. It doesn't automatically eliminate waste, and yardage isn't automatically wasteful. Careful cutting matters with either choice.
Using both is often the practical solution: precuts for the varied patchwork, yardage for the background, borders, or backing.
For a first sewing weekend, choose a project whose repeated units are easy to inspect. Rail fence is a good example: you can see whether the bands stay even before committing the whole bundle.
A clear work surface makes it easier to keep the planned fabric order intact.
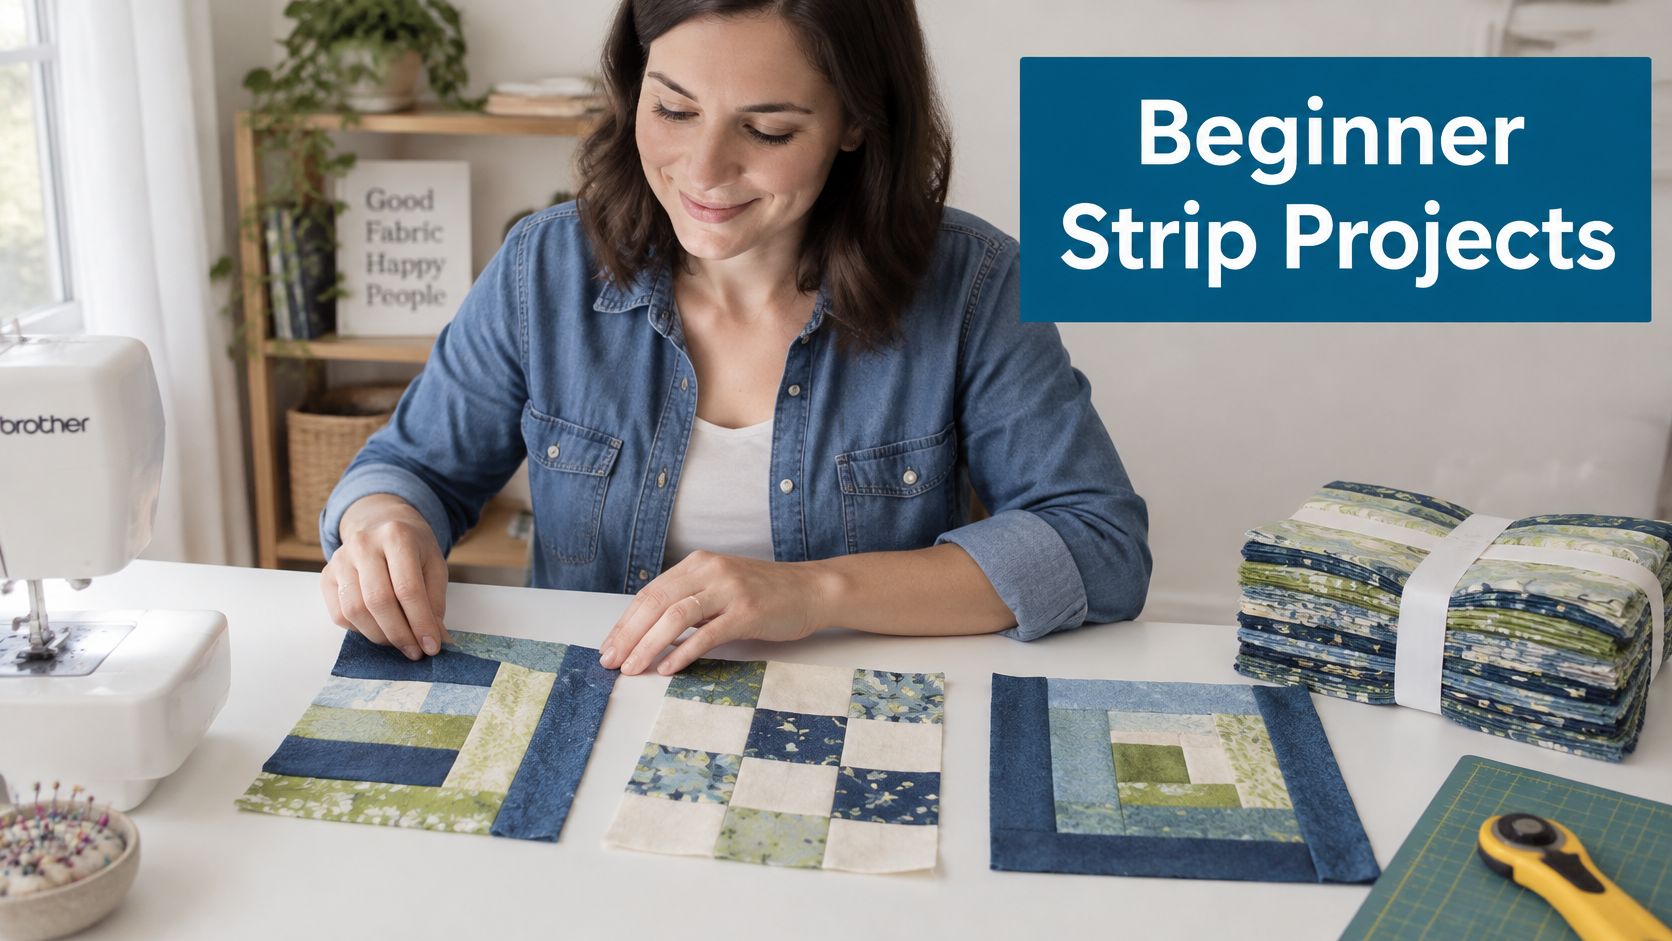
Rail fence is beginner-friendly. Sew contrasting strips into sets, crosscut units to the pattern's dimensions, and rotate the units to create alternating bands or a zigzag effect. Use jelly-roll-width strips directly when the pattern calls for that format.
For a lap-quilt pattern, plan around the bundle quantity specified by the designer rather than guessing from the quilt photograph. The likely shortage is contrast: a bundle may contain enough strips overall but too few lights or darks for the intended arrangement.
Log cabin suits a confident beginner. Start with a center square and add strips around it, like building a frame in successive rounds. Strip use follows the number of blocks and the length of the outer logs, so count the cutting list by color role.
The outer rounds are where fabric can run short. Save long, usable sections instead of cutting every strip into small pieces at the beginning.
A jelly roll race quilt uses strips joined end to end, then folded and sewn into a wider top according to the pattern. It's beginner-friendly, but the joining method and final squaring affect the result, so follow the design rather than treating the roll as a guaranteed finished size.
A strip-pieced table runner uses only part of a bundle when you choose a suitably small pattern. It's a manageable place to practice accurate seams, although borders and binding may require fabric beyond the decorative center.
Watch the construction sequence before cutting fabric for an unfamiliar technique.
| Project | Skill level | Strip-use planning | Likely shortfall |
|---|---|---|---|
| Rail-fence lap quilt | Beginner | Pattern-specified bundle | Light or dark strips |
| Log-cabin quilt | Confident beginner | Count logs by block and color | Long outer logs |
| Race quilt | Beginner | Pattern-specified full roll | Squaring and joined ends |
| Table runner | Beginner | A portion of a bundle | Borders and binding |
Leftovers can become double-fold binding, placemats, or a zippered pouch. Check each accessory pattern's materials, since a pouch may also need lining, interfacing, and a zipper.
Choose the project before buying the bundle. That turns an attractive purchase into a realistic sewing plan.
Before opening the package, compare its label with the pattern. Keep the bundle intact until you know that its contents can supply the required cuts.
The label gives you nominal dimensions. Your cutting plan needs usable dimensions.
For full-width strips, Mrs Quilty's precut size guide describes typical lengths of 42–44 inches and notes that a typical 40-strip roll may produce a lap or throw top around 50 × 64 inches, depending on the design. Borders, sashing, shrinkage, directional prints, and cutting errors can require additional yardage.
For a cautious estimate, Missouri Star's jelly roll planning guidance recommends allowing approximately 40 usable inches per strip rather than treating the entire nominal length as available. Compare the bundle specifications with your longest required cut before buying.
That planning allowance accounts for removing selvages and straightening uneven ends. It isn't a promise that every strip will measure exactly the same after preparation.
Fabric area tells you how much material you own. A cutting diagram tells you whether you can make the required pieces.
For a hypothetical yield check, multiply the bundle's strip count by your conservative usable length. The result is total usable strip length at that particular width, not finished quilt area.
Next, divide the usable length of an individual strip by the length of the segment you need. Count only complete segments, and leave room for squaring or trimming required by the pattern. You can't combine leftover lengths into an unpieced segment unless the design permits an extra seam.
A seam consumes fabric along the joined edges. Trimming selvages reduces the available length. These are different losses, and mixing them together can produce a misleading estimate.
When you sew strips along their long edges, you reduce the set's width. When you join strip ends, you reduce the resulting length. Angled joins and diagonal cuts need their own cutting allowance.
Check these pattern details together:
Straight strip layouts usually preserve more usable fabric than designs requiring repeated angled cuts. Don't use the yield from a simple striped quilt as a promise for a diagonal design.
For a first lap quilt, a coordinated collection reduces the number of color decisions. Choose a pattern that leaves spare material rather than planning to use every last piece perfectly.
Sort the fabrics by their job, not just by their printed color. A pale floral may read as a light background from a distance, while a densely printed medium fabric may read as dark.
At High Country Quilts, we label kit fabrics or make a swatch sheet when the background fabric isn't obvious. Keep those labels with the fabric until you've completed the relevant cutting.
Our fabric selection can be shopped by brand, including Moda, Riley Blake, Andover, Free Spirit, Hoffman, and Robert Kaufman. A useful example of why labels matter is WL Essential Gems White (24) 2-1/2in x 44in Strips 6 packages by Wilmington Prints: these are 100% cotton, with 24 pieces per pack and 6 packs per box.
That example isn't a standard coordinated roll. A familiar strip width doesn't tell you the package quantity or whether the fabrics provide the variety your quilt needs.
To compare prices, divide each package price by its actual strip count. Then check whether the strips have comparable dimensions and whether you can use all the included fabrics. A cheaper strip isn't better value if its length won't fit your cut list.
Once you open the bundle, reserve the straightest strips for long sets. Put shorter or irregular pieces aside for small components, and protect any fabric reserved for binding.
For hands-on help, our Colorado Springs classes and community events offer a place to learn strip piecing in person. Bring the pattern and package information so you can work from the actual project requirements.
Set out a rotary cutter, cutting mat, clear quilting ruler, pins, iron, and sewing machine. A quarter-inch presser foot is helpful, but you still need to test the seam on your machine before sewing the project fabric.
The visual sequence shows how prepared strips become repeated patchwork units.
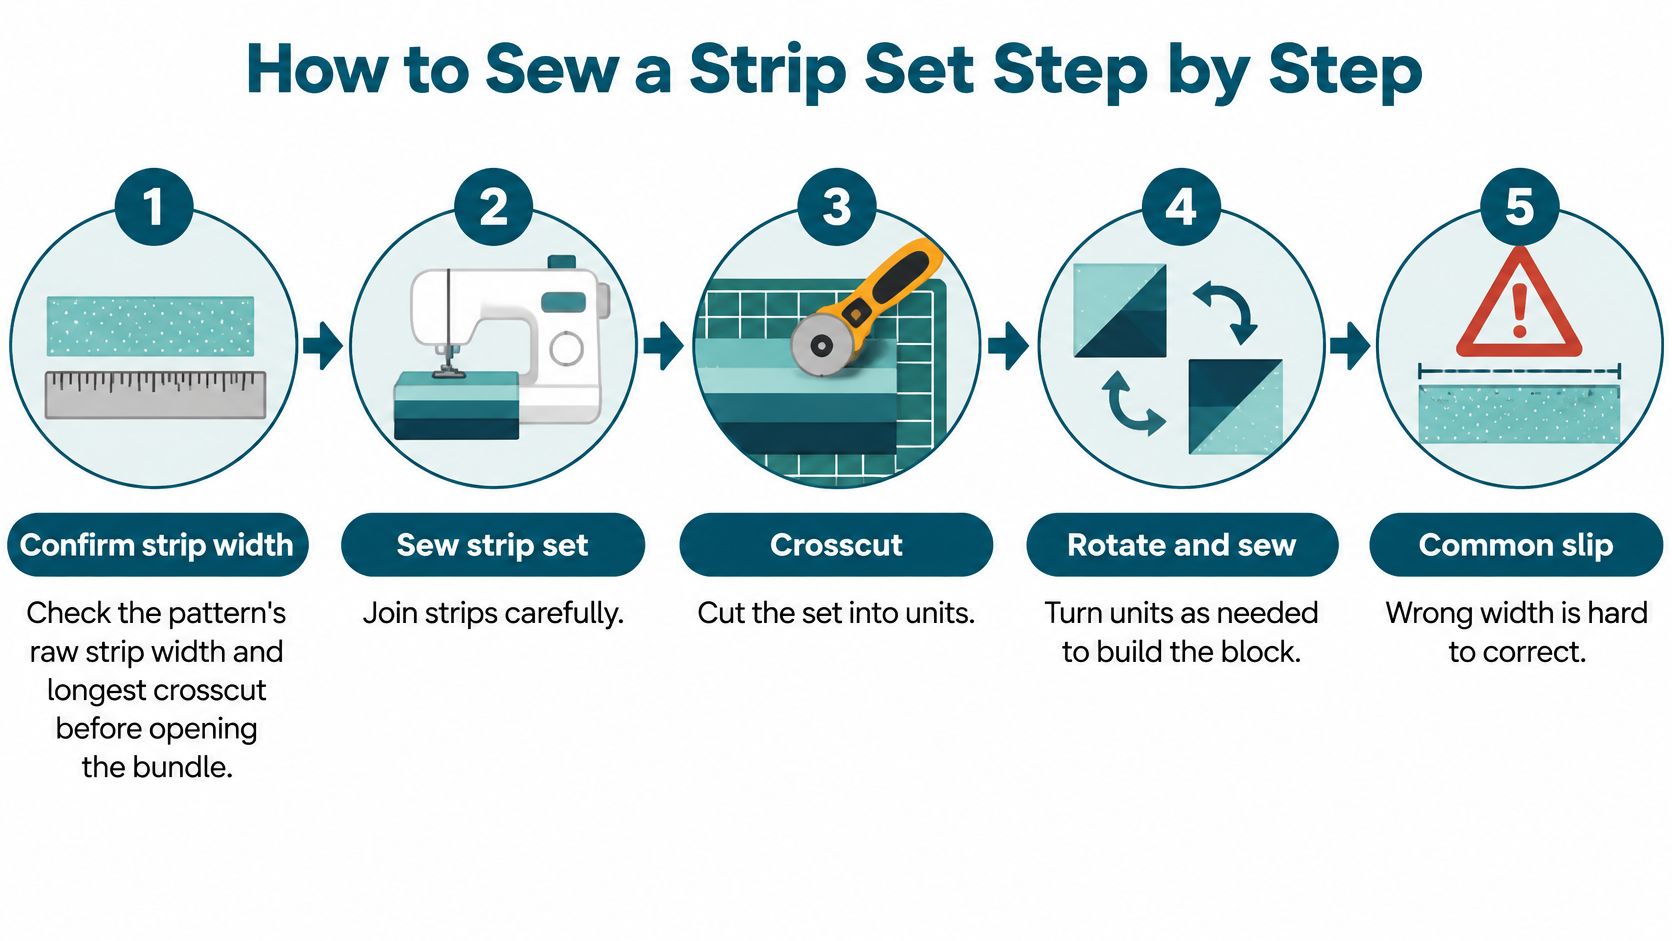
Before the next cut: If the set won't lie flat without being pulled into position, stop and find the cause.
A healthy strip set has straight edges, consistent bands, and seams that remain square to the crosscut edge. It should rest flat on the mat without rippling or curving.
If a set bows, inspect the stitching before trimming it into shape. Trimming a distorted set may hide the symptom while leaving too little fabric for the required units.
Use a ruler long enough to support the cut, keep your fingers clear of the blade, and close the rotary cutter whenever you put it down. Accuracy and safe handling are part of the same routine.
Strip problems, causes and fixes
| Symptom | Likely cause | Fix |
|---|---|---|
| Strips too short for a long segment | Length follows bolt width, about 42–44 in | Recheck the cut list and piece shorter segments or buy yardage for borders |
| Strip set narrower than planned | Seam allowance drifts from 1/4 in | Use a consistent quarter-inch foot and press before cutting |
| Strip widths vary within a bundle | Uneven cutting at manufacture | Measure several strips, align cut edges and trim before sewing |
| Blocks do not match the pattern | Pattern drafted for a different strip width | Recheck raw width and finished size before cutting |
| Binding wider or thinner than planned | 2.5 in precut width used instead of the pattern width | Cut binding strips to 2.25 in or the width the pattern specifies |
| Strips fray or stretch | Long storage or handling on the bias | Store flat, keep grain straight and press gently before cutting |
Before applying a fix, decide whether the problem came from cutting, stitching, or pressing. A set that looks too narrow may need better pressing, but a set sewn with excessive seam allowance needs its stitching corrected. Don't trim everything smaller until you know which problem you're solving.
Binding is the folded fabric that encloses the quilt's raw outer edge. Its starting width, the thickness of the quilt sandwich, and the attachment seam all affect how much binding shows.
Utah State University Extension's binding guide recommends straight-grain binding for straight edges, explains that bias binding is generally unnecessary unless the edges curve, and uses 2.25 inches in its binding-fabric calculation while noting that 2.5 inches may suit a thicker quilt sandwich. Its method cuts strips across the fabric width and joins their ends with 45-degree seams.
A convenient leftover strip therefore isn't automatically the correct binding strip. Test a short section around the actual quilt sandwich before preparing the entire length.
Re-pressing, removing a crooked seam, or squaring an end can often be handled in a sewing session. Work on a small section first so you can confirm that the correction restores the required measurement.
A true length shortage needs a different decision. You may be able to piece a segment if the design allows it, but a visible border or carefully placed print may call for additional yardage or another bundle.
Stop while the remaining fabric is still useful. A measured adjustment is easier than replacing a whole batch of units cut from an inaccurate set.
High Country Quilts offers precut fabrics, rotary-cutting tools, and classes in Colorado Springs to help you turn a strip bundle into a workable project. Bring your pattern's supply list, or visit High Country Quilts to check current options and find a class that helps you build confident strip-piecing skills.
November 2–25 only: buy a $200 gift card in either store and get a free yard of fabric every month of 2027.

Serger and BERNINA Mastery classes, longarm training, bag-of-the-month, Kids Sewing Club and a Highlands Ranch retreat. Here's what's on the calendar in November.

Free gifts, included packages and special pricing on the BERNINA 790 ULTRA, 990, Liberty Editions, L 890 serger and Q Series longarms, now through December 31.


Leave a comment