

November Classes & Events at Both Stores
Serger and BERNINA Mastery classes, longarm training, bag-of-the-month, Kids Sewing Club and a Highlands Ranch retreat. Here's what's on the calendar in November.

You've unwrapped a jelly roll, spread the coordinated fabrics across your table, and found a quilt you'd love to make. Then the questions start: Will this bundle be enough? Should you wash it? And why does the pattern's block measurement look smaller than the strips?
Learning how to use jelly roll fabric starts with checking the fabric against the pattern, not switching on the sewing machine. Precuts save repetitive cutting, but you still need to account for seams, usable strip length, and fabric for the rest of the quilt.
Before cutting, check three things against your pattern: the roll's nominal strip size, the width left after seams, and the usable strip length. A jelly roll is a starting format, not a guarantee that every pattern will fit.
Jelly roll measurements and what they mean for your plan
| Measurement | Standard Value | What It Means for Your Plan |
|---|---|---|
| Strips per roll | 40 (some packs contain 20, 41 or 42) | Count your strips before choosing a pattern |
| Strip width | 2.5 inches | Sews down to about 2 inches with a quarter-inch seam |
| Strip length | 42 to 44 inches, selvage to selvage | Usable length shrinks once selvages are removed |
| Total strip width | 100 inches (40 × 2.5) | The starting figure for cutting calculations |
| Equivalent fabric | About 2.75 to 2.875 yards | Buy separate yardage for background, borders and backing |
| Full strips per yard | About 14 | 36 inches divided by 2.5, with one partial leftover |
| Example lap-size top | About 50 × 64 inches | An approximate planning example before adjustments for borders, quilting and seam allowances |
For a standard bundle, Missouri Star Quilt Company's jelly roll guide describes 40 strips, each about 2.5 inches wide and 42 to 44 inches long. Together, their nominal widths total 100 inches, equivalent to roughly 2.75 to 2.875 yards of fabric. The guide gives an approximate lap-top example of 50 × 64 inches. Treat that as a planning reference, since layout and finishing affect the result.
Nominal size is the strip measurement before sewing. Sew a quarter-inch seam along each long edge, and a 2.5-inch strip contributes about 2 inches of finished width within a strip set. The Jelly Roll Fabric FAQ distinguishes the precut strip size from its sewn width.
The fabric is still there, enclosed in the seams. This is why a strip set's raw measurement may differ from the finished measurement in a pattern. Check whether the pattern gives unfinished cutting sizes or finished block sizes before you cut. Otherwise, a unit can seem too small even when it was cut correctly.
Planning rule: The bundle's fabric content tells you what you have. The pattern's cutting chart shows whether those strips can make the quilt as written.
Keep these checks beside your pattern:
Equivalent yardage does not behave like one uncut piece of fabric. A roll's narrow strips can supply strip sets, but they cannot make a large background square without piecing. Check the pattern's fabric requirements before assuming the roll covers every part of the quilt.
With a standard roll and minimal cutting in mind, choose a jelly roll race pattern whose requirements match your bundle. For repeating blocks and more control over color placement, choose rail fence.
Compare how the same strip format can become different blocks.
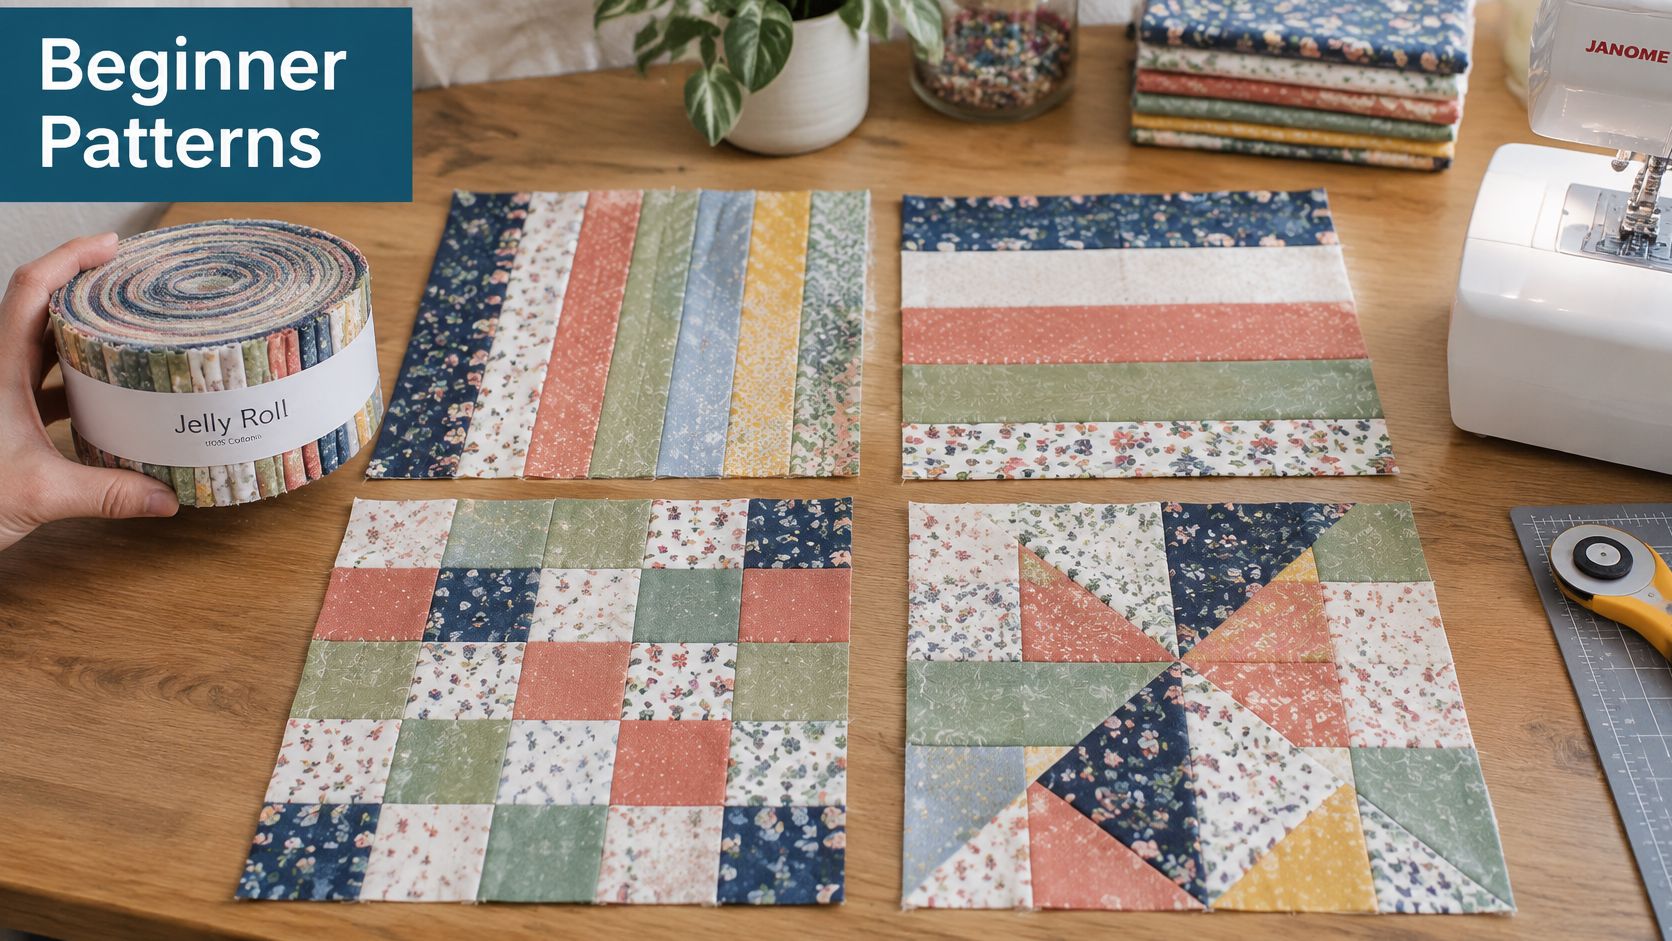
Beginner jelly roll patterns compared
| Pattern | Strips Used | Skill Level | Assembly Method | Best Fit |
|---|---|---|---|---|
| Jelly roll race | Up to 40 strips joined end to end | Beginner | Folded and sewn into progressively wider rows | Lap-size top with minimal cutting |
| Rail fence | 2 to 4 strips per strip set, cut into units | Beginner | Rows of units with seams alternated between rows | Throw or baby quilt |
| Log cabin | Strips cut to set lengths around a center square | Beginner to easy intermediate | Strips added in rounds around the center | Wall hanging or lap quilt |
| Bargello | Graded strip sets, with angled cutting in some variations | Intermediate | Strip sets cut and rearranged into waves | Modern throw with a sense of movement |
A race quilt suits someone who wants long seams rather than lots of individual blocks. Its apparent simplicity can be misleading, though: strip length, joining method, and the pattern's folding sequence affect the final proportions.
Rail fence is easier to pause, inspect, and adjust. You make repeating units, so you can arrange the blocks before committing to the whole top. For a hypothetical strip set, choose contrasting light and dark fabrics so the rails remain visible after you rotate neighboring blocks.
A log cabin gives you deliberate control over light and dark placement. It also demands careful labeling because strips must be added in the correct order and cut to the pattern's specified lengths.
Bargello asks more of your cutting and organization. Traditional versions often use crosscut strip sets rather than angled cuts, so follow the particular design instead of assuming every wave effect uses the same technique.
Watch the construction sequence before choosing a design that feels comfortable.
A 2024 jelly roll quilt tutorial describes a project finishing at 70 × 70 inches using a roll defined as 42 strips measuring 2.5 × 42 inches. Treat that as a result for that particular project, not a conversion formula for other rolls.
For a bundle with an extra strip, a rail fence pattern with a separately planned border is a straightforward choice. Don't add the extra fabric to a race sequence that assumes a fixed count unless the designer explains the adjustment.
Leftover segments can become a table runner or a small baby-quilt layout, provided you calculate the required units first. Browse quilting patterns and fabric collections with your bundle label beside you, and compare the materials list before choosing a design.
Set up the cutting table so you can measure, cut, sew, and check without searching for equipment. Accuracy depends more on a stable setup than on collecting specialty gadgets.
Optional starch can make soft fabric easier to handle. Apply it consistently and let the fabric dry before cutting; uneven treatment can change how neighboring strips behave.
Place a notepad, the pattern's cutting chart, and a lint roller beside the mat. Record measurements instead of relying on memory, and lift loose fibers from the work surface before they obscure ruler lines.
You can skip specialty bias tools and an additional ruler unless your pattern specifically needs them. A reliable basic kit is enough for a first strip-pieced quilt.
Look for rotary cutters, rulers, quarter-inch feet, and other notions that suit your machine and cutting setup before starting the project.
Jelly roll quilting cotton is often used unwashed because laundering narrow strips can fray their edges and change their dimensions. Prewashing can remove sizing and allow shrinkage before construction, but it may leave you with strips that no longer match the cutting chart.
If you want to prewash, test a strip first using the care method you intend for the quilt. Dry it, press it gently, and measure it before washing the bundle; don't assume trimming will restore lost width.
Keep the selected fabric organized as you prepare it.
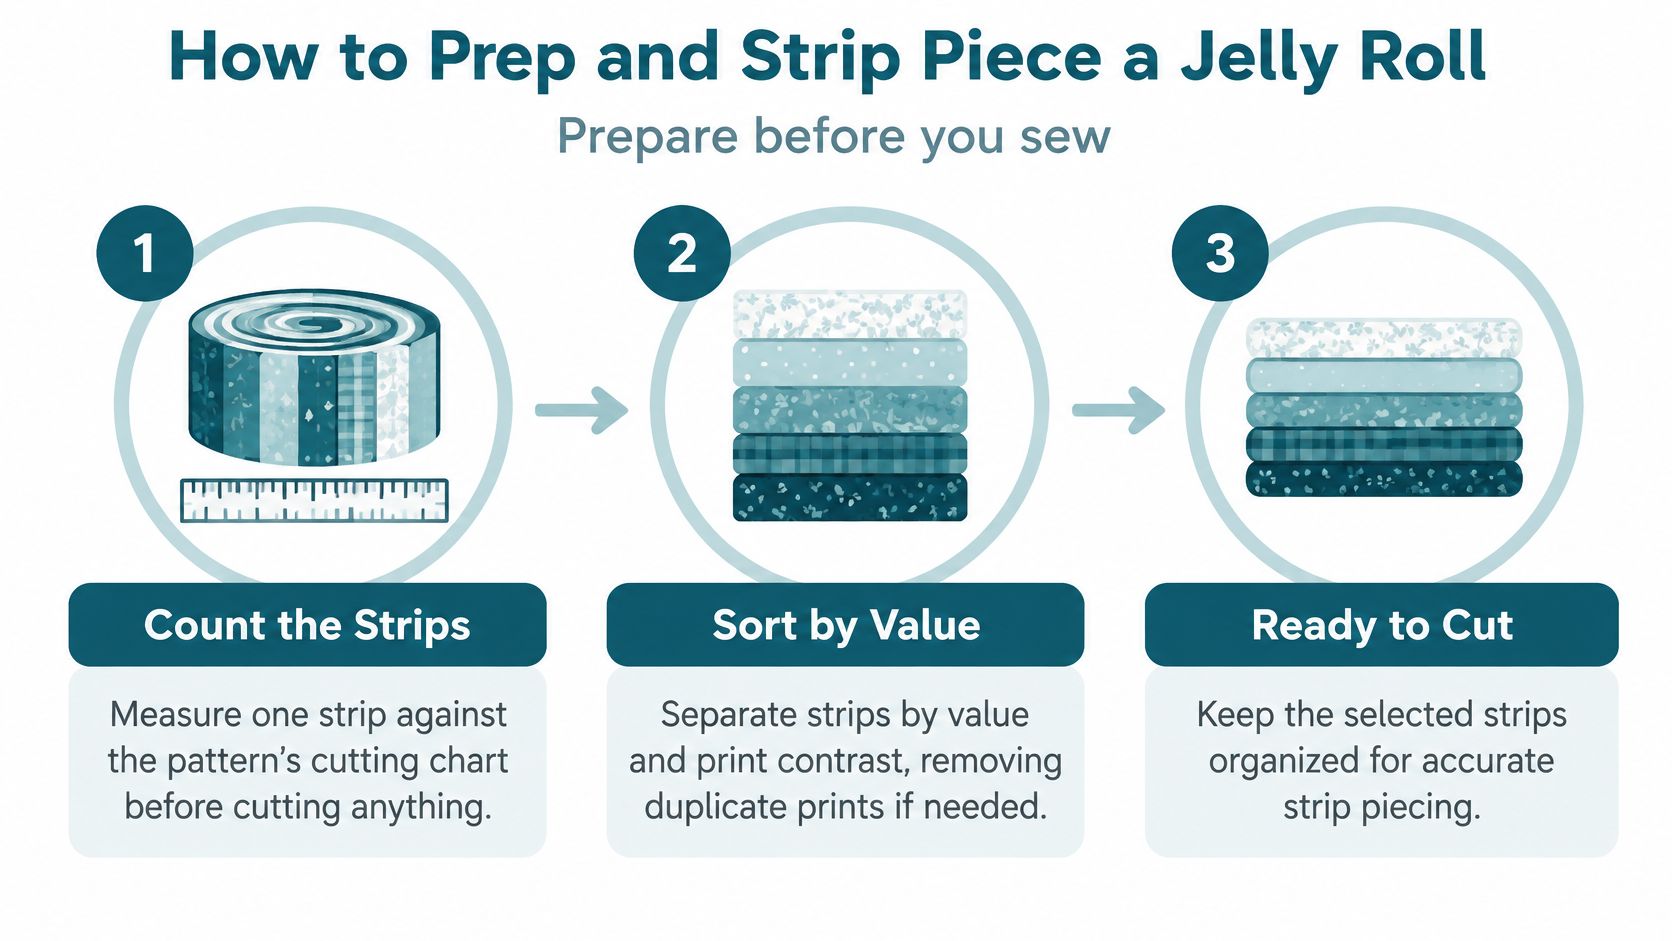
Pinked edges have peaks and valleys, which can make alignment confusing. Check how the manufacturer's stated width relates to those edges, then use a consistent reference when positioning the fabric under the presser foot.
Don't stretch a narrow strip to make its end match its partner. Ease it back into a relaxed position and check whether the mismatch comes from cutting, feeding, or pressing.
The test block is your cheapest quality check. It uses a small amount of fabric to protect everything you haven't cut yet.
If a strip set bows, stop before subcutting. Check that you aren't pulling the fabric behind the machine or sweeping the iron along the seams.
When selecting your next bundle, compare the strip count and dimensions in the jelly roll and precut fabric selection with your chosen pattern.
Lay the blocks or rows on a design wall or clean floor before joining them. Step back far enough to notice clumps of dark prints, repeated motifs, or a rail fence block turned the wrong way.
Use these pressing reminders while assembling the top.
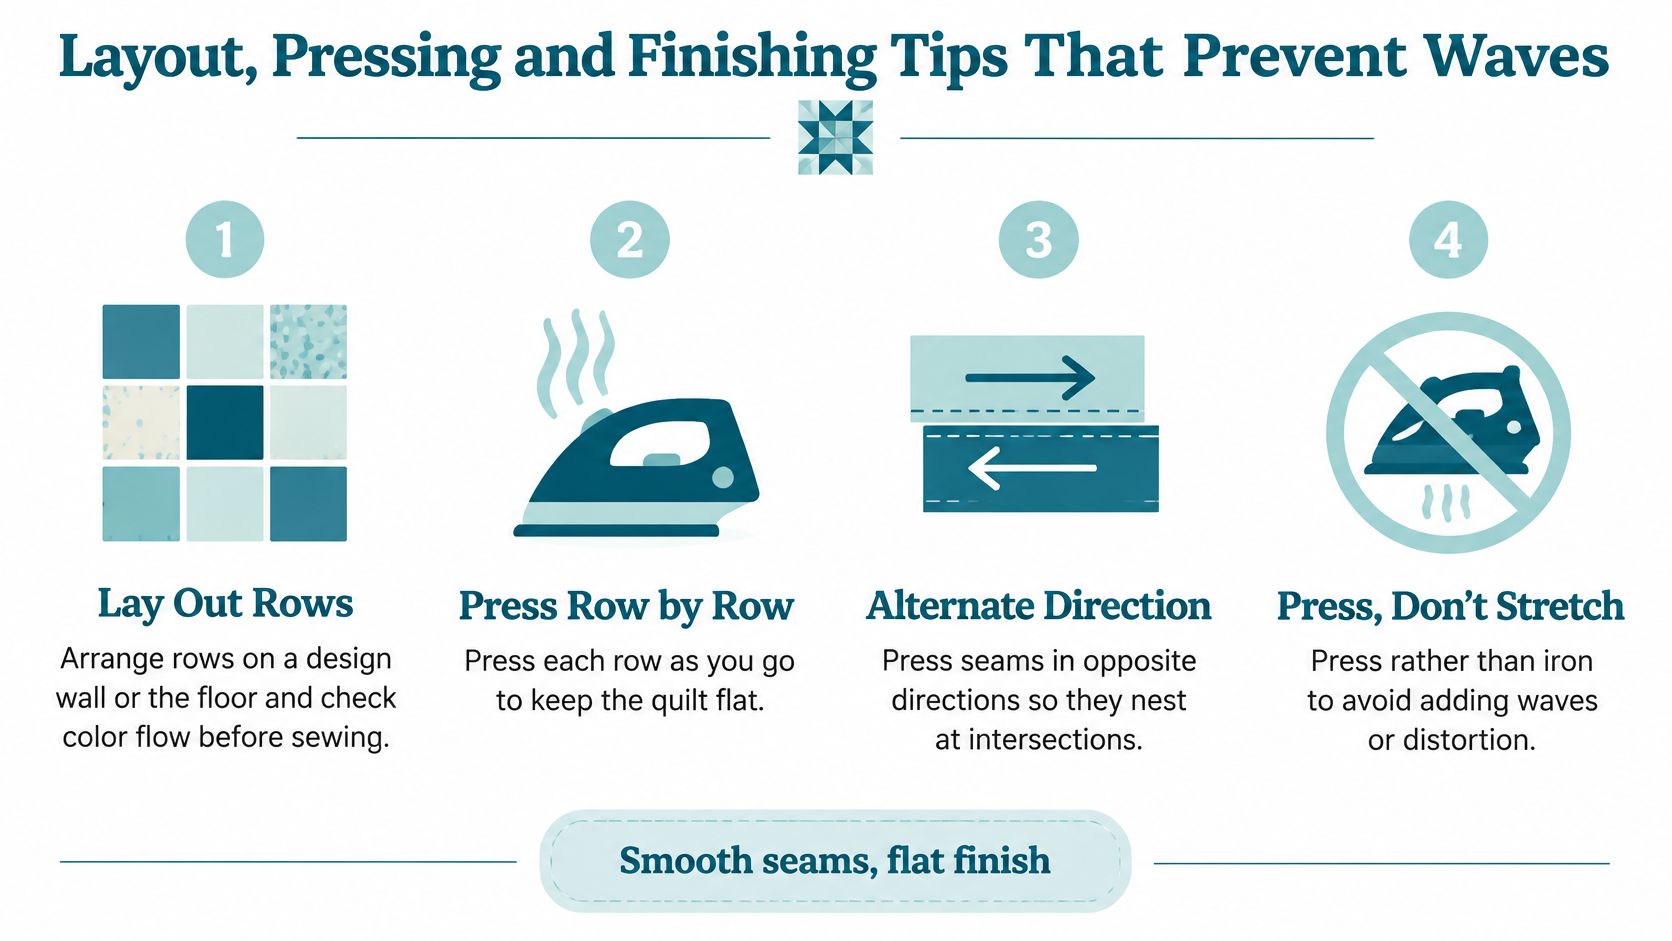
Compare the assembled top with the pattern's expected measurement at that stage. An unbound top and a finished quilt aren't necessarily measured under the same conditions.
Build the quilt sandwich with a smooth backing, batting, and pressed top. Baste with safety pins or a suitable basting spray, following the product's directions and keeping all layers relaxed.
For domestic-machine quilting, a walking foot helps feed the layers together during straight-line work. Keep the quilting reasonably even across the surface and follow the batting manufacturer's maximum spacing guidance.
Before quilting: Remove tucks during basting. Quilting over them won't make them disappear.
According to the FibreCalcs jelly roll calculator, a 40-strip roll provides approximately 1,600 inches of raw length at 40 usable inches per strip; its notes also describe approximately 44 yards when discussing longer strips. These are alternative planning estimates, not amounts to add together, and joins, trimming, and corners reduce usable binding.
Use the strips remaining from your project, not the original bundle total, for your binding calculation. Join them diagonally, press the joins, then fold the resulting strip lengthwise with wrong sides together and press before attaching it.
Choose quilting accessories and finishing supplies to match your basting method, machine, and binding plan.
For a first project, choose a rail fence throw with a separately planned small border. A pattern designed for a standard full roll gives you a manageable way to practice cutting, seam consistency, pressing, and block assembly without adding complicated angles.
The repeating grid is useful because you cut relatively short units from longer strip sets. Modest differences in original strip length may leave different amounts of waste without affecting the blocks, provided every selected strip meets the cutting chart's minimum requirement.
Your first goal isn't to sew the whole bundle quickly. It's to produce a correctly sized unit that you can repeat.
A slightly short strip isn't automatically unusable. It may still yield all the pieces required for a block, but you need to confirm that on paper before making the first cut.
If your bundle has an extra strip, rail fence lets you reserve it for a replacement unit, a pieced border detail, or another small project. That's safer than changing a fixed-count race pattern without understanding its construction.
Don't enlarge the quilt merely because fabric remains. A larger top also needs larger batting and backing, and you'll have more fabric to manage under the machine while quilting.
The useful habit is simple: decide what each piece must become before cutting it. Once your test block matches the pattern, the rest of the project becomes a controlled repetition of a process you've already checked.
High Country Quilts offers jelly rolls, notions, and quilting supplies for planning and making your first strip-pieced quilt. Visit High Country Quilts, and ask the shop team to check whether your chosen pattern fits the roll you already own before you buy additional yardage.
Serger and BERNINA Mastery classes, longarm training, bag-of-the-month, Kids Sewing Club and a Highlands Ranch retreat. Here's what's on the calendar in November.

Free gifts, included packages and special pricing on the BERNINA 790 ULTRA, 990, Liberty Editions, L 890 serger and Q Series longarms, now through December 31.

At High Country Quilts we care deeply about community. With our experiences in retail, we know that a store is not only a place to shop but also a place for the community to gather and share. During this busy...


Leave a comment