


We Love Our Quilting Community
At High Country Quilts we care deeply about community. With our experiences in retail, we know that a store is not only a place to shop but also a place for the community to gather and share. During this busy...


You're sitting at the cutting table with a new quilt pattern, a stack of fabric, and no clear idea where to begin. The cover may show a beautiful finished quilt, but the pages inside can seem packed with unfamiliar abbreviations, diagrams, measurements, and symbols.
Learning how to read a quilt pattern becomes much easier when you treat it as a translation task. You're converting a designer's shorthand into three practical decisions: what to buy, what to cut, and when to sew. Once you understand that order, even a pattern built around precuts, several quilt sizes, or a technique such as foundation paper piecing becomes far less mysterious.
You have chosen fabric, perhaps from a precut bundle or a carefully planned stack, and opened a pattern that offers several quilt sizes. The cover shows the destination, but the pages provide the route. A quilt pattern is a blueprint: it organizes fabric, measurements, shapes, and sewing steps so you can turn yardage or precuts into a quilt top.
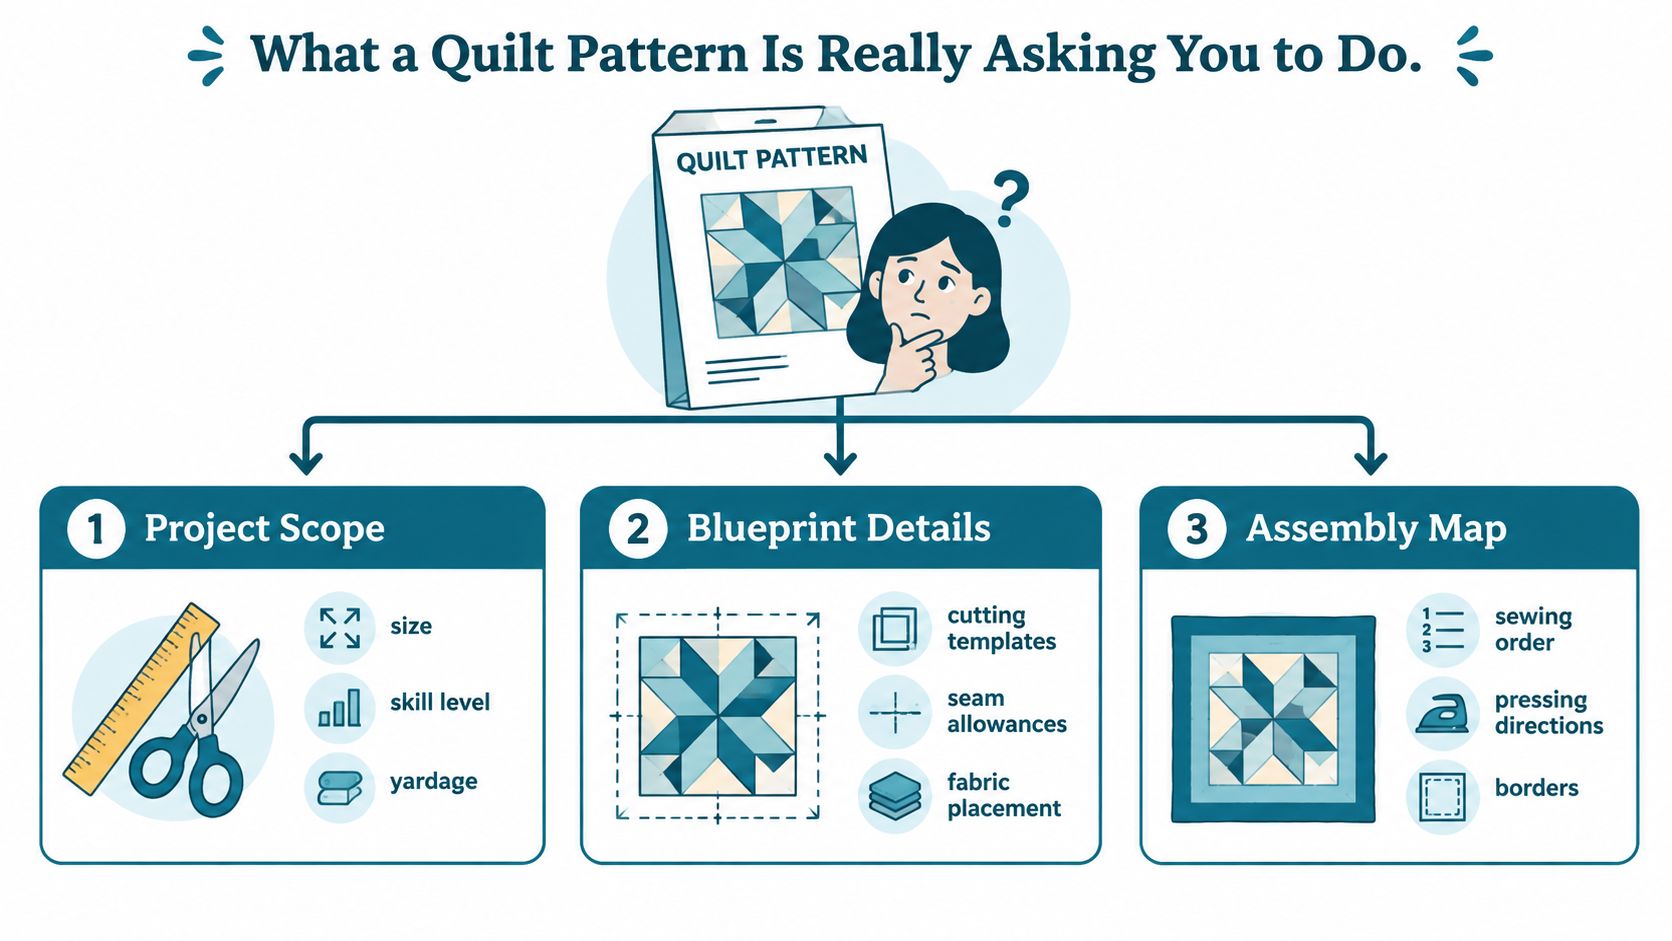
Every pattern answers three practical questions:
Begin with three locations: the yardage chart, the cutting list, and the assembly diagram. Together, they connect your shopping decisions to the finished design. Confirm the finished quilt size and the requirements for your chosen size before cutting.
Written steps and diagrams describe the same construction from different angles. The words may identify the units to join, while the illustration shows orientation, fabric placement, or pressing direction. If they appear inconsistent, pause and check the legend, fabric labels, and seam allowance. A rotated triangle or reversed unit can change the block even when every piece is the correct size.
Practical rule: Find the finished quilt size, fabric requirements, and assembly overview before following the first cutting instruction.
Pattern names can also reflect quilt history. Barbara Brackman explains that researching when a design name and block were first published, then comparing surviving examples through the Quilt Index and pattern research guidance, can show why one block has different names. A modern pattern may use a familiar name while giving it a different construction, so let the cutting and assembly instructions guide your choices.
A pattern's measurements guide two decisions at once: what to buy and what to cut. Before choosing yardage, learn whether the instructions refer to fabric formats, cut pieces, or sewn units. That distinction matters even more when a modern pattern offers several sizes or is designed around precuts.
WOF means width of fabric. FQ means fat quarter, a cut measuring 18 inches by 22 inches. A quarter-yard cut measures 9 inches by 44 inches, and a jelly roll strip measures 2 1/2 inches by 44 inches, according to Nancy's Notions' quilt-pattern terminology guide. These formats are not interchangeable automatically. A cutting plan that works from yardage may not produce every required piece from fat quarters or strips.
The seam allowance affects every measurement that follows. Many piecing patterns use a 1/4-inch seam allowance, so even a small difference can keep adjoining units from fitting. A designer may call for a scant quarter inch, which is slightly narrower than a full quarter inch. Follow the pattern's wording and test the allowance before cutting the complete set.
A finished measurement gives the size after a unit has been sewn into the quilt. An unfinished measurement gives the size before that unit is joined to another piece. If a block “will finish at 8 inches,” the block occupies 8 inches inside the quilt, without the seam allowances.
Fabric is consumed by seams, so a cut square can be larger than the area visible in the completed block. Do not substitute the finished block size for the listed cut size. That mistake can make a correct-looking stack of pieces too small for assembly.
| Term | Meaning | Typical Value |
|---|---|---|
| WOF | Width of fabric | Pattern-specific fabric width assumption |
| FQ | Fat quarter | 18 inches by 22 inches |
| Quarter-yard cut | Crosswise fabric cut | 9 inches by 44 inches |
| Jelly roll strip | Precut fabric strip | 2 1/2 inches by 44 inches |
| Finished block | Size after sewing into the quilt | Example, 8 inches |
| Seam allowance | Fabric included inside the seam | Often 1/4 inch |
A yardage chart reflects the pattern's cutting plan and its assumptions about usable fabric width. It is not a general recommendation to buy any equivalent-looking bundle. If you replace yardage with fat quarters, strips, or another precut, compare the required shapes with the dimensions available in that format.
Before shopping, mark the finished quilt size, finished block size, unfinished unit measurements, and fabric quantities. Keep those notes beside the pattern. They separate the size you plan to make from the dimensions you must purchase and cut.
You are halfway through a block when the pattern shows a triangle, an arrow, or three letters you have never seen. Pause before cutting. Quilt patterns communicate through visual marks and compact labels, and each one usually identifies a position, stitch, fold, direction, or repeat.
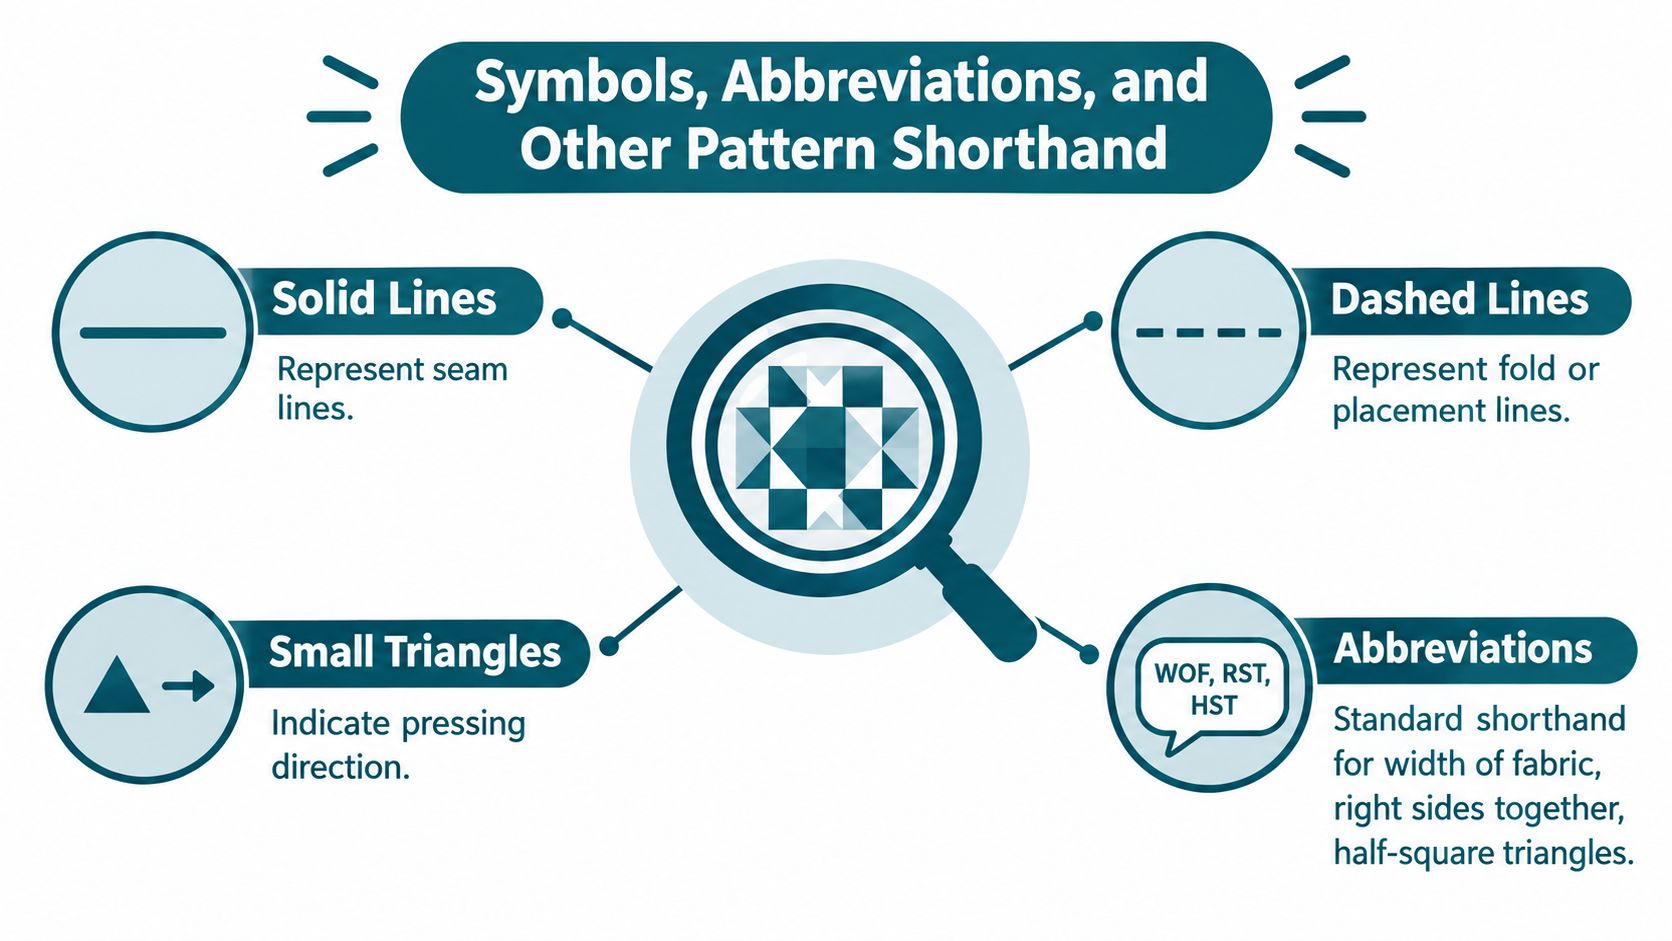
A solid line commonly marks the stitching line. A dashed line may show placement, folding, or a reference line. Small triangles can indicate pressing direction or unit orientation. Arrows often show movement, alignment, or the direction a piece should face. Asterisks usually point to an instruction that repeats, such as making the same unit for several blocks or sizes.
Patterns often use these abbreviations:
An abbreviation labels an action or unit. It does not replace the action itself. If the pattern says to place two pieces RST, put the intended front sides together before sewing. If it lists HSTs, confirm whether the instruction gives the finished unit size or the size to cut.
Color, shading, letters, and fabric numbers also carry information. A shaded square may represent the background, while an unshaded square shows a contrasting print. Shading can be hard to interpret when you are shopping from a black-and-white copy or substituting precuts, so match every mark with the fabric labels and cutting chart. Find the legend, often near the first diagram or at the page bottom, before choosing yardage, fat quarters, or strips.
Keep a small notebook beside your machine. Record unfamiliar abbreviations, pressing instructions, fabric labels, and any symbol the designer defines differently from the usual convention.
When one or more asterisks appear, find the sentence that explains them before continuing. The mark may mean repeat a step for every block, repeat it for a selected size, or return to an earlier instruction. Missing that note can give you the correct number of cut pieces but the wrong number of completed units.
Treat every triangle, arrow, letter, and shaded area as working information. If you cannot explain a mark in plain language, leave the rotary cutter and sewing machine still until you can.
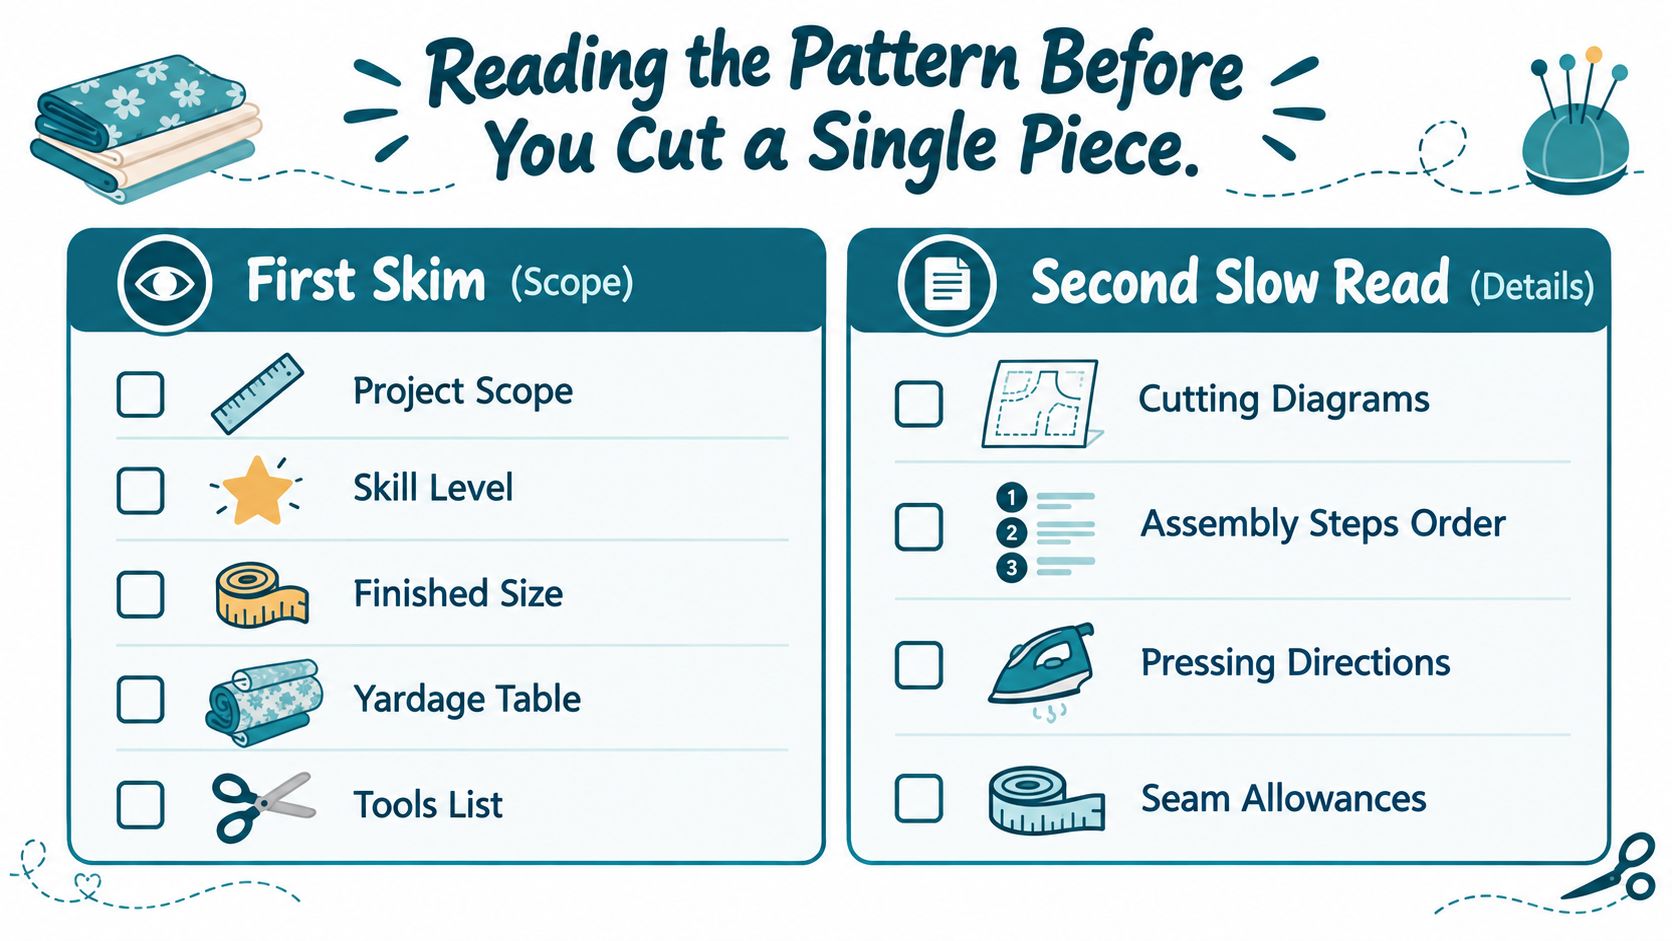
A pattern may look manageable on the cover, yet the first cutting line can reveal hidden demands. Before you unfold your fabric, read the pattern twice. The first pass establishes the project's boundaries. The second turns those instructions into a work plan you can follow at the sewing machine.
Read the complete pattern without cutting. Locate:
Use this information to decide whether the project matches your time, tools, experience, and shopping plan. A simple-looking quilt may require foundation paper piecing, appliqué, a specialty ruler, or a specific pressing method. Those requirements can affect which fabrics and supplies you buy.
On the second pass, slow down. Mark the cutting instructions, identify each diagram, and follow the order in which sub-units become blocks and blocks become rows. Alderwood Studio's guidance on reading quilt patterns recommends reading a pattern twice, labeling cut pieces, and checking WOF references before cutting. Treat that advice as a pre-cut inspection, much like checking a shopping list before purchasing fabric.
Begin with the finished quilt diagram and work toward the cutting list:
A pattern may list many small squares even though the finished block is much larger. Those squares are ingredients in a unit, not miniature finished blocks. This backward reading also helps you spot whether your fabric choices provide enough pieces in the needed colors or prints.
Check for strip piecing, chain piecing, or sew-before-cutting instructions. A strip-pieced design may have you join long strips, then subcut them into units. Cutting every piece separately can waste fabric and remove the efficiency built into the construction.
Stack and label pieces as you cut. Keep fabrics separated by letter, color, block, or step. If the pattern gives both block-unit and whole-block unfinished measurements, use them as checkpoints before continuing. pattern-selection and measurement guidance from Fabric Cafe supports using measurements to confirm that each stage is on track.
你拿著一份現代被子圖樣走進布店,購物方式可能和傳統按碼數買布不同。圖樣或許是為 charm pack、layer cake、jelly roll、fat quarter bundle 或 mini charm 設計。讀懂圖樣,現在也包括確認購物車裡的包裝是否真的符合裁切需求。
Precut-friendly pattern 應清楚寫出所需的預裁布格式與數量。配套通常只提供主要圖案布,背景布、邊框、綁帶和被背可能仍要另外購買。若說明只寫「一組 bundle」,請查看裁切圖,確認背景布是否需要額外碼數。
| Precut Name | Standard Cut Size | Typical Pattern Use |
|---|---|---|
| Fat quarter | 18 inches by 22 inches | Larger feature pieces, blocks, and mixed cuts |
| Jelly roll strip | 2 1/2 inches by 44 inches | Strip piecing, sashing, and narrow units |
| Quarter-yard cut | 9 inches by 44 inches | Strips and smaller repeated pieces |
| Charm pack | Pattern-defined precut squares | Small patchwork units and quick projects |
| Layer cake | Pattern-defined larger squares | Blocks requiring broader square cuts |
| Mini charm | Pattern-defined small squares | Tiny patchwork and accent pieces |
胖四分之一碼、四分之一碼布和 jelly roll 布條的尺寸,可參考 Nancy's Notions' measurement reference。其他預裁布格式可能依製造商或系列而不同,因此結帳前要同時核對包裝標示和圖樣要求。名稱相同,不代表每包布都能直接互換。
購物時,把圖樣的裁切表當成購物清單來讀。若需要大於預裁方形的布片,不能只因為包裝名稱相近就假定它適用。也要檢查每種布是否能提供足夠的同色或同系列片數,特別是圖樣把一包預裁布分配到多個尺寸時。
多尺寸圖樣可能用 [S]、[M] 和 [L] 方括號標示不同數值。裁切前,圈出你要製作的尺寸,並遮住其他尺寸的數字。這個小動作能避免把小尺寸裁切表和大尺寸組裝圖混在一起。
流行的製作方法也會改變讀法。泡泡被子可能先製作填充布單元;quilt-as-you-go 會先完成各區塊的縫 quilting,再把區塊接起來。Foundation paper piecing 通常用編號和縫線引導順序,panel quilt 則可能要求包框或加固印花面板,不必把整件被子拆成許多獨立小片。
Shopping checkpoint: 先確認圖樣要求的預裁格式和購物車中的包裝,再分開核對背景布、邊框、綁帶與被背。
預裁布和快速製作法越常出現在圖樣裡,購物前的核對就越有用。Stitch Logic's quilting coverage 也將圖樣閱讀和購買決定放在一起討論,尤其適用於預裁布、多尺寸圖樣和較快的組裝方式。
Before cutting your new fabric, run a short pre-flight inspection. A pattern can be accurate, yet a small measurement error can leave an entire quilt out of alignment. These checks also protect a shopping decision: if your first test unit fails, you may discover too late that a precut bundle no longer contains enough usable pieces.
Sew one test seam and measure the result. Your quarter-inch foot, marked guide, or preferred scant quarter-inch may produce a different width, so compare the sewn unit with the pattern before cutting the full project. Nancy's Notions explains why an exact 1/4-inch seam affects whether pieced units fit together.
Use these quick checks:
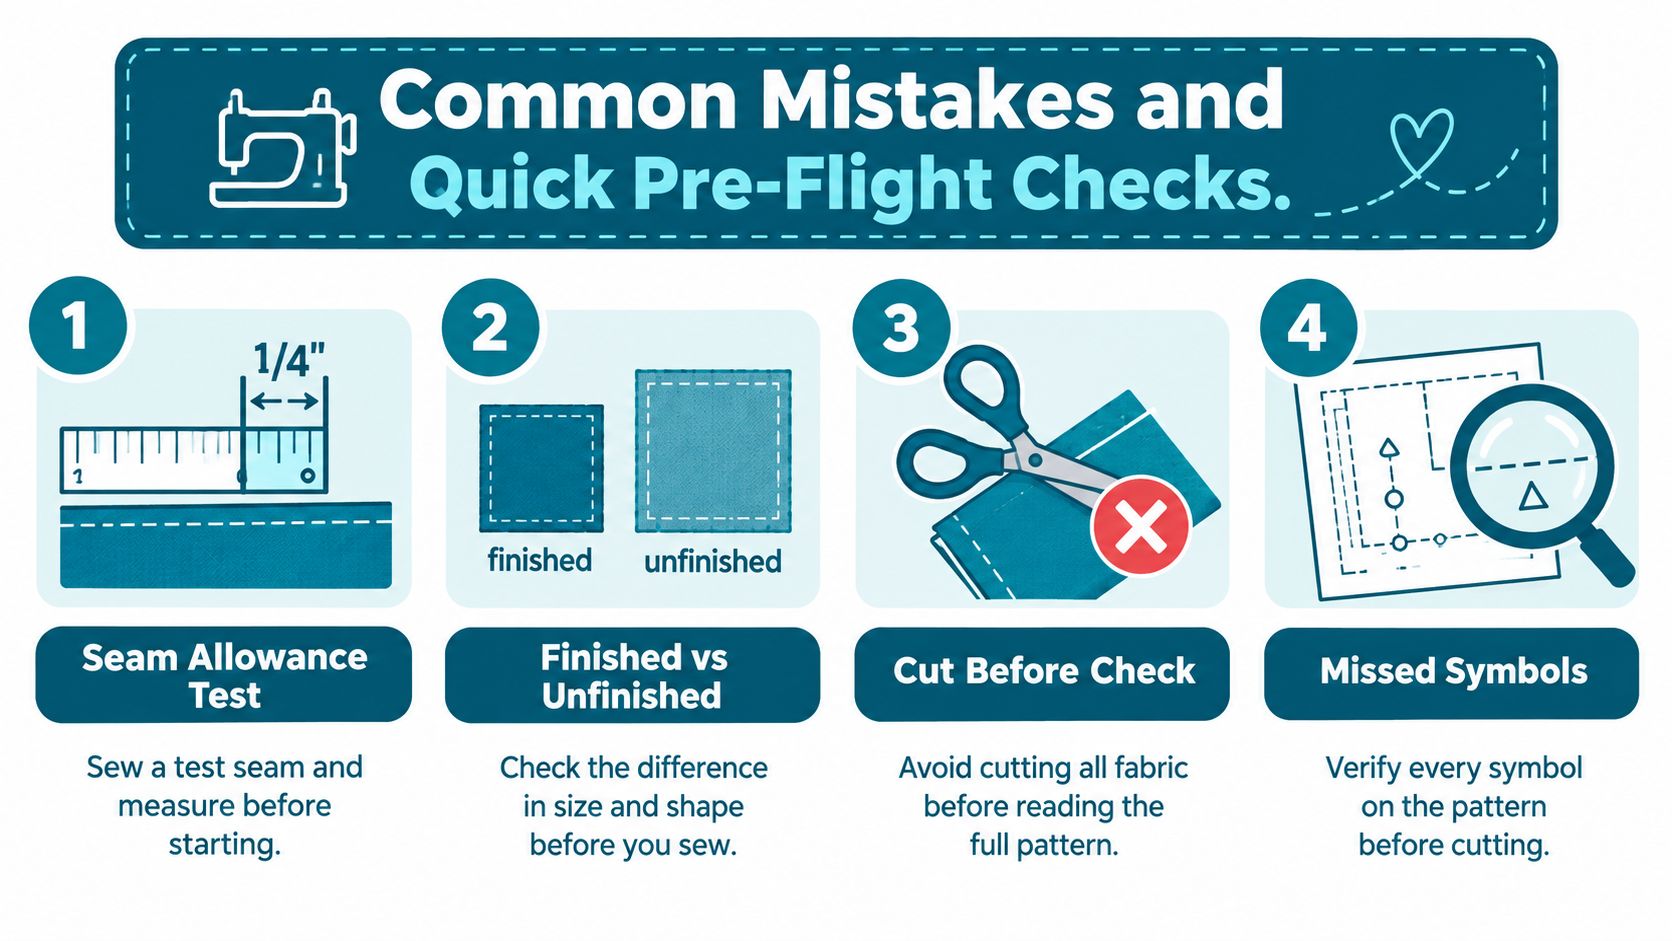
A triangle might show pressing direction in one diagram and fabric placement in another. An asterisk might repeat a step for the whole quilt, one block, or only one size. Find the designer's legend, then read the sentence attached to the symbol instead of borrowing assumptions from another pattern.
Read the later notes before shopping or cutting. WOF instructions, pressing details, specialty rulers, and alternate sizes can change how much fabric you need and how you use a precut package. A full read-through also reveals labels and cutting directions that appear after the opening pages, as pattern-reading guidance recommends.
Five quiet minutes of checking can prevent hours of unpicking. It can also show that a substitute bundle lacks enough matching or usable pieces before the cutting plan is underway.
Choose a first project that leaves room to learn. A baby or throw size with large blocks and fewer seams is often easier to read than a dense design made from tiny units. Check the skill-level label, then compare its techniques with your own experience. A pattern marked beginner may still require foundation paper piecing, appliqué, or another method you have not used.
Before buying fabric, read the supply list and cutting notes together. Precuts can save cutting time, but their usable piece sizes may not match every unit in the pattern. A multiple-size pattern may also call for different yardage, block counts, or layout choices. Trend-driven constructions, such as puff blocks or foundation-pieced designs, can change which tools and fabric cuts you need.
Set up a small pre-flight toolkit:
Use the two-pass read-through before you start. On the first pass, decide whether the project fits your skills, time, fabric, and tools. On the second, mark the chosen size, repeated steps, special techniques, and cutting order. This plan also gives you a shopping list you can check against the pieces in a precut bundle.
For an unfamiliar method, look for a local quilt shop workshop, community class, or video tutorial focused on that technique. A demonstration can show the hand position, fabric handling, or order of operations that a written sentence cannot fully explain.
Pattern literacy grows with repetition. The first time you identify RST, WOF, HST, a pressing arrow, or an unfinished measurement, you add useful vocabulary for the next project. Keep your notes with the pattern. Soon, its shorthand will feel more like a recipe than a code.
High Country Quilts offers quilt patterns, beginner-friendly supplies, precuts, sewing tools, classes, and community events to help you turn pattern knowledge into a finished project. Visit High Country Quilts to choose a pattern, gather the right materials, and find hands-on support for your next quilt.
At High Country Quilts we care deeply about community. With our experiences in retail, we know that a store is not only a place to shop but also a place for the community to gather and share. During this busy...

Hi! We’re Adam and Renee Wheaton, the new owners of High Country Quilts! For more than 40 years, we’ve owned and operated vacuum and sewing businesses. Following in Renee’s father’s footsteps after he retired from All Discount Vacuum and Sewing in Colorado...


Leave a comment